
![]()
To get us started, create a new Unity project called Sound & Vision. Be sure to set the 2D option, just as we have for all the projects in this series.
Creating an invisible barrier around the screen
In order to make an invisible barrier, we need an empty game object to attach it to. Actually, our invisible barrier will be a simple (but neat) Physics 2D Edge Collider. Right-click in the Hierarchy window and choose Create empty. Right-click the newly created GameObject and select Rename. Rename the empty object, Barrier.
Make sure that Barrier is selected in the Hierarchy window and then click the Add Component button in the Inspector window. Choose Physics 2D | Edge Collider 2D. Now we have to wrap the edges of the Scene view with the Edge Collider 2D. The verbal gymnastics required to describe the process is slightly beyond me, so I am going to show you a series of images at the same time.
In the newly created component, click the Edit Collider button. In the center of the Scene window, you will see a little green line. This is the extent of our Edge Collider at the moment.

You can just see the Edge Collider being pointed to by the big yellow arrow
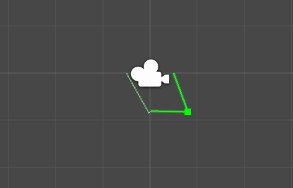
We want to turn the single green line into four green lines. Notice if you run the mouse pointer over the line, the little green block follows. You can left-click and drag the block to make a second line, connected to the first. Do this in approximately the center of the line and then drag down and release to create an approximate v shape. This does not need to be exact, but something like shown below is approximately what you are aiming to create.

Edge Collider step 1
Next, hover your mouse pointer around the center of the right-hand lane that makes the v shape. Pull down and to the right to create a third line, perhaps like the next image shows.
Edge Collider step 2
Now create the fourth line by left-clicking and dragging from the center of the left-hand line. You will hopefully have something like this next image.

Edge Collider step 3
It is not important to have exactly the same result as me, perhaps, not even close. Now we will begin to see how this Edge Collider really works. Grab the left-hand end of the four lines and drag it to the top-left corner of the white box (which represents the extent of the camera). This is shown in the next image.
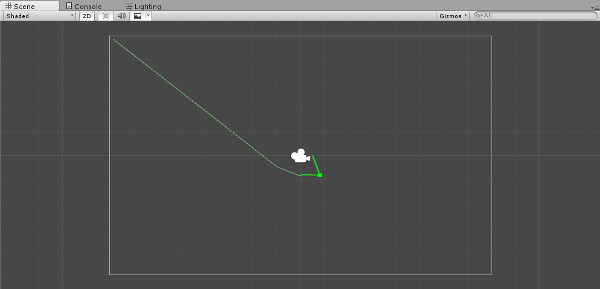
Edge Collider step 4
Grab the next corner and drag it to the bottom-left corner of the white rectangle. You need to be sure you grab the existing corner and don’t make a new corner.

Edge Collider step 5
Grab the next corner and drag it to the bottom right corner of the white rectangle. You need to be sure you grab the existing corner and don’t make a new corner.

Edge Collider step 6
Grab the next corner and drag it to the top-right corner of the white rectangle. You need to be sure you grab the existing corner and don’t make a new corner.
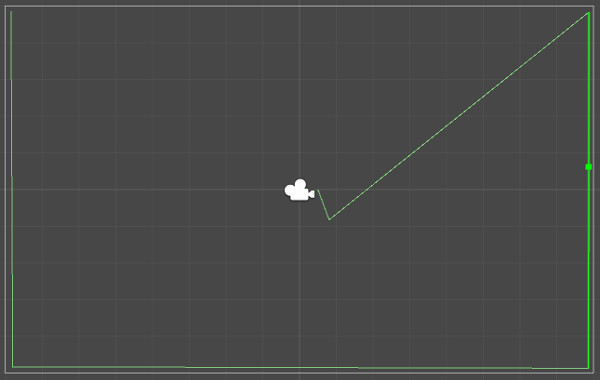
Edge Collider step 7
Grab the next corner and place it right up close to the first one in the top left.

Edge Collider step 8
If like me, you go a bit wrong and end up with an extra side, all you need to do is grab the end and move it to the top-left, into exactly the same position as the last corner and they will merge into one. Here is the finished barrier.

Edge Collider completed
Note that there are many different ways you can arrive at the same (or other suitable) layout for the Edge Collider. I just did it in a way that worked in a step-by-step way. I encourage you to delete it and to play around with the Edge Collider until you are familiar with it. If it gets in a bit of a muddle, just delete it (by right-clicking the component in the Inspector window and selecting Remove component.) and start again until it works out for you. If you study the images you will see I went wrong in step 6 by creating a new corner instead of selecting the existing one. I hope you will forgive me as I really don’t want to redo the images :-(.
Handling collisions with OnCollisionEnter2D
The Edge Collider will cause collisions with all the balls we will be adding soon. It won’t however, make a satisfying Pong-like beep. To achieve that, we need to add a script and write code in the OnCollisionEnter2D method. Make sure the Barrier object is selected in the Hierarchy window. Click the Add Component button in the Inspector window. Choose New Script and name it HandleCollision. Click Create and Add.
Open the new script by double-clicking HandleCollision in the Project window. You can delete much of the code. This is what it needs to have when you are done editing it.
|
1 2 3 4 5 6 7 8 9 10 11 12 |
using UnityEngine; using System.Collections; public class HandleCollision : MonoBehaviour { public AudioClip clip; void OnCollisionEnter2D(Collision2D coll){ AudioSource.PlayClipAtPoint(clip, Camera.main.transform.position); } } |
We have a class called HandleCollision that has a single method called OnCollisionEnter2D. This is the method that the game engine will call when a game object collides with the Edge Collider. Notice there is an public object of the type AudioClip. In a moment we will associate this with a sound file. In the OnCollisionEnter2D method, the single line of code plays the AudioClip called clip. The second argument of the PlayClipAtPoint method is the location we would like to play the sound. It is possible to make sounds come from different parts of the game world. In our simple project, we use the camera position to play the sound as if it is coming from the center of the screen.
Adding an audio clip to the project.
This is really easy, like many things in Unity. Download the link below by right-clicking and selecting Save link as….
Right-click in the project window and choose Import New Asset…. Select the beep.wav sound file that you just downloaded. Make sure that Barrier is selected in the Hierarchy window, then drag and drop beep, from the Project window onto the Clip field of the Handle Collision script component.
The barrier is primed and ready to go. Next, we need some balls.
Adding sprites with materials
Let’s add a sprite to the game. Download the ball-shaped sprite below by right-clicking it and selecting Save image as….

Download the ball sprite.
Import the sprite into Unity by right-clicking in the Project window and selecting Import New Asset…. Choose the ball.png graphic you just downloaded. Drag ball from the Project window to the Hierarchy window to add the sprite as a new game object.
Make sure the ball object is selected in the Hierarchy window and then click the Add Component button in the Inspector window. Select Physics 2D | RigidBody 2D.
Make sure the ball object is selected in the Hierarchy window and then click the Add Component button in the Inspector window. Select Physics 2D | Circle Collider 2D.
Now we will make a Physics 2d material to assign to this sprite. Right-click in the Project window and select Create | Physics 2D Material. Select the New Physics2D Material that we just created and in the Inspector window set the Bounciness to 1.1 and friction to 0.1.
Make sure the ball object is selected in the Hierarchy window and drag New Physics2D Material onto the Material field of the Circle Collider 2D component in the Inspector window.
Our ball sprite is now ready to bounce around and detect collisions. You can run the game and see the ball spin, bounce, and beep.
![]()
Now we will add another component to the ball object. The new component will be a Material. This is not the same as a Physics 2D Material, it is a material that affects the appearance of the sprite. Materials and the related topic of lighting is wide and interesting. If this quick dabble into materials and lighting creates an itch that it cannot scratch then take a look at these official Unity graphics tutorials.
Right-click the Project window and choose Create | Material. Select the New Material object that we just created. In the Inspector window set the following parameters:
- On the Shader field, choose Sprites | Diffuse
- Check the Pixel Perfect check-box
- Choose a light Red shade (see the next image)
Take a look at the next image to clarify the parameters we have just set.
![]()
Make sure the ball object is selected in the Hierarchy window and then drag the New Material object onto the Material field of the Sprite Renderer component in the Inspector window. In the Game window, you can see that our sprite has gone quite dark. We will solve this problem soon.
![]()
The ball object is now done. We do, however, want more of them. Right-click the ball object in the Hierarchy window and select Copy. Now right-click again in the Hierarchy window and select Paste. Now we have two balls. They are ball and ball (1). Right-click and select Paste a few more times to create perhaps five or six balls. Now select move mode by tapping the W key on the keyboard. Select each of your ball objects, one at a time, and arrange them around the Scene window. My Scene window looks like this next image. Yours should look similar but doesn’t have to be exact.
![]()
Run the game and watch them go wild. But it’s a bit dark.
Lighting 2D sprites in Unity
First, we will add a spotlight to the scene. Right-click in the Hierarchy window and choose Light | Spotlight. Now we can configure the light. Make sure that Spotlight is selected in the Hierarchy window and configure the following parameters in the Inspector window.
- Transform – Position – z, set to -4
- Baking, set to Realtime
- Range, set to 10
- Color, use the color picker to choose Yellow
- Intensity, set to 5
This image should make it clear where to set the parameters above.

Finally, copy and paste the Spotlight object, perhaps five or six times. Arrange them all over the Scene window, just like we did with the ball objects. Here is my Scene window after this step.

Run the game and watch the sprites bumping, bouncing and beeping as they pass under the lights.
![]()
The next project will use what we have learned in every Unity project and C# tutorial so far, to make a full game.
![]()
Leave A Comment