
Computers are fast. Stupidly fast. The one thing they do better than anything else is the same tiny task, over and over, without getting bored or losing focus. A game that updates the screen 60 times a second is doing exactly that: running the same handful of instructions 60 times a second, every second, for as long as you play. Without loops, we'd have to write those instructions out by hand 60 times, and then 60 more times for the next second. You can see where this is going.
This chapter is about giving our code the power to repeat itself. We'll meet the four kinds of loop that C++ offers, learn when to reach for each one, and pick up the tools for leaving a loop early, skipping ahead, and keeping loops lean. Along the way, we'll meet the two classic loop bugs, so you'll recognize them when they come for you. By the end, you'll understand why every game you've ever played is, at its heart, a loop.
In this chapter, we will:
- Take a fresh look at the game loop and the event loop
- Repeat code for as long as a condition holds, with
while - Run code at least once with
do-while, and read the player's typing withstd::cin - Count with
forloops, and nest them to walk a grid - Visit every item in a collection with a range-based
forloop - Leave a loop early with
break, or skip ahead withcontinue - Keep loops lean, and debug the two classic loop mistakes
- Try an optional AI exercise to compare the loops
As in Chapters 2 and 4, the examples are small experiments, so keep your Sandbox project open as you read. Put each one inside main, above return 0;, in place of whatever's there from last time, and press F5.
Let's start by looking at the loops we've been using all along.
Revisiting the Game Loop
You've been writing loops since Chapter 1. Every project so far has had two of them: the game loop, which keeps the game running until the player quits, and the event loop inside it, which reads SDL's waiting events. We used them without looking closely, because explaining them properly meant learning about conditions first. Now you know what conditions are, and the loops aren't mysterious anymore. Here's the game loop from Chapter 3, with its insides reduced to comments:
bool running = true;

while (running)
{
    // handle the events
    // update the game
    // draw the frame
}
In the preceding code, the while keeps running the code between its braces for as long as running is true. Each trip through the braces is one frame: handle the events, update the game, and draw it, just as Figure 1.7 showed in Chapter 1. When the player quits, the event handling sets running to false, the condition fails the next time it's checked, and the program carries on past the loop to the cleanup.
That's really the whole idea of a game: check what the player is doing, update the world, draw it, and go around again, until the player has had enough. Without the loop, the game would draw a single frame and end. Every game on the planet, whether it's built on a library like SDL or an engine like Unreal, is wrapped around a loop just like this one.
Now let's look at each kind of loop in turn, starting with the while loop that both of those are built on.
while Loops
The while loop is the simplest loop in C++, and the one that matches how we naturally describe repetition: while something is true, keep doing this. Here's its shape:
while (condition)
{
    // this code repeats for as long as the condition is true
}
In the preceding code, the condition is checked before every pass through the loop. If it's true, the code in the braces runs, and then the program goes back to the top and checks the condition again. As soon as the condition is false, the loop ends, and the program carries on with whatever comes after the closing brace. Each pass through a loop is called an iteration.
Here's a countdown to try in the sandbox:
int countdown = 5;

while (countdown > 0)
{
    std::cout << countdown << "..." << std::endl;
    countdown--;
}

std::cout << "Go!" << std::endl;
In the preceding code, countdown starts at 5. The condition countdown > 0 is true, so we print the number, and the decrement operator from Chapter 2 takes one off it. Then the condition is checked again. Now countdown is 4, which is still greater than 0, so we print it and take one off. This carries on until countdown reaches 0, when the condition is false and the loop stops. The console shows this:
5...
4...
3...
2...
1...
Go!
Notice that countdown--; is what makes this loop end. Without it, countdown would stay at 5 forever, the condition would always be true, and the loop would never stop. That's called an infinite loop, and writing one by accident is a rite of passage for every programmer. If it happens in the sandbox, the console fills up with 5s, and you can stop the program with Debug > Stop Debugging, or Shift+F5.
The Event Loop
The event loop in our projects is a while loop too, with a condition that's a little different:
while (SDL_PollEvent(&event))
{
    // deal with one event
}
In the preceding code, the condition is a call to SDL_PollEvent. As Chapter 1 explained, each call takes the oldest waiting event off SDL's queue, copies it into event, and answers true, and when there are no events left, it answers false. So the condition does two jobs at once: it fetches the next event, and it tells the loop whether there was one. The loop runs once for each waiting event, however many there are, and then the game carries on with its frame. On most frames, nothing has happened, so the condition is false immediately, and the body doesn't run even once.
The Intentional Infinite Loop
Sometimes a loop that never ends by itself is exactly what you want. A game should keep running until the player tells it to stop, and here's a common way to write a loop like that:
while (true)
{
    // handle the events, update the game, and draw the frame
    // if the player has quit, leave the loop
}
In the preceding code, the condition is the literal true, which is always true, so the loop never ends on its own. Something inside it has to end it, and later in this chapter, we'll see that break, which you met in Chapter 4's switch, can do that job in a loop too. Our games use a running flag instead, and we'll see why when we get there.
Until then, the rule for an ordinary while loop is simple: something inside the loop must eventually make the condition false. If nothing does, and you didn't mean to write an infinite loop, you've written a bug.
do-while Loops
The do-while loop is a close cousin of while, with one important difference: it checks its condition after the body runs, not before. That means the body always runs at least once, even if the condition is false from the start. Here's its shape:
do
{
    // this code runs once, then repeats while the condition is true
} while (condition);
In the preceding code, the do keyword starts the loop, and the while and its condition come at the bottom, after the closing brace. Figure 6.1 puts the two kinds of loop side by side.

Don't forget the semicolon after a do-while loop's condition. It's the only loop that needs one, and leaving it off gives an error that points at the line below the loop, such as C2143: syntax error: missing ';' before 'std::cout'. When an error names the line just after a loop, look at the end of the loop first.
Here's a classic use for do-while: asking the player to choose a difficulty, and asking again until they give a valid answer. It needs one new tool, std::cin, which reads what the player types:
int choice = 0;

do
{
    std::cout << "Choose a difficulty (1-3): ";
    std::cin >> choice;
} while (choice < 1 || choice > 3);

std::cout << "You chose " << choice << std::endl;
In the preceding code, the first line in the loop prints the question, without an std::endl, so that the player types their answer on the same line. The second line is new. Think of std::cin (say "see-in," short for "character input") as the keyboard's side of the console window, the opposite of std::cout. The arrows point the other way, too: >> takes what the player types and sends it into choice. When the program reaches that line, it waits until the player types something and presses Enter, and because choice is an int, std::cin reads the typing as a whole number.
Then the condition checks the answer. If it's less than 1 or greater than 3, it isn't a valid difficulty, so the loop goes around and asks again, and only a 1, a 2, or a 3 lets the player out. Run it, type 5, then 0, then 2, pressing Enter after each one, and the console looks like this:
Choose a difficulty (1-3): 5
Choose a difficulty (1-3): 0
Choose a difficulty (1-3): 2
You chose 2
Notice, in the preceding output, that the question comes before there's any answer to check. That's why a do-while is exactly right here: we have to ask at least once before the condition has anything to look at. You could write this with a plain while loop, but you'd have to give choice an invalid value first, just so the loop runs the first time, which is an awkward way to say "ask at least once."
Type a number when the program asks for one. If you type a word, such as two, std::cin can't turn it into an int, so it gives up, puts 0 in choice, and refuses to read anything more. The loop then asks again, and again, forever, as fast as the computer can print, which is an infinite loop in action. Press Shift+F5 to stop it. Handling bad typing properly takes a few more tools than we've met so far.
In practice, you'll reach for while far more often than do-while. But when the logic is "do this, then decide whether to do it again," do-while is the right tool.
for Loops
The for loop is the workhorse of counting. Whenever you want to do something a set number of times, such as moving 10 enemies, drawing 100 stars, or checking every row of a map, a for loop is almost always the cleanest choice. Its shape looks intimidating at first, but it's really just three small pieces packed into one line:
for (initialization; condition; update)
{
    // the loop's body
}
In the preceding code, the initialization runs once, before anything else, and it usually creates a counter variable. The condition is checked before every pass, just like a while loop's, and the loop ends when it's false. The update runs at the end of every pass, just before the condition is checked again, and it usually changes the counter. Figure 6.2 numbers the four parts, the three pieces and the body, and shows the order they run in.
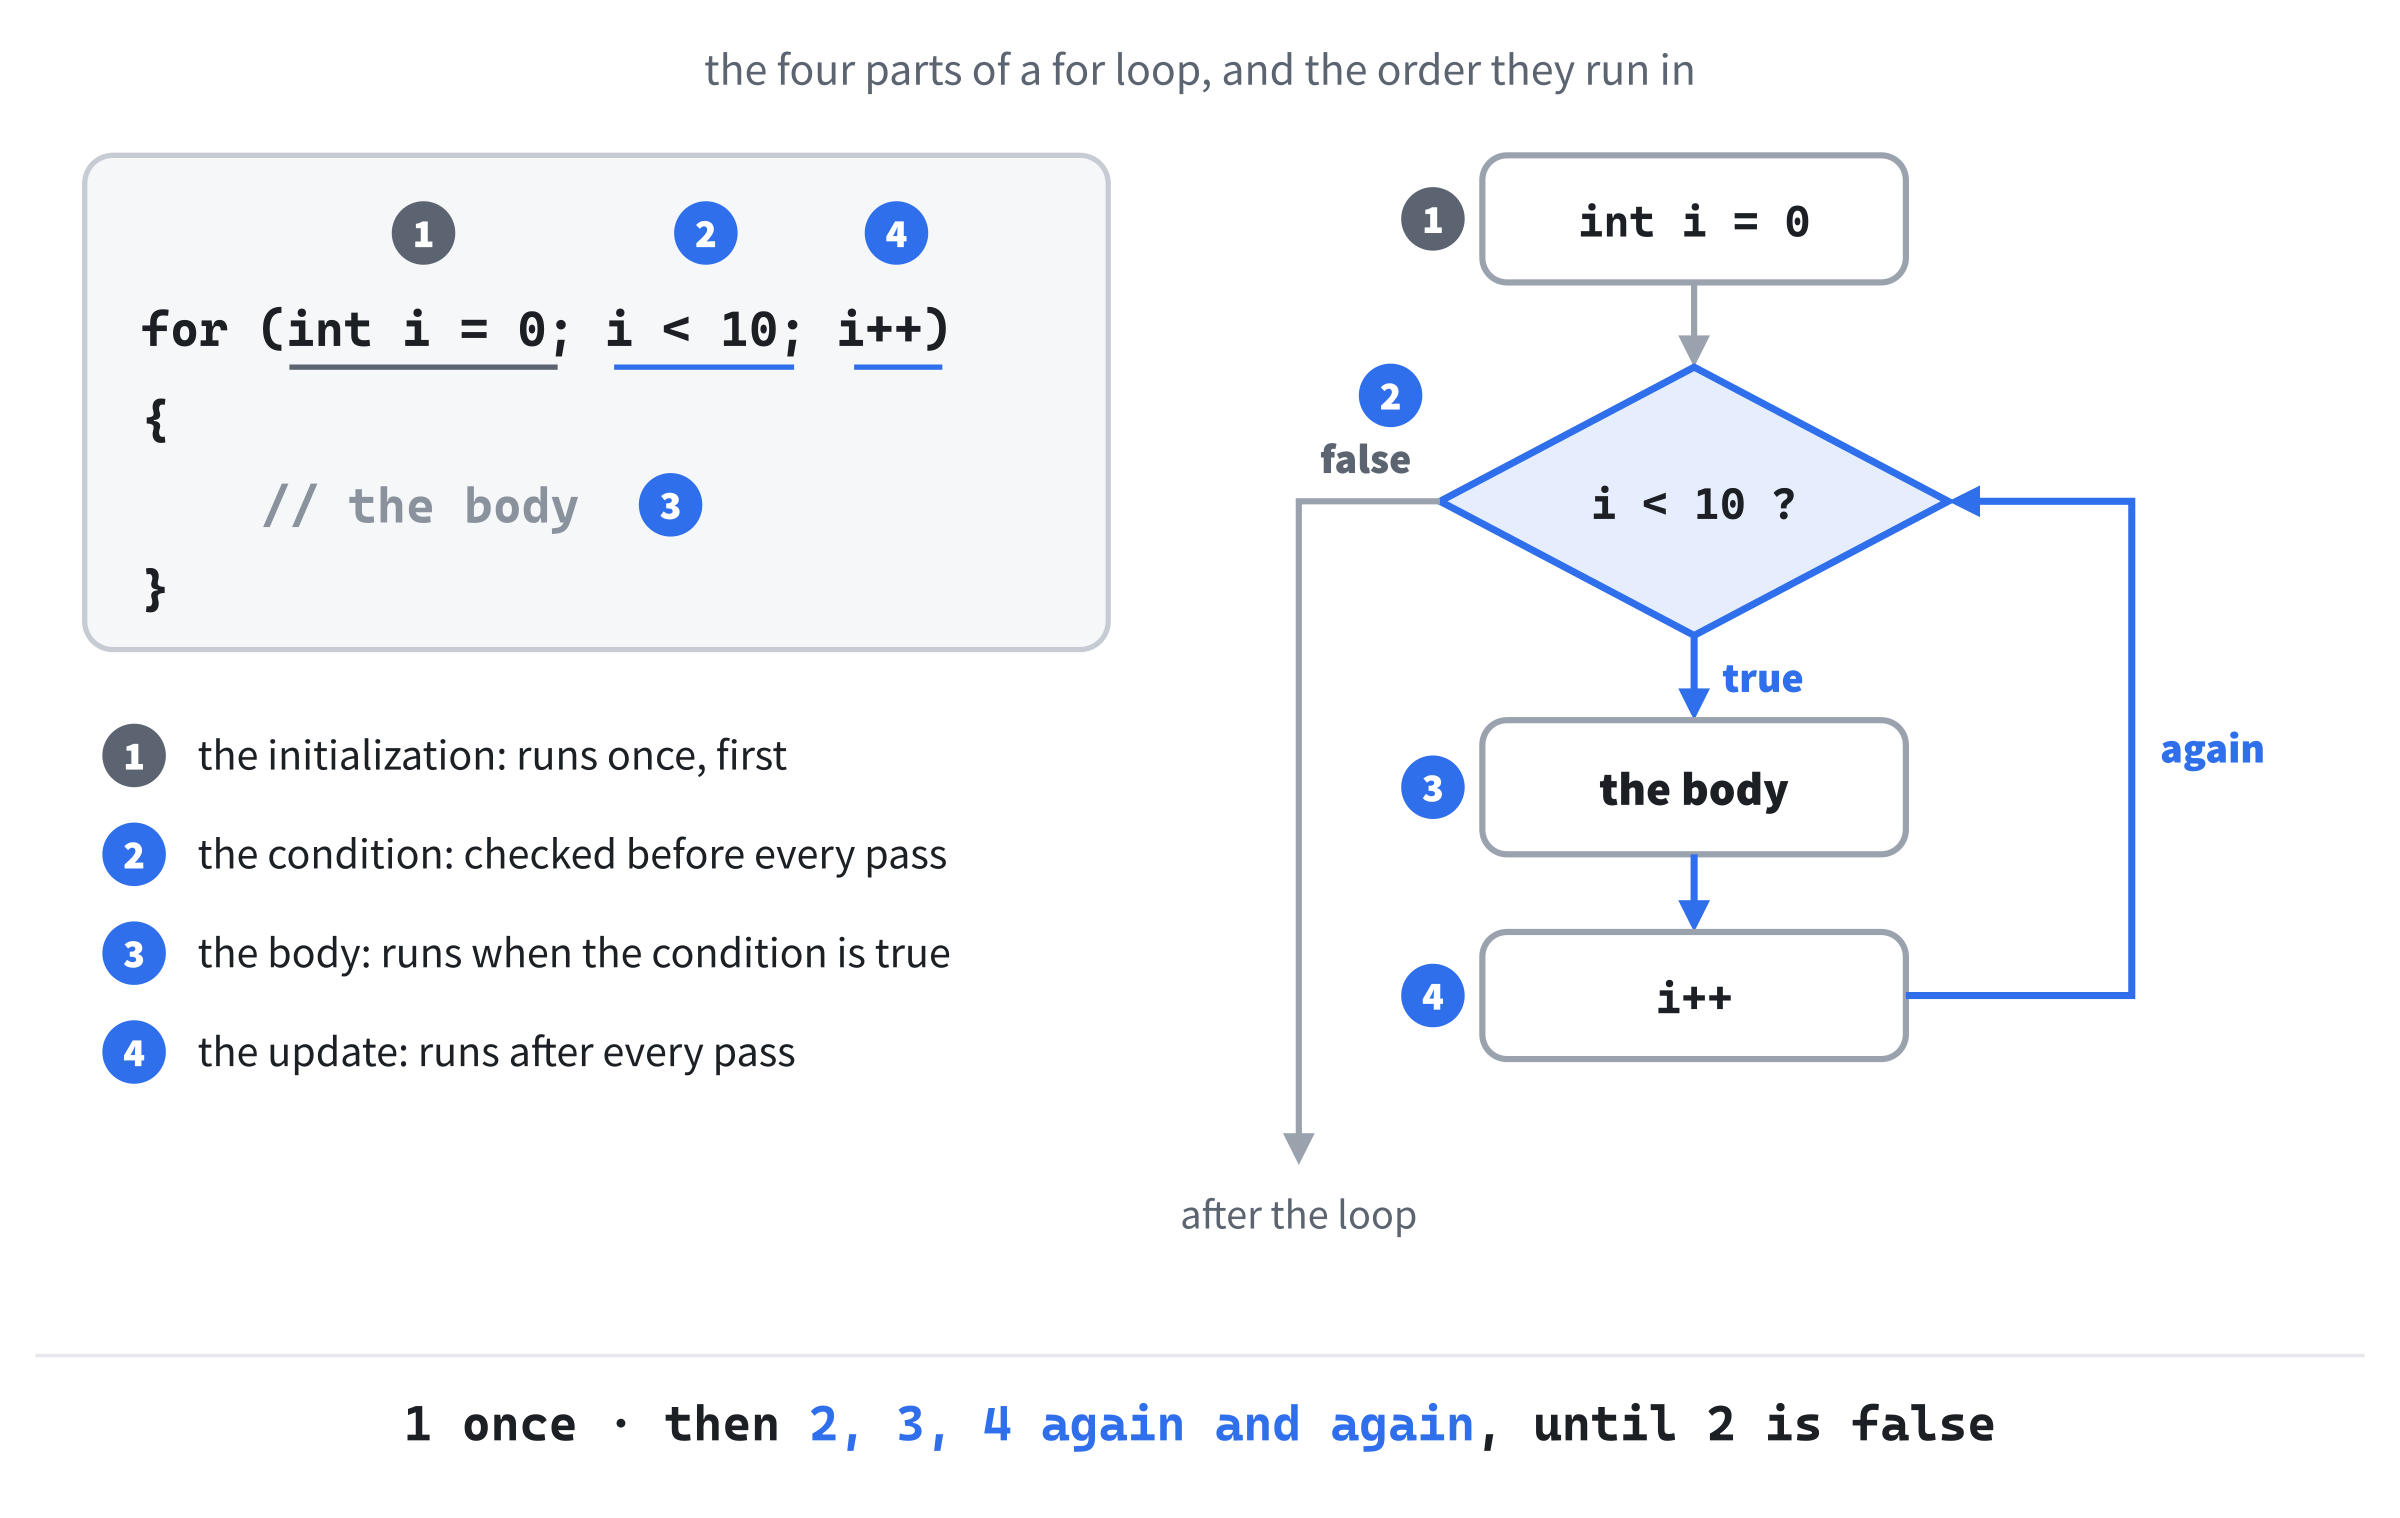
Here's the countdown from earlier, as a for loop:
for (int countdown = 5; countdown > 0; countdown--)
{
    std::cout << countdown << "..." << std::endl;
}

std::cout << "Go!" << std::endl;
In the preceding code, the three pieces do the same work as the while version: we create countdown and set it to 5, loop while it's greater than 0, and take one off after every pass. The output is exactly the same. So why prefer the for version? Because all the moving parts are in one place. When you read it, the first line tells you everything about how the loop counts, and the body is left to do the actual work.
Counting Up
The same structure works just as well counting up, and this is the form you'll see most often:
for (int i = 0; i < 10; i++)
{
    std::cout << "Enemy " << i << " spawned." << std::endl;
}
In the preceding code, i starts at 0, the loop keeps going while i is less than 10, and i++, the increment operator from Chapter 2, adds one after every pass. That gives us 10 passes, with i running from 0 to 9, so the console reports enemies 0 to 9. The name i is short for index, and it's the traditional name for a loop counter, so you'll see it everywhere.
Notice that we counted from 0, not from 1. That's a C++ habit, and it'll feel natural very soon. Most things that programs count, especially the positions of items in arrays, which you'll first use in the next chapter and meet properly in Chapter 13, are counted from 0. A loop that starts at 0 and stops before 10 runs exactly 10 times, and that pairing, starting at 0 and using <, is the one to reach for by default.
Loop Variable Scope
When you create the counter inside the for line, it only exists inside the loop. Try this:
for (int i = 0; i < 5; i++)
{
    std::cout << i << std::endl;
}

std::cout << i << std::endl;
In the preceding code, i is created by the for line, so it lives and dies with the loop, just like the variables inside braces in Chapter 2's first look at scope. The last line tries to use i after the loop has ended, and the compiler stops you with C2065: 'i': undeclared identifier. That's a good thing: it keeps a temporary counter from cluttering the rest of your code, and it means the next loop can have an i of its own. Delete the last line, and it builds again. We'll come back to scope properly in Chapter 8.
Nested for Loops
You can put one for loop inside another. This is called nesting, just like the nested if statements in Chapter 4, and it's exactly the right tool for anything shaped like a grid: rows and columns, a chessboard, a tile map, or the pixels of an image:
for (int row = 0; row < 3; row++)
{
    for (int col = 0; col < 4; col++)
    {
        std::cout << "Tile at (" << col << ", " << row << ")" << std::endl;
    }
}
In the preceding code, the outer loop goes through rows 0, 1, and 2. For each of those rows, the inner loop goes through columns 0, 1, 2, and 3, all the way, before the outer loop moves on to the next row. So the inner loop runs four times for every pass of the outer loop, giving us 3 × 4 = 12 tiles in all, in the order Figure 6.3 shows.
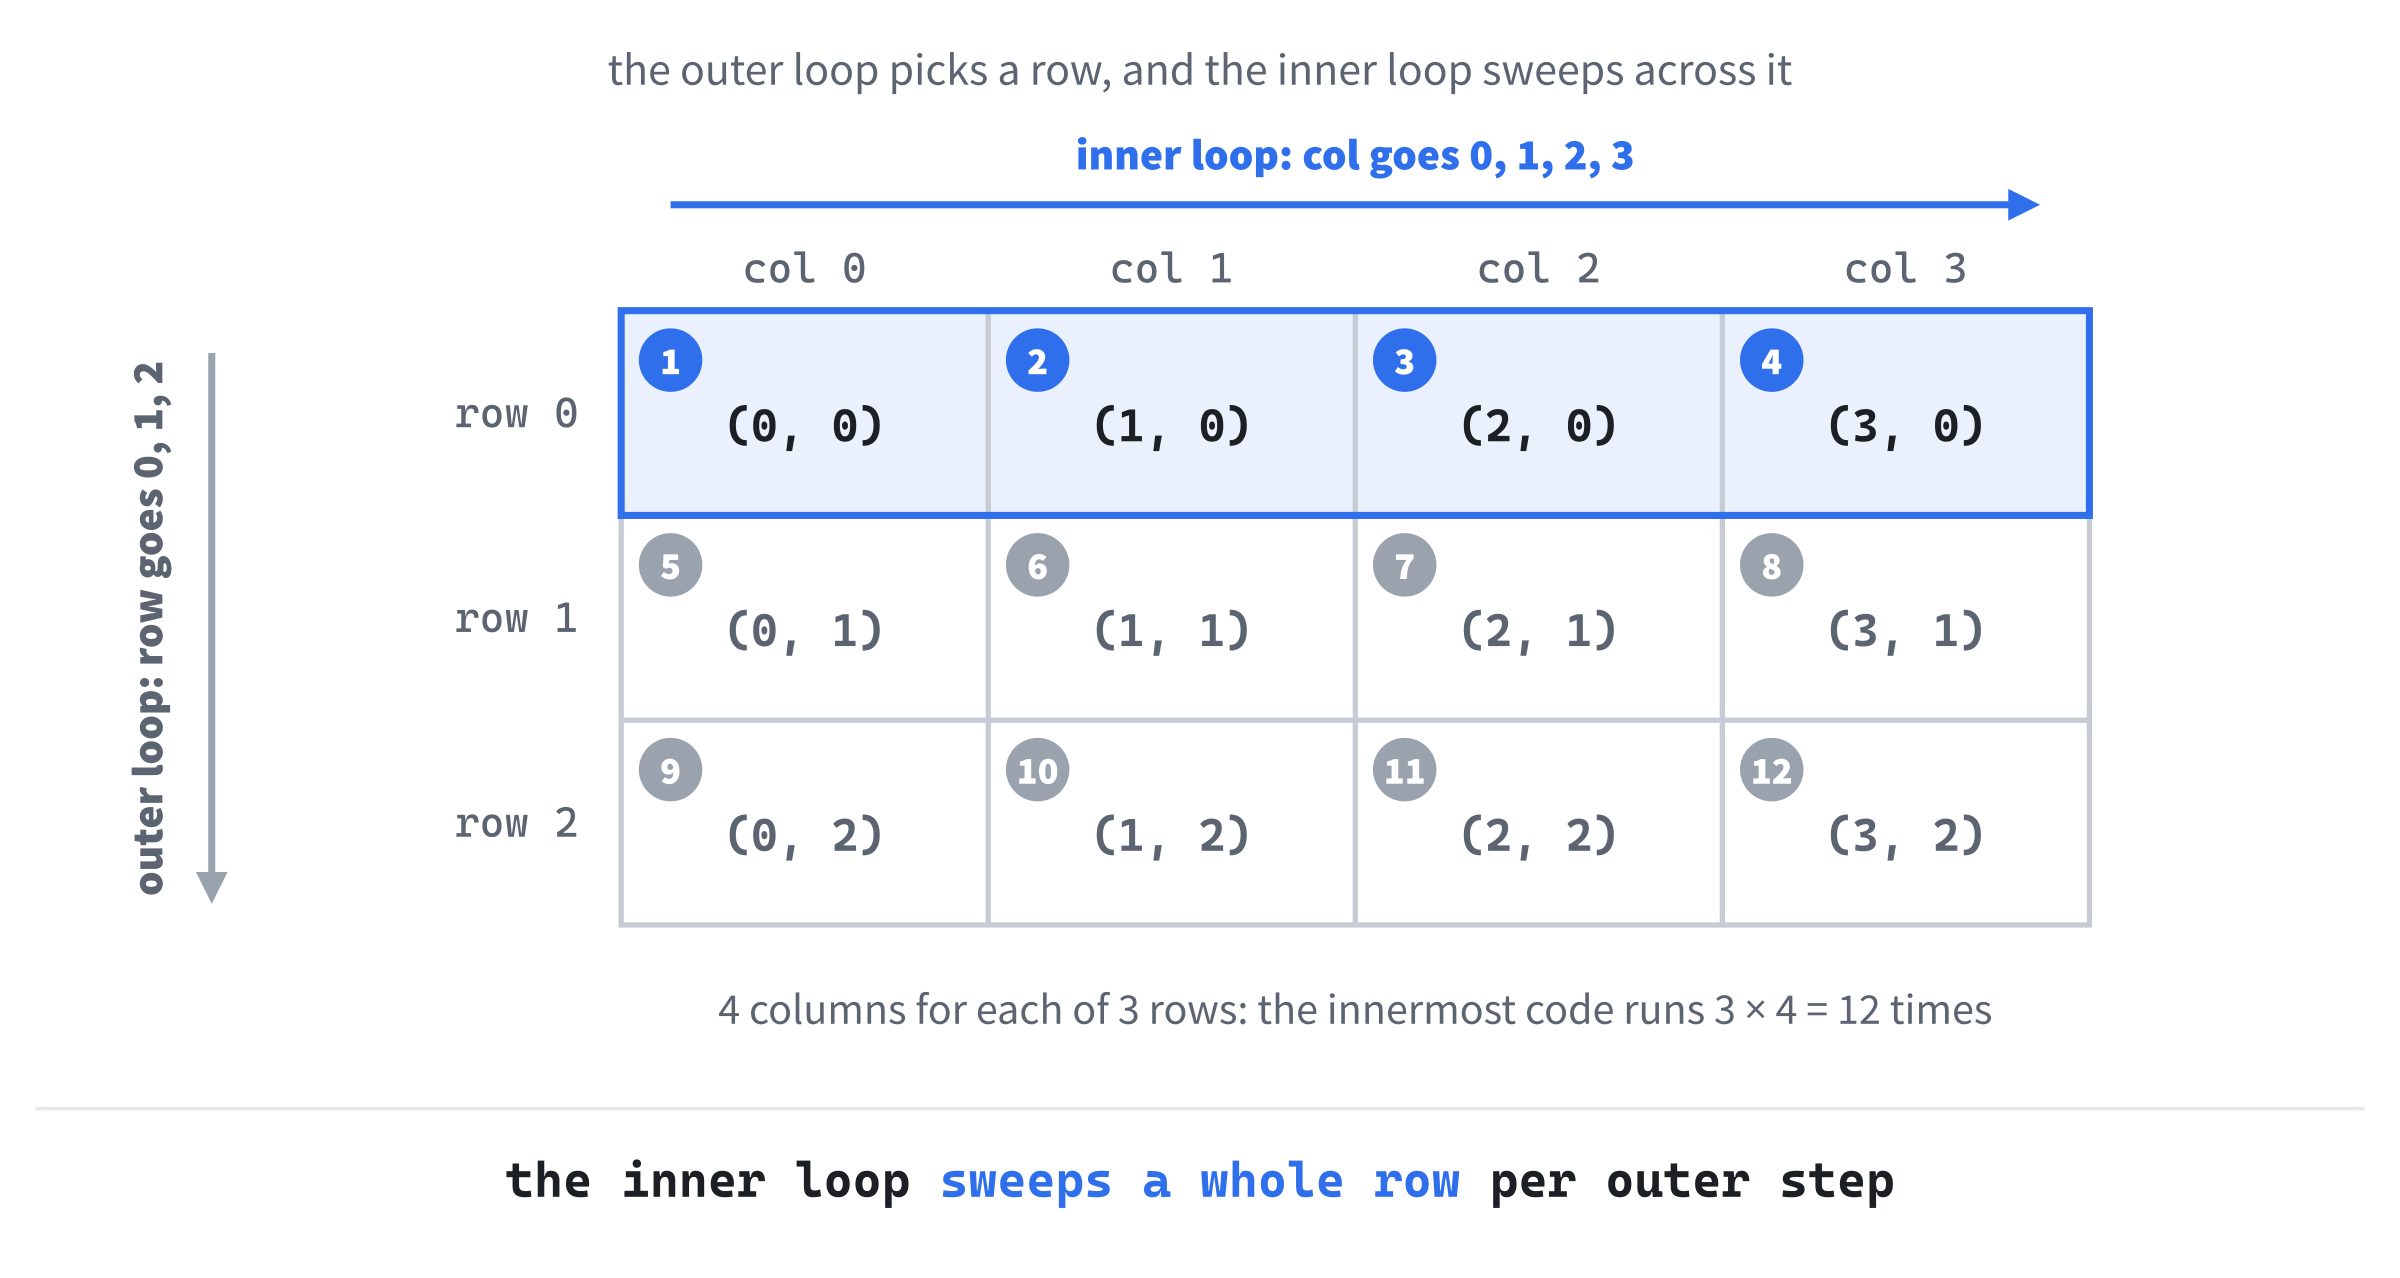
The tradition of calling a counter i extends to j and k when loops are nested, but names like row and col make a nested loop far easier to read, and far harder to mix up. Future you will thank present you.
Range-based for Loops
Often, we want to visit every item in a collection: every enemy in a list, every score in a table, or every letter in a string. C++ has a special form of the for loop for exactly this job, called the range-based for loop. Here's its shape:
for (type name : collection)
{
    // use name
}
In the preceding code, the colon reads as "in," so the whole line says "for each name in the collection." The loop visits the items one at a time, and on each pass, name holds the current one.
We haven't met collections properly yet, as they arrive in Chapter 13, but a std::string from Chapter 2 is a collection of characters, so we can try one right now. Make sure #include <string> is at the top of main.cpp, as in Chapter 2, and then try this:
std::string playerName = "Ada";

for (char letter : playerName)
{
    std::cout << letter << std::endl;
}
In the preceding code, each pass gives us the next char in playerName, which we call letter inside the loop. The console shows A, d, and a, each on its own line. There's no counter, no condition, and no update to get wrong: we asked for each letter in the name, and C++ handled the rest.
Here's a slightly more useful example, which counts the vowels in a player's name:
std::string playerName = "Ada Lovelace";
int vowelCount = 0;

for (char letter : playerName)
{
    if (letter == 'a' || letter == 'e' || letter == 'i' ||
        letter == 'o' || letter == 'u')
    {
        vowelCount++;
    }
}

std::cout << "Vowels: " << vowelCount << std::endl;
In the preceding code, the loop visits every character in the name, and for each one, the if uses Chapter 4's || to ask whether it's one of the five lowercase vowels. If it is, vowelCount goes up by one. The console shows "Vowels: 5": the lowercase a in Ada, and the o, e, a, and e in Lovelace. The capital A at the start isn't counted, because 'A' and 'a' are different characters, as Chapter 2's note on ASCII explained.
Notice how little scaffolding there is compared with a counting for loop. The range-based for is the cleanest way to visit every item in a collection when you don't need to know each item's position, and from Chapter 13 onward, you'll see it constantly.
break and continue
Sometimes you want to leave a loop early, or skip the rest of one pass and move straight on to the next. C++ has a keyword for each: break and continue.
break
The break keyword leaves the loop it's in, immediately, and the program jumps straight to the first line after the loop:
int lives = 3;

while (true)
{
    lives--;
    std::cout << "Lives left: " << lives << std::endl;

    if (lives <= 0)
    {
        std::cout << "Game over!" << std::endl;
        break;
    }
}

std::cout << "Back to the main menu." << std::endl;
In the preceding code, while (true) is an intentional infinite loop, and each pass takes away a life. When lives reaches 0, we print the game-over message, and break jumps out of the loop to the line that prints "Back to the main menu." Without the break, the loop would never end, and lives would count down through the negative numbers forever.
There's a catch, though, and it explains the running flag in our games. A break only leaves the innermost loop it's in. Try this:
for (int row = 0; row < 3; row++)
{
    for (int col = 0; col < 4; col++)
    {
        if (col == 2)
        {
            break;   // leaves the inner loop only
        }
        std::cout << "(" << col << ", " << row << ") ";
    }
    std::cout << std::endl;
}
In the preceding code, the break stops the inner loop as soon as col reaches 2, but the outer loop carries on regardless, so each of the three rows prints only its first two tiles:
(0, 0) (1, 0)
(0, 1) (1, 1)
(0, 2) (1, 2)
Notice what that means for our games. The player presses Escape inside the event loop, which sits inside the game loop, and in Chapter 5, the key check is inside a switch as well, where break already has a job of its own: ending a case. A break in there would only leave the switch, or at most the event loop, and the game would carry on regardless. Setting running to false works from anywhere, however deeply it's nested, and the game loop stops the next time it checks its condition. That's why this book's games use a flag, rather than while (true) and a break.
continue
The continue keyword is break’s quieter cousin. Instead of leaving the loop, it skips the rest of the current pass and moves straight on to the next one:
for (int enemyID = 0; enemyID < 10; enemyID++)
{
    if (enemyID == 5)
    {
        continue;   // skip enemy 5: maybe it's already dead
    }

    std::cout << "Updating enemy " << enemyID << std::endl;
}
In the preceding code, the loop runs through enemies 0 to 9, printing a message for each one. When it reaches enemy 5, continue skips the rest of that pass, so the program goes straight to the update, enemyID++, and on to enemy 6. The message for enemy 5 is never printed. Figure 6.4 shows the two keywords side by side.
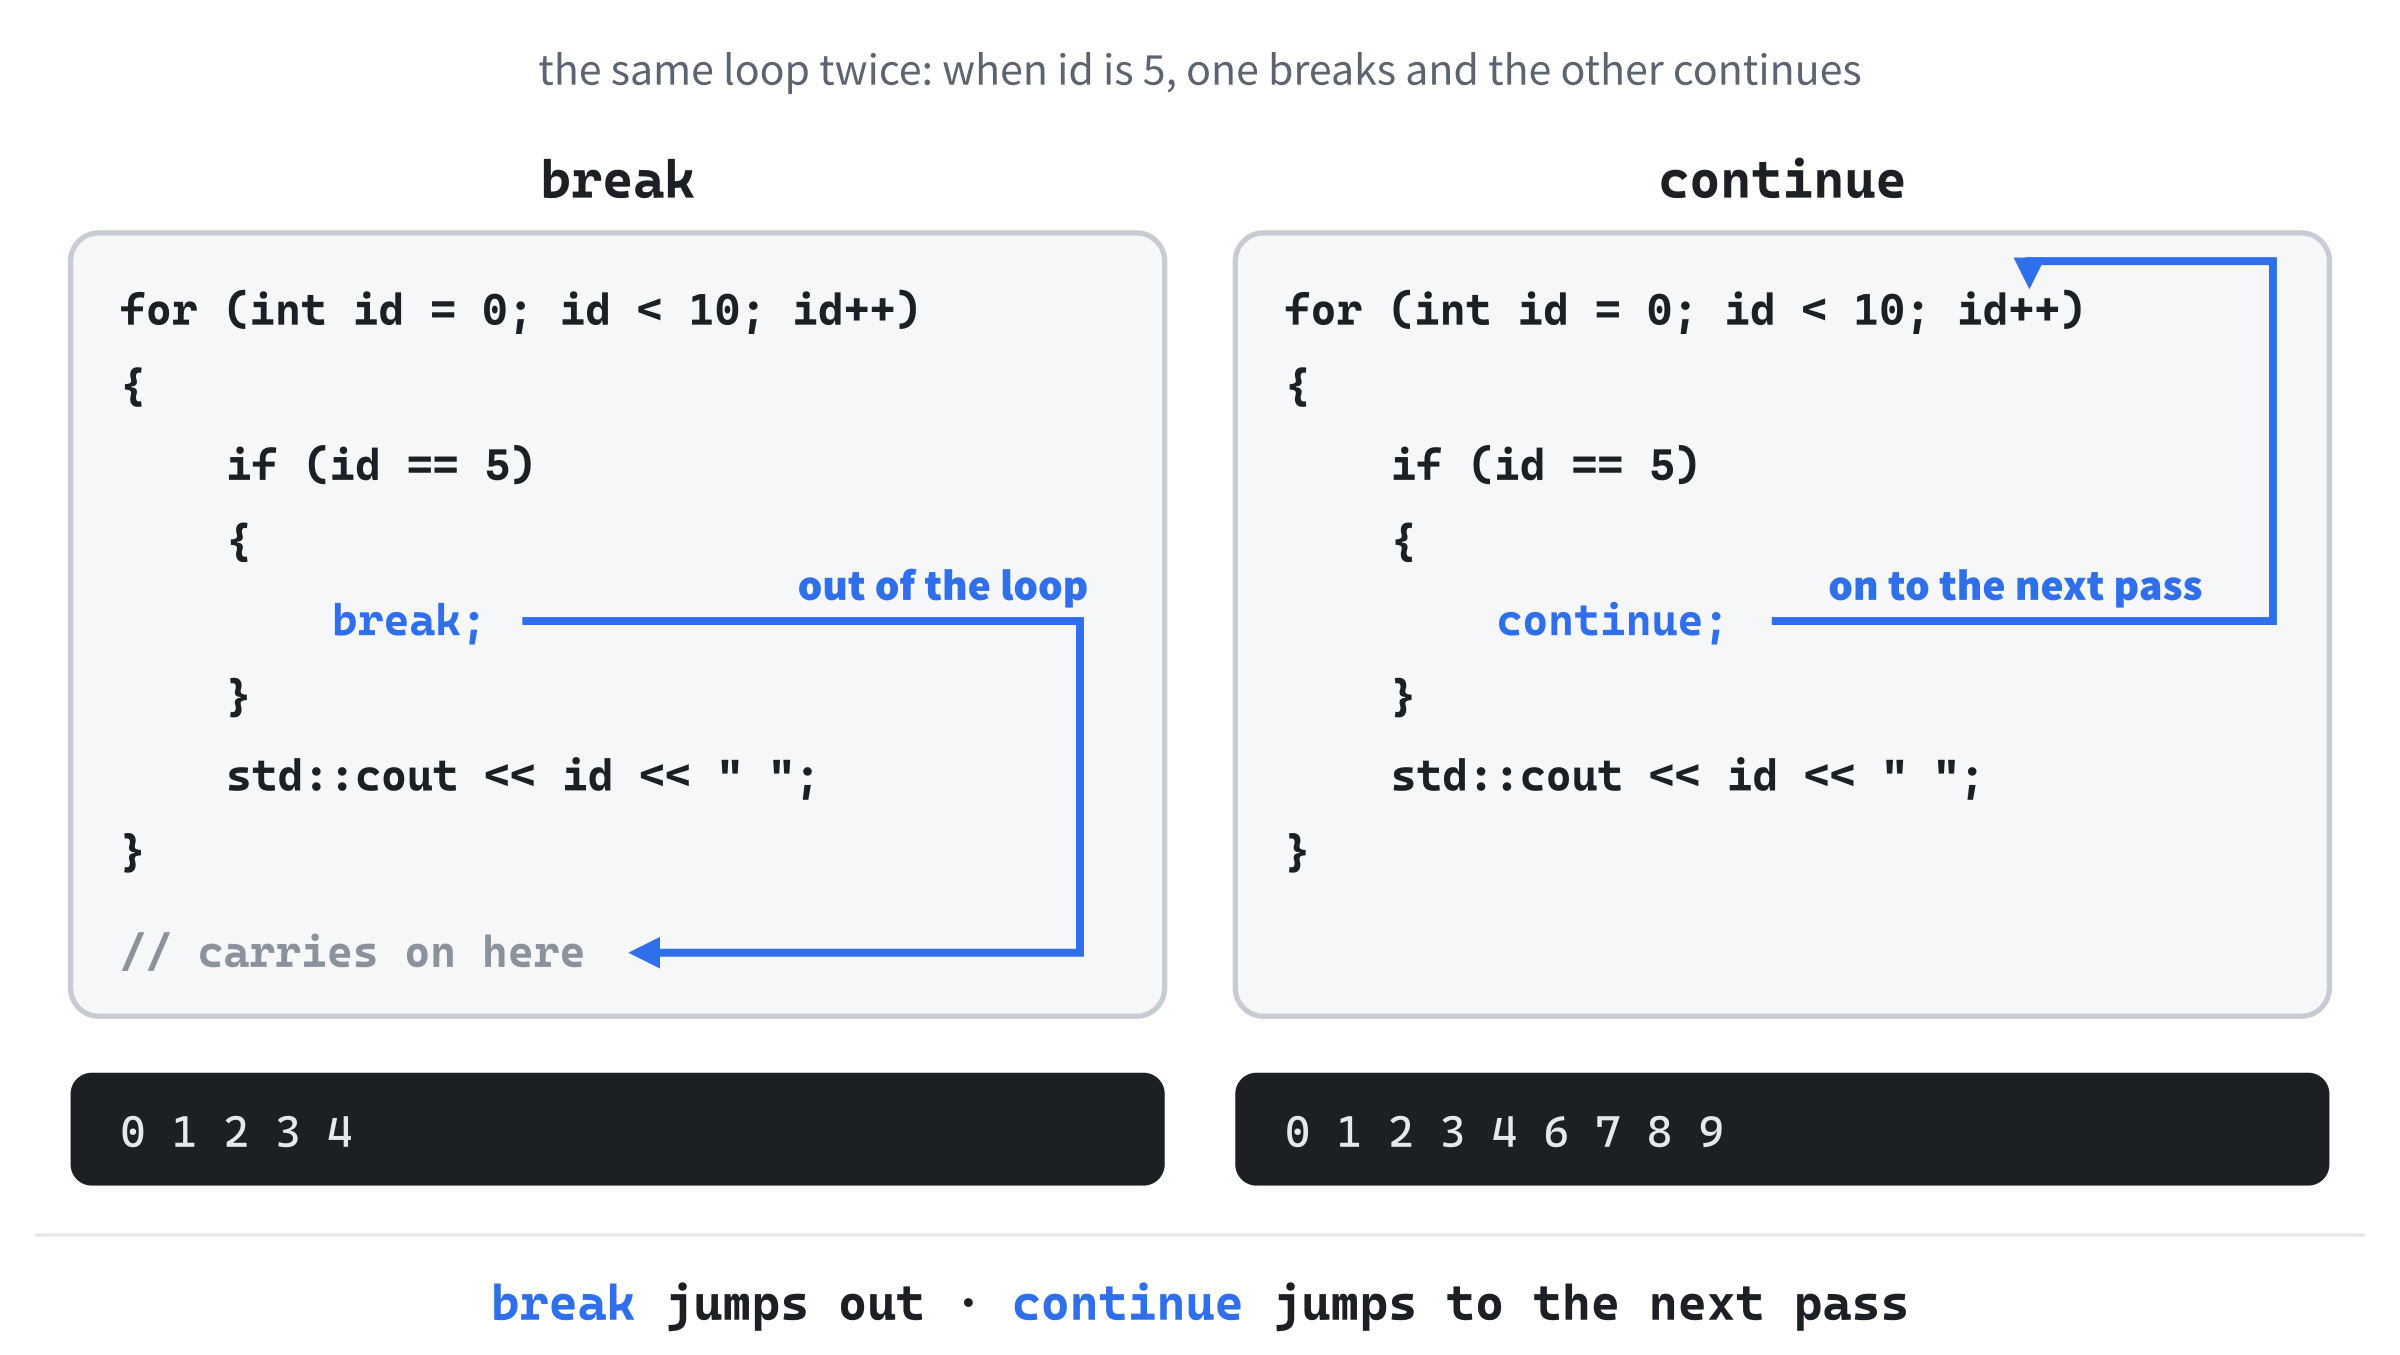
A continue saves you from wrapping the rest of a loop's body in a big if, and a common use in games is "update every enemy, except the ones that are already dead." Use both keywords sparingly, though. Four continues and two breaks scattered through one loop make it hard to follow, and they're often a sign that the logic would read better as a clean condition on the loop itself.
Loop Performance
Most of the time, loops are fast enough that you don't need to think about performance. But games are one of the places where loops run a lot: every frame, 60 or more times a second, over hundreds of objects, for as long as the player plays. A little care here pays off.
Don't Repeat Work Inside the Loop
The classic beginner's mistake is working out the same value over and over inside a loop, when it could be worked out once, before the loop starts. Imagine lining up a row of enemies, evenly spaced across the window. Here's a first attempt, from inside an SDL game:
// Wasteful: asks SDL for the window's size on every pass
for (int i = 0; i < ENEMY_COUNT; i++)
{
    int windowW = 0;
    int windowH = 0;
    SDL_GetWindowSize(window, &windowW, &windowH);
    int spacing = windowW / ENEMY_COUNT;
    int enemyX = i * spacing;
    // ... draw enemy number i at enemyX
}
In the preceding code, ENEMY_COUNT is a constant, say 20, and SDL_GetWindowSize asks SDL how big the window is, writing the answer into windowW and windowH. The & in front of each one gives SDL the variable's address, so that it can write into it, just as with SDL_PollEvent(&event) in Chapter 1. Then we work out the spacing between the enemies, and the position of enemy number i.
It works, but the window's size isn't going to change in the middle of a loop that takes a fraction of a millisecond, so asking SDL for it 20 times is pure waste, and so is working out the spacing 20 times. Here's a better version, with both jobs moved out of the loop:
// Better: ask once, before the loop
int windowW = 0;
int windowH = 0;
SDL_GetWindowSize(window, &windowW, &windowH);
int spacing = windowW / ENEMY_COUNT;

for (int i = 0; i < ENEMY_COUNT; i++)
{
    int enemyX = i * spacing;
    // ... draw enemy number i at enemyX
}
In the preceding code, we ask for the size and work out the spacing once, and the loop is left doing only the work that genuinely changes from one pass to the next: a single multiplication. The rule is simple: if a value doesn't change between passes, work it out before the loop.
As an interesting aside, the compiler spots some of this for you. A calculation made entirely of literals, such as 50 * 3 + 25, is worked out when the program is built, even in a Debug build, so the finished program just stores the answer, 175. But the compiler can't know that SDL will give the same answer every time you ask, so moving calls like SDL_GetWindowSize out of a loop is up to you.
The same goes for a loop's condition. If the condition calls a function that always gives the same answer, that function is called before every single pass, so store its answer in a variable before the loop, and use the variable in the condition.
Nested Loops Multiply
Nested loops are where performance gets interesting, and sometimes painful. If an outer loop runs 100 times and the inner loop runs 100 times, the code inside the inner loop runs 100 × 100 = 10,000 times. Nest a third loop of 100 inside, and that's a million.
Collision detection is the classic example. Checking each of 50 enemies against each of 50 bullets takes 50 × 50 = 2,500 checks every frame, and at 60 frames a second, that's 150,000 checks a second. If each check is as simple as Chapter 5's overlap test, that's no trouble at all. If each check is expensive, the frame rate starts to drop.
You don't need any formal mathematics to feel this, just the intuition that nested loops multiply, they don't add. When you see two nested loops, ask how big the numbers are and how much work happens inside. Most of the time, the answer is "small and cheap," and you move on. Occasionally, it's "huge and expensive," and you need a smarter approach.
Debugging Loops
Two loop bugs bite every beginner sooner or later, so it's worth meeting them before they meet you.
The first is the infinite loop. The program runs, but it never finishes: the console fills with the same message over and over, or a game window freezes and stops responding. The cause is almost always a condition that never becomes false. Stop the program with Shift+F5, set a breakpoint inside the loop, and run it again. Then step through a pass at a time with F10, and watch the variable the condition depends on. If it isn't changing the way you expected, or at all, you've found your bug.
The second is the off-by-one error, where a loop runs one time too many, or one too few. Here's one:
for (int i = 0; i <= 10; i++)   // meant to spawn 10 enemies
{
    std::cout << "Enemy " << i << " spawned." << std::endl;
}
In the preceding code, the <= lets i reach 10 as well, so the loop spawns 11 enemies, numbered 0 to 10, instead of 10. It's exactly the boundary question from Chapter 4's comparison operators, and the fix is to use <, because starting at 0 and stopping before 10 gives exactly 10 passes.
Watch a loop run in slow motion. Put the countdown while loop in your sandbox, click in the margin to set a breakpoint on the countdown--; line, and press F5. When Visual Studio pauses, find countdown in the Locals window, and then press F5 again to go around the loop once more. Each time it stops, countdown is one smaller, and when it's 1, the next F5 finishes the loop and the program ends.
These two bugs account for more debugging sessions in a beginner's first year than almost anything else, and now you'll recognize them the moment they appear.
AI Exercise (Optional)
Loops are a great topic to explore with an AI, because the same problem can usually be solved with several different loops, and comparing them is genuinely educational. As always, this is optional, and you won't miss any core content if you skip it.
Open your AI chatbot of choice and paste in this prompt:
"I'm a C++ beginner. I've just learned about while, do-while, for, and range-based for loops. Please write four small, separate snippets, one for each kind of loop, that each solve the same simple task: printing the squares of the numbers 1 to 5 (1, 4, 9, 16, and 25). Put each curly brace on its own line. Before each snippet, add a short comment explaining why that kind of loop does or doesn't suit the task, and at the end, give me a one-paragraph summary of which loop you'd actually reach for first in real code, and why."
Notice what the preceding prompt is doing. It pins down exactly what you've just learned, and it asks for a small, concrete task, so you can understand every line of the answer. The prompt also makes the AI justify its choices. The "which would you reach for first" question is the trick: it turns the AI from a code generator into something closer to a mentor.
Read the response carefully, and then paste each snippet into your sandbox and run it. Do all four really print the same five numbers? Can you follow each one? Did the range-based for loop need a collection of numbers to walk through, and if so, how did the AI make one? That's syntax you haven't met yet, so ask about it.
Does the AI's final recommendation match the one you'd make? If it doesn't, ask it why. "I would have used a for loop here. Why did you prefer a while loop?" is a perfectly good follow-up, and the answer will usually teach you something.
The goal isn't to end up with four working snippets. The goal is to build your own sense of which loop fits which kind of job.
Summary
Loops are the engine of almost every program, and of every game. You now know the four kinds of loop in C++, while, do-while, for, and range-based for, and when each one is the natural choice. Along the way, you've learned to read the player's typing with std::cin, leave a loop early with break, and skip a pass with continue, and you know why our games stop with a running flag instead of a break. You've seen why nested loops multiply rather than add, how to keep work out of a loop that doesn't need to be there, and how to spot the two classic loop bugs, because they'll absolutely show up.
In the next chapter, we'll put loops to work in a real SDL project, Cascade, where a single for loop draws a diagonal cascade of colored squares down the window. After that, Chapter 8 brings functions, which let us package up useful work, give it a name, and reuse it wherever we like.