
In the last chapter, we picked up while, do-while, for, break, and continue. Loops are the tool that lets a few lines of code do thousands of things, and there's only one good way to feel that for yourself: write a few lines, and watch the screen fill up.
This project is small, even by the standards of Act 1. A single for loop draws a diagonal cascade of colored squares from the top-left corner of the window, as many as will fit, going around a rainbow palette as it goes. Tweak one number, and the cascade changes shape. Add two lines and change a third, and the rainbow starts to flow. The whole program is about 130 lines, and most of them are the setup you already know by heart. The loop is the star.
SDL3 Projects/Draw squares — the complete source for this chapter lives here.In this chapter, we will:
- Set up a new SDL project, using the checklist from Chapter 3
- Store a palette of colors in a list, and count them with
SDL_arraysize - Draw a whole cascade of squares with a single
forloop - Stop the loop with
breakas soon as the next square won't fit - Go round and round the palette with the modulo operator
- Make the colors flow, using the time
- Experiment with the values, and fix the most common mistakes
- Try an optional AI exercise to extend the project
Let's build it.
Setting Up the Project
The setup is the same as in the last two projects, so here's the checklist again:
- Choose File > New > Project, pick Empty Project (the one tagged C++, Windows, and Console), name it
Cascade, and click Create. - In Solution Explorer, right-click Source Files, choose Add > New Item, and add a file called
main.cpp. - Right-click the project, choose Properties, set the two dropdowns to All Configurations and All Platforms, and then make the four changes:
- C/C++ > General > Additional Include Directories:
C:\SDL3\include - C/C++ > Language > C++ Language Standard: ISO C++20 Standard (/std:c++20)
- Linker > General > Additional Library Directories:
C:\SDL3\lib\x64 - Linker > Input > Additional Dependencies:
SDL3.lib
- C/C++ > General > Additional Include Directories:
- Right-click the project, choose Open Folder in File Explorer, and copy
SDL3.dllfromC:\SDL3\lib\x64into that folder, besidemain.cpp.
If you made a project template with the tip in Chapter 3, pick it in step 1 instead, and then you only need step 4. Either way, Chapter 1 walks through every step slowly, and its Common Errors section covers anything that goes wrong.
With the project ready, it's time to write the program.
Coding the Game
We'll build this one the same way as the last three. First comes an empty window with a working game loop, and then the cascade, a piece at a time, with a checkpoint whenever there's something new to see. As before, the blocks are shown without the indentation they'll have in your file, and the complete program at the end shows every line where it sits.
The Header Comment and Includes
Type this at the very top of main.cpp:
/*
    Cascade
    The Chapter 7 project from Learning C++ by Building Games

    A single for loop draws a diagonal cascade of colored squares
    from the top-left of the window, going around a palette of nine
    colors, and stops as soon as the next square wouldn't fit. The
    colors shift one place every tenth of a second, so the rainbow
    flows along the diagonal. Escape, or the window's X, quits.
*/

#include <SDL3/SDL.h>
#include <SDL3/SDL_main.h>
In the preceding code, the multi-line comment describes the program, and the two #include lines bring in SDL and its helper for main, as in every project so far.
The Constants
Now for the numbers that shape the cascade. Add these below the includes, with a blank line in between:
const int   WINDOW_W  = 800;                   // window width in pixels
const int   WINDOW_H  = 600;                   // window height in pixels
const float SQUARE_SZ = 30.0f;                 // each square's width and height
const float PADDING   = 2.0f;                  // the gap between squares
const float STEP      = SQUARE_SZ + PADDING;   // from one corner to the next

const SDL_Color BACKGROUND = { 30, 30, 30, 255 };   // dark gray
In the preceding code, the first two constants are the window's size, as always. The SQUARE_SZ constant is the width and height of each square, a float like Chapter 1's, so it can go straight into an SDL_FRect. Then PADDING is the small gap we'll leave between the squares, and around the first one.
Look at how STEP gets its value. Like Chapter 3's BALL_SIZE, it's worked out from other constants: a square's size plus the gap, 32 pixels in all. That's the distance from one square's top-left corner to the next square's, and because it's worked out rather than typed in, changing SQUARE_SZ or PADDING keeps it right automatically. The last line names the background color, a dark gray, as an SDL_Color, just as in the last two projects.
The Palette
The cascade needs a palette of colors to go around. We could make nine separate color constants, but it's much handier to keep them together in a single list. Add this below the background color, with a blank line in between:
// The palette the cascade goes around, one color per square
const SDL_Color COLORS[] = {
    { 220,  50,  50, 255 },   // red
    { 230, 140,  30, 255 },   // orange
    { 220, 210,  40, 255 },   // yellow
    {  50, 180,  50, 255 },   // green
    {  40, 140, 220, 255 },   // blue
    { 100,  60, 200, 255 },   // indigo
    { 170,  60, 200, 255 },   // violet
    {  50, 200, 180, 255 },   // teal
    { 200,  80, 130, 255 }    // pink
};
const int COLOR_COUNT = SDL_arraysize(COLORS);   // how many colors: 9
In the preceding code, the square brackets after COLORS make it an array: a numbered list of values, all of the same type, kept together under one name. Each item in this list is an SDL_Color in its own curly braces, with commas between the items, and the whole list sits inside one more pair of braces, with a semicolon at the end. We left the square brackets empty, so the compiler counts the items for us.
To reach an item in an array, you put its position in square brackets after the name. As in Chapter 6, positions are counted from 0, so COLORS[0] is the red at the top of the list, COLORS[1] is the orange, and COLORS[8] is the pink at the bottom. That's all we need for now. Arrays get a whole chapter to themselves in Chapter 13.
The last line counts the palette with SDL_arraysize, SDL's helper for counting the items in an array, so COLOR_COUNT is 9. If you add a tenth color to the list later, COLOR_COUNT becomes 10 by itself, just as STEP follows SQUARE_SZ.
As an interesting aside, SDL_arraysize is a shortcut for a classic trick from C. The sizeof operator says how many bytes something takes up in memory. Each SDL_Color is four one-byte parts, so the whole palette is 36 bytes, and sizeof(COLORS) / sizeof(COLORS[0]) works out 36 divided by 4, which is 9. You'll see that line, written out in full, in plenty of older code.
With the palette ready, we can start on main.
main and the SDL Setup
Add main below the palette, leaving a blank line after it, with just return 0; inside for now:
int main(int argc, char* argv[])
{
    return 0;
}
In the preceding code, main has its usual two parameters, and everything else will go inside it, above return 0;.
The setup comes first. Click at the end of the line with main’s opening brace, press Enter, and add this:
// Start SDL, then make the window and the renderer
if (!SDL_Init(SDL_INIT_VIDEO))
{
    SDL_Log("SDL_Init failed: %s", SDL_GetError());
    return 1;
}

SDL_Window* window = SDL_CreateWindow("Cascade", WINDOW_W, WINDOW_H, 0);
if (!window)
{
    SDL_Log("SDL_CreateWindow failed: %s", SDL_GetError());
    SDL_Quit();
    return 1;
}
In the preceding code, we start SDL's video system and create an 800 by 600 window titled Cascade, checking each step and bailing out with a message if it fails. The title is short, so the call to SDL_CreateWindow fits on one line this time.
The renderer and vsync finish the setup. Add this below the window check, with a blank line in between:
SDL_Renderer* renderer = SDL_CreateRenderer(window, nullptr);
if (!renderer)
{
    SDL_Log("SDL_CreateRenderer failed: %s", SDL_GetError());
    SDL_DestroyWindow(window);
    SDL_Quit();
    return 1;
}

// Show each frame in step with the monitor's refresh
SDL_SetRenderVSync(renderer, 1);
In the preceding code, we create the renderer, tidying up the window if that fails, and then turn on vsync, so the program runs in step with the monitor.
The Game Loop
Next comes the game loop, with its event handling already inside. Add it below the vsync line:
bool running = true;
SDL_Event event;

while (running)
{
    // Events: quit on the window's X, or on Escape
    while (SDL_PollEvent(&event))
    {
        if (event.type == SDL_EVENT_QUIT)
        {
            running = false;
        }
        if (event.type == SDL_EVENT_KEY_DOWN &&
            event.key.key == SDLK_ESCAPE)
        {
            running = false;
        }
    }
}
In the preceding code, the running flag keeps the game loop going, and the event loop inside it reads every waiting event, exactly as Chapter 6 explained. Clicking the window's X or pressing Escape sets running to false, and the game loop ends.
Now the drawing. Add this inside the game loop, below the event loop's closing brace, with a blank line in between:
// Draw the frame
SDL_SetRenderDrawColor(renderer, BACKGROUND.r, BACKGROUND.g,
                       BACKGROUND.b, BACKGROUND.a);
SDL_RenderClear(renderer);

SDL_RenderPresent(renderer);
In the preceding code, we set the draw color from the BACKGROUND constant, clear the window with it, and present the frame, leaving a gap between the two for the cascade.
Finally, add the cleanup below the game loop's closing brace, just above return 0;, with a blank line on each side:
// Clean up, in the reverse order we created things
SDL_DestroyRenderer(renderer);
SDL_DestroyWindow(window);
SDL_Quit();
In the preceding code, we destroy the renderer and the window and shut SDL down, in the reverse order we made them.
Checkpoint: Press F5. You should see an empty, dark gray window titled Cascade, and pressing Escape or clicking its X should close it. If it doesn't build, compare your file with the complete program at the end of this section.
The Cascade
From here on, each block goes into a gap in the code you've already typed, as Figure 7.1 shows. This time there are only three slots.
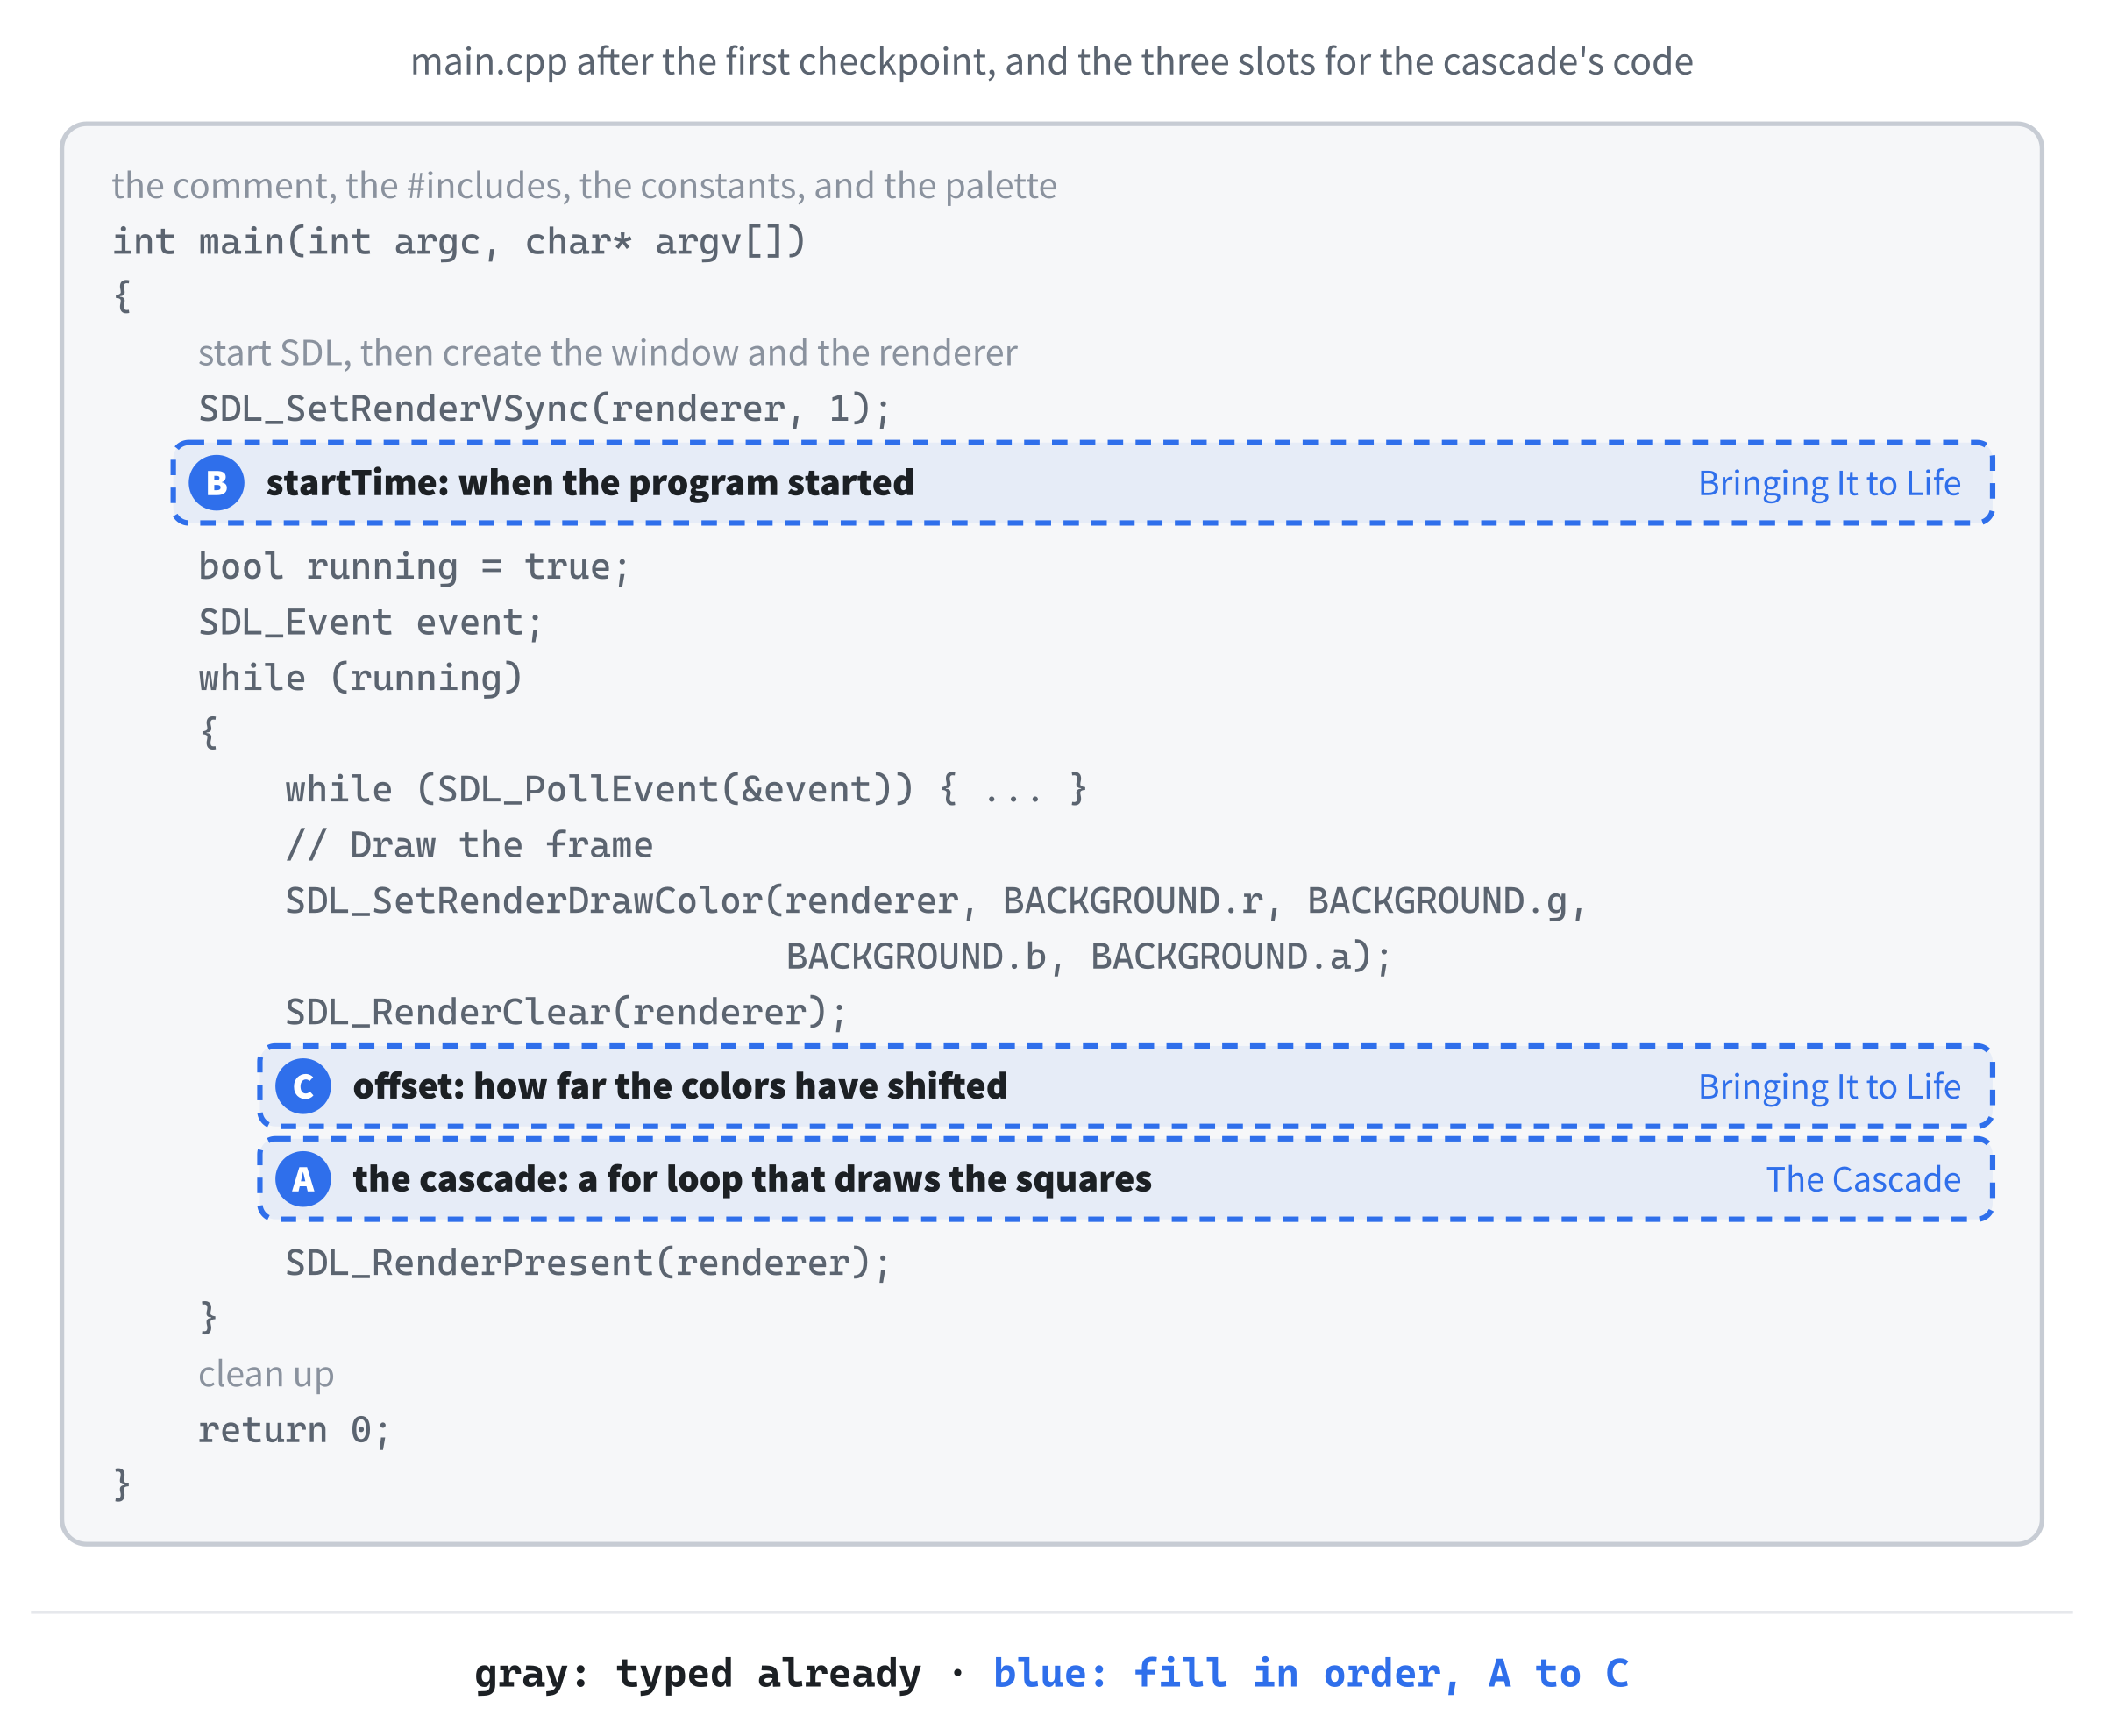
The cascade is a single for loop, and we'll build it in two parts. First comes the loop itself, which works out where each square goes and stops at the edge of the window. It goes in slot A, between SDL_RenderClear(renderer); and SDL_RenderPresent(renderer);:
// The cascade: squares marching diagonally from the top-left
float x = PADDING;
float y = PADDING;

for (int i = 0; ; i++)
{
    // Stop as soon as the next square would cross either edge
    if (x + SQUARE_SZ > WINDOW_W || y + SQUARE_SZ > WINDOW_H)
        break;

    // Move along the diagonal to the next square's spot
    x += STEP;
    y += STEP;
}
In the preceding code, x and y are the top-left corner of the next square to draw, and they start at PADDING, so the first square sits two pixels in from each edge of the window.
Then comes the loop, and there's something unusual about its first line: the middle part, the condition, is empty. That's perfectly legal. A for loop with no condition has nothing to check before each pass, so it keeps going until something inside it says stop. The counter i counts the squares, 0, 1, 2, and so on, and we'll use it to choose each square's color in a moment.
The first thing the loop does on each pass is ask whether the square it's about to draw would fit. Its right edge would be at x + SQUARE_SZ and its bottom edge at y + SQUARE_SZ, so the if asks whether either one would stick out past the window. If it would, break, from Chapter 6, leaves the loop at once. If it wouldn't, the pass carries on, and at the end of the body, x and y both move along by STEP. So each square is one step to the right of the last one, and one step down, which makes a diagonal line.
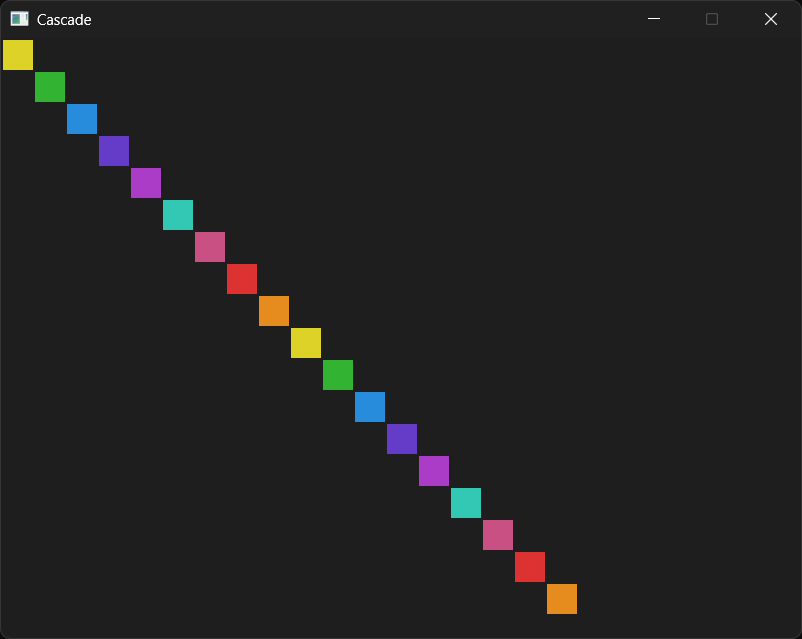
The || in the stop test matters. As Figure 7.2 shows, the window is wider than it is tall, so the squares reach the bottom edge long before the right one. The square numbered 18, the 19th square, would cross the bottom edge, so the loop stops after 18 squares. The squares wouldn't cross the right edge until square 25. With &&, the loop would only stop when both edges were crossed, so it would go on to draw seven more squares: the first hanging off the bottom edge, and the other six entirely below the window, where nobody can see them.

Why leave the condition empty, instead of counting to a fixed number of squares? Because the right number depends on the window's size, the squares' size, and the padding, and working it out would mean more arithmetic that could go wrong. Instead, the loop simply asks, square by square, whether the next one fits. Chapter 6 advised using break sparingly, and this is the kind of place where it earns its keep: the loop's natural stopping point is a question about the next square, and the top of the body is the easiest place to ask it.
A for loop with an empty condition must have its break. Without one, the loop never ends, so the program never gets as far as SDL_RenderPresent, and it never goes back to check for events. The window opens but never draws anything, and after a few seconds, Windows reports that it isn't responding. If that happens, press Shift+F5 to stop it, and check the stop test.
Run it now if you like. You won't see anything new, because the loop works out where each square goes but doesn't draw it yet. The drawing goes inside the loop, between the break; line and the // Move along the diagonal comment, with a blank line on each side:
// Pick this square's color, going around the palette
SDL_Color color = COLORS[i % COLOR_COUNT];
SDL_SetRenderDrawColor(renderer, color.r, color.g,
                       color.b, color.a);

SDL_FRect square = { x, y, SQUARE_SZ, SQUARE_SZ };
SDL_RenderFillRect(renderer, &square);
In the preceding code, the first line picks a color from the palette, using Chapter 2's modulo operator, %, which gives the remainder after dividing. For squares 0 to 8, dividing by 9 leaves the square's own number as the remainder, so they take the colors in order. For square 9, the remainder is 0, so it's red again, square 10 gets orange, and so on. As Figure 7.3 shows, the modulo wraps any count, however big, back around onto the palette, so the index can never run past the end of the list.

The chosen color is an SDL_Color, so we set the draw color from its four parts, just as we did with the background. Then we build an SDL_FRect at x and y and fill it, exactly as Chapter 1 drew its square.
Checkpoint: Press F5. A diagonal line of 18 squares runs from the top-left corner toward the bottom of the window, going red, orange, yellow, and on around the palette twice, and stopping just short of the bottom edge.
Check the count for yourself. Put a breakpoint on the break; line and press F5. When Visual Studio pauses, look at i in the Locals window: it's 18, because squares 0 to 17 fit and square 18 wouldn't. Then remove the breakpoint and press F5 to carry on.
That's the cascade drawn. Now let's make it move.
Bringing It to Life
Right now, the cascade is a still picture: the same 18 squares, in the same colors, every frame. Let's make the colors flow along the diagonal, which takes two new lines and one small change. First, the program needs to know when it started. Add this in slot B, between the vsync line and bool running = true;, with a blank line on each side:
// The time the program started, in milliseconds
Uint64 startTime = SDL_GetTicks();
In the preceding code, SDL_GetTicks gives the number of milliseconds since SDL started, as in Chapter 1, and we keep a copy of it in startTime, once, before the game loop begins.
Next, the program works out how far the colors have shifted. This goes in slot C, below SDL_RenderClear(renderer); and just above the // The cascade comment, with a blank line on each side:
// Shift the colors along one place every 100 milliseconds
int offset = static_cast<int>((SDL_GetTicks() - startTime) / 100);
In the preceding code, SDL_GetTicks() - startTime is the number of milliseconds since the program started, and dividing it by 100 turns that into tenths of a second. Both sides of the division are whole numbers, so, as Chapter 2 warned, the fraction is thrown away: offset is 0 for the first tenth of a second, then 1, then 2, and so on, going up by one every 100 milliseconds. The subtraction gives a Uint64, and static_cast, from Chapter 2, turns it into an int, to match i.
Finally, change the line that picks each square's color, just below the // Pick this square's color comment, so that it adds offset to i before the %:
SDL_Color color = COLORS[(i + offset) % COLOR_COUNT];In the preceding code, square i now takes color number (i + offset) % COLOR_COUNT. While offset is 0, nothing changes. When it goes up to 1, every square takes the color that the square after it had a moment ago, as the second row of Figure 7.3 shows, so the whole rainbow moves one square up the diagonal, toward the top-left corner. The modulo keeps the sum wrapped onto the palette however big offset grows.
As an interesting aside, the integer division is what gives the animation its character. Because offset only changes every 100 milliseconds, the colors hop along one square at a time, like the lights around a theater sign, instead of blending smoothly from one to the next.
Checkpoint: Press F5. The same cascade appears, but now the rainbow flows up the diagonal, one step every tenth of a second, for as long as you care to watch.
That's the last change, and the program is finished.
The Complete Program
Here's the whole file in one piece, with every line at its real indentation. If you've typed every block in the place described, this is exactly what you have:
/*
    Cascade
    The Chapter 7 project from Learning C++ by Building Games

    A single for loop draws a diagonal cascade of colored squares
    from the top-left of the window, going around a palette of nine
    colors, and stops as soon as the next square wouldn't fit. The
    colors shift one place every tenth of a second, so the rainbow
    flows along the diagonal. Escape, or the window's X, quits.
*/

#include <SDL3/SDL.h>
#include <SDL3/SDL_main.h>

const int   WINDOW_W  = 800;                   // window width in pixels
const int   WINDOW_H  = 600;                   // window height in pixels
const float SQUARE_SZ = 30.0f;                 // each square's width and height
const float PADDING   = 2.0f;                  // the gap between squares
const float STEP      = SQUARE_SZ + PADDING;   // from one corner to the next

const SDL_Color BACKGROUND = { 30, 30, 30, 255 };   // dark gray

// The palette the cascade goes around, one color per square
const SDL_Color COLORS[] = {
    { 220,  50,  50, 255 },   // red
    { 230, 140,  30, 255 },   // orange
    { 220, 210,  40, 255 },   // yellow
    {  50, 180,  50, 255 },   // green
    {  40, 140, 220, 255 },   // blue
    { 100,  60, 200, 255 },   // indigo
    { 170,  60, 200, 255 },   // violet
    {  50, 200, 180, 255 },   // teal
    { 200,  80, 130, 255 }    // pink
};
const int COLOR_COUNT = SDL_arraysize(COLORS);   // how many colors: 9

int main(int argc, char* argv[])
{
    // Start SDL, then make the window and the renderer
    if (!SDL_Init(SDL_INIT_VIDEO))
    {
        SDL_Log("SDL_Init failed: %s", SDL_GetError());
        return 1;
    }

    SDL_Window* window = SDL_CreateWindow("Cascade", WINDOW_W, WINDOW_H, 0);
    if (!window)
    {
        SDL_Log("SDL_CreateWindow failed: %s", SDL_GetError());
        SDL_Quit();
        return 1;
    }

    SDL_Renderer* renderer = SDL_CreateRenderer(window, nullptr);
    if (!renderer)
    {
        SDL_Log("SDL_CreateRenderer failed: %s", SDL_GetError());
        SDL_DestroyWindow(window);
        SDL_Quit();
        return 1;
    }

    // Show each frame in step with the monitor's refresh
    SDL_SetRenderVSync(renderer, 1);

    // The time the program started, in milliseconds
    Uint64 startTime = SDL_GetTicks();

    bool running = true;
    SDL_Event event;

    while (running)
    {
        // Events: quit on the window's X, or on Escape
        while (SDL_PollEvent(&event))
        {
            if (event.type == SDL_EVENT_QUIT)
            {
                running = false;
            }
            if (event.type == SDL_EVENT_KEY_DOWN &&
                event.key.key == SDLK_ESCAPE)
            {
                running = false;
            }
        }

        // Draw the frame
        SDL_SetRenderDrawColor(renderer, BACKGROUND.r, BACKGROUND.g,
                               BACKGROUND.b, BACKGROUND.a);
        SDL_RenderClear(renderer);

        // Shift the colors along one place every 100 milliseconds
        int offset = static_cast<int>((SDL_GetTicks() - startTime) / 100);

        // The cascade: squares marching diagonally from the top-left
        float x = PADDING;
        float y = PADDING;

        for (int i = 0; ; i++)
        {
            // Stop as soon as the next square would cross either edge
            if (x + SQUARE_SZ > WINDOW_W || y + SQUARE_SZ > WINDOW_H)
                break;

            // Pick this square's color, going around the palette
            SDL_Color color = COLORS[(i + offset) % COLOR_COUNT];
            SDL_SetRenderDrawColor(renderer, color.r, color.g,
                                   color.b, color.a);

            SDL_FRect square = { x, y, SQUARE_SZ, SQUARE_SZ };
            SDL_RenderFillRect(renderer, &square);

            // Move along the diagonal to the next square's spot
            x += STEP;
            y += STEP;
        }

        SDL_RenderPresent(renderer);
    }

    // Clean up, in the reverse order we created things
    SDL_DestroyRenderer(renderer);
    SDL_DestroyWindow(window);
    SDL_Quit();

    return 0;
}
In the preceding code, the shape is the same as in every project so far: the constants and the palette at the top, then the setup, the game loop, and the cleanup inside main. The cascade's for loop sits in the middle of the game loop, between clearing the window and presenting it, so it runs once every frame.
Playing the Game
Press F5. A dark gray window opens, as in Figure 7.4, with a diagonal line of 18 colored squares running from the top-left corner toward the bottom, and the rainbow flowing steadily up the line, toward the corner. It isn't really a game, as there's nothing to do and nothing to win, but it's strangely hypnotic.
Every one of those squares, in every frame, comes from the same dozen lines inside one loop. Press Escape, or close the window, when you've seen enough.
Understanding the Code
Step back from the screen, and look at the program as a whole. There's exactly one loop in it that does any visible work, and a dozen lines inside it produce the whole cascade, 60 times a second.
What's worth noticing is where each piece of that loop comes from. The for loop and the break that ends it are straight from Chapter 6, and the empty condition is the for loop's version of Chapter 6's while (true). The modulo that wraps the colors is Chapter 2's math, and the || in the stop test is Chapter 4's. The palette is an array, which we'll meet properly in Chapter 13. Everything else, from the SDL_Color members to the rectangle, is plumbing you've used in every project so far.
Loops are an organizational tool as much as anything. They take repetition and turn it into structure. Without the loop, this program would need 18 nearly identical blocks: draw a red square at 2, 2, draw an orange one at 34, 34, draw a yellow one at 66, 66, and so on. It would work, but it would be rigid. Change the window's size, the squares' size, or the padding, and all 18 blocks would need rewriting. The loop version adapts by itself: the structure stays put, and the result flexes.
The same idea drives every game you'll build. A hundred bullets are a loop over a list of bullets. A map made of tiles is two loops, one nested inside the other. An enemy deciding where to go is a loop over the things it can see. We're only at the beginning of that, but the shape is the thing to remember.
Experimenting
Try these one at a time, and see how the loop copes:
- Change
SQUARE_SZto12.0ffor a longer cascade of 42 small squares. - Change
SQUARE_SZto80.0fandPADDINGto6.0ffor just six chunky squares. - Change
y += STEP;toy += STEP / 2;for a shallower diagonal. Now it's the right edge that stops the loop, after 25 squares. - Make the cascade climb instead. Start
yat the bottom, withfloat y = WINDOW_H - SQUARE_SZ - PADDING;, changey += STEP;toy -= STEP;, and add|| y < 0.0fto the stop test, so that the loop also stops at the top edge. - Add a tenth color to the palette, with a comma after the pink. The count,
COLOR_COUNT, becomes 10 by itself, and the pattern shifts. - Change the 100 in the
offsetline to 30 for a racing rainbow, or to 1000 for one step a second.
For a bigger challenge, draw three cascades side by side. Wrap the cascade, from float x = PADDING; down to the for loop's closing brace, in another for loop that counts from 0 to 2, and start each cascade's x a little further to the right. That's a loop inside a loop, just like the grid in Chapter 6.
Each of these teaches you something about how a loop's structure decides what you see.
Common Errors and Fixes
If the build fails with errors about SDL3/SDL.h, SDL3.lib, or unresolved external symbols, the problem is the project setup, and Chapter 1's Common Errors section covers each one. Here are the problems that are particular to this chapter.
A flood of errors starting with C2059: syntax error: '{'. There's a comma missing between two colors in the palette. The first error points at the line after the missing comma, and the rest follow on from it, so fix the first one, and the flood goes away.
C2143: syntax error: missing ';' before 'const'. The semicolon after the palette's closing brace is missing. The error points at the next line, the one that defines COLOR_COUNT, so look at the end of the line above.
The window opens but stays empty, and Windows says it isn't responding. The for loop's break is missing, so the loop never ends. Press Shift+F5 to stop the program, and check the stop test at the top of the loop.
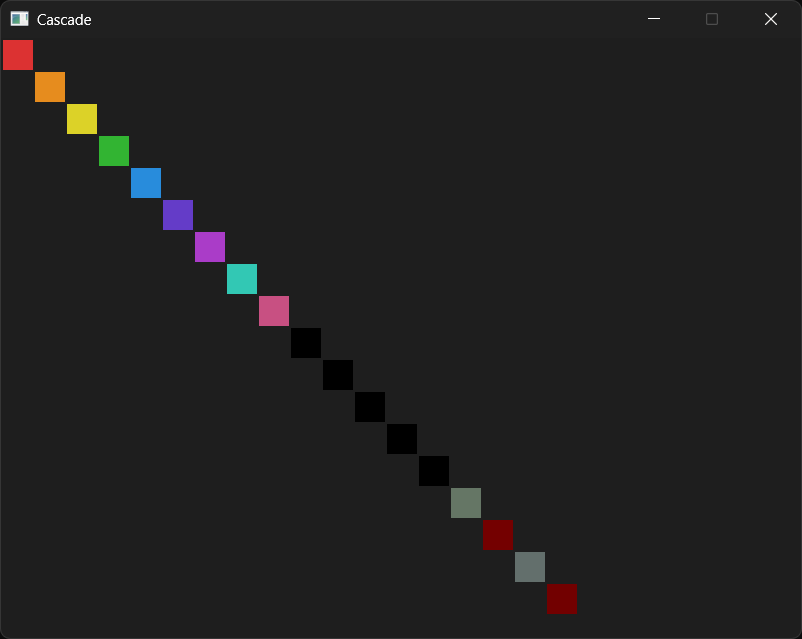
The first nine squares are fine, but the rest are black, gray, or murky red. The color line is missing its % COLOR_COUNT, so COLORS[i] reads past the end of the palette as soon as i reaches 9, as Figure 7.5 shows. C++ doesn't check array positions, so it reads whatever happens to be in the memory after the list. That's called undefined behavior: C++ makes no promises about what happens, and it can be odd colors on one computer and a crash on another. Put the % COLOR_COUNT back.
The squares touch, with no gaps between them. Check that STEP is SQUARE_SZ + PADDING, and not just SQUARE_SZ.
The colors never move. Check that the color line uses (i + offset), and that startTime is created above the game loop, not inside it. Inside the loop, startTime is set afresh every frame, so the time since it was set is always about 0, and so is offset.
A message box says "The code execution cannot proceed because SDL3.dll was not found." Copy SDL3.dll from C:\SDL3\lib\x64 into the project folder, beside main.cpp.
AI Exercise (Optional)
If you'd like to push this further with AI help, here's a small vibe coding challenge. As always, skip it if you'd rather not; nothing later in the book depends on it.
Open your AI chatbot of choice and try a prompt like this:
"I have a small C++ SDL 3 program that uses one for loop to draw a diagonal cascade of colored squares from the top-left of the window, choosing each color from a nine-color array with the modulo operator, and stopping with break when the next square wouldn't fit. The colors already flow along the line over time. I have only learned variables, structs, flow control (if, else, and switch), and loops (while, for, do-while, break, and continue). I haven't learned functions, vectors, or classes. Show me how to make the squares themselves slide diagonally across the window over time, reappearing at the top-left when they reach the edge. Use only what I've learned, put each curly brace on its own line, and show me the complete program."
Notice what the preceding prompt does. It names the language and the library exactly, so the AI doesn't suggest SDL 2 code. The description of what the program already does gives the AI something to build on, and the list of what you've learned keeps the answer inside your bubble of understanding. Asking for the whole program, rather than a snippet, means you can see exactly where every change goes.
When the answer comes back, read it carefully before you run it. Did the AI stick to the tools you listed, or did it sneak in a function or a vector? If it did, push back: "That uses a feature I haven't learned yet. Show me a version that only uses variables, flow control, and loops." That's how to make an AI work at your level, rather than dragging you up to its own.
How does its sliding work? There's more than one good answer, and a version that uses modulo to wrap the squares around would be a fine echo of this chapter.
Your version will look different from anyone else's, and that's the point.
Summary
You've used a single for loop to turn a dozen lines of code into a whole cascade of squares. The shape of the cascade, its direction, its density, and its colors, is controlled by a handful of constants, and the loop adapts to whatever you give it. An empty condition and a break stop it at exactly the right square, the modulo operator sends it round and round the palette, and two new lines and one small change make the whole rainbow flow.
Loops are an honest superpower: they're the difference between a program that handles three things and one that handles three thousand. In the next chapter, we'll meet functions, which are the same kind of superpower for structure: a way of giving a name to a chunk of work, so we can organize it and reuse it. With functions and loops together, we'll be ready for Chapter 9, the Act 1 capstone, a complete little game with real gameplay, built from well-named pieces. That's where all of this is heading.