
So far, our vectors can be added, scaled, measured and normalized. Those operations answer questions about how far something is, and which way to go to reach it. This chapter adds two operations that answer two different questions. How much do two vectors point the same way? And which side of a line is a point on? The first is answered by the dot product, and the second by the 2D cross product. Between them, they underpin field-of-view checks, "is that behind me?" tests, the winding of shapes, and nearly every collision test in Part 4.
Each one takes two vectors and gives back a single number. That's what makes them so useful: a whole geometric relationship, boiled down to a number you can test with an if. By the end of the chapter, you'll know where each formula comes from, what its sign and its size mean, and when to reach for which. You'll also have built two demos: a guard who sees only what's in front of it, and a line that sorts points by the side they're on.
In this chapter, we will:
- Build the dot product, and read its sign and its size
- Project one vector onto another, splitting it into a part along and a part across
- Give
Vec2a quarter turn,perp - Tell in front from behind, and build a cone of vision
- Build Field of View, a guard that sees only what's in its cone
- Build the 2D cross product from
perpand the dot product - Use its sign to tell which side of a line a point is on, and its size to find distances and areas
- Build Which Side, which colors points by the side of a line they're on
- Find which way a triangle, or any polygon, winds
Everything in the chapter rests on the dot product, so that's where we'll begin.
The Dot Product
Picture a guard facing one way, and a player standing somewhere nearby. Is the player in front of the guard, or behind? And how far off the guard's aim are they? We could work out the angle of each vector and compare the two angles. But angles bring trigonometry, and a nasty wrap-around at 360 degrees, which Chapter 5 sorts out. There's a much cheaper number that answers both questions, and this section builds it.
The Number We Want
We want a number that measures how well two vectors agree on a direction. It should be large when they point the same way, zero when they're at right angles, and negative when they point in opposite directions. It should also grow with the vectors' lengths, so that it can be a measure of size too.
The cosine of the angle between the vectors behaves exactly like that. Chapter 5 explains cosine fully. For now, we need just three of its values, and one fact about its shape. The cosine of 0 degrees is 1, the cosine of 90 degrees is 0, and the cosine of 180 degrees is −1. In between, it falls smoothly as the angle grows. So the number we want is the length of one vector, times the length of the other, times the cosine of the angle between them:
a · b = |a| |b| cos θThe dot in the middle is read "dot", which gives the dot product its name. The bars around a mean its length, and θ (theta) is the angle between the two vectors. As it stands, this definition isn't much use. To find θ, we'd need the angles, which is exactly the trigonometry we were trying to avoid. The surprise is that the same number can be worked out from the vectors' components alone, with two multiplications and an addition. The next section shows why.
Where the Formula Comes From
Draw the two vectors from the same point. The line that joins their heads is a third vector, a - b, and the three make a triangle. The next image shows it.
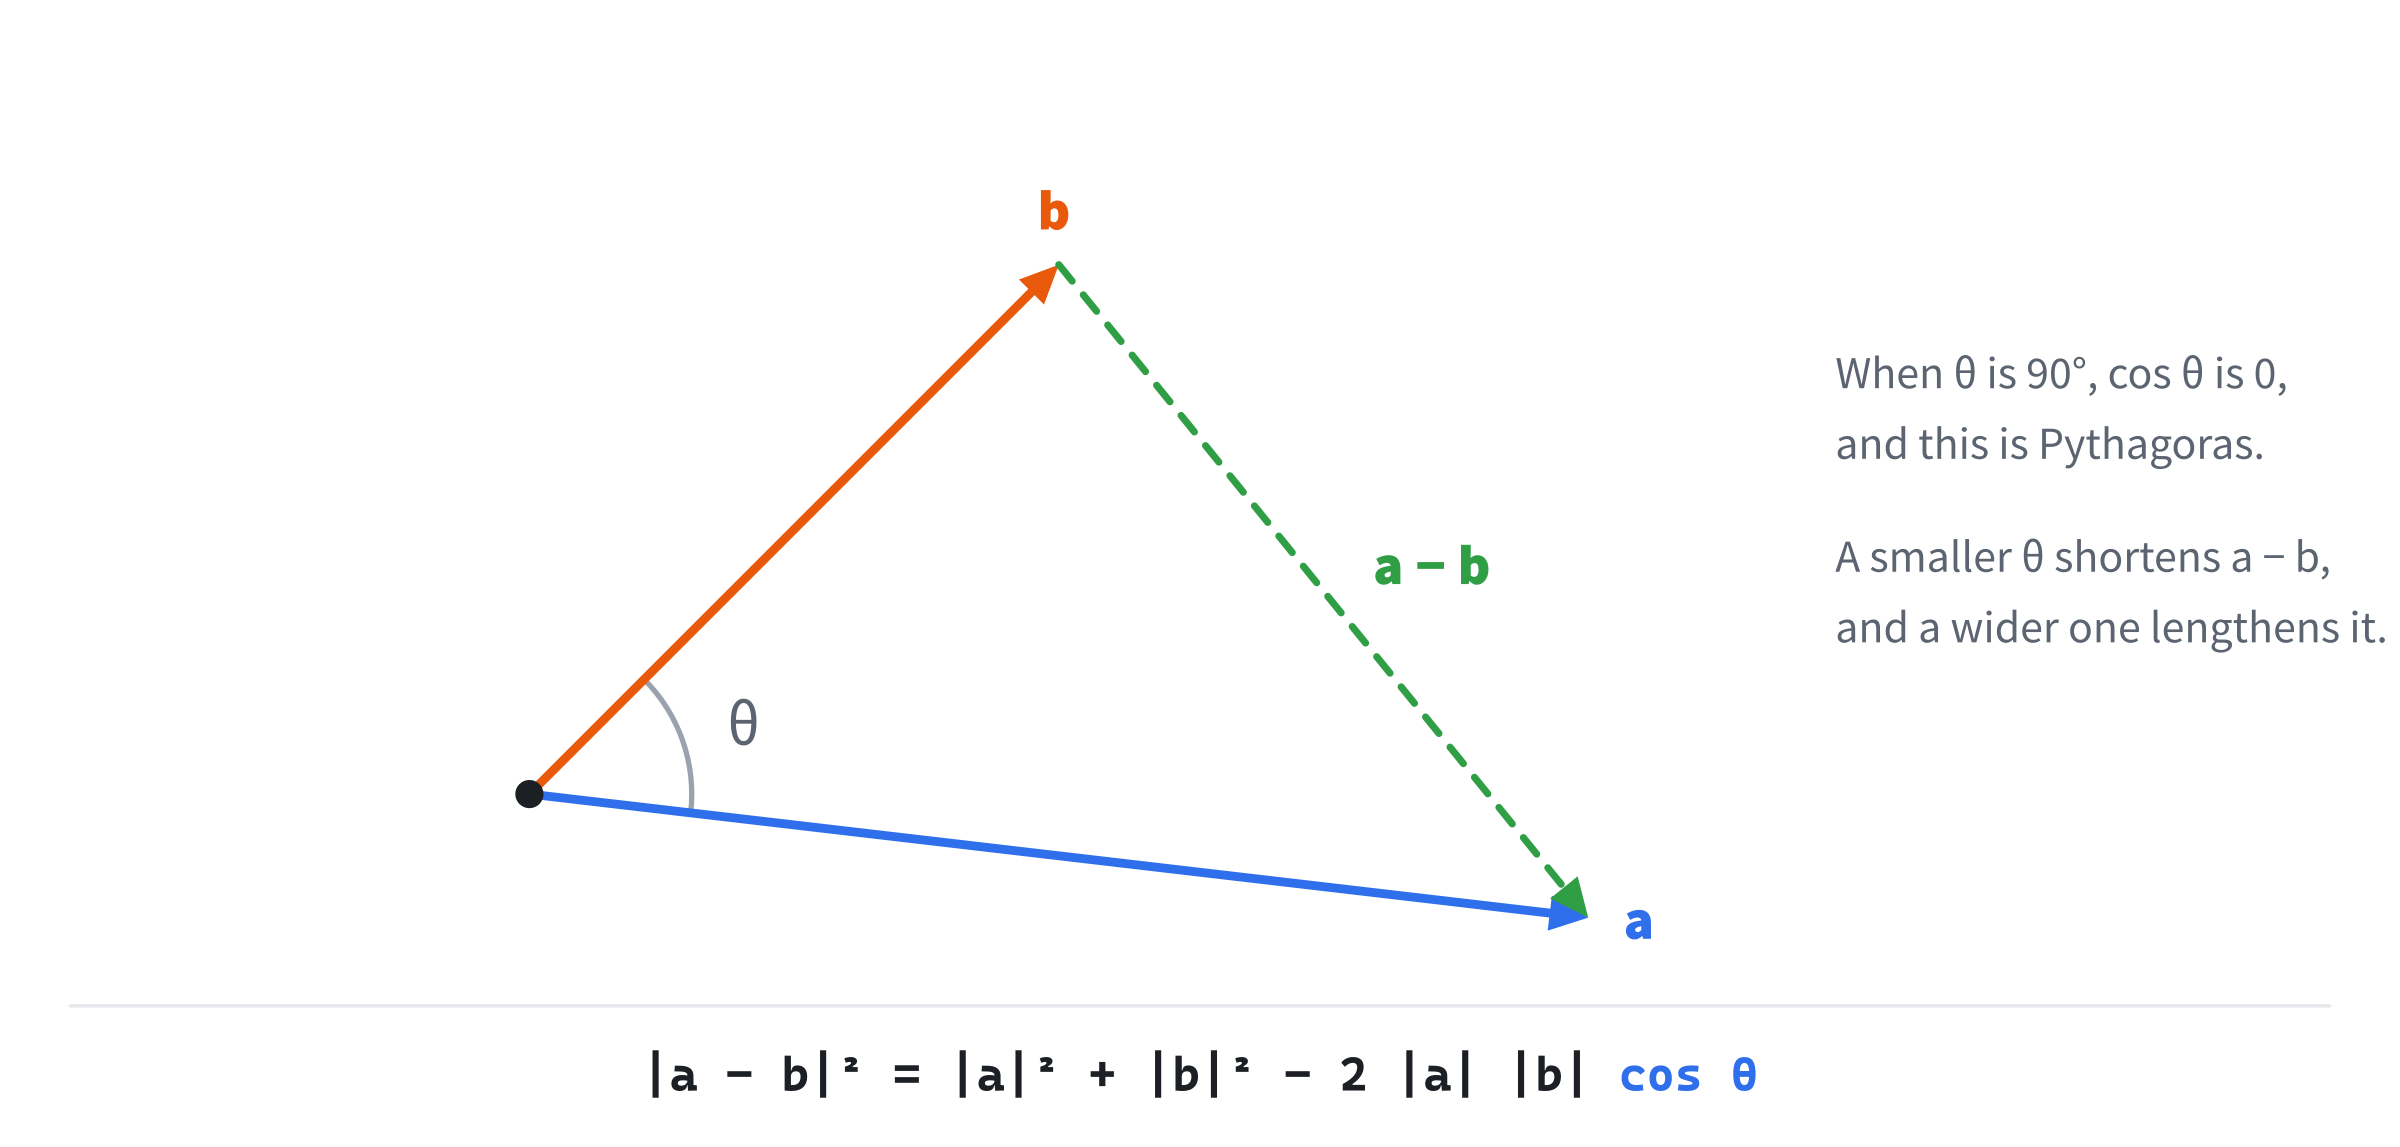
For a right-angled triangle, Pythagoras tells us the length of the long side. The law of cosines does the same for a triangle with any angle. In our triangle, it says:
|a - b|² = |a|² + |b|² - 2 |a| |b| cos θWhen θ is 90 degrees, its cosine is 0, the last term vanishes, and what's left is Pythagoras. When θ is smaller than 90 degrees, the cosine is positive, so the far side is shorter than Pythagoras would make it. When θ is wider, the cosine is negative, and the far side is longer. That matches what you'd see if you opened and closed the angle between two sticks.
Now work out the same length from the components. Chapter 3 showed that a vector's squared length is the sum of its components' squares. Writing ax for a's x component, and so on, that gives:
|a - b|²  =  (ax - bx)² + (ay - by)²
          =  ax² - 2 ax bx + bx²  +  ay² - 2 ay by + by²
          =  (ax² + ay²) + (bx² + by²) - 2 (ax bx + ay by)
          =  |a|² + |b|² - 2 (ax bx + ay by)
Put the two results side by side. Both start with |a|² + |b|², and both subtract twice something. So the two somethings must be equal:
ax bx + ay by = |a| |b| cos θThat's the dot product. Multiply the x components, multiply the y components, and add. The result is the lengths times the cosine of the angle between them, without a single angle in sight. In code, it's one line. Add dot to Vec2, below normalized:
// The dot product (Chapter 4): positive when the two point the same
// way, zero when they're perpendicular, negative when they're opposed.
float dot(const Vec2& r) const { return x * r.x + y * r.y; }
The comment names the chapter, as every part of Vec2 does. The method takes the other vector by const reference and changes nothing, so it's a const member, like length.
What Its Sign and Size Mean
Some worked numbers make this concrete. Take a = (3, 4), whose length is 5, and dot it with four other vectors. The table below gives each dot product from the components. Beside it are the two lengths multiplied together, and the cosine that the dot product divided by them gives, with its angle.
| b | a · b | Lengths | cos θ | θ |
|---|---|---|---|---|
| (6, 8) | 18 + 32 = 50 | 5 × 10 = 50 | 1 | 0° |
| (4, 3) | 12 + 12 = 24 | 5 × 5 = 25 | 0.96 | 16° |
| (−4, 3) | −12 + 12 = 0 | 5 × 5 = 25 | 0 | 90° |
| (−3, −4) | −9 − 16 = −25 | 5 × 5 = 25 | −1 | 180° |
The first row doubles a, so the two point the same way, and the dot product is the whole product of their lengths. The third row is at right angles, and its dot product is exactly 0. The last row points the opposite way, and its dot product is negative.
So the sign of a dot product tells you the angle at a glance. It's positive when the angle is less than 90 degrees, zero at exactly 90 degrees, and negative when the angle is more than 90 degrees. This works for vectors of any length, because lengths are never negative. Only the cosine can make the result negative.
When both vectors have a length of 1, the lengths drop out, and the dot product is the cosine itself. That's the case games use most. The next image shows five pairs of unit vectors, and their dot products.
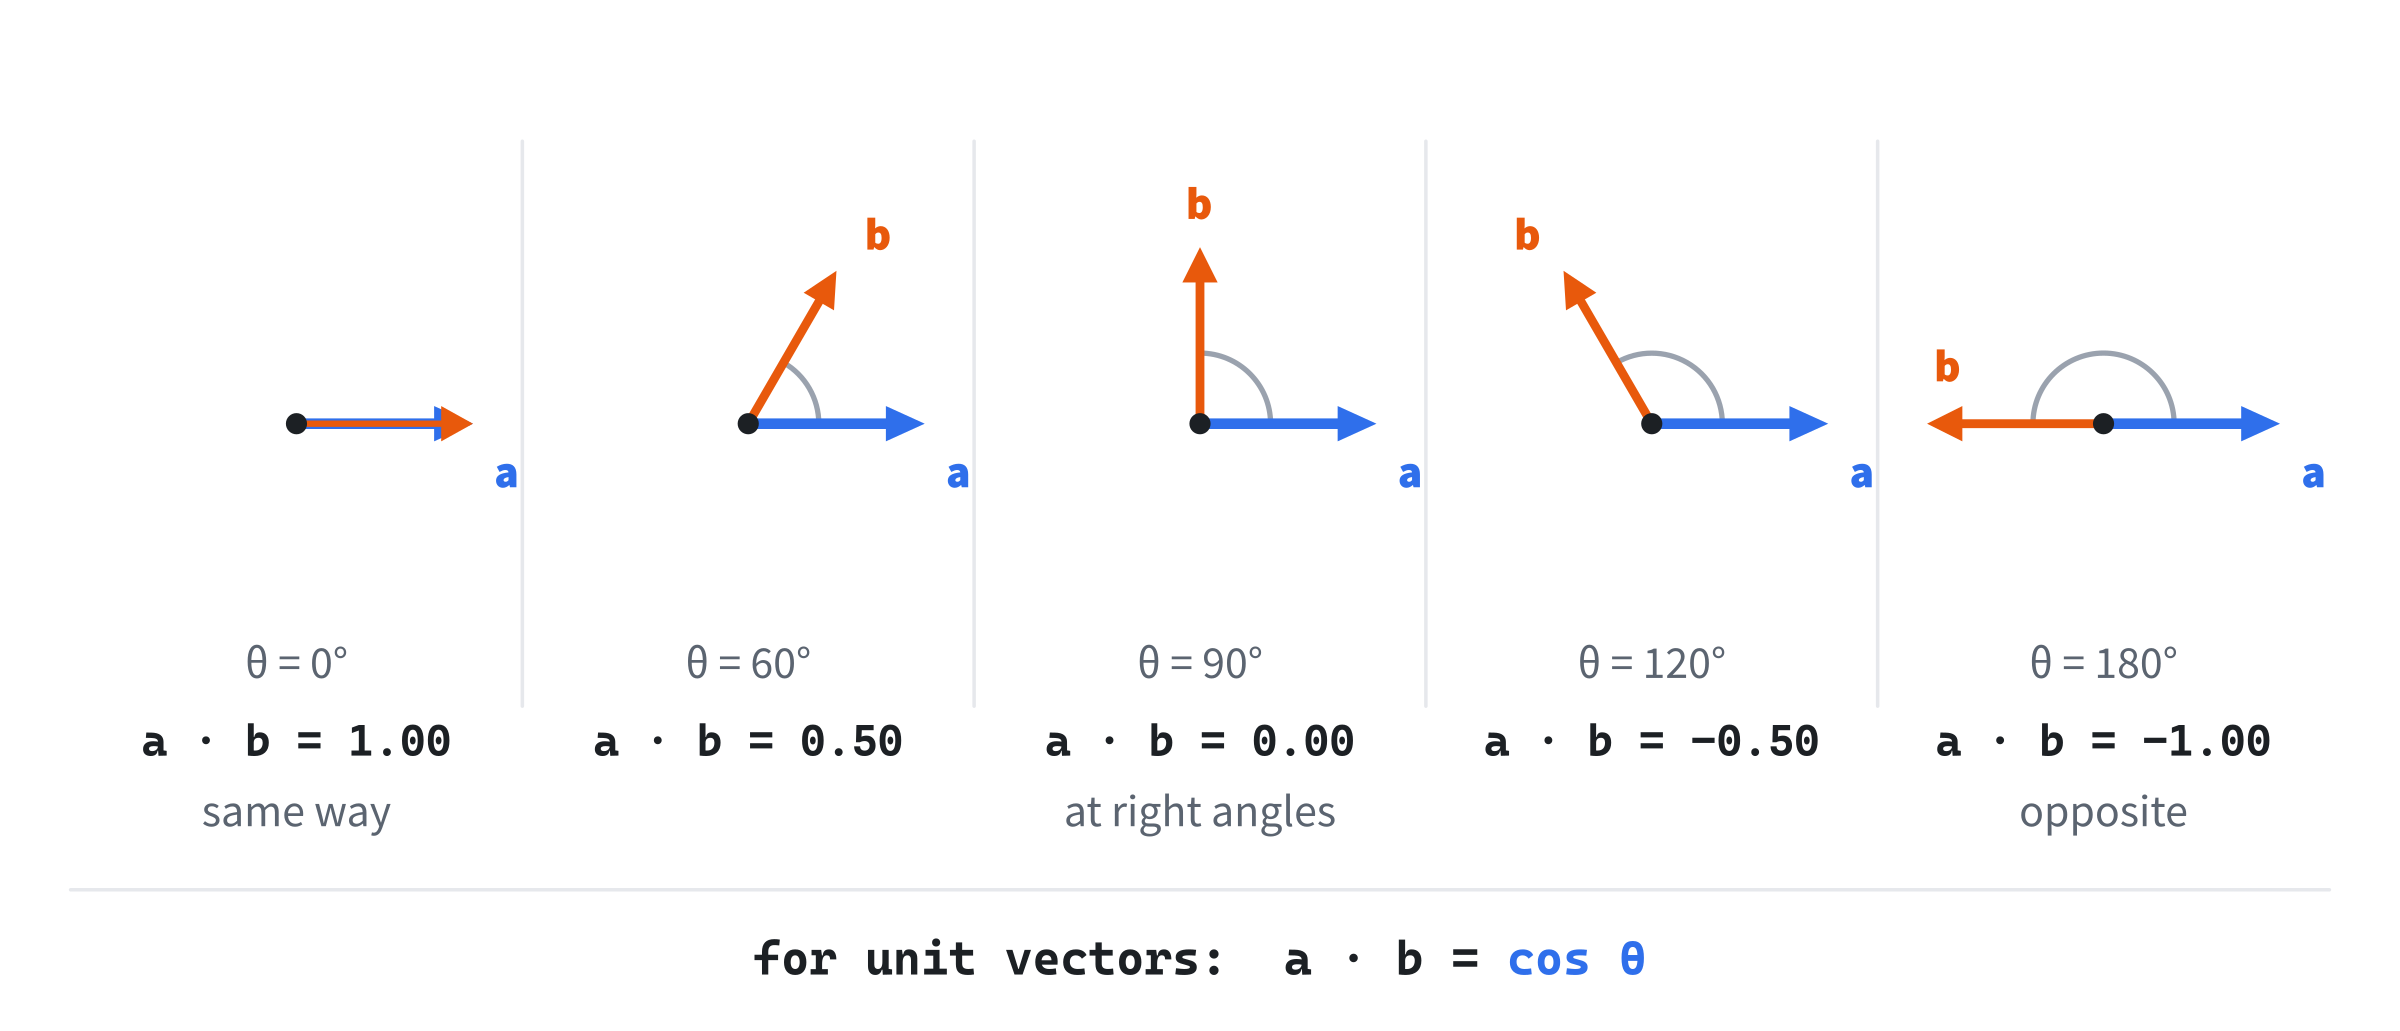
For unit vectors, the dot product runs from 1 down to −1. It's 1 when they point the same way, 0 at right angles, and −1 when they point in opposite directions. Two multiplications and an addition tell you exactly how well two directions agree.
Projection
The dot product has a second meaning, as useful as the first. It measures how far one vector reaches along another. Shine a light straight down onto the line of a vector u, and look at the shadow that b casts on it. The length of that shadow is the projection of b onto u.
The Part Along, and the Part Across
The next image shows b = (4, 2) and a unit vector u = (0.6, 0.8), with b's shadow on u's line.
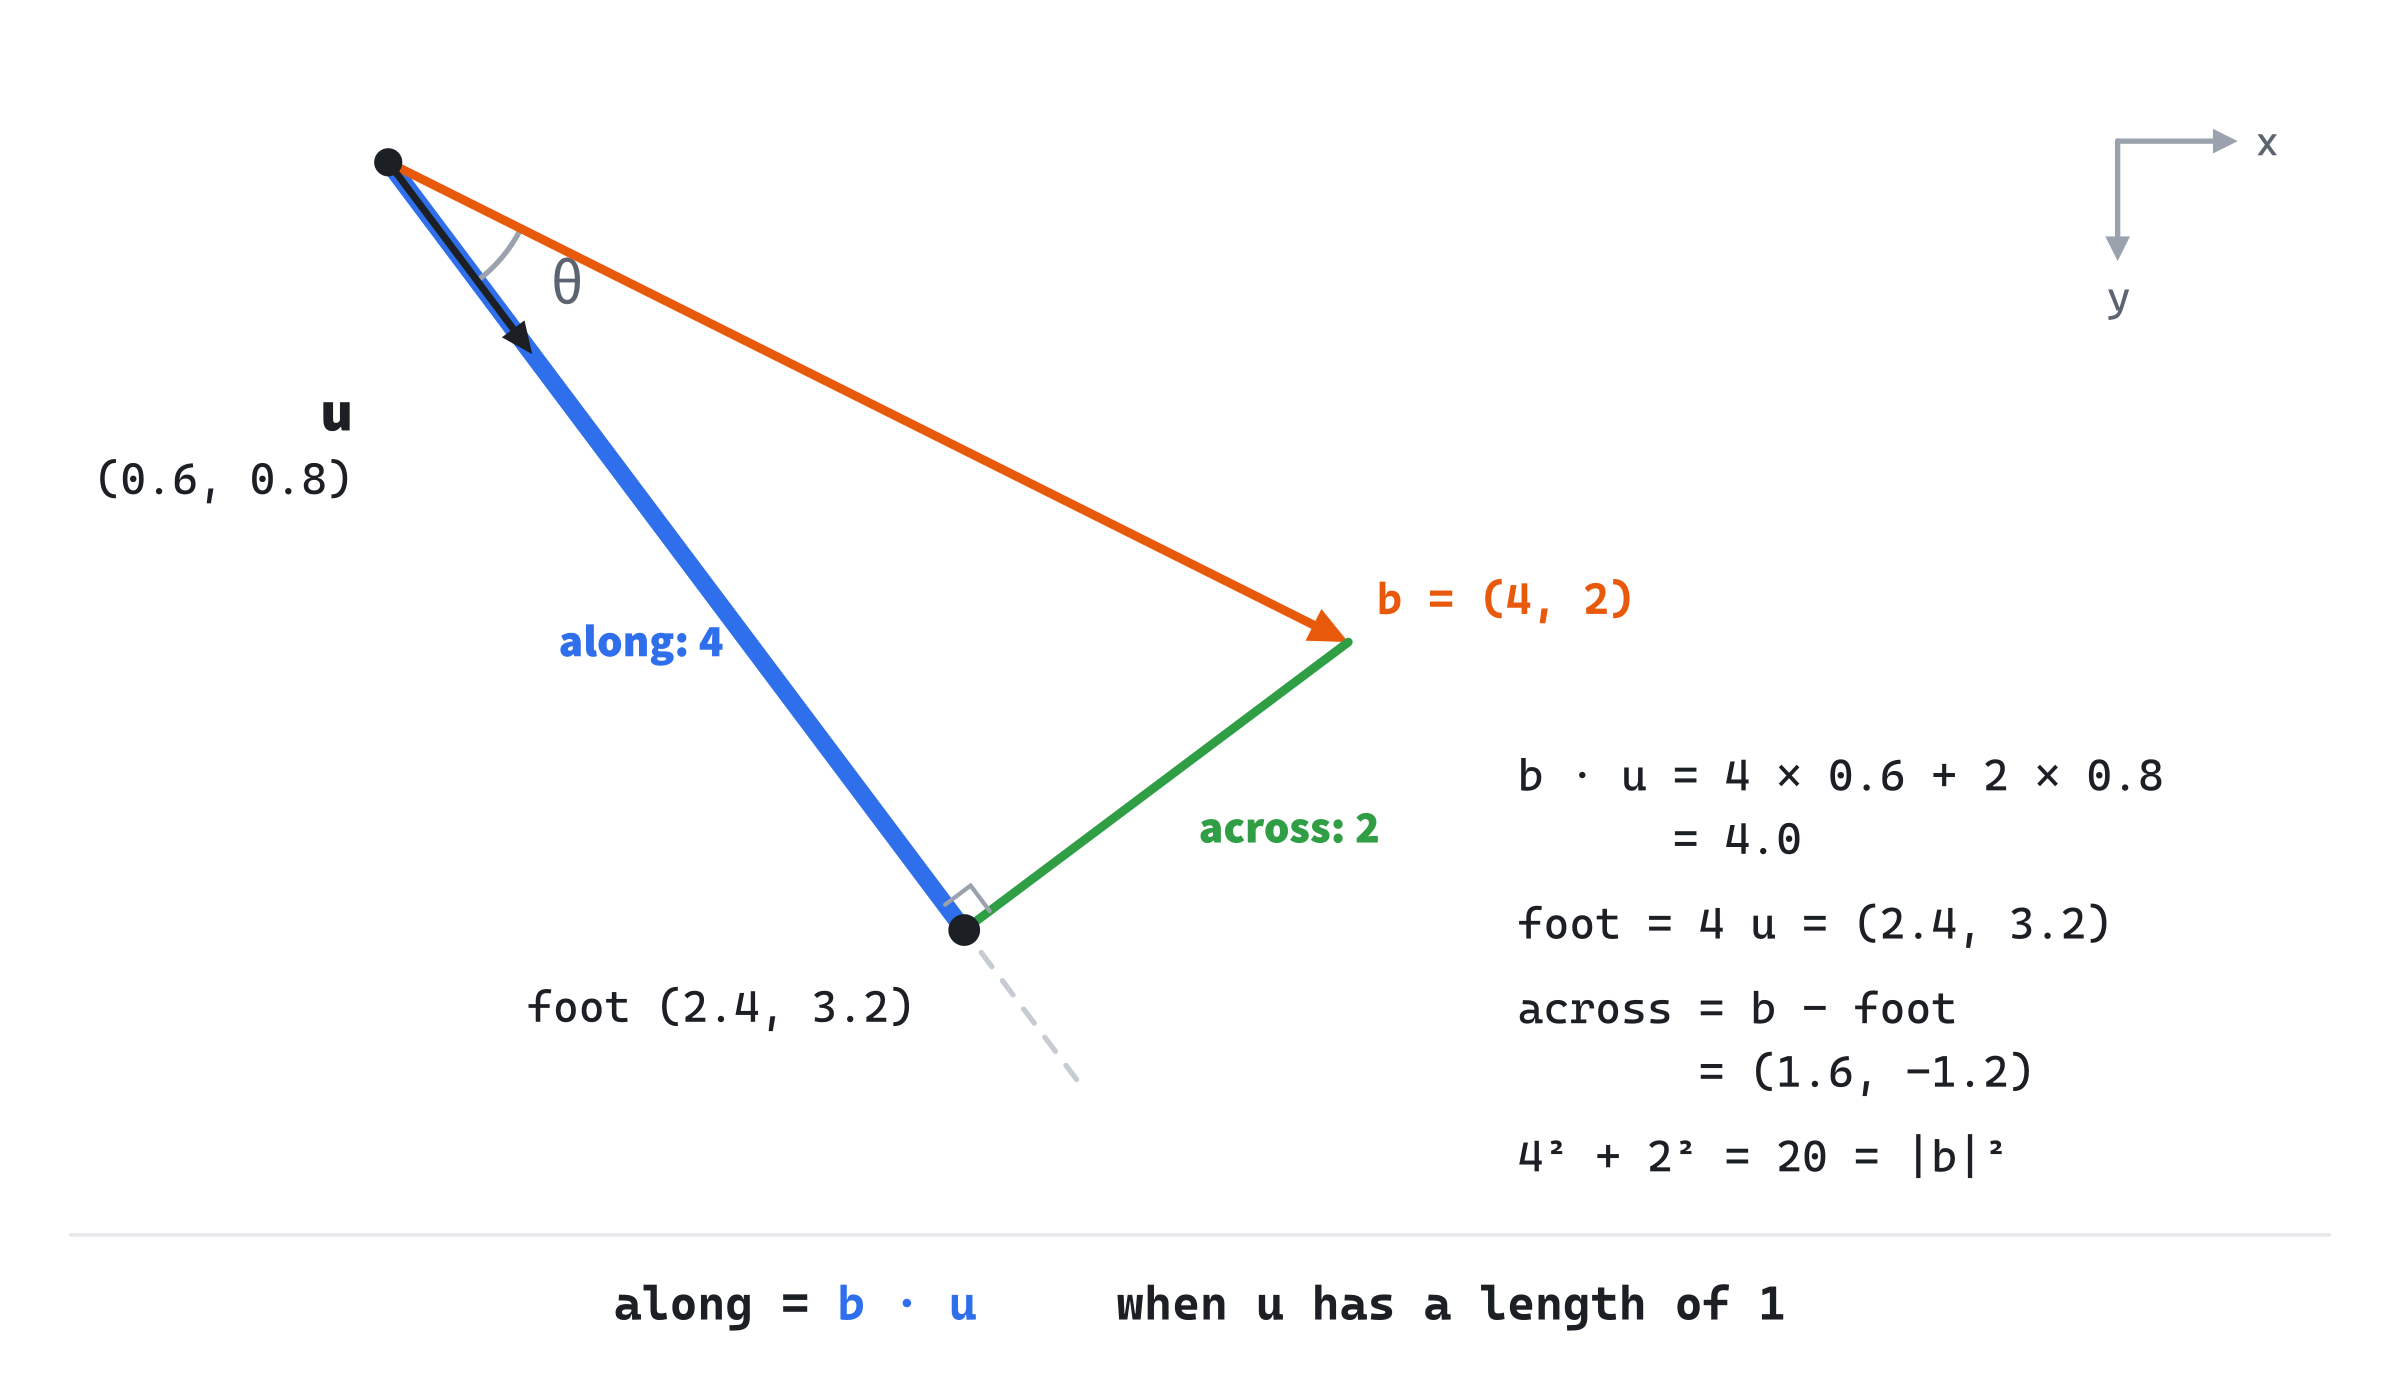
The light drops from b's head onto u's line at a point we'll call the foot. The foot is some distance s along u, so it's at s u. What's left of b after the shadow, b - s u, runs from the foot to b's head, which is straight across u's line. So its dot product with u is zero. The dot product shares out over a sum, just as ordinary multiplication does, which you can check by writing out the components. That gives:
(b - s u) · u = b · u - s (u · u) = 0And u · u is u's squared length, which is 1. So s is simply b · u. When u has a length of 1, the dot product is exactly the shadow's length:
along = b · u = 4 × 0.6 + 2 × 0.8 = 2.4 + 1.6 = 4.0So b reaches 4 along u's direction, and the foot is at 4 × (0.6, 0.8) = (2.4, 3.2). The dot product's first form agrees: with |u| as 1, b · u is |b| cos θ, the length of the shadow.
Take the shadow away from b, and what's left is the part of b that's across u's line: (4, 2) - (2.4, 3.2) = (1.6, -1.2). Dot that with u, and you get 0.96 - 0.96 = 0. So the leftover part is at right angles to u, as the drop of the light was. Its length is 2, and the two parts obey Pythagoras: 4² + 2² = 20, which is b's squared length. Every vector splits like this into a part along a direction, and a part across it.
A word of warning, since this is a classic mistake. The dot product is the shadow's length only when u has a length of 1. For a longer vector a, the dot product is the shadow's length times |a|, so you have to divide by |a| to get the shadow. When you only care about the sign, the length doesn't matter. When you care about the size, normalize first.
Projection turns up all through the book. Chapter 10 bounces a ball by projecting its velocity onto a wall's normal. Chapter 13 finds the closest point on a line by projecting onto it. And Chapter 16 tests whether two shapes overlap by projecting both onto a line, and comparing their shadows.
A Quarter Turn
The part across u points at right angles to it. It's often handy to have that direction directly, as a vector of its own. Turning a vector a quarter turn turns out to be startlingly cheap. Swap its components, and negate one:
perp((x, y)) = (-y, x)Check it with the dot product. The dot of (x, y) with (-y, x) is -xy + yx, which is 0 for any x and y. So the two are always at right angles. They have the same length, too, since both have the same components squared. Add perp to Vec2, below dot:
// A quarter turn of this vector, which is clockwise on the screen.
Vec2 perp() const { return { -y, x }; }
Which way does it turn? Chapter 1 set y pointing down the screen, and that matters here. The vector (1, 0) points right. Its perp is (0, 1), and on the screen, y = 1 is down. So right turns to down, which is a clockwise turn. The next image shows two vectors and their quarter turns, on the screen's grid.
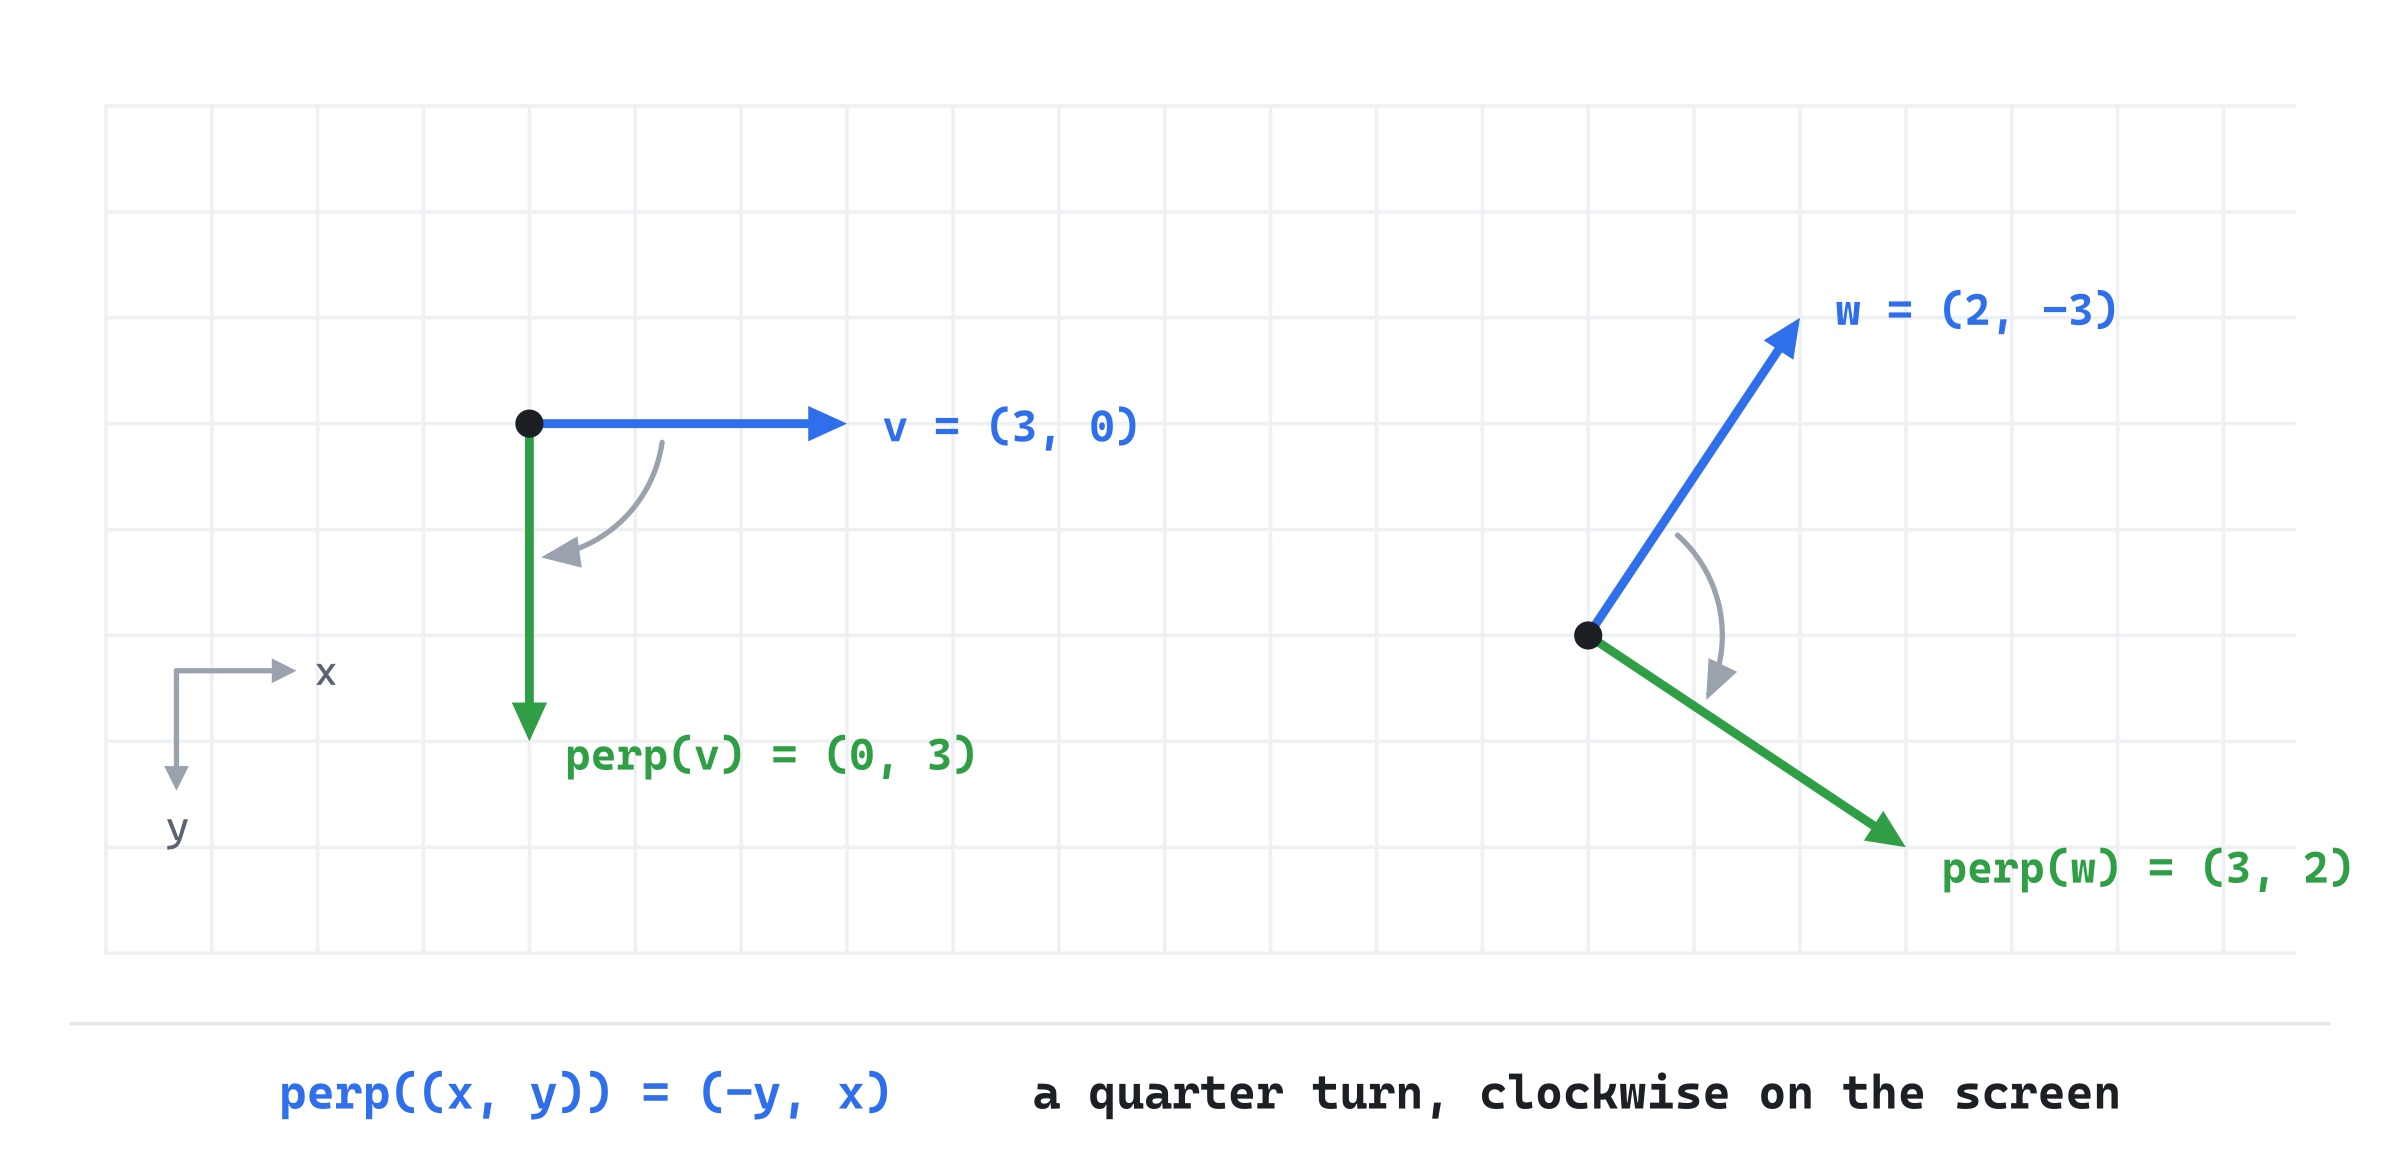
In a math book, where y points up, the same formula turns the other way, counterclockwise. Nothing about the formula changes. The picture is mirrored, because the y axis is. We'll come back to this when it decides which side counts as left.
With perp, the part of b across u can be measured directly, like the part along it. The dot product of b with perp(u) is its length, with a sign. For our example, perp(u) = (-0.8, 0.6), and b · perp(u) = -3.2 + 1.2 = -2.0. The size, 2, is the leftover part's length. The minus sign says that b sits on the counterclockwise side of u, the opposite way from where perp turns. Together, the two dot products give b in coordinates of its own, 4 along u and −2 across it, as if u were the x axis. A game uses exactly this to ask how far ahead of a guard something is, and how far to its right.
In Front, Behind, and in View
Back to the guard. Its facing is a unit vector, facing. A target stands somewhere, and the vector from the guard to it is target - guard. Its dot product with facing answers the first question at once:
- If it's positive, the target is in front: within 90 degrees of where the guard faces.
- If it's zero, the target is exactly to one side.
- If it's negative, the target is behind.
This test doesn't need the direction to the target to be normalized. Normalizing divides by a length, which is positive, and dividing by a positive number never changes a sign. So (target - guard).dot(facing) > 0 is a complete "in front" test, with no square root anywhere.
The Cone Test
"In front" is a half-circle of vision, 180 degrees wide. Real guards see a narrower cone, perhaps 80 degrees wide: 40 degrees each side of their aim. The angle from the aim to one edge is the cone's half-angle. A target is in view when the angle between the facing and the direction to it is no more than the half-angle.
Comparing cosines instead of angles avoids the trigonometry. As an angle grows from 0 to 180 degrees, its cosine falls. So a smaller angle has a larger cosine, and "the angle is at most the half-angle" becomes "the cosine is at least the half-angle's cosine". For unit vectors, the dot product is the cosine. So the whole test is:
in view when direction · facing >= cos(halfAngle)Here, direction is the normalized vector to the target. The cosine of the half-angle only changes when the cone does, so it's worked out once, not once for every target. The next image shows the cone, and two targets.
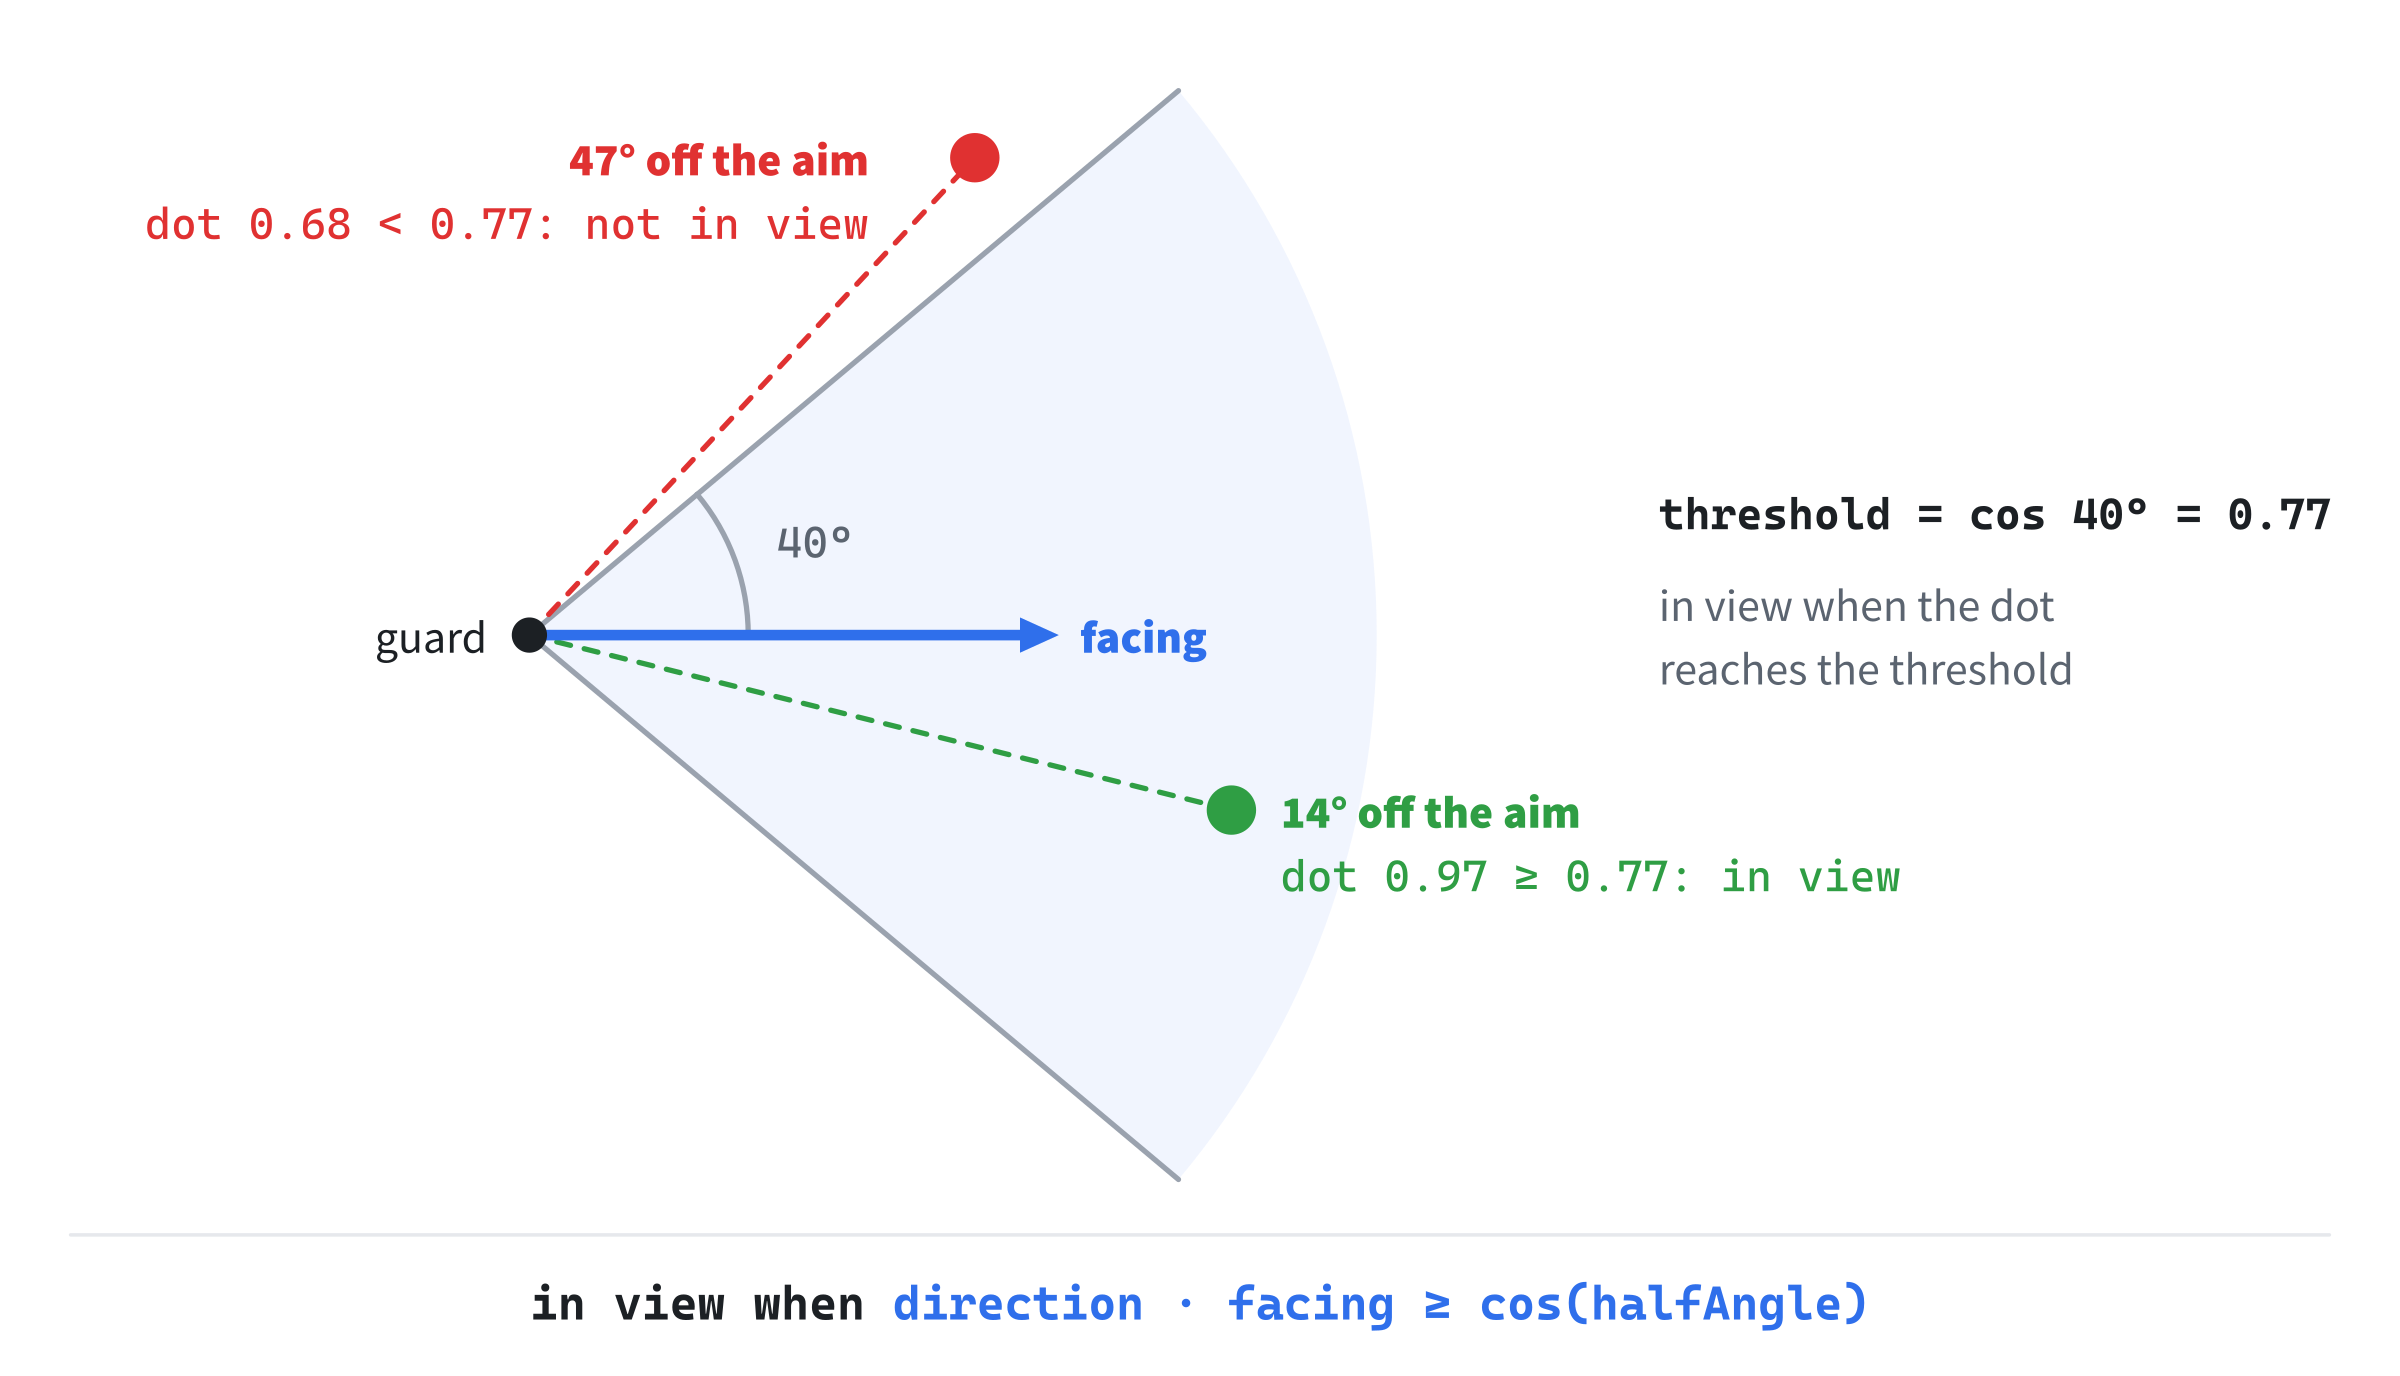
With a half-angle of 40 degrees, the threshold is cos 40°, which is 0.77. A target 14 degrees off the aim has a dot product of 0.97. That's above 0.77, so it's in view. A target 47 degrees off the aim has a dot product of 0.68, which falls short, so it isn't. The demo we're about to build shows exactly these numbers.
This time, the direction must be normalized. Without it, the dot product is the cosine times the distance to the target. A target 134 pixels away and 47 degrees off the aim would score 0.68 × 134, which is 91. That's far above 0.77, so a target well outside the cone would pass the test. The sign test can skip normalizing. The cone test can't.
Getting the Angle Back
Sometimes you want the angle itself, perhaps to show it, or to turn something toward a target. The arc cosine, std::acos, undoes the cosine. Give it a cosine, and it returns the angle in radians. For two unit vectors, std::acos(a.dot(b)) is the angle between them.
There's one trap. The std::acos function accepts numbers from −1 to 1 only. Two unit vectors that point the same way should have a dot product of exactly 1. But each was normalized with float arithmetic, so the result can come out as 1.0000001. The arc cosine of that is NaN, Chapter 3's "not a number", and it spreads to everything it touches. The fix is to clamp the value into range first, which the demo does.
Building Field of View
Field of View puts a guard in the middle of the window. It aims wherever the mouse points, and its cone of vision swings to follow. Targets are scattered around it: green when they're in view, and red when they're not. The target nearest the aim gets its projection drawn, the part along the aim and the part across it, with both lengths in the readout. The Up and Down arrow keys widen and narrow the cone.
Get the code. The complete project is in the
Field of Viewfolder of the book's repository. Chapter 1 gives its address.
The demo starts from the skeleton, as every demo does. Nothing in it moves by itself, so it doesn't need delta time, and leaves the skeleton's timing out. It reuses three helpers: drawGrid from Chapter 1 for the grid, drawArrow from Chapter 2 for the facing, and fillCircle from Chapter 3 for the targets. Its Vec2.h is Chapter 3's, with dot and perp added.
The Guard and the Targets
The demo adds three headers to the skeleton's. The <cmath> header has std::cos and std::acos, <vector> holds the targets, and Vec2.h is our vector. With the skeleton's <string> among them, they read:
#include <cmath>
#include <string>
#include <vector>
#include "Vec2.h"
Its constants come next: a value for π, for turning degrees into radians, and the colors it draws with:
constexpr float PI = 3.14159265f;

constexpr SDL_Color TEXT = { 235, 238, 242, 255 };
constexpr SDL_Color GREY = { 90, 100, 112, 255 };
constexpr SDL_Color BLUE = { 47, 111, 235, 255 };
constexpr SDL_Color GREEN = { 47, 158, 68, 255 };
constexpr SDL_Color RED = { 224, 49, 49, 255 };
constexpr SDL_Color AMBER = { 232, 89, 12, 255 };
The readout shows numbers with two decimal places, rather than the six that std::to_string gives a float. A small helper formats them, with SDL_snprintf, SDL's portable version of snprintf:
// A number as text with two decimals, such as 0.77.
std::string fmt2(float v)
{
    char buf[32];
    SDL_snprintf(buf, sizeof(buf), "%.2f", v);
    return buf;
}
The demo's state goes after the font is loaded, before the loop:
// The guard stands at the center, and its facing, a unit vector,
// turns to the mouse. The half-angle runs from the aim to one edge.
const Vec2 guard = { WINDOW_WIDTH / 2.0f, WINDOW_HEIGHT / 2.0f };
Vec2 facing = { 1.0f, 0.0f };
float halfAngleDeg = 40.0f;

std::vector<Vec2> targets = {
    { 780, 340 }, { 700, 540 }, { 560, 230 }, { 300, 320 },
    { 380, 560 }, { 640, 400 }, { 470, 150 }, { 250, 520 }
};
The guard stands at the center of the window, and never moves. Its facing starts pointing right, but each frame turns it toward the mouse. The half-angle is kept in degrees, since that's what the readout shows. And targets holds the eight points the guard is trying to see.
Aiming
In the event loop, two more keys join the skeleton's Escape. Up widens the cone by five degrees on each side, and Down narrows it:
if (event.key.key == SDLK_ESCAPE) running = false;
else if (event.key.key == SDLK_UP) halfAngleDeg += 5.0f;
else if (event.key.key == SDLK_DOWN) halfAngleDeg -= 5.0f;
halfAngleDeg = SDL_clamp(halfAngleDeg, 10.0f, 90.0f);
The SDL_clamp macro keeps the half-angle between 10 and 90 degrees. A half-angle of 90 degrees makes the cone 180 degrees wide, which is the whole of "in front".
After the skeleton reads the mouse, the guard turns to face it:
// Aim the guard: its facing is the direction to the mouse. On the
// guard itself there's no direction, so the facing stays as it was.
Vec2 toMouse = Vec2{ mx, my } - guard;
if (toMouse.lengthSquared() > 1.0f) facing = toMouse.normalized();
The facing is the direction from the guard to the mouse: the mouse's position minus the guard's, normalized. The if handles the mouse sitting right on the guard. There, toMouse is the zero vector, which has no direction, and Chapter 3's normalized would return zero. A facing of zero would make every dot product 0, so instead the guard keeps the facing it had. Comparing the squared length with 1 means "closer than a pixel", without a square root.
Next comes the threshold, the cosine of the half-angle:
// The dot product at the cone's edge: the cosine of the half-angle.
float halfAngle = halfAngleDeg * PI / 180.0f;
float threshold = std::cos(halfAngle);
The half-angle is turned into radians first, since std::cos takes radians. Chapter 5 explains radians. For now, it's enough that 180 degrees is π radians, so degrees times π over 180 gives radians.
The Nearest Target
Before drawing, the demo finds the target nearest the aim. That's the one whose direction has the largest dot product with the facing, since a larger dot product means a smaller angle:
// The target nearest the aim: the one whose direction has the
// largest dot product with the facing.
float bestDot = -2.0f;
Vec2 best = targets[0];
for (const Vec2& t : targets)
{
    float d = (t - guard).normalized().dot(facing);
    if (d > bestDot)
    {
        bestDot = d;
        best = t;
    }
}
For each target, t - guard is the vector from the guard to it: where it is, minus where the guard is. Normalized, it's a direction, and its dot product with the facing is the cosine of the angle between the two. The bestDot variable starts at −2, below any real cosine, so the first target always replaces it.
The nearest target is then split into its two parts, exactly as the projection section split b:
// Its projection onto the aim: how far ahead of the guard it is.
// What's left over is across the aim, to the right when it's
// positive, as the quarter turn is clockwise on the screen.
Vec2 toBest = best - guard;
float ahead = toBest.dot(facing);
float side = toBest.dot(facing.perp());
Vec2 foot = guard + facing * ahead;
The facing is a unit vector, so toBest.dot(facing) is how far ahead of the guard the target is, in pixels. The dot product with facing.perp() is how far across the aim it is. A positive side means the target is clockwise from the aim, which is to its right, as the screen shows it. The foot is the point on the aim's line nearest the target: the guard's position, plus the facing scaled by ahead.
The readout also shows the angle to the nearest target, so the demo turns its dot product back into an angle:
// The angle to it, from its dot product. acos takes -1 to 1, and
// rounding can push a dot product just outside that.
float clamped = SDL_clamp(bestDot, -1.0f, 1.0f);
int bestAngle = (int)(std::acos(clamped) * 180.0f / PI + 0.5f);
This is the clamp from Getting the Angle Back. Here, SDL_clamp pulls the dot product into the range from −1 to 1, so std::acos can't return NaN. The angle comes back in radians. Multiplying by 180 over π gives degrees, and adding 0.5 before the cast rounds to the nearest degree.
Drawing the Cone
Each edge of the cone is the facing, turned by the half-angle. Turning a vector by any angle is Chapter 6's subject, but the edges need little more than this chapter has built. A unit vector at an angle from the facing is made of two parts: the cosine of the angle along the facing, and the angle's sine across it, along facing.perp(). Chapter 5 explains sine. The edges are drawn 360 pixels long:
// The cone's edges. A unit vector at an angle a from the facing is
// the facing times cos(a), plus a quarter turn of it times sin(a).
Vec2 across = facing.perp() * std::sin(halfAngle);
Vec2 edge1 = guard + (facing * threshold + across) * 360.0f;
Vec2 edge2 = guard + (facing * threshold - across) * 360.0f;
SDL_SetRenderDrawColor(renderer, GREY.r, GREY.g, GREY.b, GREY.a);
SDL_RenderLine(renderer, guard.x, guard.y, edge1.x, edge1.y);
SDL_RenderLine(renderer, guard.x, guard.y, edge2.x, edge2.y);
The part along the facing is the threshold itself, since that's the cosine of the half-angle. So the dot product of each edge with the facing is exactly the threshold. The grey edges are drawn precisely where the test changes its answer. A target on an edge has a dot product equal to the threshold.
The nearest target's projection comes next, in amber, and the blue facing arrow is drawn over it:
// The projection, under the facing arrow: along the aim to the
// foot, then across to the target.
SDL_SetRenderDrawColor(renderer, AMBER.r, AMBER.g, AMBER.b, AMBER.a);
SDL_RenderLine(renderer, guard.x, guard.y, foot.x, foot.y);
SDL_RenderLine(renderer, foot.x, foot.y, best.x, best.y);
fillCircle(renderer, foot, 3);
drawArrow(renderer, guard, guard + facing * 190.0f, BLUE);
The first line runs along the aim, from the guard to the foot. The second drops from the foot to the target, at right angles to the aim. A small dot marks the foot.
Testing the Targets
Finally, each target is tested, counted, and drawn:
// Each target is in view when its direction's dot product with the
// facing reaches the threshold.
int inView = 0;
for (const Vec2& t : targets)
{
    bool visible = (t - guard).normalized().dot(facing) >= threshold;
    if (visible) inView++;
    SDL_Color c = visible ? GREEN : RED;
    SDL_SetRenderDrawColor(renderer, c.r, c.g, c.b, c.a);
    fillCircle(renderer, t, 8);
}
That one comparison is the whole field-of-view test. A target whose direction's dot product with the facing reaches the threshold is in view, and drawn green. Any other target is drawn red.
The readout puts the numbers on the screen:
std::string cone = "field of view " +
                   std::to_string((int)(halfAngleDeg * 2)) +
                   " deg: in view when dot >= cos " +
                   std::to_string((int)halfAngleDeg) + " deg = " +
                   fmt2(threshold);
std::string count = "targets in view: " + std::to_string(inView) +
                    " of " + std::to_string((int)targets.size());
std::string nearest = "nearest the aim: dot " + fmt2(bestDot) +
                      ", angle " + std::to_string(bestAngle) + " deg";
std::string parts = "its projection: " +
                    std::to_string(std::lround(ahead)) +
                    " px ahead, and " +
                    std::to_string(std::lround(std::abs(side))) +
                    " px " + (side >= 0.0f ? "right" : "left") +
                    " of the aim";
drawText(renderer, font, cone, 12, 10, TEXT);
drawText(renderer, font, count, 12, 30, inView > 0 ? GREEN : TEXT);
drawText(renderer, font, nearest, 12, 50, TEXT);
drawText(renderer, font, parts, 12, 70, AMBER);
drawText(renderer, font,
         "[mouse] aim   [Up/Down] widen or narrow   [Esc] quit",
         12, WINDOW_HEIGHT - 26, GREY);
In the preceding code, the first line shows the cone's width, its half-angle, and the threshold. The second counts the targets in view, and turns green when there are any. The third gives the nearest target's dot product and angle. The fourth, in amber to match its lines, gives the nearest target's two parts, and which side of the aim it's on. The std::lround function, from <cmath>, rounds each part to the nearest whole number. The last line is the controls, at the bottom of the window.
Trying It Out
Run the demo, and move the mouse to aim the guard. The next image shows the guard aiming up and to the right.
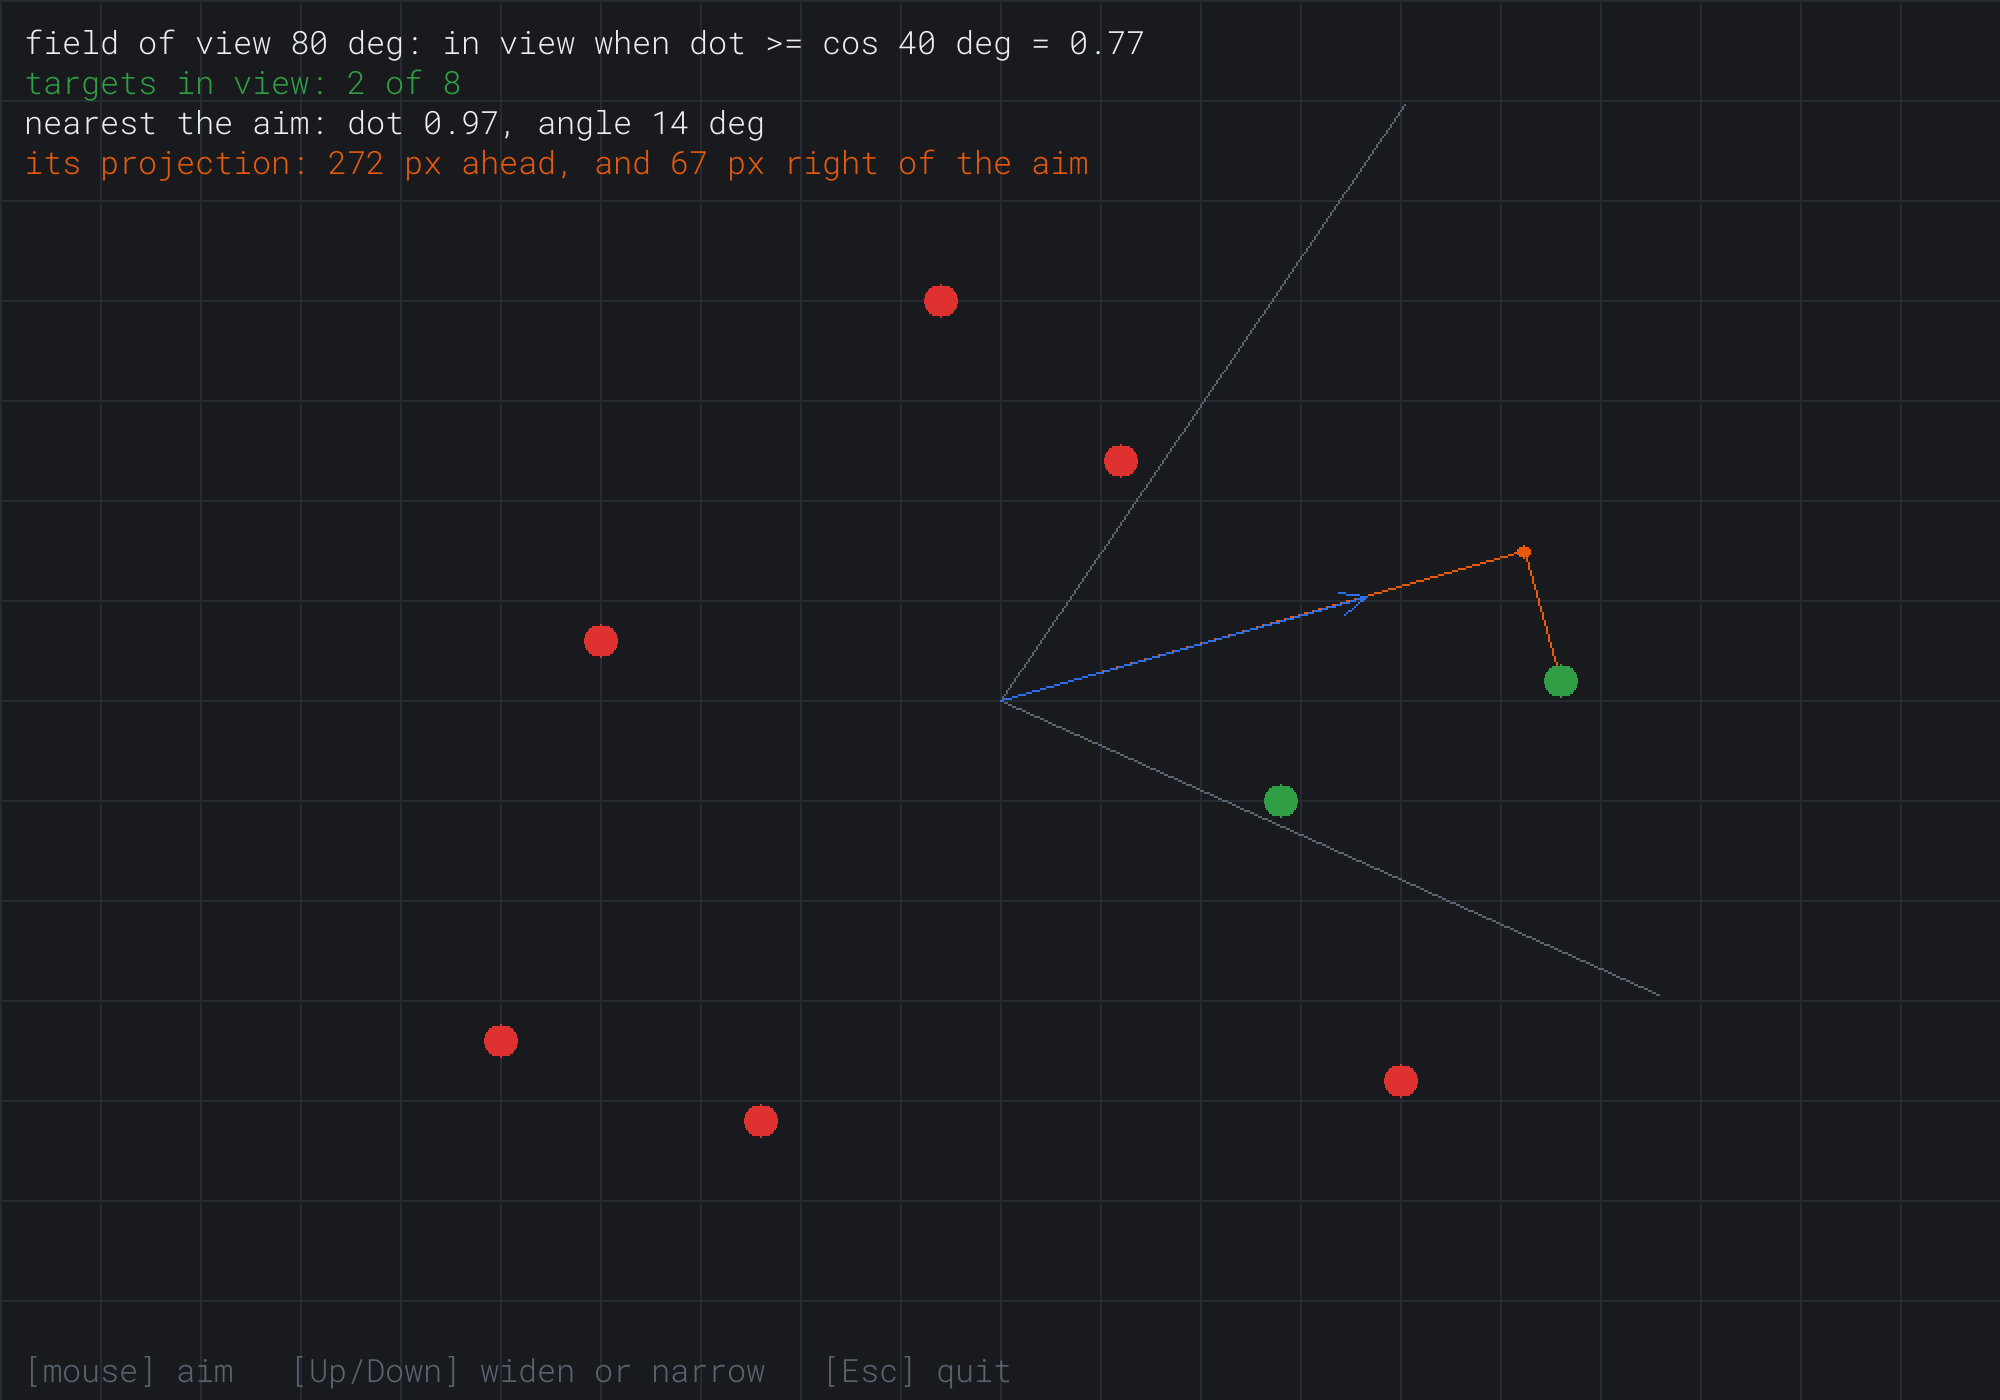
These are the numbers from the cone test. The cone is 80 degrees wide, so the threshold is cos 40°, or 0.77. The target nearest the aim is 14 degrees off it, with a dot product of 0.97, so it's green. The red target just outside the cone's upper edge is 47 degrees off the aim, with a dot product of 0.68. The amber lines split the nearest target into 272 pixels ahead of the guard, and 67 pixels to the right of the aim.
Some things to try:
- Aim so that a target sits on one of the grey edges. Its dot product hovers right at the threshold, and the smallest move of the mouse turns it green or red.
- Press Up until the cone is 180 degrees wide. The threshold falls to cos 90°, which is 0, and the cone test becomes the plain "in front" test. The readout says -0.00, since in floats, 90 degrees comes out a hair over a quarter turn. It changes nothing here, and it's the kind of rounding Chapter 5's tolerance is for.
- Watch the projection's side change from right to left as the aim sweeps past the nearest target. The nearest target changes as you sweep, too.
The projection's numbers are worth a moment. The two parts of the nearest target, 272 ahead and 67 across, are its position in the guard's own coordinates. Square them, add them, and take the square root, and you get 280. That's the target's distance from the guard, as Pythagoras promises.
The 2D Cross Product
The dot product can't tell left from right. A target 30 degrees to the left of the aim and one 30 degrees to the right have the same cosine, and the same dot product. But the part across the aim, the dot product with perp, did tell them apart: it was positive on one side, and negative on the other. That number is worth a name of its own.
Building It From perp
Write perp(a) out, and dot it with b:
perp(a) · b = (-ay, ax) · (bx, by) = -ay bx + ax by = ax by - ay bxThat's the 2D cross product of a and b, written a × b. It's the dot product of b with a turned a quarter turn, which measures how far b reaches across a's line. Add cross to Vec2, below perp:
// The 2D cross product (Chapter 4), which is perp().dot(r): positive
// when r points to the right of this vector, as the screen shows them.
float cross(const Vec2& r) const { return x * r.y - y * r.x; }
Two things about the cross product are useful: its sign, and its size. Both come straight from its being a dot product with perp.
Its Sign and Its Size
The sign says which side b is on. The vector perp(a) is a turned clockwise on the screen. So the dot product with it is positive when b leans clockwise from a, and negative when b leans counterclockwise. Picture yourself standing on the screen at a's tail, looking along it. A turn clockwise, as the screen shows it, is a turn to your right. So a positive cross product means b points to the right of a. A negative one means to the left, and zero means that b points along a's line, one way or the other.
That's the convention for the whole book: on the screen, with y down, a positive cross product means right. Math books, with y up, say that positive means left. They're not wrong. Their picture is mirrored, so their left is our right. The formula and its sign are identical. Only the picture flips.
The size is an area. The vector perp(a) has the same length as a. So a × b is the length of a times how far b reaches across a's line. Take a as the base of a parallelogram, with b as its slanting side. How far b reaches across is the parallelogram's height, and base times height is its area. Half of it is the area of the triangle that a and b make. (Chapter 5 will call that height |b| sin θ, so the cross product is |a| |b| sin θ, to set beside the dot product's cosine.)
A worked example puts numbers on both. Take a = (4, 0) and b = (1, 3). Then a × b = 4 × 3 - 0 × 1 = 12. On the screen, a points right, and b points right and down. That's clockwise from a, so the positive sign is right. And the parallelogram has a base of 4 along the x axis and a height of 3, for an area of 12.
Which Side of a Line
The cross product's most common job is deciding which side of a line a point is on. A line from A to B has the direction B - A. For any point P, the vector from the line's start to it is P - A. Their cross product gives the side:
side = (B - A) × (P - A)If side is positive, P is to the right of the line, looking from A toward B. If it's negative, P is to the left, and if it's zero, P is on the line. The direction matters: swap A and B, and every sign flips, since the right of one direction is the left of the other. The next image shows a line, with a point on each side.
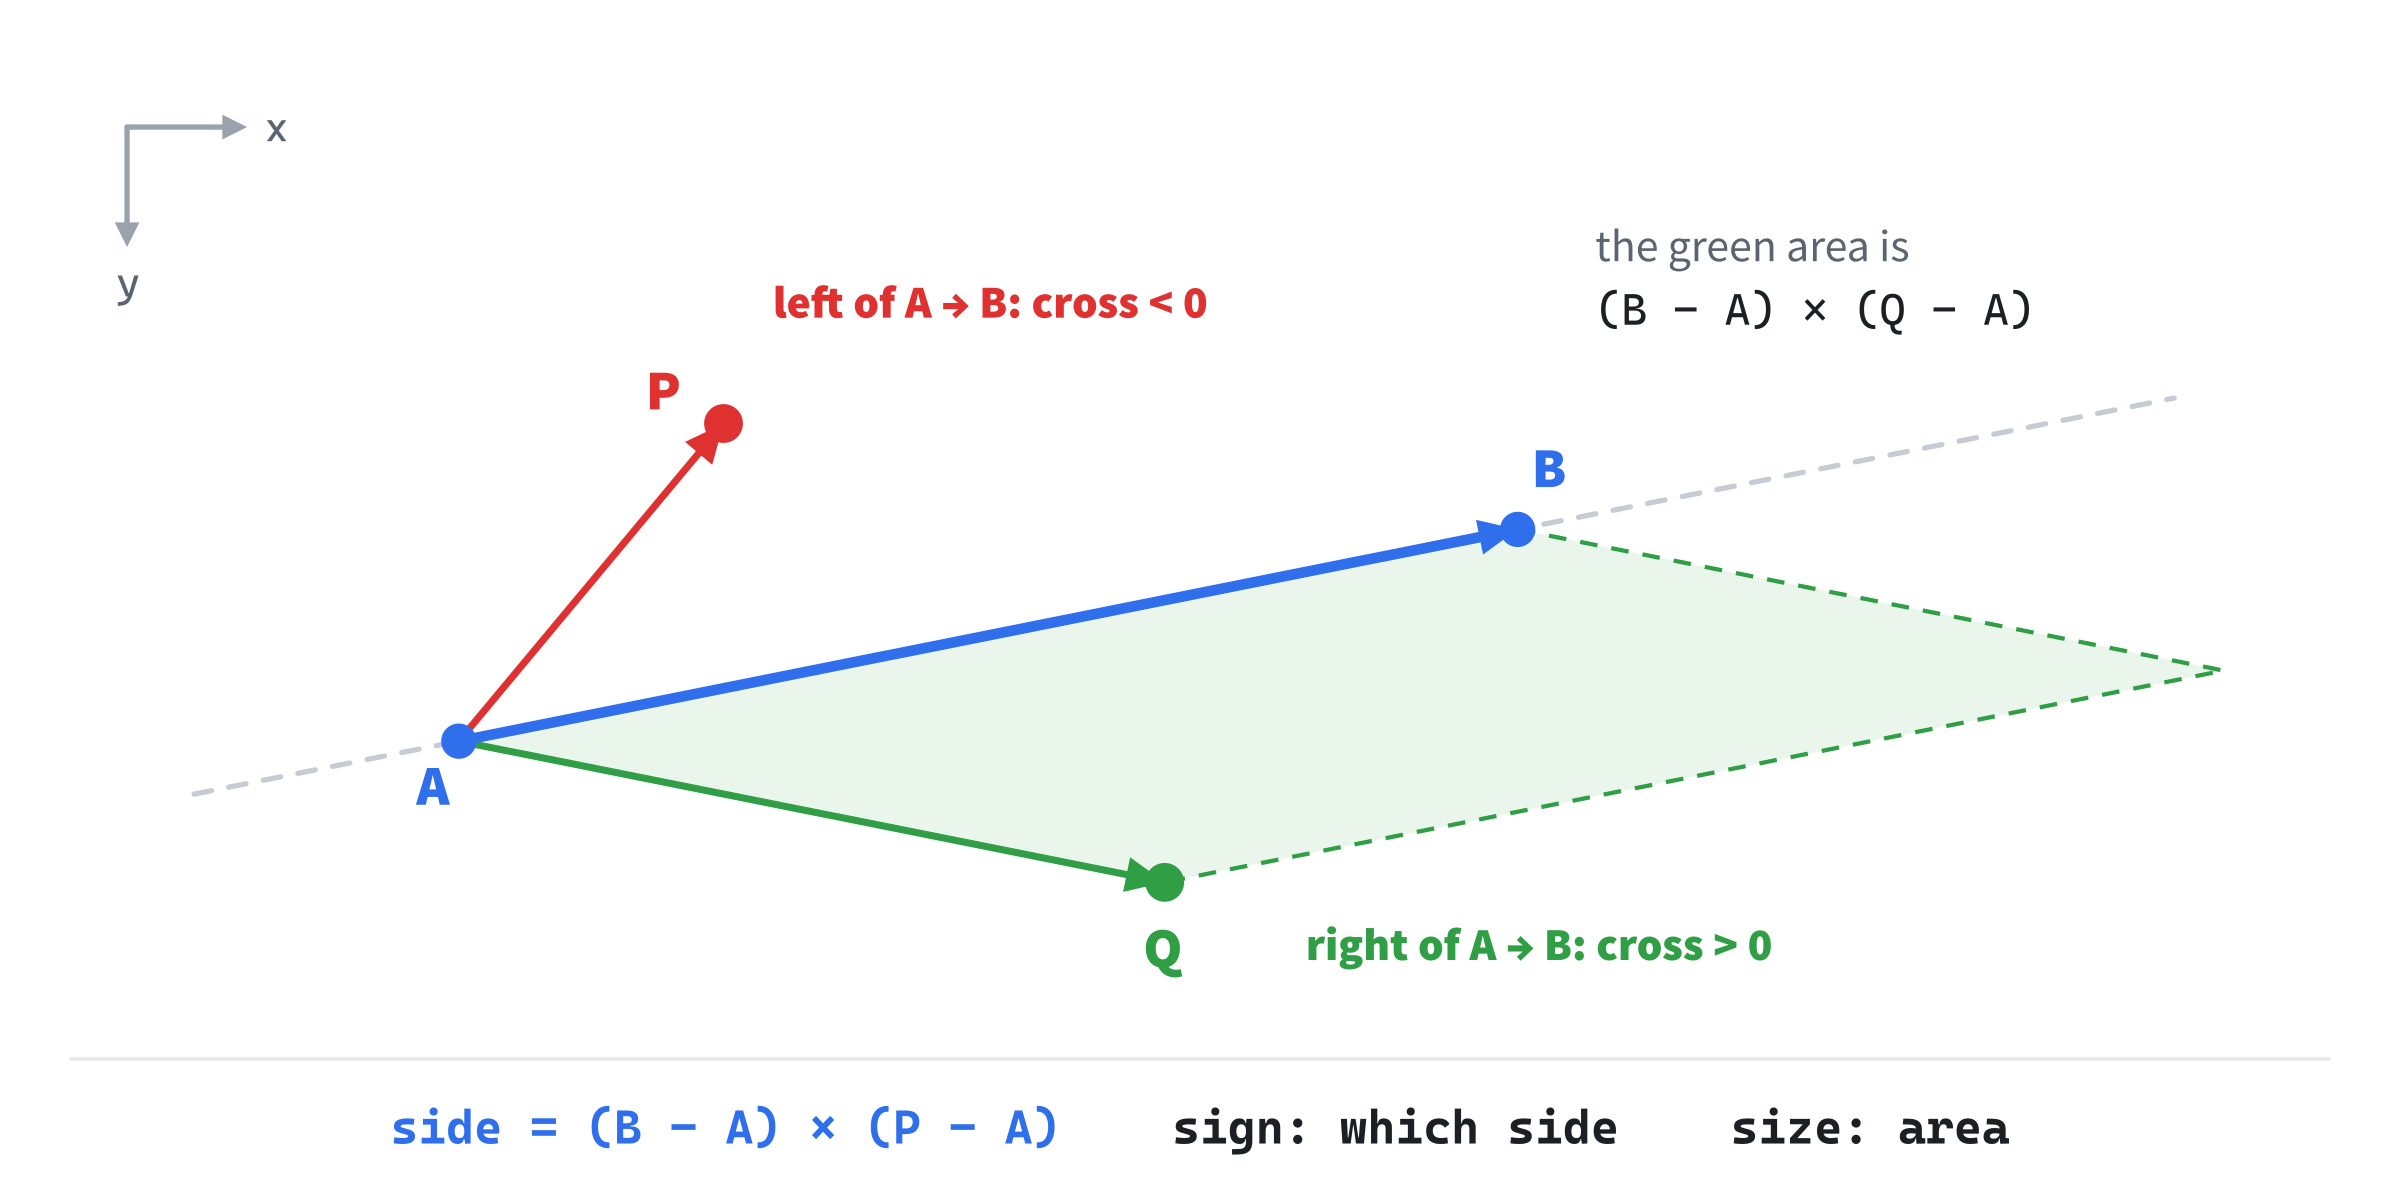
The size gives the point's distance from the line. The cross product is the parallelogram's area. Its base is the line's length, |B - A|. Its height is the point's distance from the line, so the distance is the area divided by the base:
distance = |side| / |B - A|So the cross product of two pixel vectors isn't in pixels. It's in pixels squared, an area, and it grows with the line's length. A point 3 pixels from a line 440 pixels long has a cross product of 1,320. To ask whether a point is within 3 pixels of the line, compare the cross product with 3 times the line's length.
This one test is a building block for much of the book. A convex shape is the space inside all of its edges, so testing a point against every edge tells you whether it's inside. Chapter 13 does exactly that.
Building Which Side
Which Side draws a line from A to B, with an arrow to show its direction, and twelve points around it. Each point is green when it's to the right of the line, red when it's to the left, and grey when it's within 3 pixels of the line. Drag either end with the mouse to swing the line, and the points change color as they change sides. The mouse is also a probe, P. The readout gives its cross product, its side, and its distance from the line. It also gives the area and the winding of the triangle A, B, P.
Get the code. The complete project is in the
Which Sidefolder of the book's repository.
Which Side starts from the skeleton, without its timing, as Field of View did. It includes the same headers, uses the same colors apart from amber, and reuses the same helpers. Its Vec2.h is Field of View's, with cross added.
The Line and the Points
A small helper picks a point's color from its cross product. It goes after drawArrow:
// A cross product's color: green right of the line, red left of it, and
// grey within the band that counts as on it.
SDL_Color sideColor(float cross, float band)
{
    if (cross > band) return GREEN;
    if (cross < -band) return RED;
    return GREY;
}
The band, the number of pixels squared that counts as "on the line", is passed in, since it depends on the line's length.
The state goes before the loop, as in Field of View:
// The line runs from A to B, and either end can be dragged.
Vec2 A = { 300.0f, 430.0f };
Vec2 B = { 720.0f, 300.0f };
int grabbed = -1;   // -1 for neither, 0 for A, 1 for B

std::vector<Vec2> points = {
    { 250, 200 }, { 420, 250 }, { 560, 180 }, { 700, 470 }, { 820, 250 },
    { 500, 480 }, { 350, 560 }, { 640, 560 }, { 480, 340 }, { 760, 380 },
    { 300, 300 }, { 600, 620 }
};
The points A and B are the line's ends. The grabbed variable says which end, if any, the mouse is dragging, and points are the dots to sort.
Dragging the Ends
Dragging takes two more cases in the event loop, after the skeleton's key case. A press of the left button near an end grabs it, and releasing the button lets go:
else if (event.type == SDL_EVENT_MOUSE_BUTTON_DOWN &&
         event.button.button == SDL_BUTTON_LEFT)
{
    // A press within 16 pixels of an end grabs it.
    Vec2 at = { event.button.x, event.button.y };
    if (distance(at, A) < 16.0f) grabbed = 0;
    else if (distance(at, B) < 16.0f) grabbed = 1;
}
else if (event.type == SDL_EVENT_MOUSE_BUTTON_UP)
{
    grabbed = -1;
}
The press's own position is in the event, as event.button.x and event.button.y. Chapter 3's distance says whether it's within 16 pixels of either end. Then, after the skeleton reads the mouse, a grabbed end follows it:
Vec2 mouse = { mx, my };
if (grabbed == 0) A = mouse;
if (grabbed == 1) B = mouse;
That's all a drag takes. Any demo that wants a handle to drag can use the same pattern.
Sorting the Points
The band comes next. It's 3 pixels, times the line's length, as Which Side of a Line worked out:
// A point is on the line when it's within 3 pixels of it. The cross
// product is the line's length times the distance, so the cross
// product at 3 pixels is the line's length times 3.
float lineLength = distance(A, B);
float onLine = lineLength * 3.0f;
The band is a choice about distance, not a guard against rounding. Anything within 3 pixels counts as on the line because that's close enough to see, and to hit with the mouse.
After the grid, each point is drawn in its side's color:
// Each point, colored by which side of the line it's on.
for (const Vec2& p : points)
{
    SDL_Color c = sideColor((B - A).cross(p - A), onLine);
    SDL_SetRenderDrawColor(renderer, c.r, c.g, c.b, c.a);
    fillCircle(renderer, p, 7);
}
The expression (B - A).cross(p - A) is the side test for each point, word for word as the formula wrote it.
The Probe
The mouse gets the same test. Its triangle with the line's ends is drawn in its side's color, with a dot and a letter at the mouse:
// The mouse is a probe, P: the triangle A, B, P, in its side's color.
float probe = (B - A).cross(mouse - A);
SDL_Color pc = sideColor(probe, onLine);
SDL_SetRenderDrawColor(renderer, pc.r, pc.g, pc.b, pc.a);
SDL_RenderLine(renderer, A.x, A.y, mouse.x, mouse.y);
SDL_RenderLine(renderer, B.x, B.y, mouse.x, mouse.y);
fillCircle(renderer, mouse, 3);
drawText(renderer, font, "P", mouse.x + 10, mouse.y - 8, pc);
The line itself is drawn over the triangle, with a dot and a letter at each end. Its arrow stops 9 pixels short of B, just outside the dot, which would otherwise cover the arrow's head:
// The line from A to B, and its ends, drawn on top. The arrow stops
// short of B, so that B's dot doesn't hide its head.
drawArrow(renderer, A, B - (B - A).normalized() * 9.0f, BLUE);
SDL_SetRenderDrawColor(renderer, BLUE.r, BLUE.g, BLUE.b, BLUE.a);
fillCircle(renderer, A, 7);
fillCircle(renderer, B, 7);
drawText(renderer, font, "A", A.x - 20, A.y - 8, BLUE);
drawText(renderer, font, "B", B.x + 10, B.y - 8, BLUE);
The readout turns the probe's cross product into everything this chapter says it holds:
// The probe's side, its distance from the line (the cross product
// over the line's length), and its triangle: half the cross product
// is the area, and the sign is the winding, clockwise on the
// screen when it's positive.
float away = (lineLength > 0.0f) ? std::abs(probe) / lineLength : 0.0f;
std::string side = (probe > onLine) ? "right of the line"
                 : (probe < -onLine) ? "left of the line"
                 : "on the line";
std::string winding = (probe > onLine) ? "clockwise"
                    : (probe < -onLine) ? "counterclockwise"
                    : "flat";
std::string probeText = "the mouse, P: cross " +
                        std::to_string(std::lround(probe)) +
                        ", so P is " + side + ", " +
                        std::to_string(std::lround(away)) +
                        " px from it";
long area = std::lround(std::abs(probe) / 2);
std::string triangle = "triangle A, B, P: area " +
                       std::to_string(area) + " square px, winding " +
                       winding;
drawText(renderer, font,
         "the line from A to B: for a point P, "
         "cross = (B - A) x (P - A)", 12, 10, TEXT);
drawText(renderer, font, probeText, 12, 30, pc);
drawText(renderer, font, triangle, 12, 50, TEXT);
drawText(renderer, font, "[drag] move A or B   [Esc] quit",
         12, WINDOW_HEIGHT - 26, GREY);
In the preceding code, away is the probe's distance from the line, the cross product over the line's length. The check that the length isn't zero stops a division by zero when both ends are dragged to the same spot. The area of the triangle A, B, P is half the cross product. Its winding, clockwise or counterclockwise, follows the sign, as the next section explains.
Trying It Out
Run the demo, and move the mouse below the line. The next image shows the probe at (560, 470), to the right of the line.
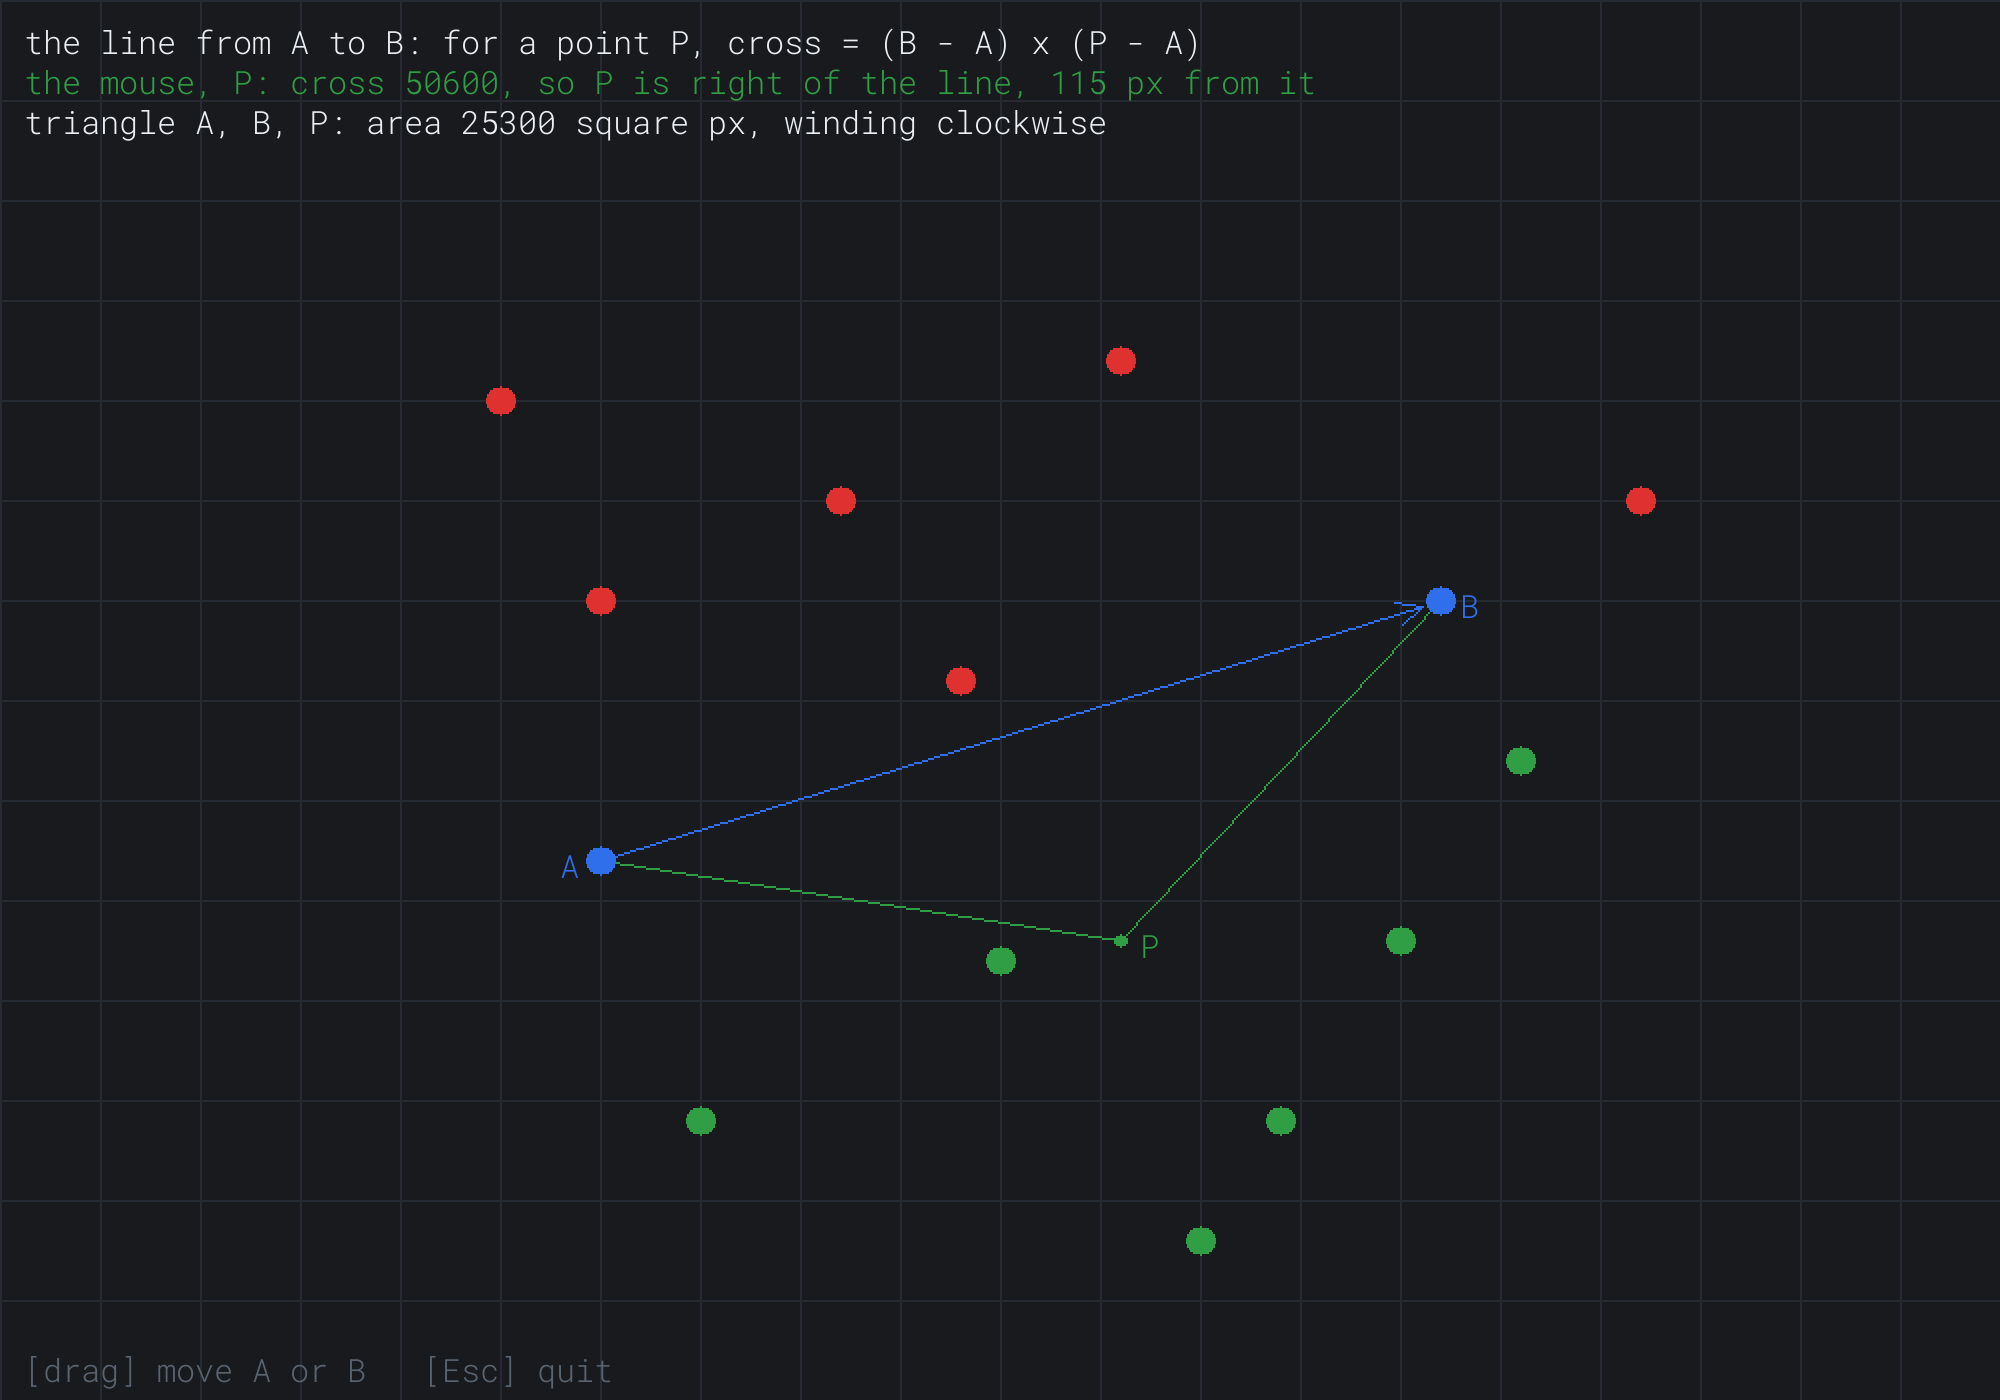
You can check every number in the readout by hand. The vector B - A is (420, -130), and P - A is (260, 40). Their cross product is 420 × 40 - (-130) × 260, which is 16,800 + 33,800, or 50,600. The line's length is 440 pixels, rounded, so the probe is 50,600 / 440, or 115 pixels, from the line. The triangle's area is half the cross product, 25,300 square pixels.
Some things to try:
- Drag
Bslowly aroundA, and watch the points change color as the line sweeps across them. - Drag
BontoA, and then dragAto whereBwas. Every color swaps, because the right of one direction is the left of the other. Where the two ends overlap, a press picks upA, which is whyBgoes first. - Move the probe onto the line, and watch its cross product fall toward zero. Within 3 pixels of the line, it turns grey.
Notice that the band is the same on the screen however long the line is: 3 pixels on each side of it. As a number, it changes. It's 3 times the line's length, in pixels squared: 1,320 for this line, and only 300 for a line 100 pixels long.
Winding
The readout's third line names a triangle's winding: the way it turns as you go around its corners in order. Go from A to B to P, and back to A. On the screen, that trip turns either clockwise or counterclockwise. The cross product (B - A) × (P - A) says which. When it's positive, P is to the right of the line from A to B, and the trip turns right at every corner, which is clockwise. When it's negative, the trip turns counterclockwise. The next image shows a triangle each way.
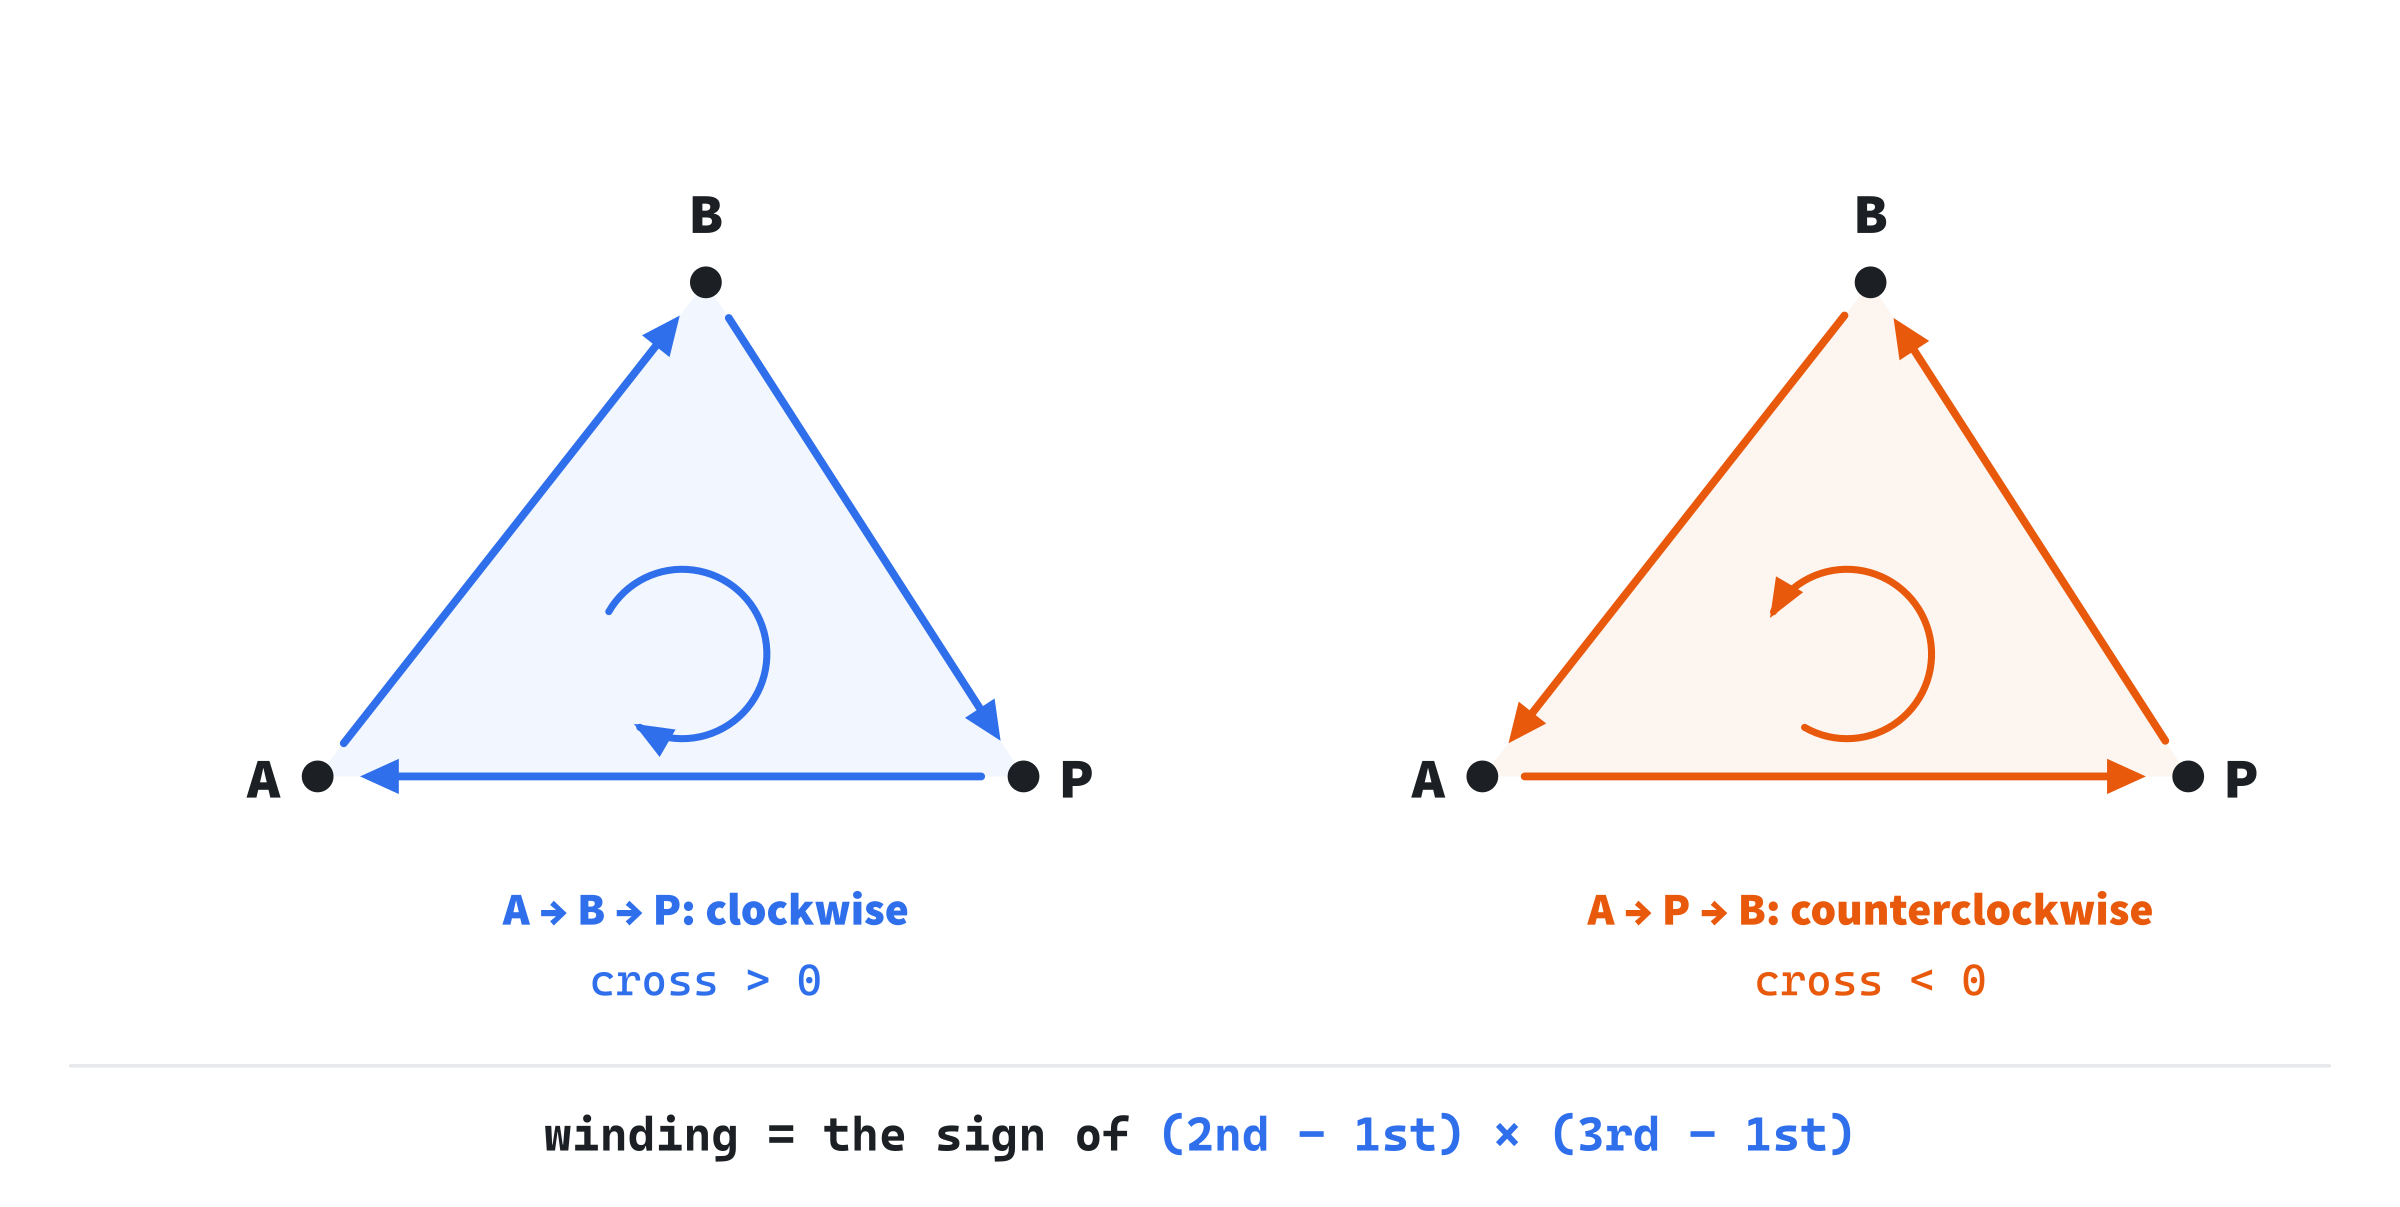
The winding belongs to the order of the corners, not to the triangle's shape. Going around the same triangle the other way, from A to P to B, reverses it.
A polygon with more corners has a winding too, and the cross product finds it. Add up the cross products of each corner with the next, going all the way around and back to the first. For any polygon whose edges don't cross each other, the total is twice its area, with a sign. It's positive when the corners go clockwise on the screen, and negative when they go counterclockwise. This sketch isn't in a demo. It works out the total for a list of corners, pts:
// A polygon's area, times 2, with a sign: positive when its corners go
// clockwise on the screen, and negative when they go counterclockwise
float twiceArea = 0.0f;
for (size_t i = 0; i < pts.size(); ++i)
    twiceArea += pts[i].cross(pts[(i + 1) % pts.size()]);
The % pts.size() wraps the last corner's "next" around to the first. Try it on a square with corners at (0, 0), (10, 0), (10, 10) and (0, 10), in that order. The four cross products are 0, 100, 100 and 0, for a total of 200. That's twice the square's area of 100. And it's positive, so the corners go clockwise on the screen. On the screen, they do: right along the top, down the right side, left along the bottom, and up.
Why should a game care which way a shape winds? Turn each edge of a shape a quarter turn with perp, and you get a direction straight across it. If the shape's corners go clockwise on the screen, the inside is always on the right, so every one of those directions points into the shape. If they go counterclockwise, every one points out. In Part 7, every triangle of a 3D model must wind the same way, so that the direction worked out from its corners points out of the model. Chapter 33 relies on that to skip the faces turned away from the camera. A shape with its corners in the wrong order can quietly turn inside out.
FAQ
Q) Does a positive cross product mean left or right?
A) On the screen, with y pointing down, a positive a × b means that b points to the right of a. In math books, with y pointing up, it means left. The formula is the same either way, and only the picture is mirrored. What matters is that the sign is consistent: a point that crosses the line always changes sign.
Q) Can a field of view be wider than 180 degrees?
A) Yes, and the cone test still works. A half-angle over 90 degrees has a negative cosine, so the threshold goes below zero. With a half-angle of 135 degrees, the threshold is about −0.71, and everything passes except a wedge 90 degrees wide, straight behind. Field of View stops at 90 only to keep its cone easy to draw.
Q) How do I make an enemy turn toward the player a little each frame?
A) Use both products. The sign of the cross product of the facing with the direction to the player says which way to turn: clockwise on the screen when it's positive. Turn the facing by a small angle that way each frame, and stop when the dot product is close to 1, when the enemy is aimed at the player. Chapter 6 shows how to turn a vector by an angle.
Q) How do I test whether a point is inside a triangle?
A) With three side tests. Take the triangle's edges in order: A to B, B to C, and C to A. For each one, find which side the point is on, with the cross product. The point is inside when all three signs agree: all positive, or all negative, depending on which way the triangle winds. Chapter 13 tests points in convex shapes this way, and Chapter 33 uses the same test to fill triangles, pixel by pixel.
Q) How can I tell whether two lines are parallel?
A) Their directions' cross product is zero. In words, neither direction reaches across the other's line at all. With floats, test whether the cross product is close to zero, rather than exactly zero, as Chapter 5 explains. Chapter 12 checks for exactly this before it works out where two lines cross, since parallel lines never do.
Q) Is there a cross product in 3D?
A) Yes, and it's even more useful there, though it gives a vector rather than a number. The 3D cross product of two vectors is a third vector at right angles to both, with a length equal to the area of their parallelogram. Lay two 3D vectors flat, with a z of zero, and their cross product points straight out of the screen, with a size of exactly our 2D cross product. Chapter 28 builds it.
Exercises
The first three exercises need only a pencil, and the worked examples in the chapter show the way. The others change the demos.
- The cone (paper). A guard stands at (0, 0) and faces
(0.6, 0.8). Its half-angle is 30 degrees, so the threshold is cos 30°, which is 0.87. Is a target at (2, 5) in view? What about one at (5, 1)? Normalize each direction first. - Two parts (paper). Split
b = (6, 2)into its part alongu = (0.8, 0.6)and its part across. Check that the two parts are at right angles, and that their lengths obey Pythagoras. Then findb · perp(u), and say which side ofuthe vectorbis on, as the screen shows it. - Which side (paper). For the line from
A = (0, 0)toB = (4, 2), which side isP = (1, 3)on, as the screen shows it? How far from the line is it? - An alert cone (code). Give Field of View a second, narrower cone, with half the half-angle, drawn in another color. Draw a target that's in the inner cone differently from one that's only in the outer one.
- The probe's foot (code). In Which Side, project
P - Aonto the line's direction, and draw a dot at the foot, the point on the line nearest the probe. Then draw a line from the foot to the probe. How long is it, compared with the readout's distance? - Dot or angle (conceptual). The cone test compares a dot product with a cosine, instead of comparing angles. Why is that cheaper? When would you still want the angle itself?
For the code exercises, work on a copy of the demo's folder, so that the original stays as the chapter describes it.
AI Exercise (Optional)
Field of View has one guard, standing still, and you aim it with the mouse. With an AI's help, you can turn it around: the guards patrol, and you're the one sneaking past. It's an experiment, so it doesn't matter if the guards walk through each other or spin in circles. It's a lot of fun when it works. Open your AI chatbot of choice, and try a prompt like this:
"I have a C++ demo using SDL3. A struct Vec2 has float x and y, the usual operators, length(), normalized(), dot(), perp() and cross(), where perp() turns a vector clockwise on the screen, since y points down, and a.cross(b) is positive when b points to the right of a. I have delta time, dt, each frame, and the mouse's position as Vec2 mouse. I'd like a stealth game in a 1000 by 700 window. There should be three guards, each walking back and forth between two points at 60 pixels a second, facing the way it walks. Each guard sees in a cone with a half-angle of 30 degrees, out to 250 pixels: in view when the direction to the player, normalized, has a dot product with the facing of at least cos(30 degrees), and the player is within range. The player is the mouse. Draw each guard's cone with two lines and an arc of short lines. When a guard sees the player, it should turn red, stop patrolling, and turn toward the player by at most 90 degrees a second, using the sign of the cross product to choose which way to turn."
That prompt hands the AI this chapter's tests, in its own words, so the game uses the dot product for sight and the cross product for turning. Spelling out the screen's y direction, and what a positive cross product means, heads off the commonest bug: guards that turn away from you. And the numbers, the speeds, the cone and the range, make it playable at once.
Then play, and read the code. The sight test should be exactly Field of View's, with a distance check added. Look for a check that the player isn't right on top of the guard before normalizing, or the dot product will be NaN, or zero, at the worst moment. If the guards turn the wrong way, the sign is flipped, which is this chapter's convention biting. Swap the two vectors in the cross product, and they'll come for you.
If it all works, there's plenty more to try. Ask for walls that block a guard's sight, which needs Chapter 12's rays. Ask for a guard that turns its head from side to side while it walks. Or ask for a crouch key that shortens how far the guards can see you.
Summary
The dot product multiplies two vectors' components and adds them, and the law of cosines showed that the result is their lengths times the cosine of the angle between them. Its sign tells in front from behind, and for unit vectors it's the cosine itself, which made a whole cone of vision one comparison. It also projects one vector onto another, splitting it into a part along and a part across. The 2D cross product is the dot product with a quarter turn: its sign says which side of a line a point is on, its size is an area that gives distances, and its sign around a shape gives the shape's winding. The Vec2 type now has the whole working vocabulary of a 2D vector. In Chapter 5, which opens Part 2, the angles we've leaned on stop being taken on trust: we'll meet the unit circle, and turn directions into angles and back again.