
In the last chapter, a point was two numbers: a place on the grid. That was true, but modest. This chapter promotes those two numbers to the most important object in the book, the vector. Almost everything we do from here on is vectors being added, scaled and compared: moving, aiming, colliding, bouncing, rotating, and projecting into 3D. Get comfortable with the vector, and the rest of the book is detail.
We'll build a small C++ type, Vec2, to hold a vector and give it the operations we need. Along the way, we'll meet operator overloading, which lets us write a + b for two vectors instead of a clumsy add(a, b). It's what makes vector math in code look like vector math on paper. By the end of the chapter, you'll have Vec2.h, the header every later demo includes, and a demo in which you drag two vectors and watch them add.
In this chapter, we will:
- Meet the vector, and its two everyday meanings: a position and a displacement
- Learn the rules for adding and subtracting positions and displacements, and find a midpoint
- Design the
Vec2struct that the whole book is built on - Learn operator overloading, so vector code reads like the math, and the rules it can't change
- Decide which operators are members and which are free functions
- Keep
Vec2correct withconst, and see why copying one is cheap - Build Vector Lab, in which you drag two vectors and watch them add and subtract
We'll start with what a vector is, before any code.
What a Vector Is
A vector is a quantity with a direction and a size. In two dimensions, we store it as an (x, y) pair, just like a point. But we use it in two different ways, and it's worth being clear about both from the start.
Sometimes a vector is a position: an arrow from the origin out to a place. The player is at (300, 200). Sometimes a vector is a displacement: an arrow that describes a movement, or an offset, from wherever it starts. Move the player by (5, 0) this frame. It's the same type, holding the same two numbers. The difference is only in what we mean by them. The next image shows one pair of numbers read both ways, on the screen, where y points down.

This double life is a feature, not a confusion. Because a position and a displacement are the same type, we can combine them freely. Where the player is, plus how far it moves, is where it ends up. That one idea, position = position + velocity * dt, drives nearly every moving thing in this book.
The Rules for Points and Vectors
Since positions and displacements share a type, nothing stops us from combining them in ways that make no sense. So it's worth knowing which combinations do. There are three rules:
- A position minus a position is a displacement. The vector
Q - Pis the arrow that takes you fromPtoQ. - A position plus a displacement is a position. Adding
Q - PtoPlands onQ. - A position plus a position means nothing. Adding two places, such as where the player is and where the door is, gives a third place that depends on where the origin happens to be. Move the origin, and the answer moves too.
There's one useful exception to the third rule: the midpoint. Halfway from P to Q is P plus half the displacement between them, P + (Q - P) / 2. Multiply that out, and it's (P + Q) / 2. The sum on its own means nothing, but halved, it's the point halfway between. The next image shows two points, the displacement from one to the other, and their midpoint.
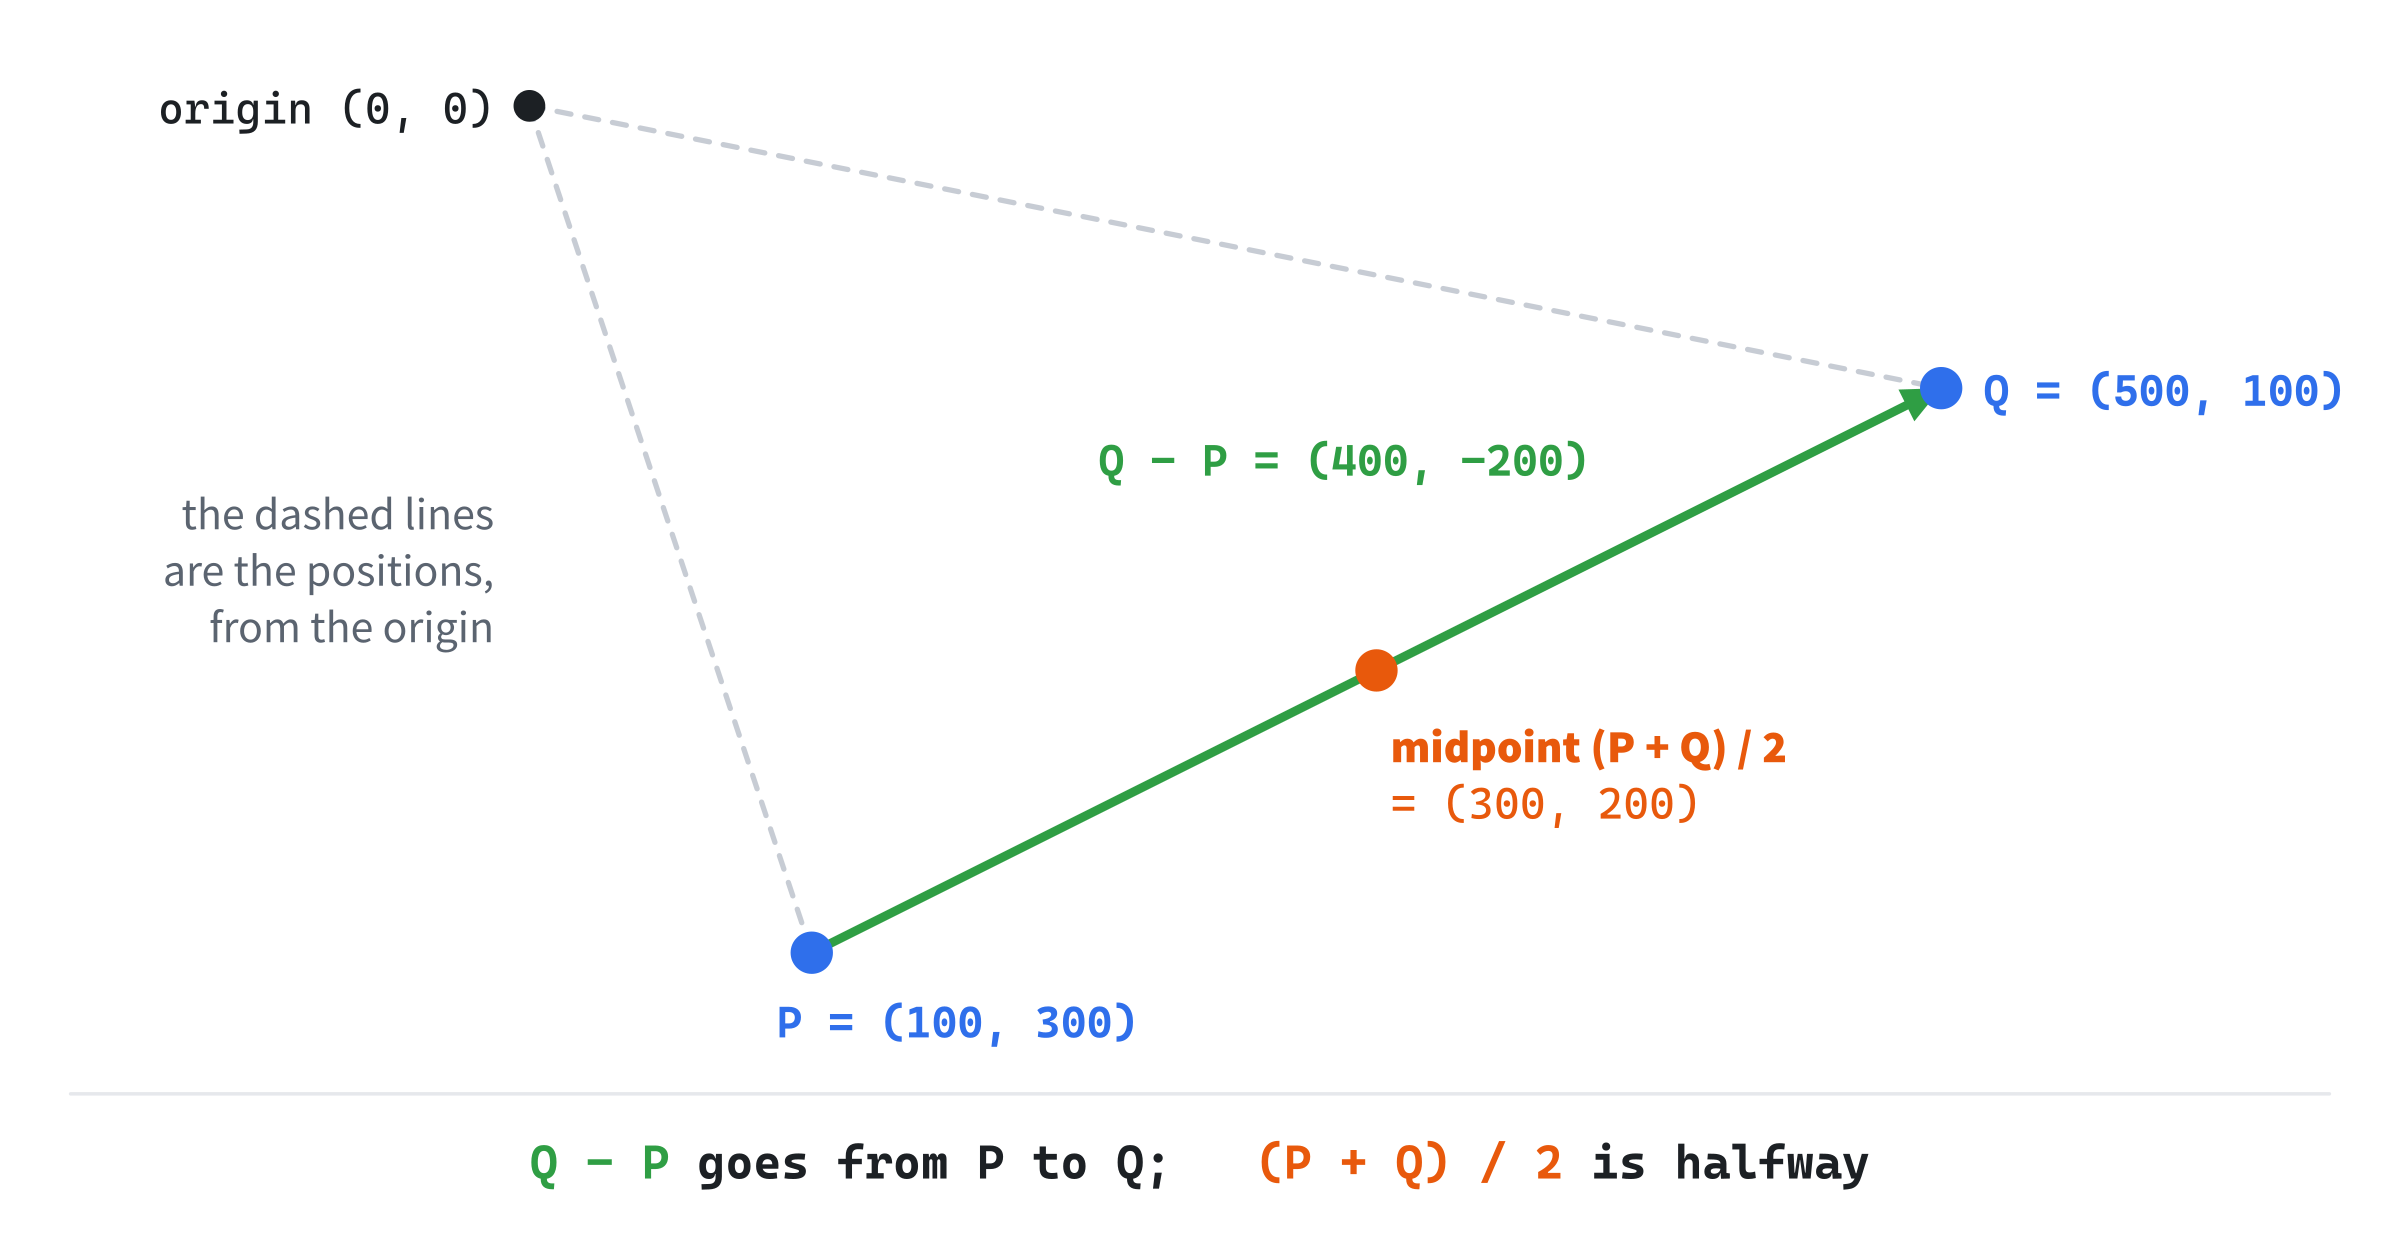
With P = (100, 300) and Q = (500, 100), the displacement Q - P is (400, -200): 400 to the right, and 200 up the screen. The midpoint is (600, 400) / 2, which is (300, 200). Keeping these rules in mind prevents a whole family of bugs, in which a position is added to a position and the answer looks almost right.
Designing Vec2
Here's the start of the type, in Vec2.h. It's a struct with two floats, and two constructors:
#pragma once

// Vec2: a two-dimensional vector, an (x, y) pair. It can stand for a
// position, a direction, a velocity or an offset: anything in the plane.
// The book grows it chapter by chapter, and each part names its chapter.
struct Vec2
{
    float x = 0.0f;
    float y = 0.0f;

    Vec2() = default;
    Vec2(float x, float y) : x(x), y(y) {}
The components x and y start at zero, so a plain Vec2 v; is the zero vector, rather than two pieces of garbage. The second constructor lets us write Vec2 v(3.0f, 4.0f), or, with braces, Vec2 v = { 3.0f, 4.0f }.
The first constructor, Vec2() = default, is needed because of the second. A class that declares any constructor of its own loses the default one that the compiler would otherwise make. Without that line, Vec2 v; wouldn't compile. Writing = default asks for the compiler's version back, and it does real work: it sets x and y to the zeros their declarations give them.
The type uses float rather than double. Games handle a great many vectors, float is half the size, and it's the standard currency of graphics. Its precision is plenty for a screen.
That's a perfectly good container for two numbers. What makes it a vector is what we can do with it, and that's where operator overloading comes in.
Operator Overloading
Suppose we want to add two vectors. Without any help, we'd write a function, as in this sketch:
Vec2 add(Vec2 a, Vec2 b) { return Vec2(a.x + b.x, a.y + b.y); }That works. But a line of real vector math would become a pile of nested calls, such as add(position, scale(velocity, dt)), which is hard to read and easy to get wrong. What we'd like to write is position + velocity * dt, just as we'd write it on paper.
C++ lets us do exactly that. Operator overloading gives an operator, such as +, a meaning for our own type. An operator is really a function with a symbol for a name, and we're allowed to define it. Here are the arithmetic operators, which go inside the struct, below the constructors:
// Arithmetic (Chapter 2): add, subtract, scale and negate.
Vec2 operator+(const Vec2& r) const { return { x + r.x, y + r.y }; }
Vec2 operator-(const Vec2& r) const { return { x - r.x, y - r.y }; }
Vec2 operator*(float s)       const { return { x * s,   y * s   }; }
Vec2 operator/(float s)       const { return { x / s,   y / s   }; }
Vec2 operator-()              const { return { -x, -y }; }
Take operator+ first. It's a member function, whose name is operator+. When the compiler sees a + b, and a is a Vec2, it calls a.operator+(b). So, inside the function, x and y are a's components, and r is b. It returns a new Vec2, made from the two pairs of components added together. The braces build the result from its two numbers, with the second constructor.
The others follow the same pattern. Subtraction subtracts the components. This operator* takes a float, not a Vec2, since multiplying a vector by a number scales it. The vector v * 2.0f is twice as long, pointing the same way. Division by a number shrinks it. The last one, operator- with no parameter, is unary minus: -v points the opposite way, with the same length.
What Adding Means
Adding two vectors adds their components. So with a = (3, 4) and b = (-1, 2):
a + b  =  (3 + (-1), 4 + 2)  =  (2, 6)
a - b  =  (3 - (-1), 4 - 2)  =  (4, 2)
2 * a  =  (2 * 3, 2 * 4)     =  (6, 8)
-b     =  (-(-1), -2)        =  (1, -2)
The picture behind the numbers is tip to tail. Put b's tail on a's head, and b's head lands on a + b. Put a's tail on b's head instead, and you reach the same point, since adding in either order gives the same sum. The two routes are the sides of a parallelogram, with a + b as its diagonal. Subtraction has a picture too. The vector a - b is the arrow from b's head to a's head, since that's the displacement that takes you from one to the other. The next image shows both, with the numbers above.
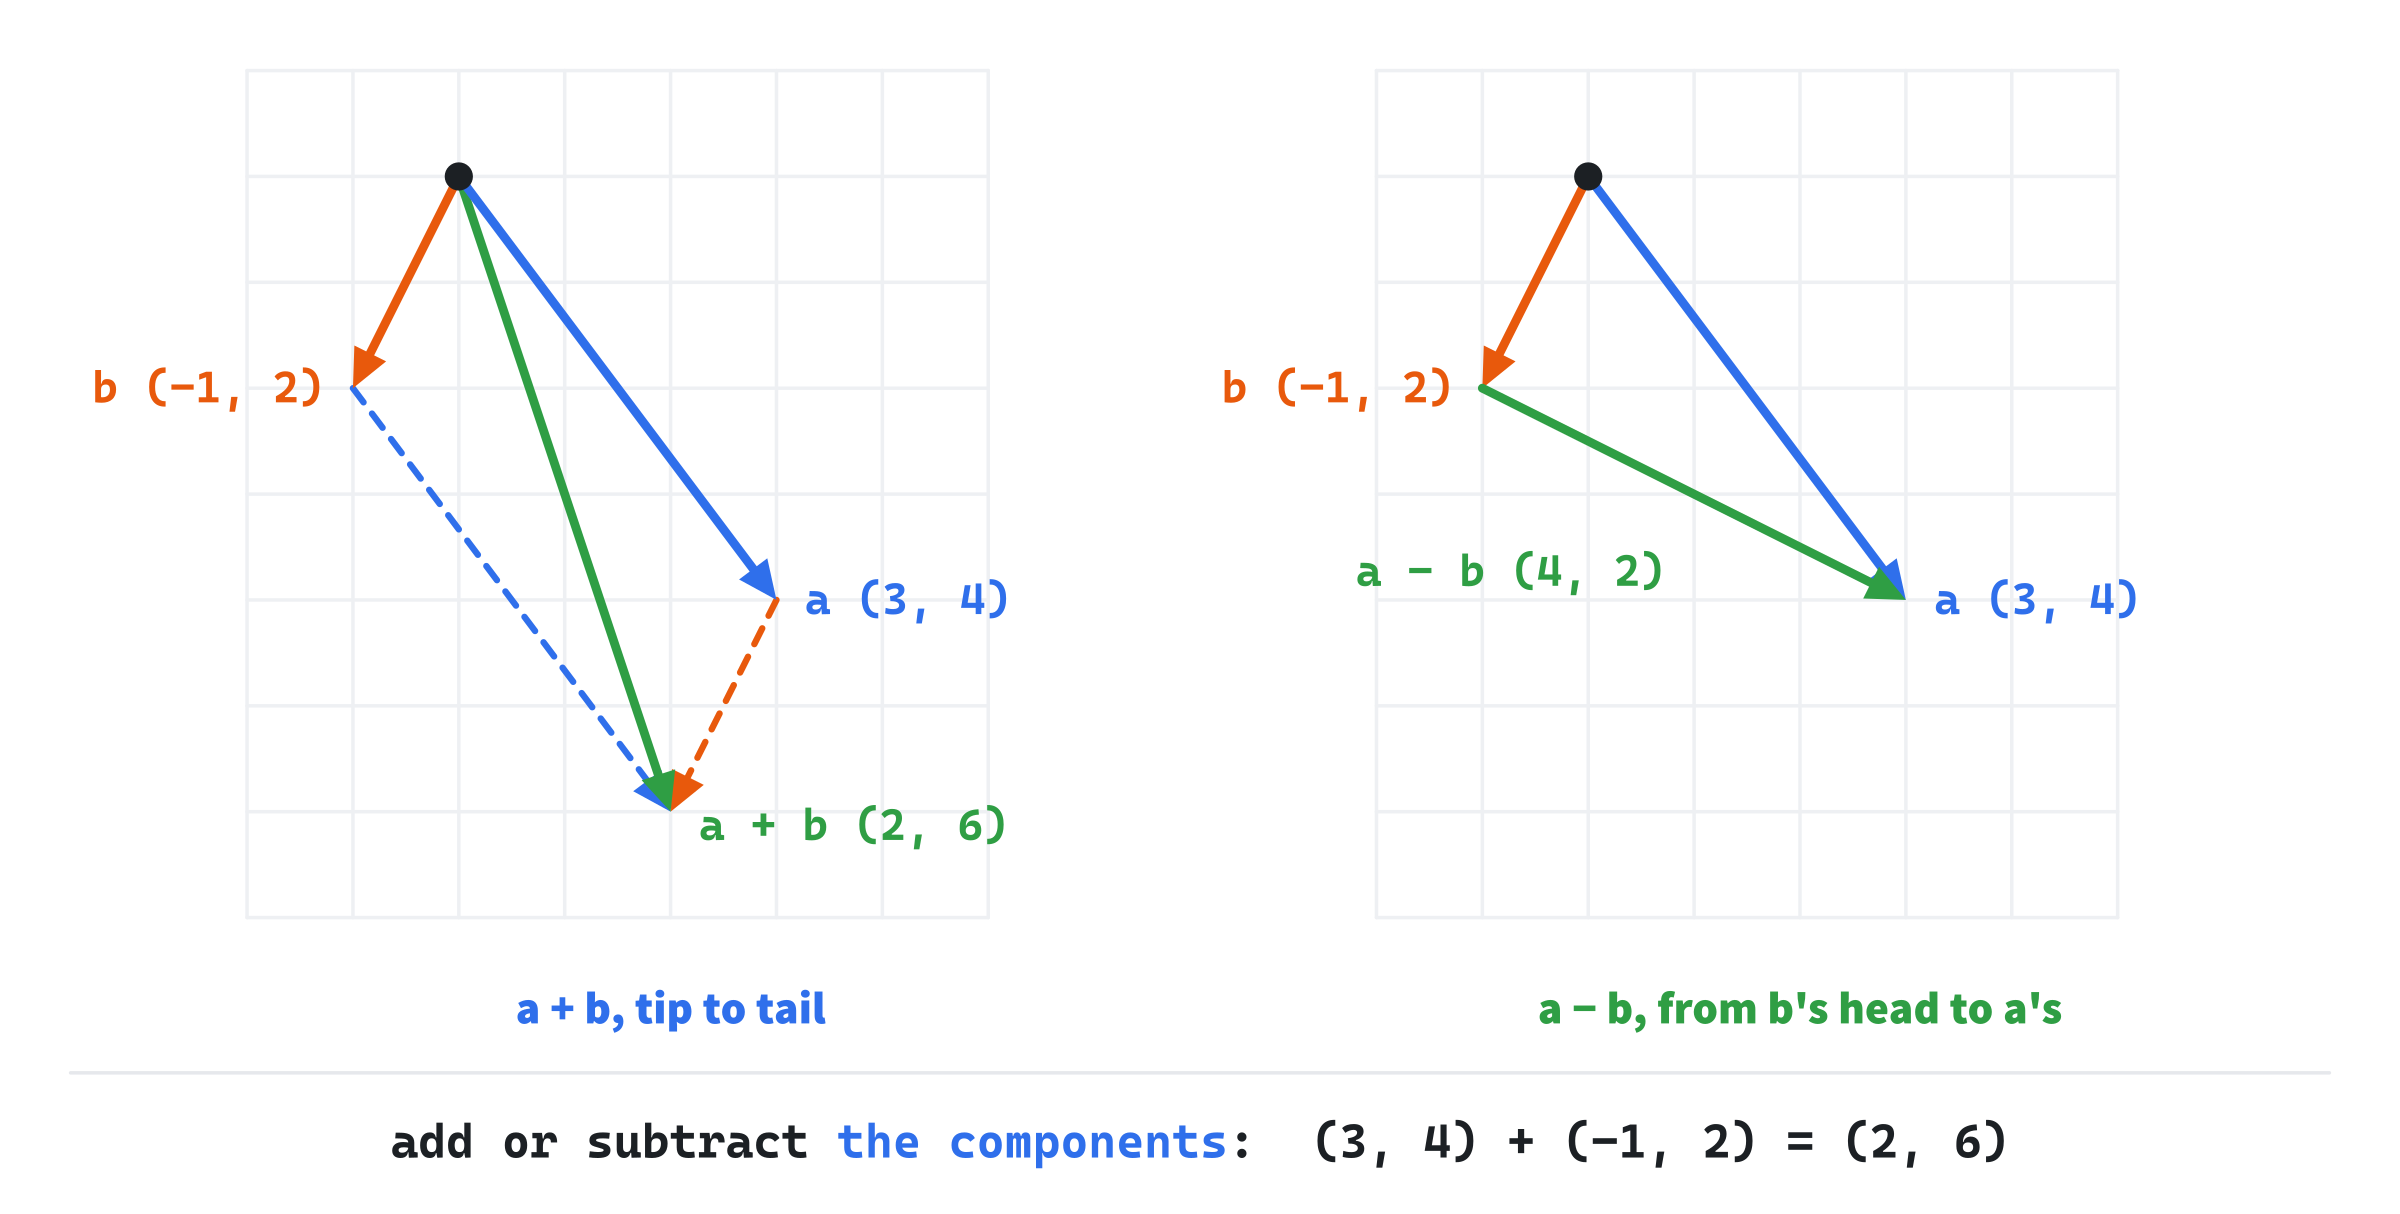
On the screen, where y points down, a = (3, 4) points right and down. Read the figure's grid in the same way: each square is one unit.
Changing a Vector in Place
We also want compound operators, so we can change a vector in place. They go below the arithmetic:
// The compound forms, so we can write pos += velocity * dt.
Vec2& operator+=(const Vec2& r) { x += r.x; y += r.y; return *this; }
Vec2& operator-=(const Vec2& r) { x -= r.x; y -= r.y; return *this; }
Vec2& operator*=(float s)       { x *= s;   y *= s;   return *this; }
These change the vector they're called on, so there's no const after their parentheses: changing x and y is the whole point. Each returns *this, the vector itself, by reference. That's how C++'s own += behaves on numbers, and it means a compound assignment can be used as a value, as in (a += b) += c, without a copy being made. It isn't what lets us write position += velocity * dt. That line would compile even if += returned nothing at all, since its result isn't used.
The Rules We Can't Change
Operator overloading gives an operator a new meaning, but not a new grammar. Three things stay exactly as C++ defines them.
The first is precedence: which operator is done first. Multiplication binds more tightly than addition, for vectors just as for numbers. So position + velocity * dt scales the velocity first, and then adds it, which is just what we want.
The second is how many operands each operator takes: * always takes two, and unary - always takes one.
The third is that we can only overload operators that C++ already has. We can't invent a new symbol. Chapter 4 adds the dot product and the cross product. C++ has no symbol for either, so they'll be named functions, dot and cross.
And there's a rule of taste: only overload an operator when its meaning is obvious. Everyone agrees what adding two vectors means, so + is fair game. Nobody agrees what % would mean for two vectors, so we don't touch it. An operator that surprises the reader is worse than a plainly named function.
Member or Free Function?
Our operator* lets us write v * 2.0f, with the vector on the left. But people write 2.0f * v too, and someone will try it. As written, it fails. The compiler looks for a way to call 2.0f.operator*(v), and a float has no member functions at all.
The fix is a free function, outside the struct. It goes at the end of the header, after the struct's closing brace:
};

// A number on the left, so that 2.0f * v works as well as v * 2.0f.
inline Vec2 operator*(float s, const Vec2& v) { return { v.x * s, v.y * s }; }
This operator* takes the float first and the Vec2 second, so it matches 2.0f * v. It lives outside the struct because its left-hand operand isn't a Vec2, so there's no object to call a member on. The rule of thumb: if the left-hand side is your type, a member is natural. If it's some other type, you need a free function.
The inline matters, too. In bigger programs, more than one .cpp file includes Vec2.h, and each one gets its own copy of this function. Normally, the linker refuses two definitions of the same function. The word inline tells it that the copies are identical, and that it may keep one. Member functions defined inside the struct are inline automatically, which is why the operators above don't need the word.
Keeping It Correct
Two smaller design choices are worth a moment, since you'll see them on every page.
The first is const, which appears in two places with two meanings. A const after a member function's parentheses, as in operator+, promises that the function doesn't change the vector it's called on. Without it, you couldn't add two const vectors, such as Vector Lab's origin. A const on a parameter, as in const Vec2& r, promises that the function doesn't change its argument. Arithmetic makes a new vector, and leaves both of its inputs alone.
The second is how a Vec2 is passed. The operators take const Vec2&, a reference that can't change what it refers to, which is the usual way to pass a class to a function. The helpers in the demos take a Vec2 by value, as a copy. Both are fine. A Vec2 is two floats, 8 bytes in all, which is as cheap to copy as a reference is to pass. The book uses references in Vec2.h, as most vector libraries do, and copies in the helpers, where they read more simply.
Comparing Vectors
Last, Vec2 gets an equality operator, which goes at the end of the struct, just before its closing brace:
// Exact equality: the same two numbers. Floats that come from
// arithmetic need a tolerance instead (Chapter 5).
bool operator==(const Vec2& r) const { return x == r.x && y == r.y; }
Two vectors are equal when both of their components are equal. There's a trap here, though, worth flagging now and facing properly later. Comparing floats with == is unreliable for numbers that came from arithmetic, because tiny rounding errors can leave two values that should be equal differing in their last digit. A vector you'd swear is (1, 0) might be stored as (0.99999994, 0) after a rotation or two, and == would say it's different. For "is this the same pair of numbers I stored a moment ago?", the exact test is fine. For "are these two computed vectors effectively the same?", we'll need a test that allows a whisker of difference, which Chapter 5 builds.
There's no operator!=, and there doesn't need to be. In C++20, when the compiler meets a != b and finds no operator!=, it rewrites the expression as !(a == b).
That completes the Vec2 for this chapter. It's in Vec2.h, which every later demo includes, and the chapters that follow add to it, each in its own commented part.
Building Vector Lab
Numbers on a page only go so far. Vector Lab lets you drag two vectors around and watch them add in real time: a in blue, b in amber, and their sum in green. Hold the left mouse button to set a, and the right button to set b. Each is the arrow from the middle of the window to the mouse. Space switches between showing a + b and a - b.
Get the code. The complete project is in the
Vector Labfolder of the book's repository.
Vector Lab starts from the skeleton, without its timing, since nothing moves by itself. It adds <cmath>, for std::sqrt, Vec2.h, and three more colors:
#include <cmath>
#include <string>
#include "Vec2.h"

constexpr int WINDOW_WIDTH  = 1000;
constexpr int WINDOW_HEIGHT = 700;

constexpr SDL_Color TEXT = { 235, 238, 242, 255 };
constexpr SDL_Color GREY = { 90, 100, 112, 255 };
constexpr SDL_Color BLUE = { 47, 111, 235, 255 };
constexpr SDL_Color AMBER = { 232, 89, 12, 255 };
constexpr SDL_Color GREEN = { 47, 158, 68, 255 };
It reuses drawGrid from Chapter 1, and adds three helpers of its own, which go after drawText.
Arrows and Dashes
A vector is a direction, and a line with no arrowhead is just a line. So the first helper draws an arrow from one point to another. Every later demo that draws a vector uses it:
// Draw an arrow from one point to another: a line, and a head of two short
// strokes back from the tip. The head needs the arrow's direction, and a
// quarter turn of it, which Chapters 3 and 4 explain.
void drawArrow(SDL_Renderer* renderer, Vec2 from, Vec2 to, SDL_Color color)
{
    SDL_SetRenderDrawColor(renderer, color.r, color.g, color.b, color.a);
    SDL_RenderLine(renderer, from.x, from.y, to.x, to.y);

    Vec2 d = to - from;
    float len = std::sqrt(d.x * d.x + d.y * d.y);
    if (len < 1.0f) return;
    Vec2 dir = d / len;
    Vec2 side = { -dir.y, dir.x };
    Vec2 wing1 = to - dir * 13.0f + side * 6.0f;
    Vec2 wing2 = to - dir * 13.0f - side * 6.0f;
    SDL_RenderLine(renderer, to.x, to.y, wing1.x, wing1.y);
    SDL_RenderLine(renderer, to.x, to.y, wing2.x, wing2.y);
}
The first SDL_RenderLine draws the arrow's shaft. Everything after it builds the two short strokes of its head. The vector d runs along the arrow, from its tail to its tip, and len is its length, by Pythagoras: the square root of the sum of the squared components. An arrow under a pixel long gets no head. Dividing d by its length gives dir, a vector one pixel long pointing along the arrow. Then side is that direction turned a quarter turn, made by swapping its components and negating one. Each wing of the head is 13 pixels back from the tip, and 6 pixels to one side. If the length and the quarter turn feel like sleight of hand, they're the subjects of the next two chapters. Here they're just what draws a tidy arrow.
The second helper draws a dashed line, for the guides that complete the parallelogram:
// A dashed line from one point to another: 6-pixel dashes, 12 apart.
void drawDashed(SDL_Renderer* renderer, Vec2 from, Vec2 to, SDL_Color color)
{
    SDL_SetRenderDrawColor(renderer, color.r, color.g, color.b, color.a);
    Vec2 d = to - from;
    float len = std::sqrt(d.x * d.x + d.y * d.y);
    if (len < 1.0f) return;
    Vec2 dir = d / len;
    for (float t = 0.0f; t < len; t += 12.0f)
    {
        Vec2 start = from + dir * t;
        Vec2 end = from + dir * SDL_min(t + 6.0f, len);
        SDL_RenderLine(renderer, start.x, start.y, end.x, end.y);
    }
}
Here, dir is the direction along the line again, one pixel long. The loop walks from the start to the end in strides of 12 pixels, and draws a 6-pixel dash at each stride. SDL's minimum, SDL_min, stops the last dash from running past the end. A dashed line reads as a guide, rather than a real vector, which is the distinction the picture wants.
The third helper builds a vector's label for the readout:
// A vector as text, such as "a = (180, -110)".
std::string vecLabel(const std::string& name, Vec2 v)
{
    return name + " = (" + std::to_string((int)v.x) + ", " +
           std::to_string((int)v.y) + ")";
}
It casts each component to an int, so the label reads (180, -110) rather than trailing decimals.
The State
The demo's state goes before the loop:
// The vectors start at the origin, O, in the middle of the window.
const Vec2 origin = { WINDOW_WIDTH / 2.0f, WINDOW_HEIGHT / 2.0f };
Vec2 a = { 180.0f, -110.0f };
Vec2 b = { 90.0f, 130.0f };
bool showSum = true;
The origin is the middle of the window, where every arrow starts, so there's room to drag in every direction. It's const, since it never changes, which is why operator+ must be a const member to add to it. The vectors a and b start with values of their own. Remember that a negative y points up the screen, so a starts pointing up and to the right. And showSum starts true, so the demo opens showing the sum.
Dragging
In the event loop, Space joins the skeleton's Escape, and switches between the sum and the difference:
else if (event.key.key == SDLK_SPACE) showSum = !showSum;The expression !showSum is the opposite of showSum, so each press flips it. Then the demo reads the mouse, and keeps the buttons that SDL_GetMouseState returns:
SDL_MouseButtonFlags buttons = SDL_GetMouseState(&mx, &my);

// A held left button sets a, and the right button sets b: each is
// the vector from O to the mouse, the mouse's position minus O's.
Vec2 mouse = { mx, my };
if (buttons & SDL_BUTTON_LMASK) a = mouse - origin;
if (buttons & SDL_BUTTON_RMASK) b = mouse - origin;
Vec2 result = showSum ? a + b : a - b;
The buttons value holds a flag for each mouse button that's held down. The left button's flag is SDL_BUTTON_LMASK, and & tests whether it's set. While it is, a follows the mouse. The key line is a = mouse - origin. That's operator-, giving the displacement from the origin to the mouse: a position minus a position, as the first rule says. The right button sets b the same way. Then result is the sum or the difference, with the operators we built. There's no add or subtract anywhere. The code reads like the math.
Drawing
After the grid, two lines through the origin serve as axes:
// The axes through O.
SDL_SetRenderDrawColor(renderer, 70, 78, 90, 255);
SDL_RenderLine(renderer, 0, origin.y, WINDOW_WIDTH, origin.y);
SDL_RenderLine(renderer, origin.x, 0, origin.x, WINDOW_HEIGHT);
Next come the guides and the arrows. This is where the parallelogram appears:
if (showSum)
{
    // b placed at a's head, and a at b's head: the parallelogram's
    // dashed sides, which meet at a + b.
    drawDashed(renderer, origin + a, origin + a + b, AMBER);
    drawDashed(renderer, origin + b, origin + b + a, BLUE);
}
else
{
    // a - b runs from b's head to a's head.
    drawDashed(renderer, origin + b, origin + a, GREEN);
}

drawArrow(renderer, origin, origin + result, GREEN);
drawArrow(renderer, origin, origin + a, BLUE);
drawArrow(renderer, origin, origin + b, AMBER);
The arrows are drawn from the origin, so their heads are at the origin plus each vector: origin + a is where a's head is on the screen. In the sum, a dashed b runs from a's head to origin + a + b, and a dashed a runs from b's head to the same point. Those are the parallelogram's two other sides. In the difference, one dashed line runs from b's head to a's head, which is exactly a - b. Then the three arrows are drawn, the result first, so a and b sit on top of it.
Last, each arrow gets its name beside its head, and the readout gives the numbers:
// Each arrow's name, beside its head.
Vec2 nameA = origin + a + Vec2{ 6, -8 };
Vec2 nameB = origin + b + Vec2{ 6, -8 };
Vec2 nameR = origin + result + Vec2{ 6, -8 };
drawText(renderer, font, "a", nameA.x, nameA.y, BLUE);
drawText(renderer, font, "b", nameB.x, nameB.y, AMBER);
drawText(renderer, font, showSum ? "a+b" : "a-b", nameR.x, nameR.y,
         GREEN);

drawText(renderer, font, vecLabel("a", a), 12, 10, TEXT);
drawText(renderer, font, vecLabel("b", b), 12, 30, TEXT);
std::string name = showSum ? "a + b" : "a - b";
drawText(renderer, font, vecLabel(name, result), 12, 50, GREEN);
drawText(renderer, font,
         "[left drag] a   [right drag] b   [Space] a + b or a - b"
         "   [Esc] quit", 12, WINDOW_HEIGHT - 26, GREY);
Each name goes 6 pixels right of its arrow's head and 8 pixels up, so the letters don't touch the lines. The readout uses vecLabel to show a, b and the result, and they change the moment you drag.
Trying It Out
Run the demo, and drag with each button. The next image shows a set to (150, 200), and b to (-50, 100).
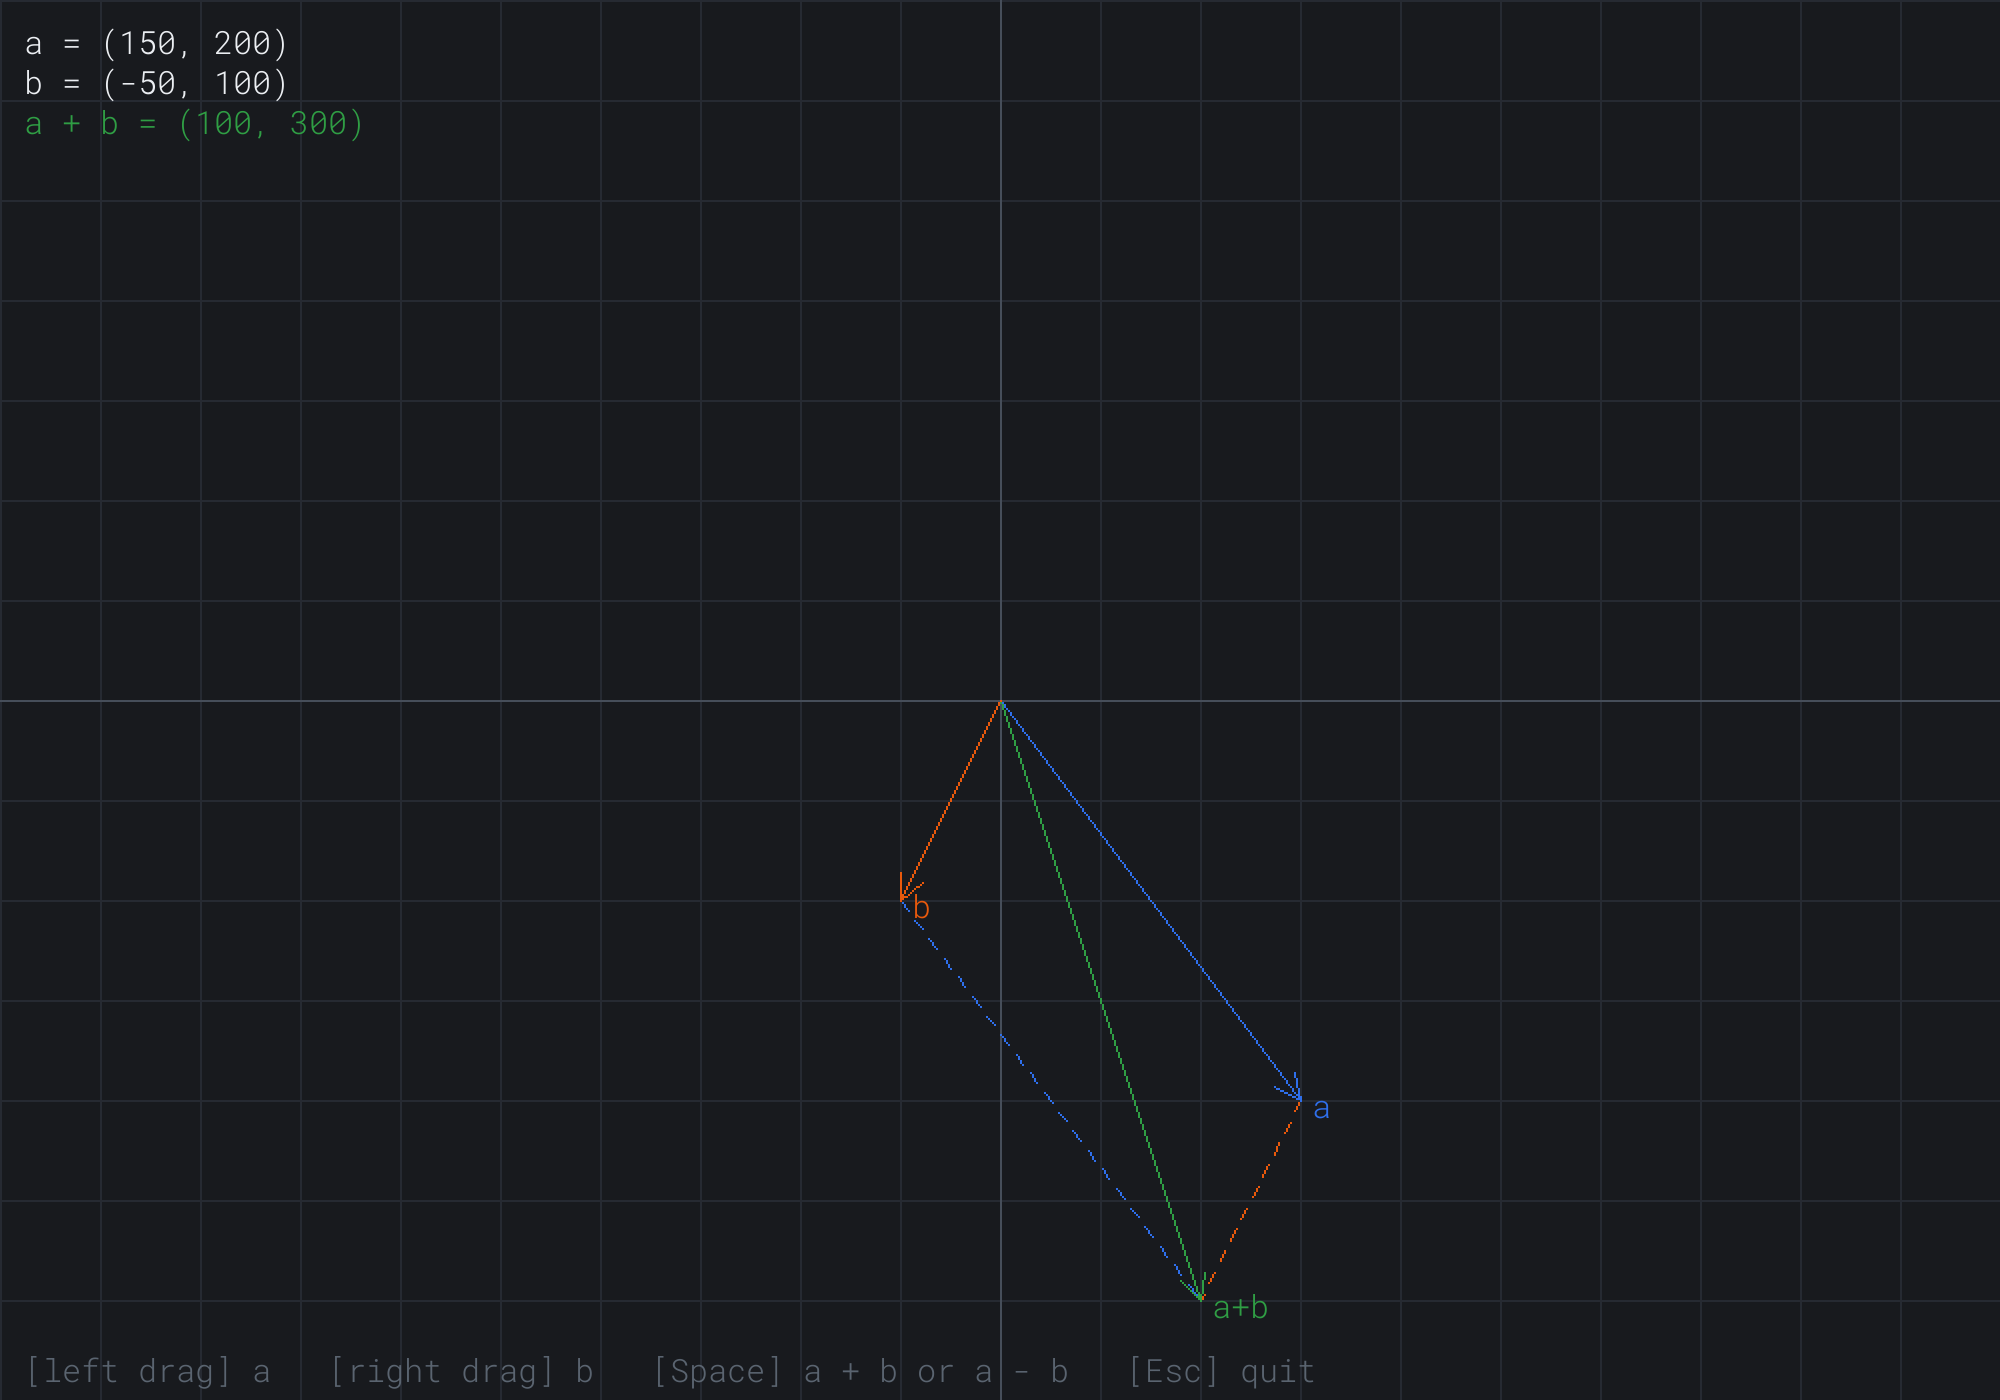
Those two vectors are the worked example's (3, 4) and (-1, 2), each 50 times longer. Their sum, (100, 300), is 50 times (2, 6). Press Space, and the difference reads (200, 100), which is 50 times (4, 2). Scaling both vectors scales their sum and difference by the same amount.
Some things to try:
- Drag
aandbso they point the same way. The parallelogram collapses to a line, anda + bis the two laid end to end. - Drag them to point in opposite directions. Now
a + bis short, as the two cancel out. - In the difference, set
aandbto the same spot. The difference shrinks to nothing, since a vector minus itself is zero.
In the difference, notice that the green a - b arrow from the origin is the same length and direction as the dashed line from b's head to a's head. A displacement doesn't care where it starts.
FAQ
Q) Why is this called a vector, when std::vector is a list?
A) The two names clash by an accident of history. A std::vector is a list of values that can grow, and it has nothing to do with direction or size. Our Vec2 is the geometric kind, an arrow. Game libraries keep the two apart by naming the geometric kind vec2, Vector2 or FVector2D, never plain vector.
Q) Why is Vec2 a struct, not a class?
A) In C++, the only difference is that a struct's members are public unless it says otherwise, and a class's are private. A vector's x and y are meant to be read and written directly, with nothing to protect, so struct says what we mean in fewer words.
Q) Wouldn't separate types for points and vectors be safer?
A) They can be. Some libraries make adding two points a compile error. It's tidy, but every conversion between the two becomes a chore, and game code converts constantly. One type is simpler, as long as you keep the rules for points and vectors in mind.
Q) Could Vec2 hold doubles, or ints, instead?
A) Yes, as a template: template <typename T> struct Vec2T, with using Vec2 = Vec2T<float>; for the usual one. A vector of ints is handy for the cells of a grid, which Chapters 22 and 23 number in whole columns and rows. The cost is error messages that are much harder to read, and some decisions that a float vector never meets, such as what (3, 4) / 2 should be. This book keeps one, simple float Vec2.
Q) Do all these little operators slow the game down?
A) Not where it matters. Each operator is defined inside the struct, so the compiler is free to paste its body in place, and in a Release build a + b becomes two additions, with no call at all. In a Debug build, which turns optimization off so the debugger can follow every line, they're real calls, and a Debug build of any C++ program is often several times slower. Measure speed in Release.
Exercises
The first exercise needs only a pencil. The others change Vec2 or Vector Lab.
- By hand, then check (paper). For
a = (2, -3)andb = (4, 1), work outa + b,a - b,3 * band-a. Then find the midpoint of the points(2, -3)and(4, 1). In Vector Lab, drag the two vectors to 50 times youraandb, and check the sum and the difference. - A tempting overload (judgment). Add an
operator*that multiplies two vectors component by component, returning(x * r.x, y * r.y). Using the rule of taste from The Rules We Can't Change, argue whether you should keep it. Is there one obvious meaning ofa * bfor two vectors? - More arrows (code). Make Vector Lab also draw
a * 2andb * 0.5, as faded arrows from the origin, so you can see scaling stretch and shrink a vector without turning it. - Free or member (conceptual). Delete the free
operator*, and try to compile2.0f * v. What does the compiler say, and why?
For the code exercises, work on a copy of the demo's folder, so that the original stays as the chapter describes it.
AI Exercise (Optional)
Vector Lab draws three arrows. With an AI's help, you can make it draw a few hundred, and turn the window into a vector field: an arrow at every point of a grid, each one computed from where it is. It's an experiment, so it doesn't matter if it goes wrong, and it looks great when it works. Open your AI chatbot of choice, and try a prompt like this:
"I have a C++ demo using SDL3. It has a struct Vec2 with float x and y, operators for +, -, scaling by a float and division by a float, and a helper, drawArrow, which takes the renderer, two Vec2 points to draw from and to, and an SDL_Color. The window is 1000 by 700, y points down, and I read the mouse each frame into float mx, my. I'd like to draw an arrow at every point of a grid, every 50 pixels. Each arrow should point from its grid point toward the mouse, and be 20 pixels long, whatever the distance. Then give me two more versions: one where the arrows point away from the mouse, and one where they get shorter the farther they are from it. Use only the Vec2 operations I've listed, and show me the drawing code to put in my frame."
That prompt tells the AI exactly what you have: the type, its operators, the helper, and the window. So the code it gives you should drop straight into Vector Lab, rather than inventing a vector library of its own. It also asks for three versions, which makes it easier to see what each line does.
Check what comes back against this chapter. The arrow at a grid point should start at the grid point, and point along the mouse's position minus the grid point's, the displacement from one to the other. To make every arrow 20 pixels long, the AI has to divide that vector by its length, which Chapter 3 calls normalizing. If it uses std::sqrt to find the length, that's fine: Chapter 3 is about to give Vec2 a length of its own. Then watch for the mouse sitting exactly on a grid point. The vector there has a length of zero, and dividing by it fails, as Chapter 3 explains. If your arrows vanish, or the program misbehaves when the mouse lands on a grid point, ask the AI how to skip that arrow.
If it all works, try asking for arrows that circle the mouse, rather than pointing at it. It's a quarter turn of each arrow, which Chapter 4 explains, but you can watch it happen first.
Summary
A vector is a direction and a size, held as two numbers, and read as a position or as a displacement, with three rules for combining the two and a midpoint as the exception. The Vec2 type holds a vector, and operator overloading made its arithmetic read like the math. Vectors add tip to tail and subtract head to head. Compound operators change a vector in place, and a free function lets a number go on the left. Vector Lab let you watch addition and subtraction happen under your mouse. In Chapter 3, Vec2 learns to measure itself: its length, the distance between two points, and how to shrink a vector to a pure direction. That's what makes our dots start to chase.