
Every game, however grand, begins with the same question: where is everything? Where is the player, where are the enemies, and where does that bullet go next? Before we can move, rotate, collide or texture a single thing, we need a way to answer it. In two dimensions, the answer is always a pair of numbers, and a shared agreement about what they mean. This chapter is about that agreement.
It's also about the tools we'll use for the rest of the book. We'll lean on SDL for very little: opening a window, reading the keyboard and mouse, and drawing points, lines and textures. Everything else, we'll write ourselves. By the end of the chapter, you'll have a small program called the skeleton. It opens a window and runs a game loop. It measures time, reads input, and puts text on the screen. Every demo in the book starts from it. Then we'll build the first demo, Plotter, which shows the screen's coordinates as you move the mouse.
In this chapter, we will:
- Meet the screen's coordinate system, and the surprising direction of its y axis
- See that pixels are cells, and what that means for the numbers at the edges
- Tell world space from screen space, and convert between them
- Represent a point as what it really is: two numbers
- Walk through the skeleton, line by line, from start-up to clean-up
- Get the book's code, and set up a Visual Studio project of your own
- Build Plotter, a demo that shows coordinates live as you move and click
Let's start with the grid you're already looking at.
The Screen as a Grid
A screen is a grid of pixels, and every pixel has an address. We give the address with two numbers: how far across the pixel is, and how far down. The first number is the x coordinate, and the second is the y coordinate. We write them together as a pair, (x, y).
One thing about this trips up nearly everyone, so let's get it out of the way now. The corner where the numbering starts, the origin at (0, 0), is the top-left corner of the window. From there, x grows as you go right, just like the graphs you drew in school. But y grows as you go down. Not up: down. The next image shows the window's coordinates, with a point at (620, 300).
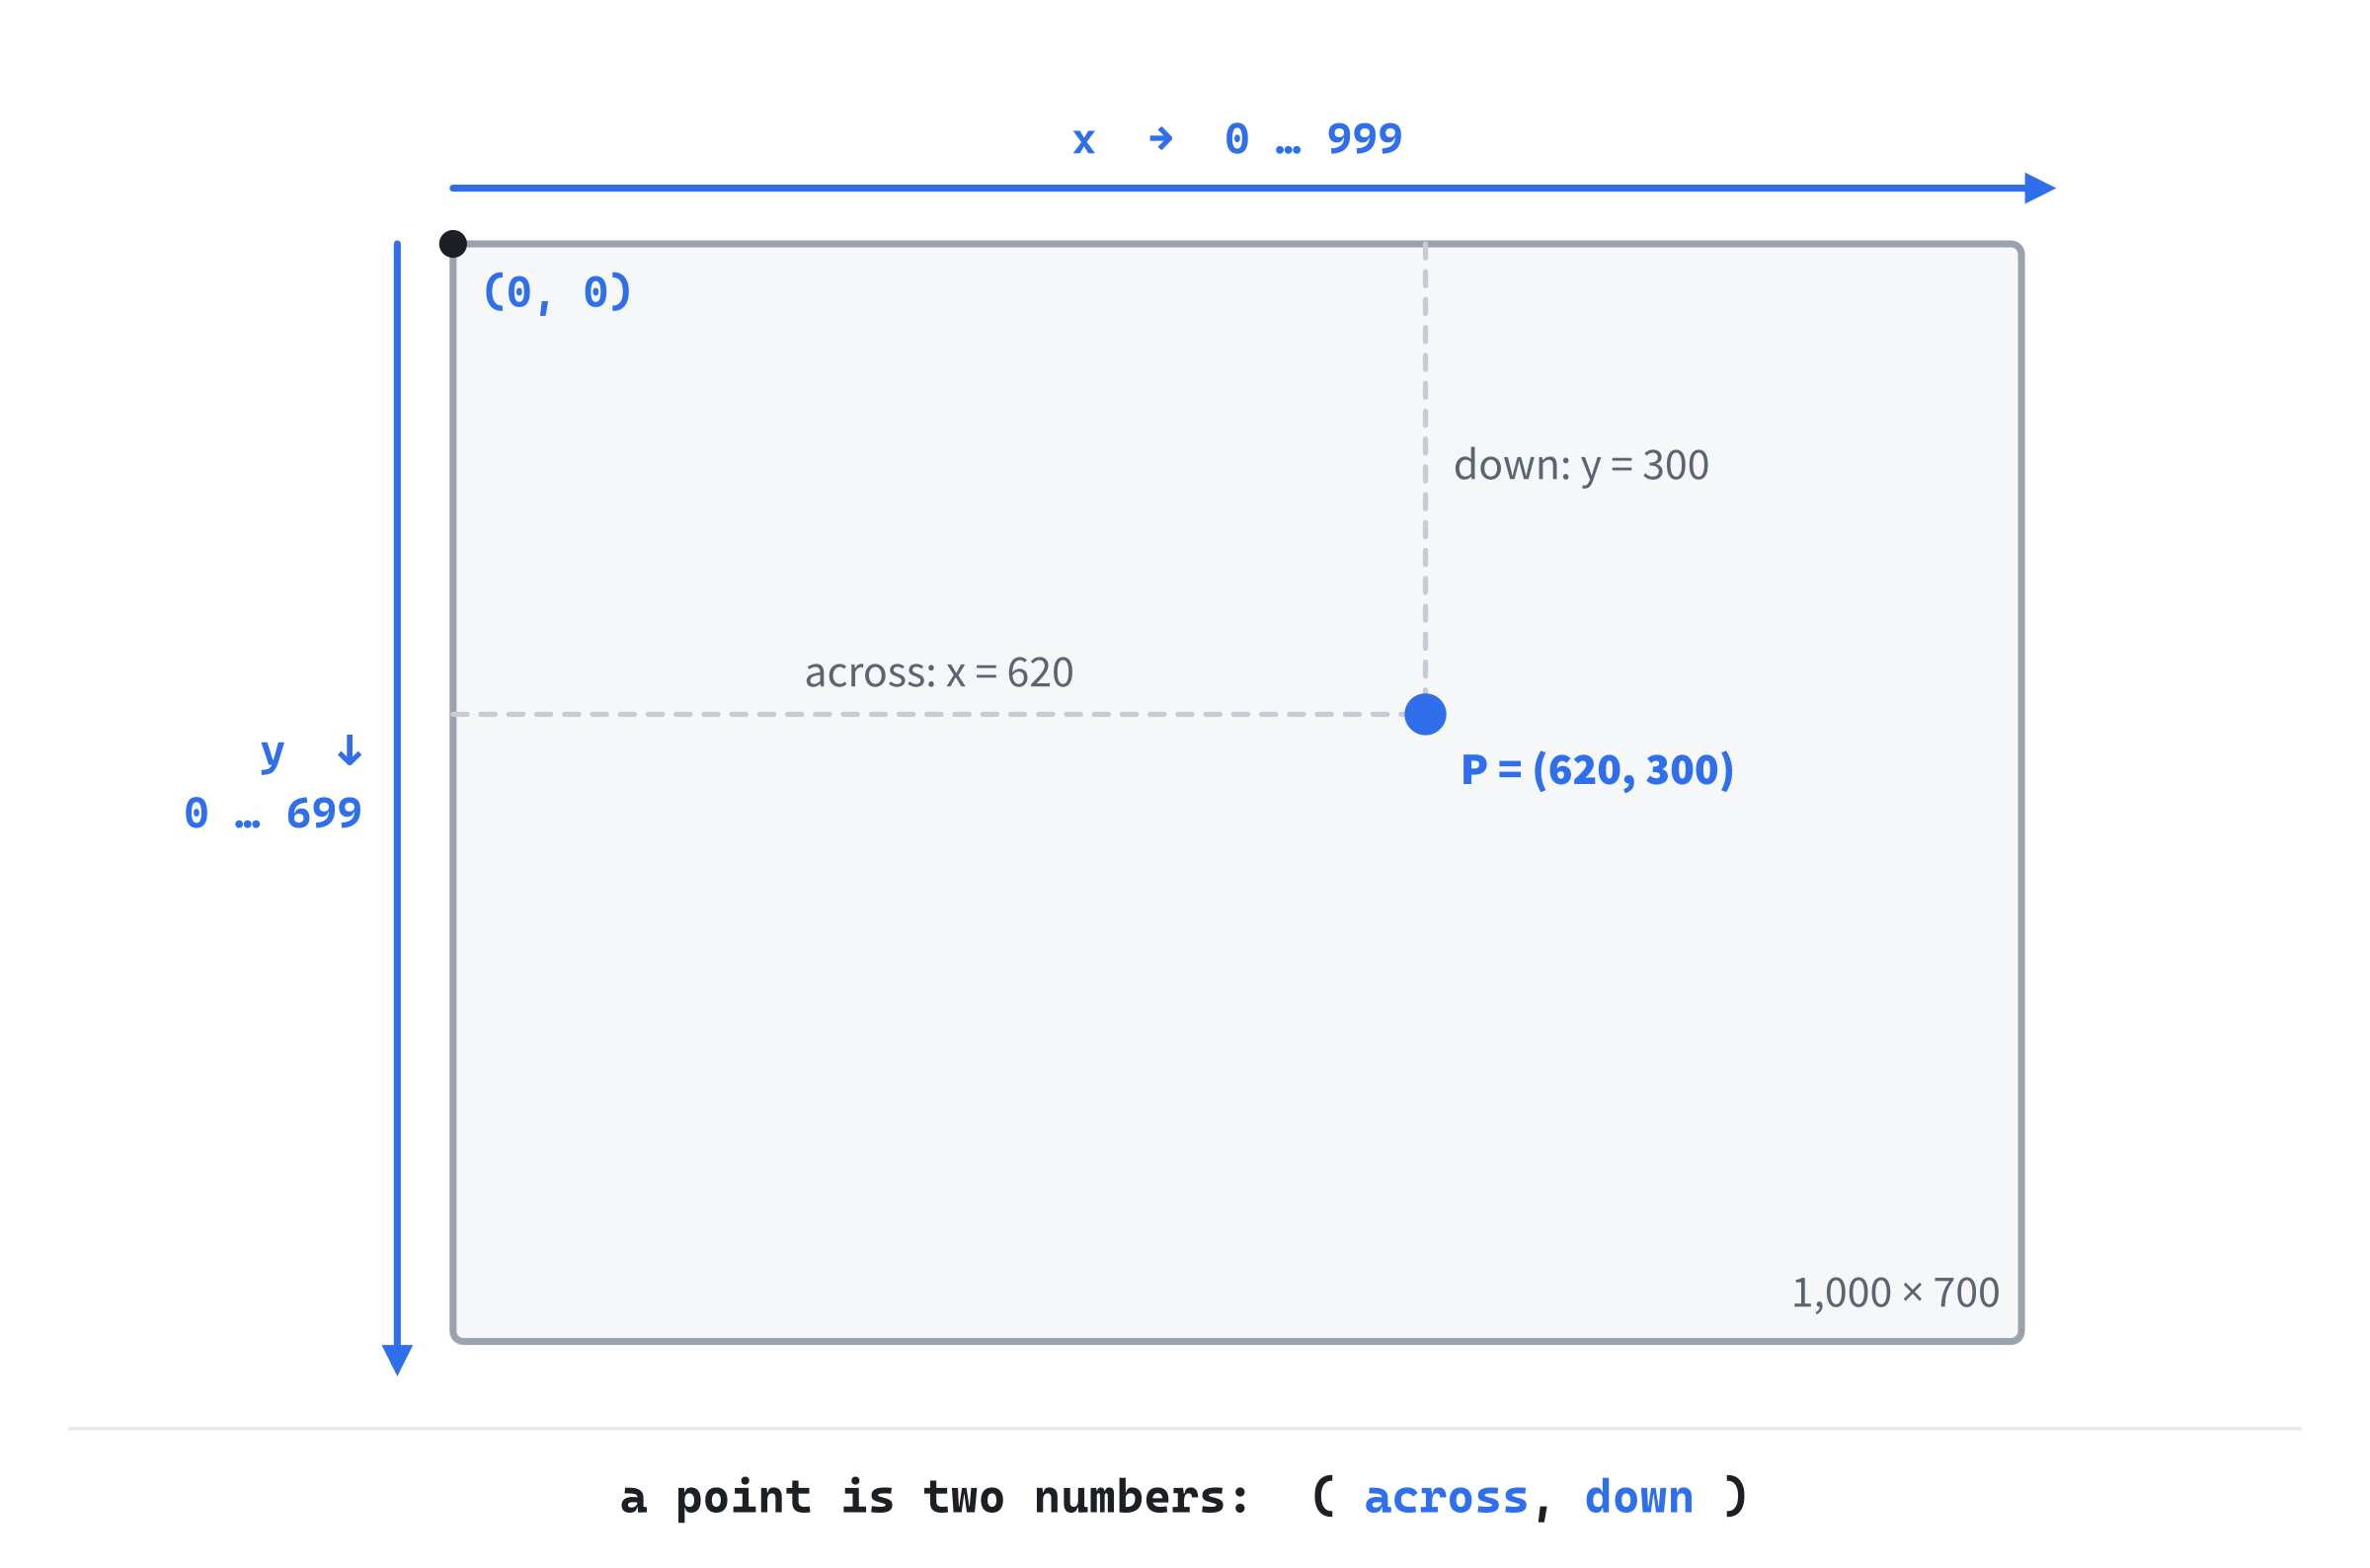
This feels backwards at first, because in math class the y axis pointed up. It makes sense once you know where it came from. Old displays drew the picture the way you read a page: left to right, and top to bottom, one line at a time. The first line drawn was at the top, so the top got the small y values. Nearly every 2D graphics system inherited that order, SDL included, and we'll live with it happily for the whole book.
It matters more than it looks. When we make something fall under gravity, we'll add to its y, not subtract. When we ask whether an enemy is above the player, we'll check whether its y is smaller. Keep Figure 1.1 in mind, and these sign choices stop being surprising.
Pixels Are Cells
A pixel isn't a point. It's a small square cell, and its address is the corner of the cell nearest the origin. The pixel at (0, 0) covers the square from 0 to 1 across, and from 0 to 1 down. So a window 1,000 pixels wide has columns numbered 0 to 999, and a window 700 pixels high has rows 0 to 699. The point (1000, 700) isn't the bottom-right pixel. It's the far corner of that pixel, just outside the window.
SDL hands us positions as floats, not whole numbers. On an ordinary screen, the mouse sits on whole numbers, but on a high-resolution screen it can sit between them, at a position such as 412.5. Turning a float into an int with a cast drops the fraction, so 412.5 becomes 412: the column the mouse is in. Plotter does exactly that for its readout.
World Space and Screen Space
Here's a distinction worth planting early, though we won't need it in force for a while. The coordinates we keep for our objects, and the coordinates we draw them at, don't have to be the same.
Imagine a game world 10,000 pixels wide, far bigger than any window. A treasure chest lives at (8400, 512) in the world. The window is only 1,000 pixels across, so we can't draw the chest there. We have to work out where (8400, 512) lands on the screen right now, given where the camera is looking. The chest's position in the world, its world space position, never changes. Its screen space position changes every time the camera moves.
A small example shows how a conversion works. Suppose we'd like a world whose origin is the middle of our 1,000 × 700 window, with y pointing up, as in math class. The middle of the window is screen (500, 350). A world point is then found from a screen point by measuring from the middle, and flipping y:
worldX   =  screenX - 500
worldY   =  350 - screenY
So the screen point (750, 200) is world (250, 150): 250 to the right of the middle, and 150 above it. Turned around, the same formulas take a world point back to the screen:
screenX  =  worldX + 500
screenY  =  350 - worldY
They take world (250, 150) back to screen (750, 200), since 250 + 500 is 750, and 350 − 150 is 200. The next image shows that point with both its addresses.

For the next several chapters, our world and our screen will be the same. A point at world (300, 200) is drawn at screen (300, 200), with no conversion at all. That keeps things simple while we build up the math. When we reach cameras in Part 6, this distinction becomes the whole story. File it away. Where a thing is and where we draw it are two different questions, which happen today to have the same answer.
Points
A point is the simplest thing in this book, and it's worth a pause because it's so simple. A point is two numbers, and that's the whole idea. The point (620, 300) is 620 across and 300 down. In code, Plotter keeps the two numbers together in a small struct:
// A point the user has clicked: how far across (x) and how far down (y),
// which is all a point ever is.
struct Point
{
    float x;
    float y;
};
With a type for a point, we can pass a point around as one value, rather than juggling two loose numbers. The numbers are floats, not ints, because points will soon need to sit at fractional positions: halfway between two pixels, or a third of the way along a line.
The same two numbers can mean quite different things, though. Take (1000, 700). As a size, it's our window: 1,000 pixels wide and 700 high. As a place, it's the far corner of the window's last pixel. As a velocity, it's a movement of 1,000 pixels a second to the right, and 700 down. Nothing in the numbers says which they are. Only how we use them does.
That's where the next chapter begins. There, this pair of numbers grows into the Vec2, the two-dimensional vector. A Vec2 can be a place, a size or a movement, and it's the most important type in the book. Today, a point is just a place.
Our SDL Toolkit
We need just enough SDL to open a window and draw in it. This section walks through the skeleton, the program every demo starts from, in the order it runs. If you've used SDL before, it's a quick refresher. If you haven't, it's all you need to follow every demo in the book.
Starting Up
The skeleton includes SDL itself and SDL_ttf, a small companion library that draws text from a font file. The demos use it for their live readouts: an angle, a length, or the frame rate, printed right onto the window. The <string> header is for the readouts' text:
#include <SDL3/SDL.h>
#include <SDL3_ttf/SDL_ttf.h>
#include <string>
Below the includes come the window's size, and the two colors every demo uses for text. The TEXT color is for readouts, and GREY is for the line of controls at the bottom:
constexpr int WINDOW_WIDTH  = 1000;
constexpr int WINDOW_HEIGHT = 700;

constexpr SDL_Color TEXT = { 235, 238, 242, 255 };
constexpr SDL_Color GREY = { 90, 100, 112, 255 };
An SDL_Color holds four numbers from 0 to 255: red, green, blue, and alpha, which is how opaque the color is. 255 alpha is fully opaque.
The main function starts SDL and SDL_ttf:
int main(int argc, char* argv[])
{
    // Start SDL and SDL_ttf. Each returns false if it fails.
    if (!SDL_Init(SDL_INIT_VIDEO))
    {
        SDL_Log("SDL_Init failed: %s", SDL_GetError());
        return 1;
    }
    if (!TTF_Init())
    {
        SDL_Log("TTF_Init failed: %s", SDL_GetError());
        return 1;
    }
In SDL 3, most functions return true when they work and false when they fail, so !SDL_Init(...) means "if starting SDL failed". The SDL_GetError function says why, and SDL_Log prints it. A demo built from the book's projects opens a console window beside its own, and that's where these messages appear. Returning 1 from main ends the program, with a number that says something went wrong.
The Window and the Renderer
Next come a window to look at, and a renderer to draw with:
// The window, and a renderer that waits for the screen to refresh
// (vsync), so the loop runs once for every frame the screen shows.
SDL_Window* window =
    SDL_CreateWindow("Skeleton", WINDOW_WIDTH, WINDOW_HEIGHT, 0);
SDL_Renderer* renderer = SDL_CreateRenderer(window, nullptr);
SDL_SetRenderVSync(renderer, 1);
The SDL_CreateWindow function makes a window with a title, 1,000 pixels wide and 700 high. The final 0 is where window options would go, and we don't want any. The SDL_CreateRenderer function gives us a renderer tied to the window. The renderer is what we give drawing commands to: think of it as the pen, and the window as the paper. Its second argument, nullptr, lets SDL pick the best way to draw on this computer.
The SDL_SetRenderVSync function turns on vsync. A screen shows a new picture a fixed number of times a second, 60 on most screens and more on some. With vsync on, the renderer waits for the screen to be ready before it shows each new frame. So the program draws one frame for every picture the screen shows, and no more. Without it, a simple demo would draw thousands of frames a second, most of which the screen never shows, and it would keep a processor core busy doing it.
The Font
The skeleton loads a font for its text:
// The font is copied beside the program when it's built. SDL_GetBasePath
// gives the program's folder, wherever the program is started from.
const char* base = SDL_GetBasePath();
std::string folder = base ? base : "";
std::string fontPath = folder + "RobotoMono-Light.ttf";
TTF_Font* font = TTF_OpenFont(fontPath.c_str(), 16);
if (!font) SDL_Log("Font not found, so no labels: %s", SDL_GetError());
The font file, RobotoMono-Light.ttf, is copied into the same folder as the program when the program is built. A program can be started from anywhere: from Visual Studio, by double-clicking it, or from a command line in another folder. So the skeleton asks SDL for the program's own folder, with SDL_GetBasePath, and looks for the font there. The folder's name ends with a separator, ready for a file's name to be added. If SDL can't tell, base is null, and the skeleton tries the name alone.
The TTF_OpenFont function opens the font at a size of 16 points. If it fails, the program carries on without labels, rather than stopping. A missing font shouldn't take the whole program down with it.
The Game Loop
A game isn't a program that runs from top to bottom and stops. It does the same handful of jobs over and over, many times a second, until you close it. That repeating cycle is the game loop, and it's the heart of everything we'll build. The next image shows one turn of it.
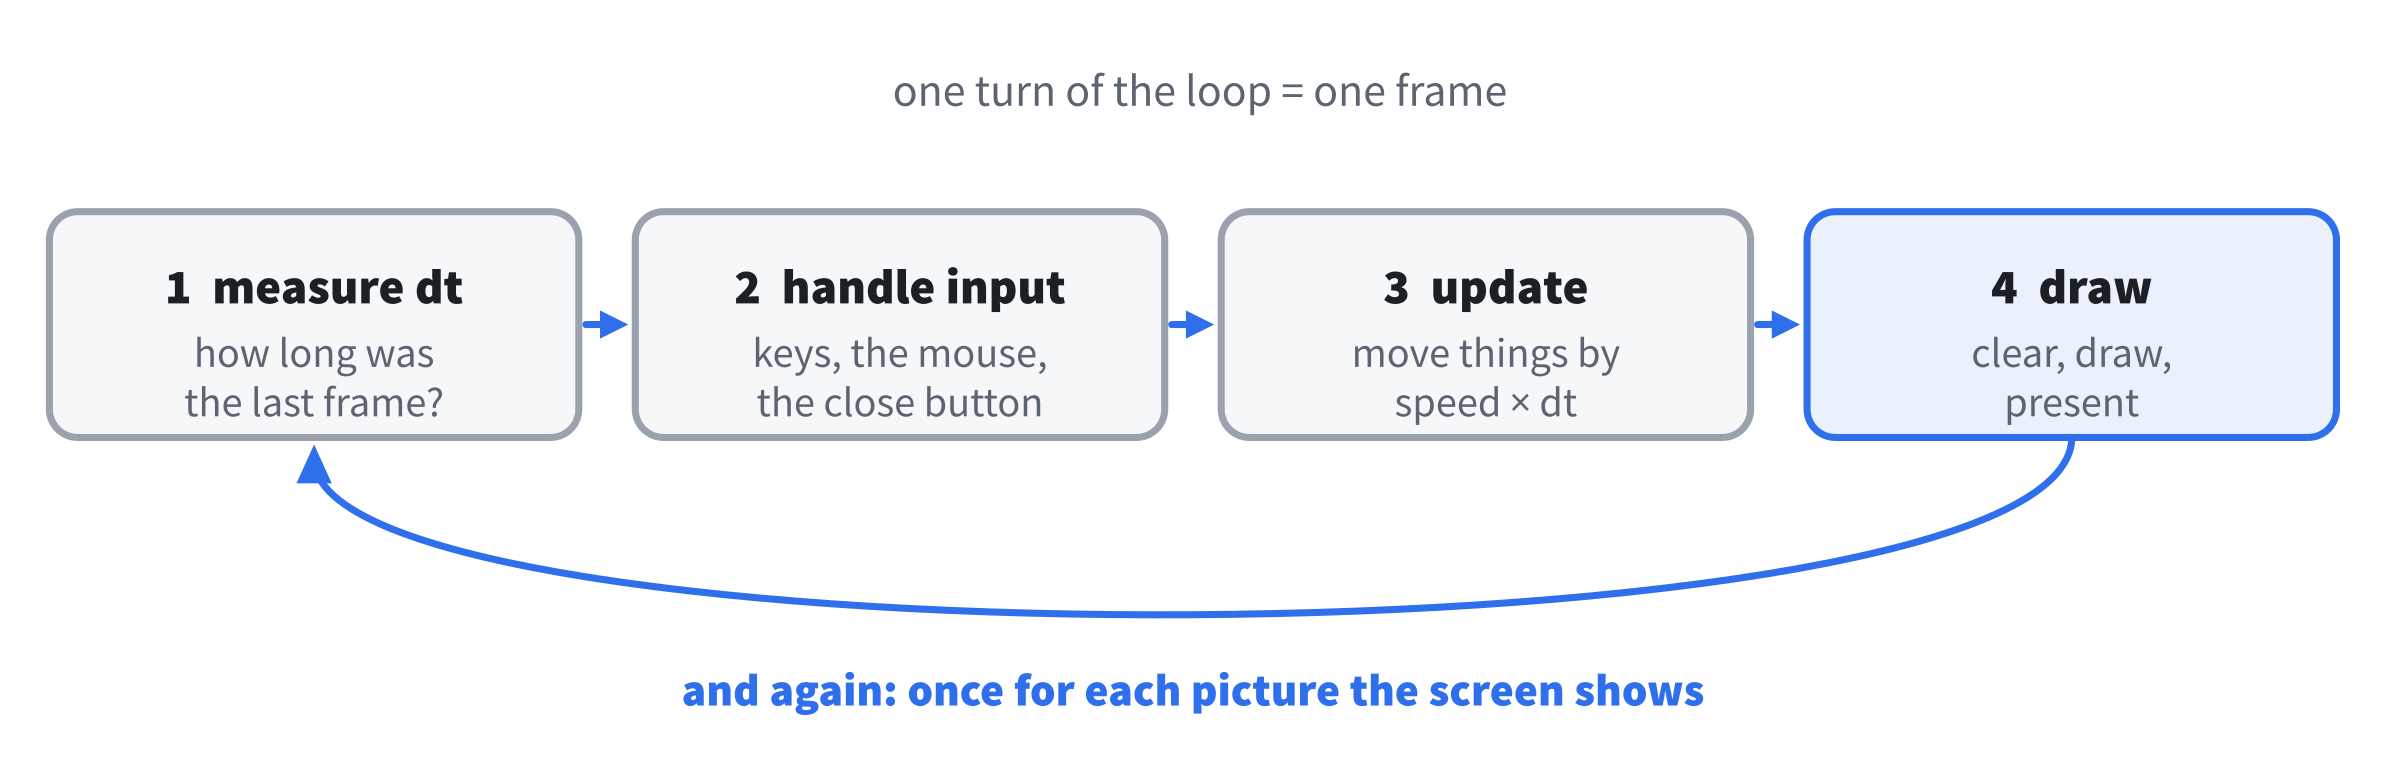
Each trip around the loop makes one frame: one complete picture for the screen. First, it measures how long the last frame took. Then it handles input, updates the state of things, and draws. Our work in this book is mostly about the update, the math that moves and collides things, and the drawing. The rest barely changes, which is why it's written once, in the skeleton.
Delta Time
Different computers run the loop at different speeds, and so do different screens. If we moved things by a fixed amount each frame, the game would run faster on a screen that shows 144 frames a second than on one that shows 60. The fix is to measure how long each frame actually took, a time called delta time, and to scale all movement by it. The skeleton measures it with SDL's high-resolution counter:
// Delta time: the seconds since the last frame, from SDL's counter.
Uint64 previous = SDL_GetPerformanceCounter();
const double frequency = (double)SDL_GetPerformanceFrequency();

bool running = true;
while (running)
{
    Uint64 now = SDL_GetPerformanceCounter();
    float dt = (float)((now - previous) / frequency);
    previous = now;
    if (dt > 0.05f) dt = 0.05f;   // A long stall counts as 1/20 s.
The SDL_GetPerformanceCounter function returns a count that ticks steadily upward, and SDL_GetPerformanceFrequency says how many ticks make a second. The block also opens the loop itself, which runs while running is true. At the top of each frame, the loop takes the count now, subtracts the count from last time, and divides by the frequency. The result, dt, is the length of the last frame, in seconds: about 0.0167 at 60 frames a second.
The last line caps dt at a twentieth of a second. If the program stalls, perhaps while you drag its window around, the next frame's dt could be a whole second or more, and everything would jump. Chapter 7, on motion, explains the cap fully. Chapter 3 is the first to use dt, to move things at a steady speed.
Handling Input
Each frame, SDL hands us a queue of things that have happened: keys pressed, the mouse clicked, or the window's close button pressed. The loop empties the queue with SDL_PollEvent:
// Events: quitting, and the keys and clicks that happen once.
SDL_Event event;
while (SDL_PollEvent(&event))
{
    if (event.type == SDL_EVENT_QUIT) running = false;
    else if (event.type == SDL_EVENT_KEY_DOWN)
    {
        if (event.key.key == SDLK_ESCAPE) running = false;
    }
}
The SDL_PollEvent function fills in event with the next thing that happened, and returns false when there's nothing left. Each event has a type. An event of type SDL_EVENT_QUIT means the window's close button was pressed, so the loop stops. A key press is SDL_EVENT_KEY_DOWN, and event.key.key says which key. The skeleton stops on Escape. A demo adds its own keys below that one, and its own kinds of event after the key's case.
Events are for things that happen once. For things that are true all the time, such as where the mouse is, the skeleton asks SDL directly, once a frame:
// The mouse's position, read once a frame.
float mx, my;
SDL_GetMouseState(&mx, &my);
The SDL_GetMouseState function writes the mouse's position, relative to the window, into mx and my. It also returns which mouse buttons are held, which the skeleton doesn't need. A demo that does, as Chapter 2's does, keeps that return value.
Drawing
Drawing a frame always follows the same three beats: clear the window to a background color, draw the frame, then show it:
// Update: a demo's own work goes here, scaled by dt.

// Draw: clear to the background, draw the frame, then show it.
SDL_SetRenderDrawColor(renderer, 24, 26, 30, 255);
SDL_RenderClear(renderer);

drawText(renderer, font, "Hello, Fundamentals", 12, 10, TEXT);
drawText(renderer, font, "[Esc] quit", 12, WINDOW_HEIGHT - 26, GREY);

SDL_RenderPresent(renderer);
The comment at the top marks where a demo's update goes. The SDL_SetRenderDrawColor function chooses the color for whatever is drawn next. Then SDL_RenderClear fills the whole window with it: a dark slate, in every demo. The skeleton then draws two lines of text, as placeholders for a demo's own readout and its controls. Last, SDL_RenderPresent shows the finished frame. Everything drawn between the clear and the present appears at once. The loop's closing brace comes right after the present, and sends the loop around again.
SDL draws a single pixel with SDL_RenderPoint, and a line between two points with SDL_RenderLine. Those two, and textures, which are pictures, are nearly all the drawing SDL will do for us. Every shape, every rotation, and every 3D scene later in the book is built from points, lines and textures that we place ourselves.
Text
A single pixel is too small to see, and a demo is far more useful when it can tell you what it's doing. SDL_ttf turns a string into a picture we can draw. That takes three steps, so the skeleton wraps them in one helper, drawText, which goes above main:
// Draw a line of text at (x, y). SDL_ttf turns the string into a surface,
// the surface is uploaded as a texture, and the texture is drawn.
void drawText(SDL_Renderer* renderer, TTF_Font* font,
              const std::string& text, float x, float y, SDL_Color color)
{
    if (!font) return;   // No font loaded: skip the label rather than crash.

    SDL_Surface* surface = TTF_RenderText_Blended(font, text.c_str(), 0, color);
    if (!surface) return;

    SDL_Texture* texture = SDL_CreateTextureFromSurface(renderer, surface);
    SDL_FRect dst = { x, y, (float)surface->w, (float)surface->h };
    SDL_RenderTexture(renderer, texture, nullptr, &dst);

    SDL_DestroySurface(surface);
    SDL_DestroyTexture(texture);
}
The TTF_RenderText_Blended function draws the string into an SDL_Surface, a picture in the computer's ordinary memory, in the given font and color. The 0 is the string's length, and 0 means the string ends with a null character, so SDL_ttf can find its end itself. The SDL_CreateTextureFromSurface function then copies the surface into an SDL_Texture, a picture the renderer can draw quickly. An SDL_FRect, a rectangle of floats, places it at (x, y) at its own size, and SDL_RenderTexture draws it. The last two lines free the surface and the texture, since a new pair is made every time a label is drawn.
Cleaning Up
When the loop ends, the skeleton frees what it made, in the reverse order of making it:
// Clean up, in the reverse order of creation.
if (font) TTF_CloseFont(font);
SDL_DestroyRenderer(renderer);
SDL_DestroyWindow(window);
TTF_Quit();
SDL_Quit();
return 0;
The font goes first. The renderer goes next, since it belongs to the window, and then the window itself. Last, SDL_ttf and SDL themselves shut down. Reverse order matters because each thing may depend on the ones made before it. Returning 0 says the program ended normally, and main's closing brace ends the skeleton.
The Skeleton, Assembled
Put those pieces together, and you have a complete program that does nothing yet, but is ready for anything. That's the skeleton. It's in the book's repository as a project of its own, in the Skeleton folder, ready to copy when you start a demo of your own. Appendix B prints it whole.
Every later chapter starts from it, and shows only the code that makes its demo what it is. To say where that code goes, the chapters name the skeleton's parts. The next image shows them.
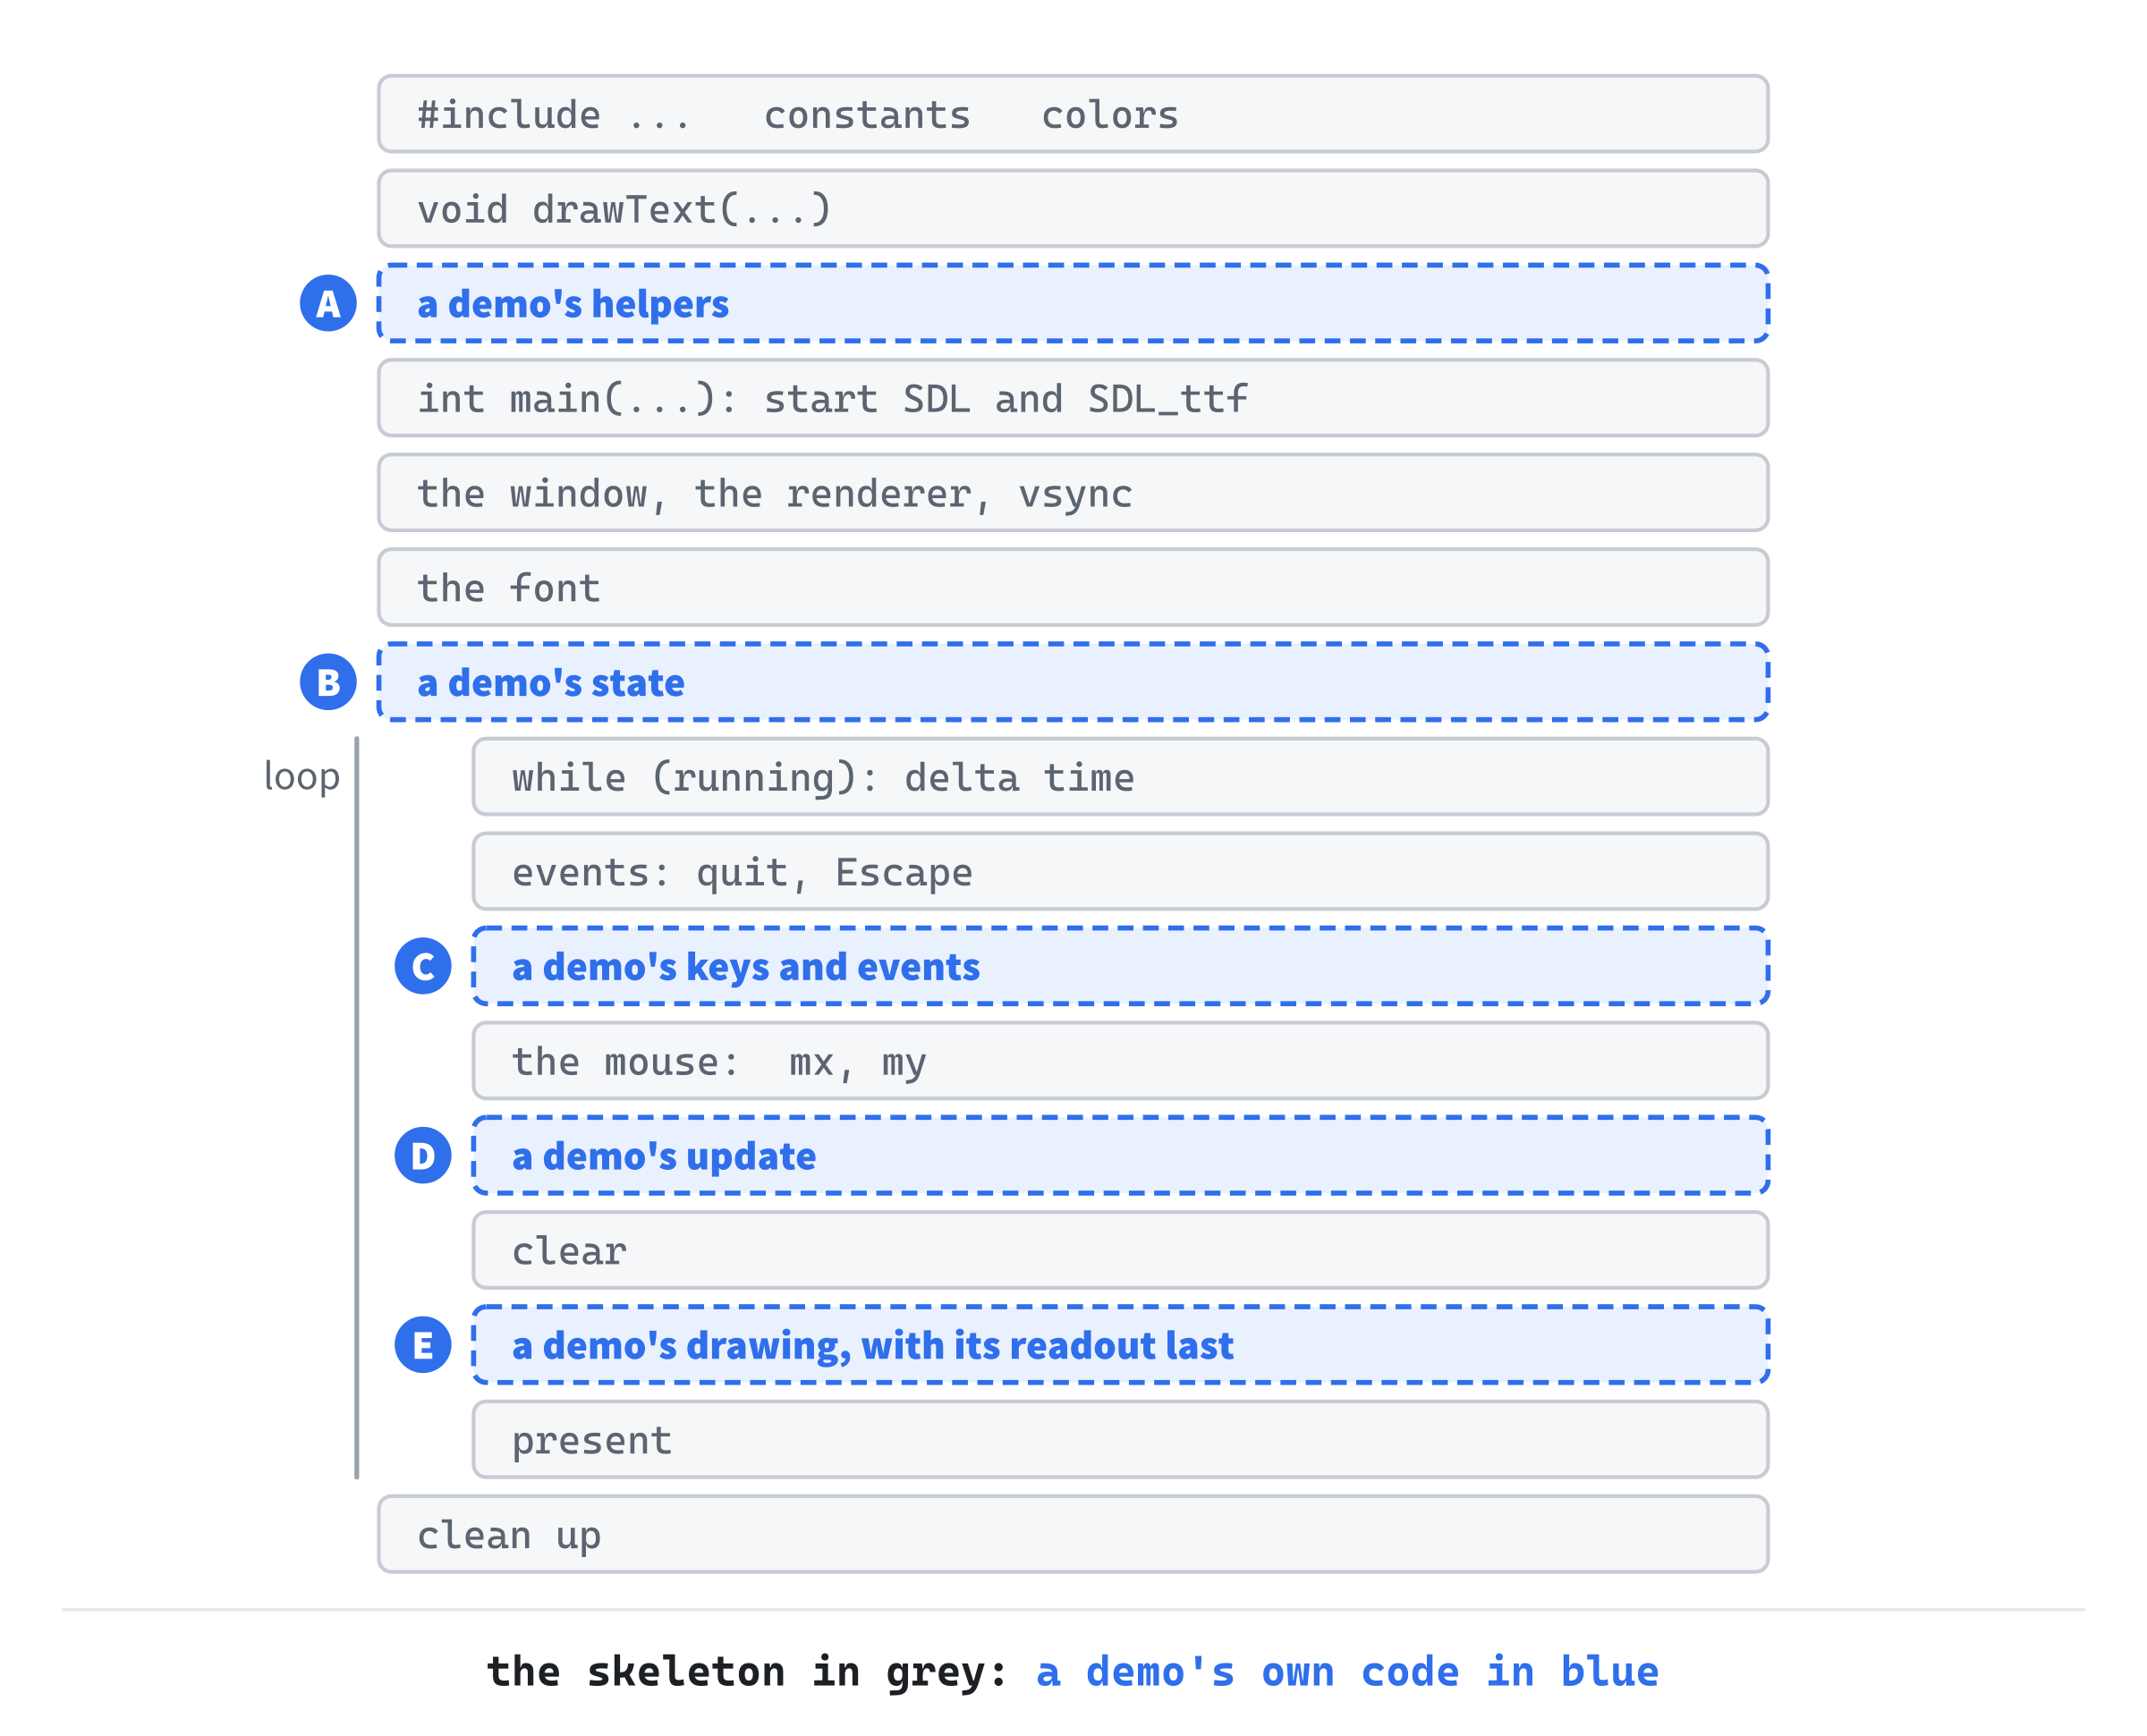
A demo's helpers go above main, after drawText. Its own types go near the top after the colors, as Plotter's Point does, or just above the helpers that use them. Its state, the things it keeps track of, goes after the font is loaded, before the loop. New keys and events go in the event loop, and the update goes after the mouse is read. Drawing goes between the clear and the present, with the readout last, on top of everything. Some demos leave out parts they don't need: a demo in which nothing moves by itself has no use for delta time.
Getting the Code
The book's code is in its repository on GitHub:
https://github.com/EliteIntegrity/Learning-C-by-Building-Games-Fundamentals-2nd-Edition
Click the green Code button, and then Download ZIP, and unzip it anywhere you like. If you use Git, you can clone it instead. Inside, there's a folder for each demo, named after it, and a Skeleton folder. Beside them are SDL3 and SDL3_ttf, in folders of their own, and the font, RobotoMono-Light.ttf.
Each demo's folder holds its code and a Visual Studio project, with everything set up. To run a demo, open its .slnx file in Visual Studio 2026, and press F5. Visual Studio builds the program, copies SDL's two DLLs and the font beside it, and runs it.
If you're on a Mac or on Linux, Appendix F shows how to build every demo with CMake instead.
A Project of Your Own
The day you start a program of your own from an empty Visual Studio project, it won't know where SDL is. The compiler needs to find SDL's headers, the linker needs to find its libraries, and the program needs SDL's DLLs and the font beside it when it runs. Five settings take care of it all. They assume your project's folder sits beside the SDL3 and SDL3_ttf folders, as the demos' folders do, so ..\ reaches them. When Visual Studio asks where to make the new project, set Location to the folder that holds SDL3, and tick Place solution and project in the same directory. Left unticked, that box puts the project a folder deeper, where ..\ misses.
Open Project ▸ Properties. At the top of the dialog, set Configuration to All Configurations, and Platform to x64. Then fill in these:
- C/C++ ▸ General ▸ Additional Include Directories: type
..\SDL3\include;..\SDL3_ttf\include. This is where the compiler finds<SDL3/SDL.h>and<SDL3_ttf/SDL_ttf.h>. - C/C++ ▸ Language ▸ C++ Language Standard: choose ISO C++20 Standard (/std:c++20). The demos use C++20.
- Linker ▸ General ▸ Additional Library Directories: type
..\SDL3\lib\x64;..\SDL3_ttf\lib\x64. This is where the linker finds SDL's.libfiles. - Linker ▸ Input ▸ Additional Dependencies: add
SDL3.lib;SDL3_ttf.libat the front. These are the two libraries to link with. - Build Events ▸ Post-Build Event ▸ Command Line: type the three lines below. After each build, they copy SDL's DLLs and the font into the folder the program is built in.
copy /Y "$(ProjectDir)..\SDL3\lib\x64\SDL3.dll" "$(OutDir)"
copy /Y "$(ProjectDir)..\SDL3_ttf\lib\x64\SDL3_ttf.dll" "$(OutDir)"
copy /Y "$(ProjectDir)..\RobotoMono-Light.ttf" "$(OutDir)"
In these lines, $(ProjectDir) is your project's folder, and $(OutDir) is the folder the program is built in. Build for x64, since that's where these settings live, and SDL's libraries are the 64-bit ones.
Building Plotter
Plotter is deliberately tiny. It draws a grid, and marks the origin with the two axes. As you move the mouse, it shows the mouse's coordinates beside it, with guide lines back to each axis, so you can see the x and the y being measured. Click anywhere to drop a point, and press C to clear them. It does nothing useful, and it teaches the coordinate system better than any paragraph could.
Get the code. The complete project is in the
Plotterfolder of the book's repository.
Plotter starts from the skeleton, as every demo does, and adds to it.
Two Helpers
Plotter adds two headers to the skeleton's: <cmath>, for std::sqrt, and <vector>, to hold the points clicked. It also adds a blue for the axes and the points:
#include <SDL3/SDL.h>
#include <SDL3_ttf/SDL_ttf.h>
#include <cmath>
#include <string>
#include <vector>

constexpr int WINDOW_WIDTH  = 1000;
constexpr int WINDOW_HEIGHT = 700;

constexpr SDL_Color TEXT = { 235, 238, 242, 255 };
constexpr SDL_Color GREY = { 90, 100, 112, 255 };
constexpr SDL_Color BLUE = { 47, 111, 235, 255 };
Most demos draw a faint grid behind everything, to read positions against. One helper draws it, and goes after drawText:
// A faint grid, with a line every 50 pixels, to read positions against.
void drawGrid(SDL_Renderer* renderer)
{
    SDL_SetRenderDrawColor(renderer, 38, 42, 50, 255);
    for (int x = 0; x < WINDOW_WIDTH; x += 50)
        SDL_RenderLine(renderer, (float)x, 0, (float)x, WINDOW_HEIGHT);
    for (int y = 0; y < WINDOW_HEIGHT; y += 50)
        SDL_RenderLine(renderer, 0, (float)y, WINDOW_WIDTH, (float)y);
}
One loop draws the grid's vertical lines, every 50 pixels across, and another draws the horizontal ones. Each loop stops before the window's edge, since a line at x = 1,000 would be just outside the window. The casts to float are there because SDL_RenderLine takes floats.
A point drawn as a single pixel would be nearly invisible, so Plotter draws each one as a small disc. SDL draws lines, but not discs, so a second helper fills a circle with lines:
// Fill a circle. SDL draws lines but not discs, so we draw one horizontal
// line for each row of pixels, as wide as Pythagoras says the circle is
// at that row.
void fillCircle(SDL_Renderer* renderer, float cx, float cy, float radius)
{
    for (int dy = -(int)radius; dy <= (int)radius; ++dy)
    {
        float dx = std::sqrt(radius * radius - (float)(dy * dy));
        SDL_RenderLine(renderer, cx - dx, cy + dy, cx + dx, cy + dy);
    }
}
The circle is drawn as a stack of horizontal lines, one for each row of pixels. For each row, dy above or below the center, the line's half-width dx comes from Pythagoras. A point on the circle's edge is dx across and dy down from the center, and its distance from the center is the radius, so dx² + dy² = radius². That gives dx = √(radius² − dy²). Chapter 3 meets Pythagoras properly, as the length of a vector.
This fillCircle takes its center as two floats, since we have no type for a point with arithmetic yet. In Chapter 3, whose demo is the next to fill circles, it takes a Vec2 instead.
Points and Clicks
Plotter keeps the points clicked in a vector, made after the font is loaded:
std::vector<Point> points; // every point the user has clickedThe loop works out the frame rate from dt, for the readout, before the skeleton caps dt:
int fps = (dt > 0.0f) ? (int)(1.0f / dt + 0.5f) : 0;A frame that took a sixtieth of a second makes 60 frames a second, so the rate is one over dt. Adding 0.5 before the cast rounds it to the nearest whole number. It's worked out before the cap, so that a slow frame shows as slow.
In the event loop, C clears the points, and a left click adds one:
else if (event.type == SDL_EVENT_KEY_DOWN)
{
    if (event.key.key == SDLK_ESCAPE) running = false;
    else if (event.key.key == SDLK_C) points.clear();
}
else if (event.type == SDL_EVENT_MOUSE_BUTTON_DOWN &&
         event.button.button == SDL_BUTTON_LEFT)
{
    points.push_back({ event.button.x, event.button.y });
}
A click's position is in the event, as event.button.x and event.button.y. The new Point is made from them, right inside the call to push_back. Checking event.button.button means that only the left button adds points.
Drawing the Scene
Plotter draws from the back to the front: the grid first, then the axes, the guide lines and the points, and the text last, on top of everything. The grid is drawn right after the skeleton's clear:
SDL_RenderClear(renderer);
drawGrid(renderer);
The axes and the guide lines follow:
// The two axes, which meet at the origin in the top-left corner.
SDL_SetRenderDrawColor(renderer, BLUE.r, BLUE.g, BLUE.b, BLUE.a);
SDL_RenderLine(renderer, 0, 0, WINDOW_WIDTH, 0);
SDL_RenderLine(renderer, 0, 0, 0, WINDOW_HEIGHT);

// Guides from the cursor back to each axis, to show how its x and y
// are measured: across from the left, and down from the top.
SDL_SetRenderDrawColor(renderer, GREY.r, GREY.g, GREY.b, GREY.a);
SDL_RenderLine(renderer, mx, 0, mx, my);
SDL_RenderLine(renderer, 0, my, mx, my);
The axes are two blue lines along the window's top and left edges, which meet at the origin. The guide lines run from the mouse straight up to the top edge, and straight across to the left edge. Their lengths are the mouse's y and its x.
Each point clicked is drawn as a small blue disc:
// Every point clicked, as a small circle.
SDL_SetRenderDrawColor(renderer, BLUE.r, BLUE.g, BLUE.b, BLUE.a);
for (const Point& p : points)
    fillCircle(renderer, p.x, p.y, 5);
The text comes last:
drawText(renderer, font, "(0, 0)", 8, 6, TEXT);
std::string cursor = "(" + std::to_string((int)mx) + ", " +
                     std::to_string((int)my) + ")";
// Below and to the right of the mouse, or on its other side near
// the window's right or bottom edge, so it stays on the window.
float labelX = (mx > WINDOW_WIDTH - 110) ? mx - 105 : mx + 12;
float labelY = (my > WINDOW_HEIGHT - 30) ? my - 26 : my + 10;
drawText(renderer, font, cursor, labelX, labelY, TEXT);

std::string stats = "points: " + std::to_string(points.size()) +
                    "   fps: " + std::to_string(fps);
drawText(renderer, font, stats, 12, WINDOW_HEIGHT - 50, TEXT);
drawText(renderer, font, "[click] add a point   [C] clear   [Esc] quit",
         12, WINDOW_HEIGHT - 26, GREY);
The first label marks the origin. The second is the mouse's position, built as text from mx and my, each cast to an int, so it reads (413, 288) and not a long decimal. It's drawn just below and to the right of the mouse, so the pointer doesn't cover it. Near the window's right or bottom edge, it moves to the mouse's other side, so that it stays on the window. The stats line counts the points and shows the frame rate, and the last line lists the controls.
Running Plotter
Run Plotter, and a window 1,000 pixels by 700 opens onto a dark grid, with the two blue axes along its top and left edges. Move the mouse, and its position follows it, with the numbers growing as you go right and down. The next image shows Plotter with three points clicked, and the mouse at (413, 288).
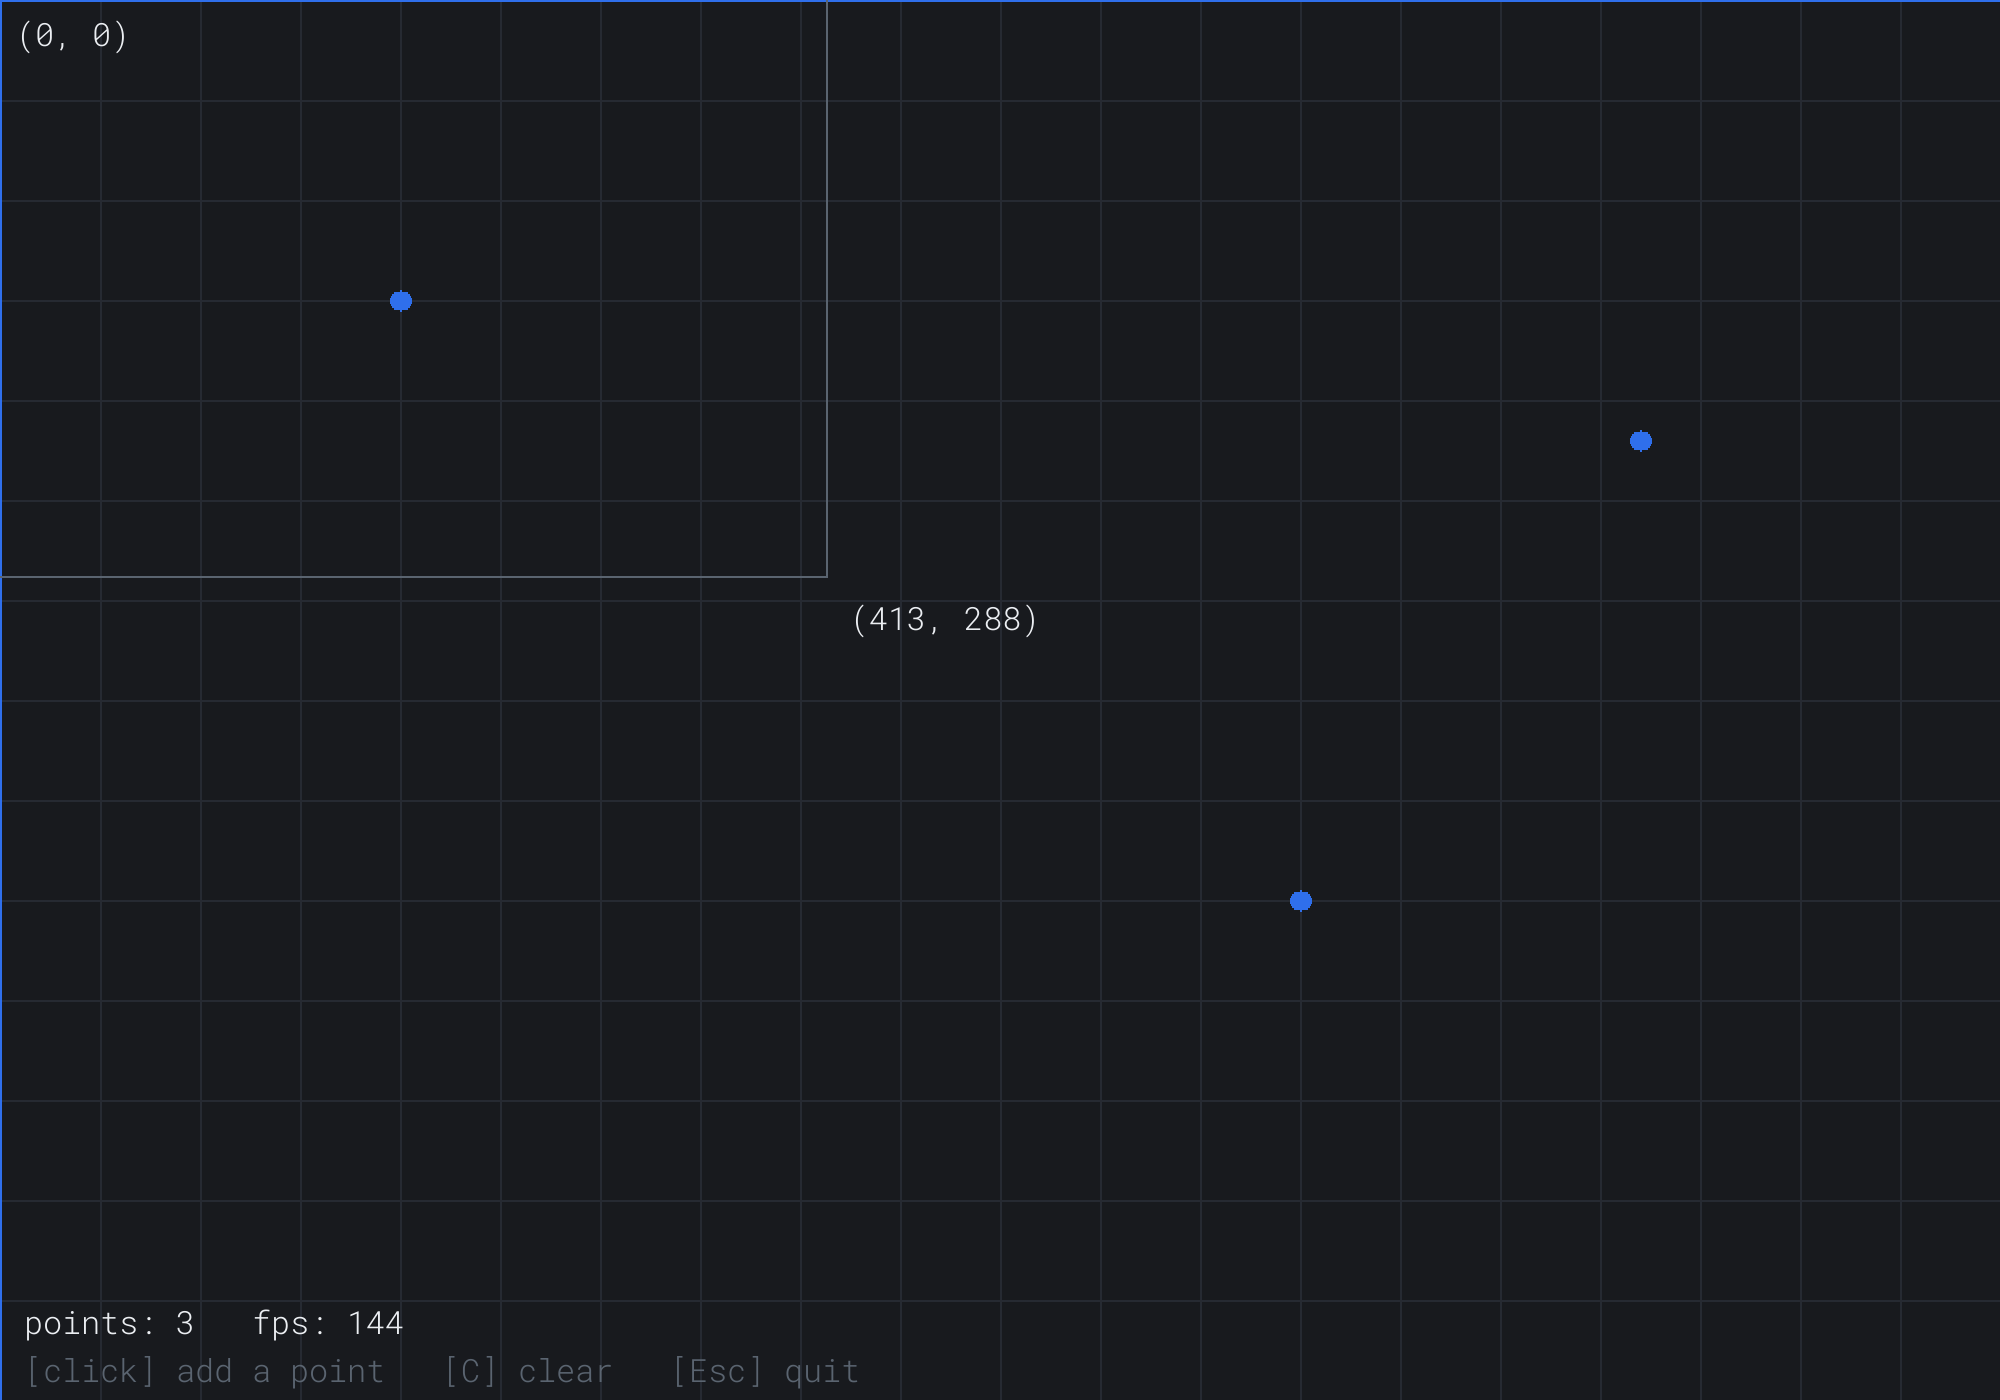
Take a moment to move the mouse to each corner, and watch the numbers. The top left reads (0, 0). Going right, x grows, to 999 at the right edge. Going down, y grows, to 699 at the bottom. The stats line shows the frame rate, which is your screen's own, since vsync ties the loop to it. Most screens show 60 pictures a second. The one Figure 1.5 was captured on shows 144.
Some things to try:
- In
drawGrid, change both 50s to 25, or to 100, and run it again. The grid tightens or loosens. - In the call to
fillCircle, make the radius 10 instead of 5, for bigger points. - Change the 1 in
SDL_SetRenderVSyncto 0, and watch the frame rate jump to thousands. That's how fast the loop runs when it doesn't wait for the screen, drawing frames that are never shown. - Draw a line from the origin to the mouse each frame, with one
SDL_RenderLinefrom0, 0tomx, my.
That last line has a length and a direction: it's a vector, and it's exactly where the next chapter begins. None of these changes can break anything, and if one misbehaves, undo it and try another.
FAQ
Q) Should I flip y, so that it points up, as in math class?
A) Not on the screen. SDL, your mouse and every image you load all agree that y points down, and fighting that means converting in a dozen places. If a part of your game reads better with y up, such as a physics world, keep it in its own world space. Then convert once, when you draw, as World Space and Screen Space showed.
Q) Can the window be resizable?
A) Yes. Pass SDL_WINDOW_RESIZABLE as the last argument of SDL_CreateWindow, instead of 0. But then WINDOW_WIDTH and WINDOW_HEIGHT no longer say how big the window is. You can ask each frame with SDL_GetWindowSize, and lay things out to fit. Or you can keep drawing at 1,000 × 700, and let SDL scale the picture to fit the window: call SDL_SetRenderLogicalPresentation(renderer, WINDOW_WIDTH, WINDOW_HEIGHT, SDL_LOGICAL_PRESENTATION_LETTERBOX) after making the renderer. Letterbox keeps the shape, with bars at the sides, or at the top and bottom, if the window's shape differs. But SDL 3 doesn't convert the mouse to match, so a click still arrives in the window's own pixels. Pass each event to SDL_ConvertEventToRenderCoordinates before you read its position, and convert the position from SDL_GetMouseState with SDL_RenderCoordinatesFromWindow.
Q) What's the console window for, and can I get rid of it?
A) The book's projects are console programs, so SDL_Log's messages have somewhere to go, which helps a lot when something's wrong. A finished game usually hides it. In Visual Studio, set Linker ▸ System ▸ SubSystem to Windows, and add #include <SDL3/SDL_main.h> to the file that holds main. That header gives Windows the start-up function it looks for in a program without a console, and calls your main from it.
Q) Why doesn't the skeleton free the text that SDL_GetBasePath returns?
A) Because SDL owns it. In SDL 3, the function works out the folder once and keeps it. Each call hands back the same text, so freeing it would be a bug. If you've used SDL 2, this is a change: there, SDL_GetBasePath returned a copy that you had to free with SDL_free.
Q) The window opens, but there's no text. Or it closes at once. What's wrong?
A) No text means the font wasn't found. Look in the console window for the "Font not found" message, and check that RobotoMono-Light.ttf was copied beside the program. A window that closes at once, or a message about a missing DLL, means SDL3.dll or SDL3_ttf.dll isn't beside the program. The Post-Build Event copies all three, so check that its three lines are in place.
Q) Isn't making a new texture for every label, every frame, wasteful?
A) A little. Turning text into a texture takes some work, and a demo with a handful of labels does it a few hundred times a second, which a modern computer hardly notices. A game with a lot of text that rarely changes would make each label's texture once, keep it, and draw it again each frame.
Exercises
These exercises start from Plotter. The first needs only a pencil, and the others change the demo.
- Read the grid (paper). A point is dropped at screen
(250, 525)in Plotter's 1,000 × 700 window. What fraction of the way across the window is it, and what fraction of the way down? Then find its address in the world from World Space and Screen Space, with the origin in the middle and y up. - A ruler (code). Each frame, draw a line from the middle of the window to the mouse, and show its length in pixels in the stats line. Pythagoras gives the length: the square root of the difference in x squared, plus the difference in y squared.
- Undo (code). C clears all the points. Add a key that removes only the last point dropped, with
pop_back. - World coordinates (code). Add a second line to the mouse's readout that shows its world coordinates, with the origin in the middle of the window and y up. Check it against Figure 1.2: the mouse at screen
(750, 200)should read world(250, 150).
For the code exercises, work on a copy of Plotter's folder, so that the original stays as the chapter describes it.
Summary
The screen is a grid of pixel cells, numbered from an origin at the top left, with x running right and y running down, and a point is just two numbers on it. Where a thing is and where we draw it are separate questions, and a simple conversion connects them. The skeleton starts SDL and opens a window and a font. Then it loops, measuring delta time, handling input and drawing, until you quit, and cleans up in reverse order. Every demo starts from it, and Plotter made the coordinates visible. In Chapter 2, the point grows a length and a direction, and becomes the vector: the type that everything else in this book is built from.