
A wireframe hides nothing. Its front edges and back edges are drawn alike, and you can see straight through it. Fill its faces, and a question arrives that the wireframe never had to answer: when two surfaces cover the same pixel, which one do you see? Answering it is hidden surface removal, and it's what turns a see-through cage into a solid object.
This chapter fills triangles itself, a pixel at a time, into a picture of its own. That's what a graphics card does in hardware, and writing the loop is the clearest way to see what hidden surfaces need. Then it answers the question three ways. Back-face culling skips the faces turned away from the eye, about half of a closed mesh's. The painter's algorithm sorts triangles, the farthest first, and paints the nearer ones over them. The z-buffer keeps a depth for every pixel, and lets the nearest surface win each pixel on its own. The demo drives a bar through a cube, the case that shows what each one can and can't do.
In this chapter, we will:
- Fill a triangle a pixel at a time, with three cross products for each pixel
- Blend a triangle's corners into a pixel by its barycentric weights
- See why depth after the divide blends exactly across a triangle
- Skip the faces turned away from the eye, by back-face culling
- Sort triangles with the painter's algorithm, and see where it fails
- Keep a depth for each pixel, in a z-buffer
- Build Solid Cube, a cube with a bar through it, drawn each of the three ways
We'll start with filling a triangle.
Filling Triangles
A Picture of Our Own
Chapter 24's SDL_RenderGeometry fills triangles, but it can't keep a depth for each pixel, so it can't decide which surface is in front. So Solid Cube draws into a picture of its own: a color for each pixel, kept in a std::vector, and a depth for each pixel beside it. Once the frame is drawn, the colors are copied into a texture, and the texture is drawn over the window. Everything between, from a triangle's three corners to the pixels it covers, is this chapter's code.
Inside or Outside
A triangle on the picture is three corners, and a pixel is inside it when its center is on the inside of all three edges. Chapter 4's 2D cross product tells which side of a line a point is on. For the edge from a to b, and a pixel's center p, it's:
(b - a) × (p - a)That's positive on one side of the line, negative on the other, and 0 on it. Taken for the three edges in turn, a to b, b to c and c to a, all three have the same sign when p is inside. Its sign depends on which way round the corners go, so the test accepts all three positive or all three negative. Each pixel in the box around the triangle is tested, and those inside are filled.
The Weights
The three cross products do more than test. Each is twice the area of a small triangle: the pixel's center and one edge. Those three small triangles fill the whole triangle, so their areas add up to its area. The next image shows them, for one pixel.
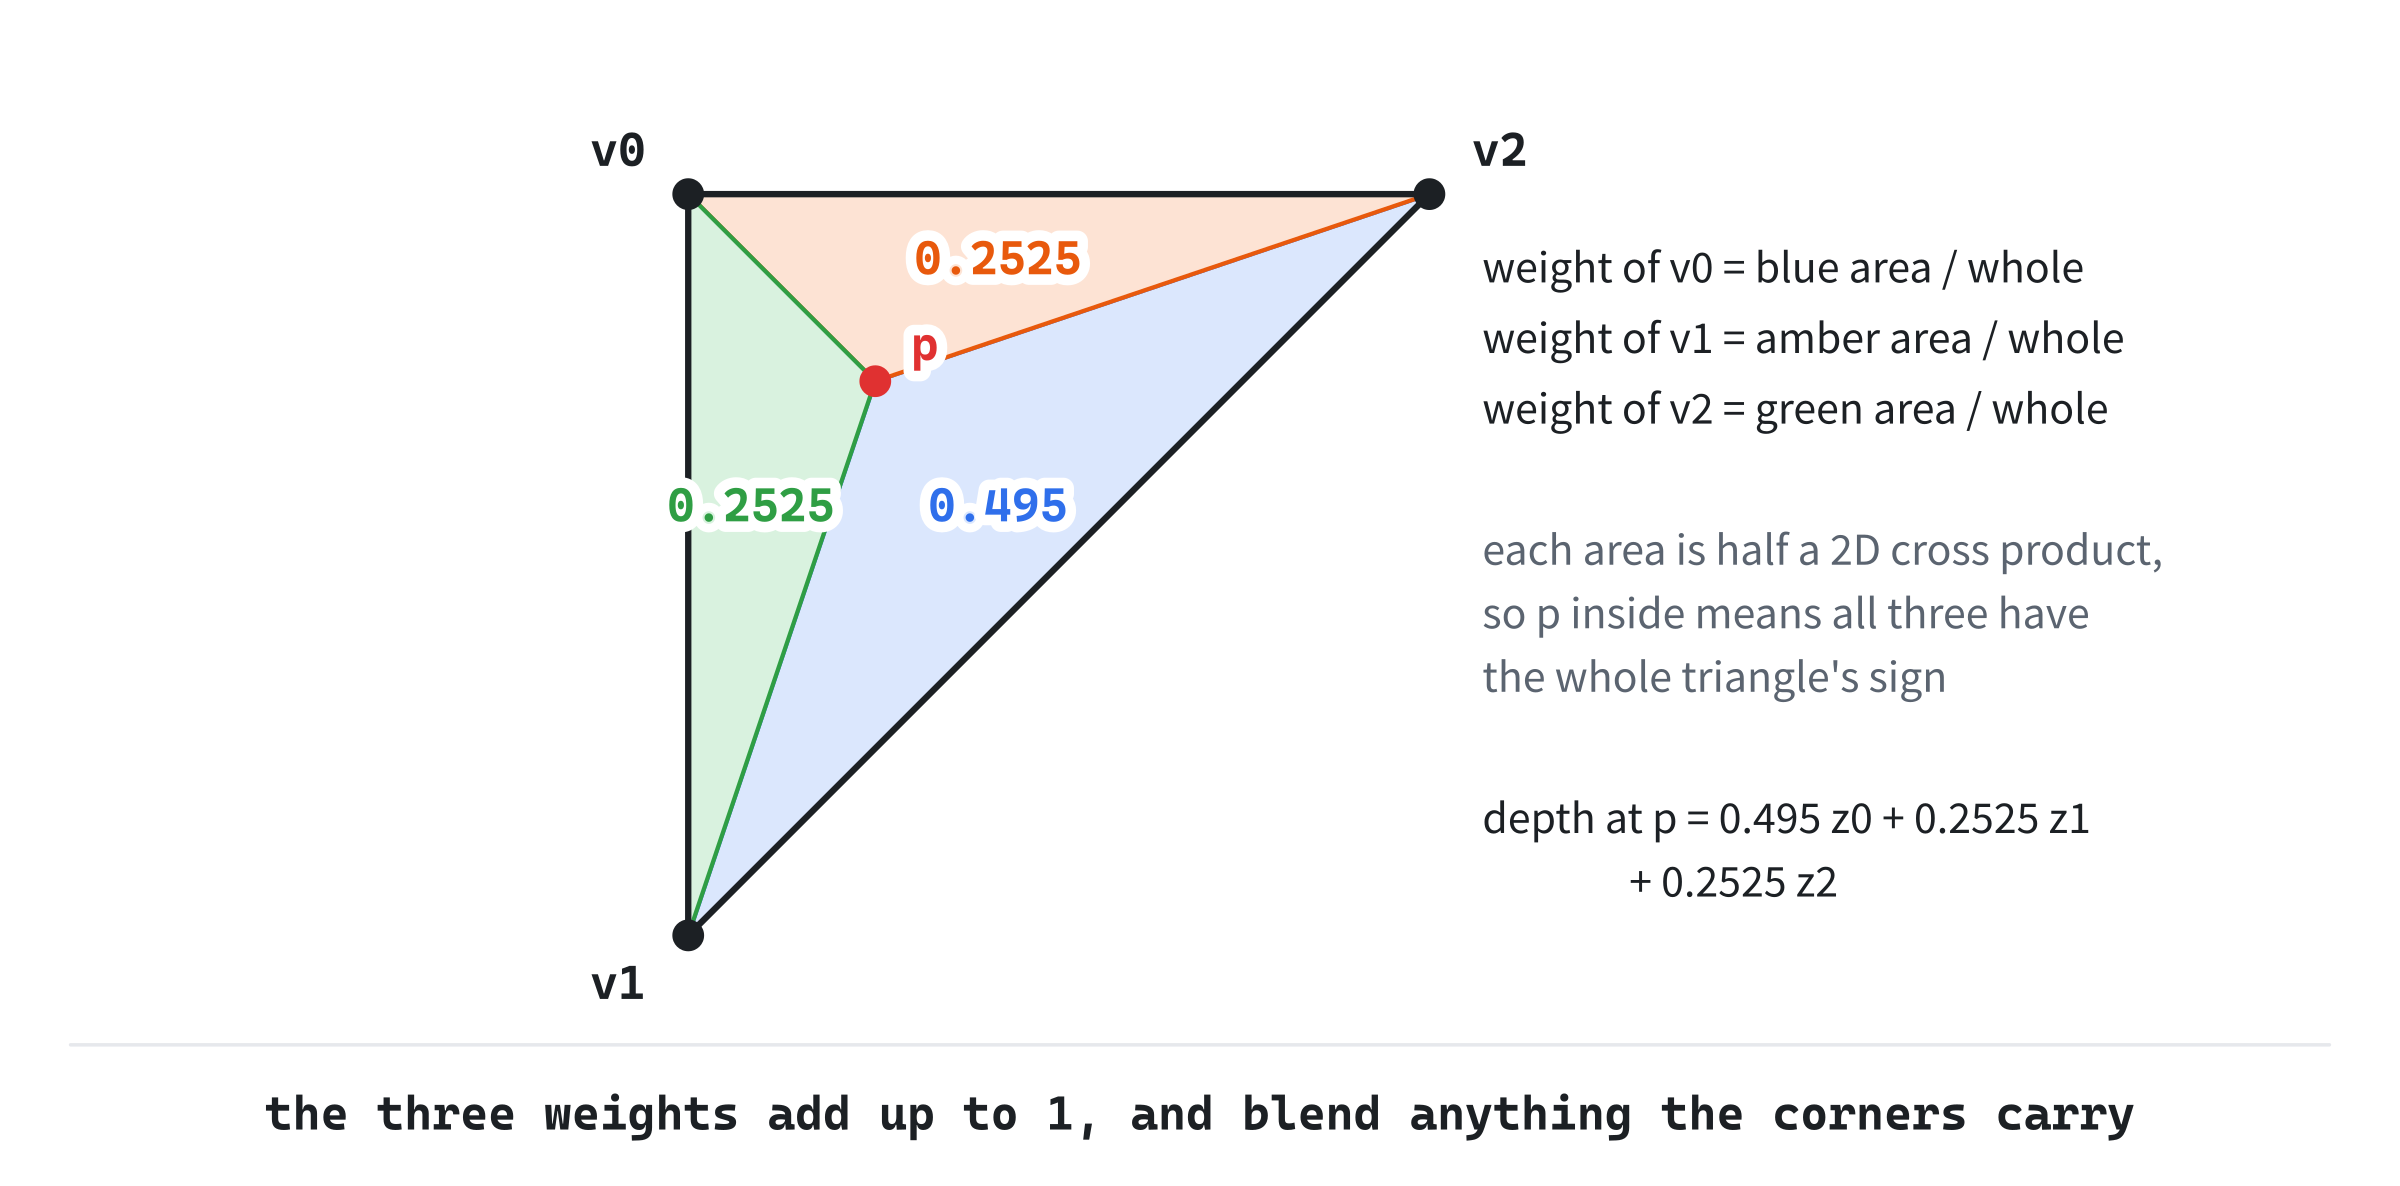
Divide each small area by the whole, and you get three barycentric weights, one for each corner: the share of the small triangle opposite it. They add up to 1. Near a corner, its weight is near 1, since the small triangle opposite it nearly fills the whole. On the edge opposite a corner, its weight is 0.
Take the triangle with corners v0 at (100, 100), v1 at (100, 300) and v2 at (300, 100), on the picture, and the pixel whose center is at (150.5, 150.5). The whole triangle's cross product is -40000. The three small ones are -19800, -10100 and -10100, so the weights are 0.495, 0.2525 and 0.2525. Anything the corners carry blends by those weights. If their depths are 0.95, 0.96 and 0.97, the pixel's depth is:
z = 0.495 * 0.95 + 0.2525 * 0.96 + 0.2525 * 0.97 = 0.9576The weights blend the corners' positions too, and give back the pixel's center, (150.5, 150.5), which is a good check. Chapter 34 blends texture coordinates the same way.
Why Depth Blends Exactly
The depth blended here is NDC's z, after the divide, and that's no accident. A triangle is flat, and Chapter 28's plane gives its points: a x + b y + c z = d, in view space. A point on it lands on the picture at x and y divided by its w, which is -z, times the projection's scales. Put x and y back in terms of those, and the plane's equation becomes:
1 / w = (p x' + q y' + r) / dHere x' and y' are the point's place in NDC, and p, q and r come from the plane's a, b and c and the projection's scales. A plane through the eye has a d of 0, but it's seen edge on, as a line, with nothing to fill. So 1 over w is a straight-line function of the place on the picture, and blending it by the weights is exact. NDC's z is -A + B / w, a straight-line function of 1 over w, so it blends exactly too.
View space's depth, w itself, doesn't. Take a line seen at a slant, from a depth of 2 to a depth of 10. The point halfway across it on the picture is at a depth of 3.33, not 6, since the near half of the line covers more of the picture. Blending w would put it at 6, while blending NDC's z gives exactly the z of the point at 3.33.
Other Ways to Fill
The three cross products are the simplest way to fill a triangle, and graphics cards use them, testing blocks of pixels at once. A scanline fill works by rows instead. For each row of pixels, it finds where the triangle's left and right edges cross it, and fills the run between them. That visits only the pixels inside, so it's faster for a program on its own, but it has more cases to get right. Solid Cube tests every pixel in the triangle's box, which is clearer, and fast enough for two boxes.
Back-Face Culling
Faces Turned Away
A closed mesh, such as a cube, shows only the faces turned toward the eye. The faces turned away are behind the near ones, so drawing them is wasted work. Without depth, it's worse than wasted, since a back face drawn after a front face covers it. About half of a closed mesh's triangles face away at any moment, and back-face culling skips them.
A face is turned toward the eye when its normal points toward the eye. Chapter 32's meshes are wound counterclockwise from outside, so Chapter 28's cross product of a triangle's edges points out of the mesh. The test is the sign of one dot product:
n · (eye - center) > 0where n is the triangle's normal and center is its middle. A positive dot product means the normal points toward the eye, and the face is drawn. Otherwise, it's culled.
The Eye, Not the View's Direction
It's tempting to test the normal against the way the camera looks, which is the same for every face. That's right for an orthographic projection, but not for a perspective one. With perspective, the eye sees a face off to the side at a slant, from the face's own side. The next image shows a face that the view's direction gets wrong.
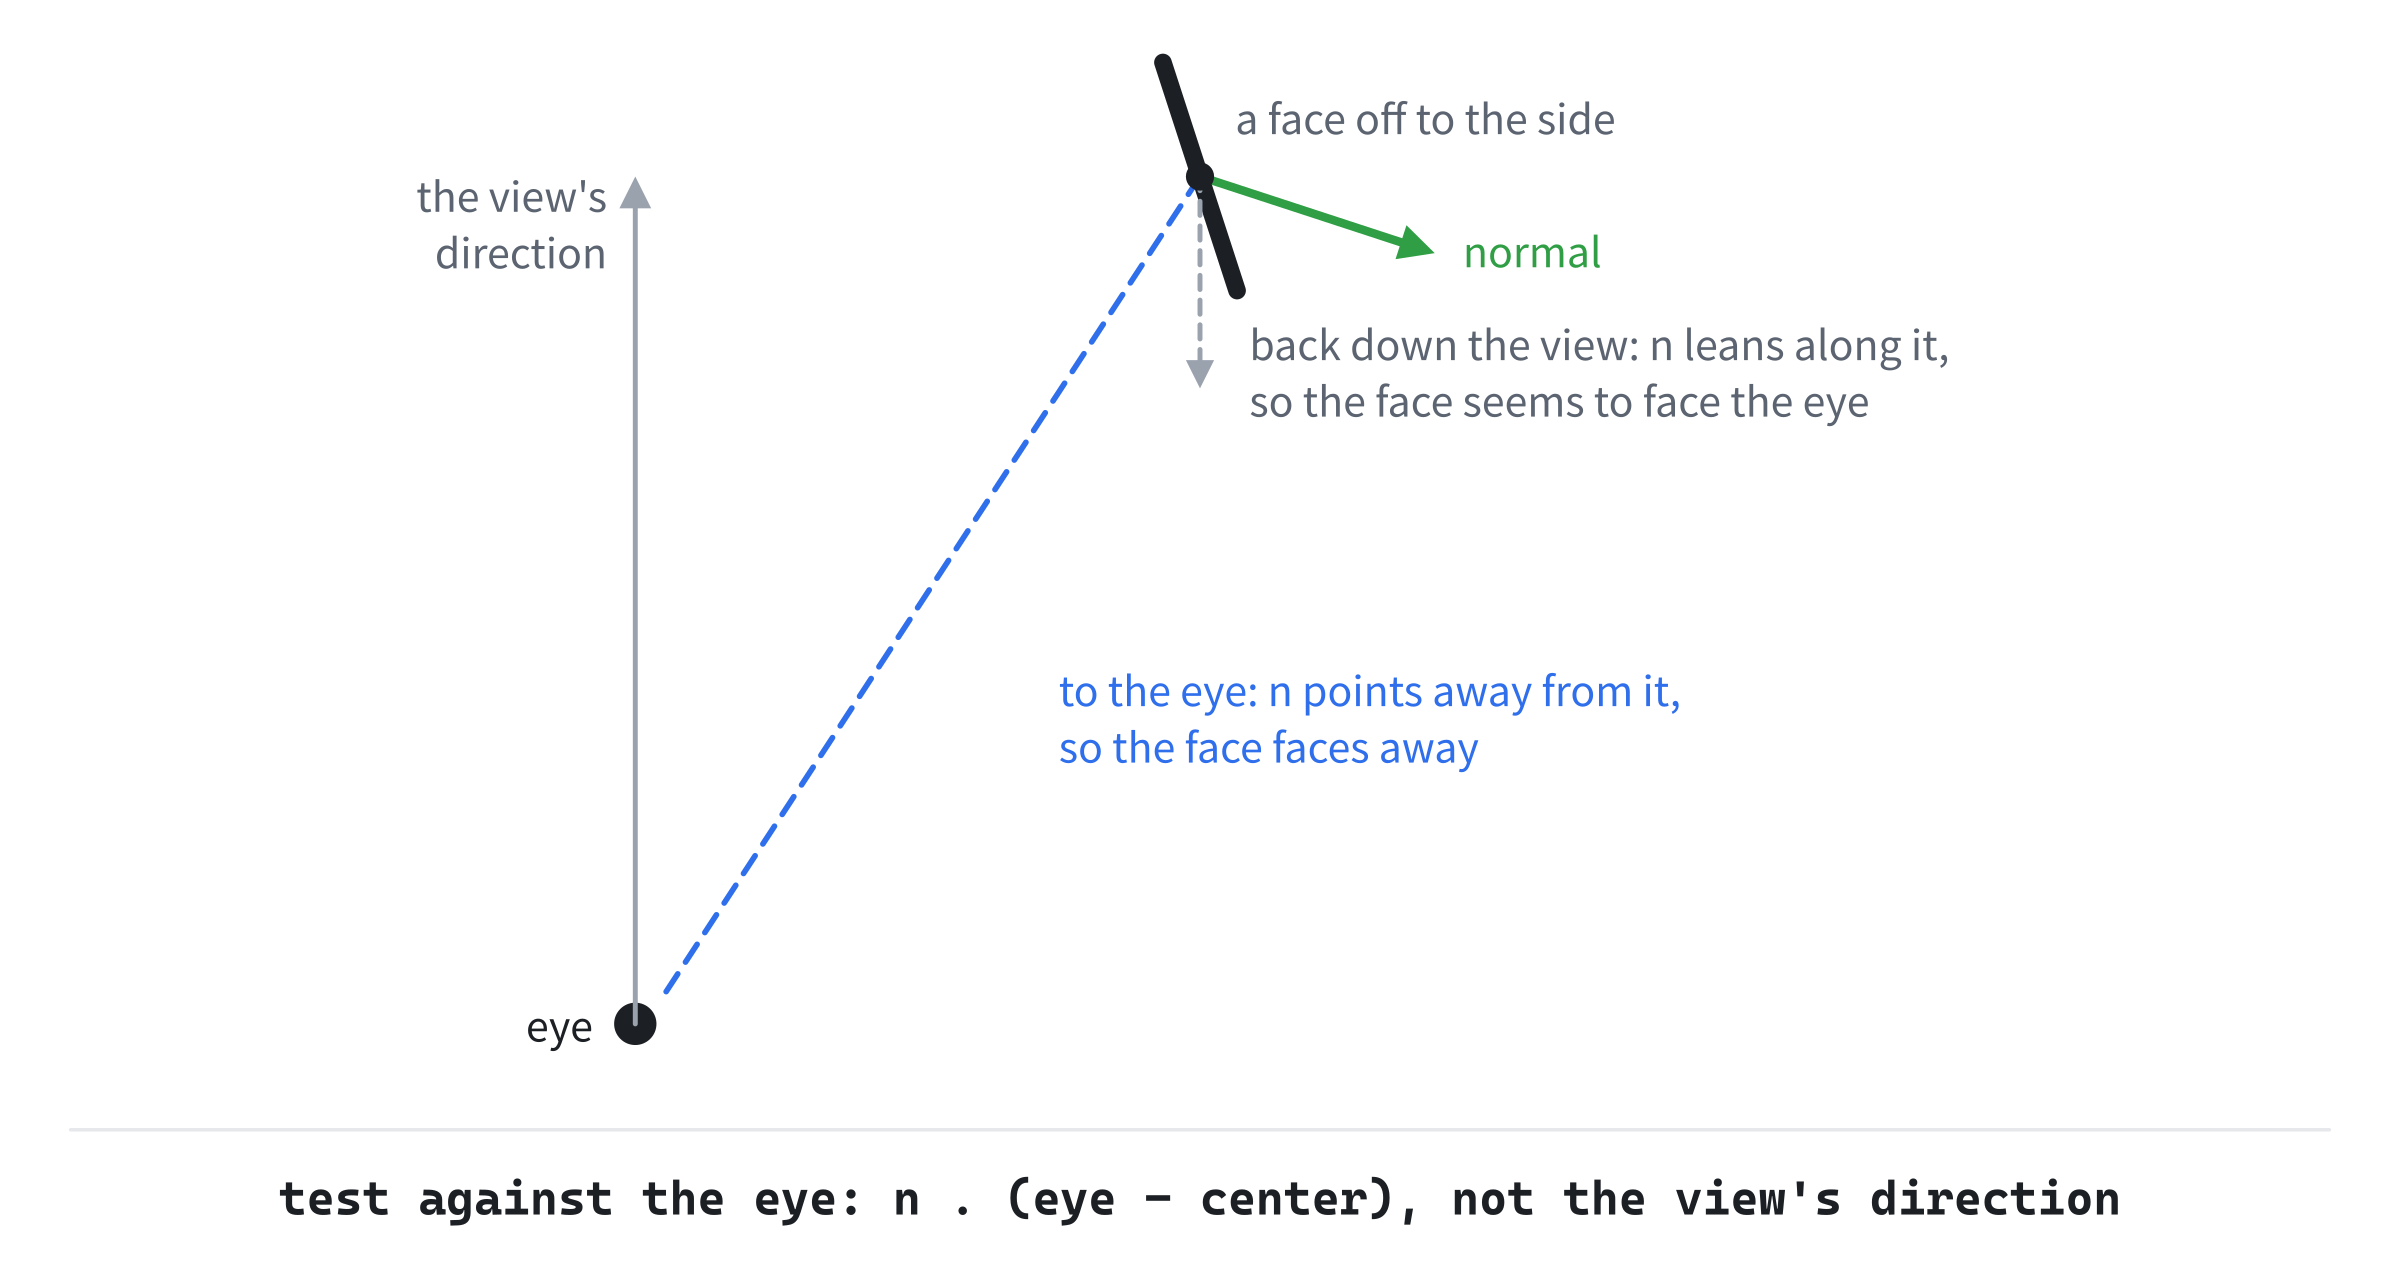
The face's normal is (0.95, 0, 0.31), for a camera at the origin looking down -z, and its center is at (4, 0, -6). Against the way back down the view, (0, 0, 1), the dot product is 0.31, so the face seems to face the eye. Against the way from its center to the eye, (-4, 0, 6), it's -1.94, and the face is turned away. The eye sees its back, so culling it is right.
Graphics cards cull a different way, by the sign of a triangle's area on the picture, since a face turned away shows its corners in the opposite order. In Solid Cube's picture, a front face's area is negative, since the picture's y runs down and flips every triangle. For the built-in cube seen square on from 6 away, the front face's first triangle has a cross product of -72327. The back face's has +36902. Solid Cube culls in the world instead, before it projects anything. Its inside test accepts both signs, so that it can draw the back faces when culling is off.
Enough for One Convex Object
For one convex object, culling is all it takes. A convex object's front faces never cover each other, so once the back faces are gone, the rest can be drawn in any order. A single turning cube needs nothing else. Two objects, or one with a dent, can cover themselves, and need more.
The Painter's Algorithm
Farthest First
A painter paints the distant hills first, then the trees in front of them, then the figure in front of everything, each layer covering what's behind it. The painter's algorithm does the same with triangles. It sorts them by depth, the farthest first, and fills them in that order, so that nearer triangles paint over farther ones. Each triangle's depth is its corners' average. It needs no memory beyond the list, and for many scenes it looks right.
Where It Fails
It fails in two ways. In the first, no order is right. When two triangles pass through each other, each is nearer on one side of the line where they cross. The next image shows two such triangles: as a depth for each pixel draws them, from the side, and as whole triangles stacked.

Whichever is drawn second covers the whole overlap, and the line where they cross is lost. Three triangles that each cover the next, in a ring, fail the same way.
In the second, a right order exists, but one depth for each triangle picks the wrong one. A long, thin triangle can have an average that's farther than a small triangle's, while the part of it that overlaps the small one is nearer. Sorted by averages, it's drawn first and painted over. That's the more common failure. Solid Cube shows both. Its bar passes through the cube, so no order of whole triangles can draw it right, and the averages decide which half of each crossing face wins.
The Z-Buffer
A Depth for Each Pixel
The z-buffer stops sorting triangles, and decides each pixel on its own. Beside the picture's colors, it keeps a depth for every pixel, which starts each frame farther than anything can be. As a triangle is filled, each pixel's depth is blended from its corners'. If it's nearer than the depth already kept there, the pixel takes the triangle's color, and the new depth is kept. If it's farther, the pixel is left alone.
The nearest surface wins every pixel, whatever order the triangles come in. Triangles that cross are drawn right, since each pixel picks whichever is nearer there, and so are rings of triangles. The cost is the memory for the depths, and a comparison for every pixel filled. It's so worth it that every graphics card has a z-buffer, and the painter's algorithm survives only where the z-buffer can't help, such as surfaces you see through, which have to be blended in order.
Depth Precision
The depths kept are NDC's z, crowded toward 1 as Chapter 30 found. With Solid Cube's planes, 0.1 and 100, NDC's z is 0 at a depth of 0.2, 0.80 at 1 and 0.97 at 6. At the start, the cube and the bar, at depths from 4.3 to 7.7, get NDC depths from 0.955 to 0.976. Floats have room to tell those apart, but two surfaces almost on top of each other can round to the same depth. Then they flicker through each other as the scene turns, which is Chapter 30's z-fighting, the z-buffer's one failure. Surfaces that touch exactly, such as a poster on a wall, need a small offset, and the near plane should be as far out as the scene allows.
Building Solid Cube
Solid Cube fills a cube with a bar through it, the bar turned so that the two cross at a slant. M switches between the z-buffer, the painter's algorithm and no method, and C switches culling on and off. Drag to orbit the camera, and roll the wheel to move it in and out. Space stops the spin, and R puts everything else back.
Get the code. The complete project is in the
Solid Cubefolder of the book's repository.
Solid Cube starts from the skeleton, with its timing. It reads the mouse's movement and its wheel, but not its position. It reuses fmt2 from Chapter 4, and builds its boxes from Mesh Viewer's built-in cube. Its Vec2.h, Vec3.h, Mat4.h and Mesh.h are Mesh Viewer's. Here are its includes and its colors:
#include <algorithm>
#include <cmath>
#include <string>
#include <vector>
#include "Vec2.h"
#include "Vec3.h"
#include "Mat4.h"
#include "Mesh.h"

constexpr int WINDOW_WIDTH  = 1000;
constexpr int WINDOW_HEIGHT = 700;

constexpr SDL_Color TEXT = { 235, 238, 242, 255 };
constexpr SDL_Color GREY = { 90, 100, 112, 255 };
The <algorithm> header is for std::sort, std::fill, std::min and std::max. Then comes the picture's size:
// The picture the rasterizer fills: a pixel for each of the window's.
constexpr int PIC_WIDTH = WINDOW_WIDTH;
constexpr int PIC_HEIGHT = WINDOW_HEIGHT;
The picture has a pixel for each of the window's, and is stretched over it. A game short of speed can make its picture smaller, and let the stretch blur it, and a picture twice the size makes a sharper screenshot, as this chapter's are. Then the constants:
// The projection: the window's aspect, a field of view of 55 degrees, and
// the near and far planes. Then the scene's spin, in radians a second, and
// the orbit camera's drag, pitch limit, distances and wheel step, as in
// Mesh Viewer, but kept outside the boxes.
constexpr float ASPECT = (float)WINDOW_WIDTH / (float)WINDOW_HEIGHT;
constexpr float FOV = 55.0f * PI / 180.0f;
constexpr float NEAR_DIST = 0.1f;
constexpr float FAR_DIST = 100.0f;
constexpr float SPIN_SPEED = 0.5f;
constexpr float DRAG_TURN = 0.01f;
constexpr float PITCH_LIMIT = 1.4f;
constexpr float MIN_DIST = 4.0f;
constexpr float MAX_DIST = 14.0f;
constexpr float WHEEL_STEP = 0.5f;
The camera is Mesh Viewer's, but kept between 4 and 14 from the middle, outside the boxes. Then the three methods, with names for the readout:
// The ways of handling hidden surfaces, in the order M steps through them.
constexpr int ZBUFFER = 0;
constexpr int PAINTER = 1;
constexpr int NONE = 2;
const char* const METHOD_NAME[3] = { "the z-buffer", "the painter's algorithm",
                                     "none" };
Then the scene's triangles:
// A triangle of the scene, in the scene's own space, with its color.
struct Tri
{
    Vec3 a;
    Vec3 b;
    Vec3 c;
    SDL_Color color;
};
A triangle on the picture is three of these:
// A corner on the picture: its pixel, and its depth in NDC.
struct ScreenVert
{
    Vec2 p;
    float z;
};
And a triangle ready to fill gathers them, with its color and its depth for sorting:
// A triangle ready to fill: its three corners on the picture, its shaded
// color, and its depth for the painter's algorithm.
struct Draw
{
    ScreenVert v[3];
    SDL_Color color;
    float key;
};
The painter's algorithm sorts these, and the fill takes them one at a time.
The Helpers
Four new functions go before main. The first adds a box to the scene:
// Add a box to the scene: the built-in cube, placed by a matrix, with each
// face cut into a fan of triangles from its first corner. A face of n
// corners gives n - 2 triangles, each wound as the face is.
void addBox(std::vector<Tri>& tris, const Mat4& place, SDL_Color color)
{
    Mesh cube = builtinCube();
    for (const std::vector<int>& f : cube.faces)
        for (size_t k = 1; k + 1 < f.size(); ++k)
            tris.push_back({ place.apply(cube.verts[f[0]]),
                             place.apply(cube.verts[f[k]]),
                             place.apply(cube.verts[f[k + 1]]), color });
}
Each face is cut into a fan of triangles, all sharing its first corner. The first triangle has the face's corners 1, 2, 3, the next 1, 3, 4, and so on. A face of n corners gives n - 2 triangles, so each of the cube's squares gives two, and a box 12. Each triangle keeps the face's winding. A fan is right for any convex face, but not for a face with a dent, where some of the fan's triangles can lie outside the face. The second puts a point in clip space on the picture:
// A point in clip space, beyond the near plane, on the picture: the divide
// by w, and the stretch across the picture.
Vec2 toPixels(Vec4 c)
{
    return { (c.x / c.w * 0.5f + 0.5f) * PIC_WIDTH,
             (0.5f - c.y / c.w * 0.5f) * PIC_HEIGHT };
}
It's Mesh Viewer's toPixels, stretching across the picture rather than the window. The third puts a triangle's three corners on the picture:
// A triangle's corners onto the picture, through clip space, and its
// depth for the painter's algorithm, the average of its corners'. A
// triangle with a corner short of the near plane gives false, to be
// dropped whole.
bool toPicture(const Mat4& toClip, const Vec3 corner[3], Draw& d)
{
    for (int k = 0; k < 3; ++k)
    {
        Vec4 c = toClip.apply4(corner[k]);
        if (c.z + c.w < 0.0f) return false;
        d.v[k] = { toPixels(c), c.z / c.w };
    }
    d.key = (d.v[0].z + d.v[1].z + d.v[2].z) / 3.0f;
    return true;
}
Each corner keeps its NDC depth, z over w. A triangle with a corner short of the near plane is dropped whole, since the camera stays outside the boxes, and that never happens here. A camera that can come close would clip the triangle instead, as Mesh Viewer clipped edges, which turns it into a shape of three or four corners, to be fanned. The fourth fills a triangle:
// Fill a triangle into the picture. Each pixel inside it gets its color,
// and with useDepth, only if the triangle is nearer there than what's
// already been drawn. The cross products e0, e1 and e2 are twice the areas
// of the three triangles the pixel's center makes with the edges, with a
// sign. Inside, all three have the area's sign, and over the area, they're
// the corners' shares of the pixel, which blend their depths. Every pixel
// inside is counted in filled.
void fillTriangle(std::vector<SDL_Color>& color, std::vector<float>& depth,
                  const Draw& d, bool useDepth, int& filled)
{
    Vec2 a = d.v[0].p;
    Vec2 b = d.v[1].p;
    Vec2 c = d.v[2].p;
    float area = (b - a).cross(c - a);
    if (std::fabs(area) < 1e-6f) return;

    // The box of pixels the triangle covers, kept inside the picture.
    int x0 = std::max(0, (int)std::floor(std::min({ a.x, b.x, c.x })));
    int x1 = std::min(PIC_WIDTH - 1,
                      (int)std::ceil(std::max({ a.x, b.x, c.x })));
    int y0 = std::max(0, (int)std::floor(std::min({ a.y, b.y, c.y })));
    int y1 = std::min(PIC_HEIGHT - 1,
                      (int)std::ceil(std::max({ a.y, b.y, c.y })));
    for (int y = y0; y <= y1; ++y)
        for (int x = x0; x <= x1; ++x)
        {
            Vec2 p = { x + 0.5f, y + 0.5f };
            float e0 = (c - b).cross(p - b);
            float e1 = (a - c).cross(p - c);
            float e2 = (b - a).cross(p - a);
            bool inside = (e0 >= 0 && e1 >= 0 && e2 >= 0) ||
                          (e0 <= 0 && e1 <= 0 && e2 <= 0);
            if (!inside) continue;
            ++filled;
            float z = (e0 * d.v[0].z + e1 * d.v[1].z + e2 * d.v[2].z) / area;
            int i = y * PIC_WIDTH + x;
            if (useDepth && z >= depth[i]) continue;
            depth[i] = z;
            color[i] = d.color;
        }
}
In the preceding code, the box of pixels is the smallest that holds the triangle, and it's clamped to the picture, so that a triangle partly off the picture is filled only where it's on it. The initializer lists give std::min and std::max three values at once. Each pixel's center is tested by the three cross products. Over the whole triangle's, they're the corners' weights, as The Weights found. The weights blend the corners' depths. With useDepth, a pixel is only taken when the triangle is nearer there, and its depth is kept. Without it, every pixel inside is taken, which is how the painter's algorithm and no method at all draw. The count of pixels filled includes those whose depth test fails.
The State
The state goes after the font is loaded. First come the picture, and the texture it's shown through:
// The picture, and the texture it's shown through. A vector of SDL_Color
// holds each pixel's red, green, blue and alpha bytes in that order,
// which is RGBA32's order (Chapter 24). Then a depth for each pixel.
SDL_Texture* picture = SDL_CreateTexture(renderer, SDL_PIXELFORMAT_RGBA32,
                                         SDL_TEXTUREACCESS_STREAMING,
                                         PIC_WIDTH, PIC_HEIGHT);
std::vector<SDL_Color> color(PIC_WIDTH * PIC_HEIGHT);
std::vector<float> depth(PIC_WIDTH * PIC_HEIGHT);
The texture is a streaming one, since it's filled every frame. An SDL_Color is four bytes: red, green, blue and alpha. That's the order Chapter 24's RGBA32 format keeps in memory. So a vector of them can be copied into the texture as it is. Then the scene:
// The scene: a cube, and a long, thin bar through it, turned so that the
// two cross at a slant. Both are made once, in the scene's own space.
std::vector<Tri> scene;
addBox(scene, Mat4::scale(1.1f, 1.1f, 1.1f), { 90, 150, 240, 255 });
addBox(scene, Mat4::rotationY(0.7f) * Mat4::rotationX(0.5f) *
              Mat4::scale(2.8f, 0.42f, 0.42f), { 235, 140, 60, 255 });
The cube is the built-in cube, a little larger. The bar is the same cube, stretched to 5.6 long and 0.84 thick, and then turned. Its matrix is read from the right, as always. The scene's 24 triangles are made once, before the loop. Then come the light and the controls:
// The light's direction, toward the light. Then the method, culling,
// the spin, and the orbit camera.
const Vec3 LIGHT = Vec3(-0.4f, 0.7f, 0.6f).normalized();
int method = ZBUFFER;
bool culling = true;
float spin = 0.0f;
bool spinning = true;
bool dragging = false;
float yaw = 0.4f;
float pitch = 0.3f;
float dist = 6.0f;
The light comes from the upper left and in front. The demo starts with the z-buffer and culling, and the camera 6 from the middle, a little above the scene. The projection never changes:
// The projection, which never changes.
Mat4 proj = Mat4::perspective(FOV, ASPECT, NEAR_DIST, FAR_DIST);
It's Chapter 30's perspective, at 55 degrees.
The Events
M steps through the methods, C switches culling, and the drag and the wheel move the camera:
// Events: quitting, and the keys, clicks and turns of the wheel that
// happen once. A drag orbits the camera, and the wheel moves it.
SDL_Event event;
while (SDL_PollEvent(&event))
{
    if (event.type == SDL_EVENT_QUIT) running = false;
    else if (event.type == SDL_EVENT_KEY_DOWN)
    {
        if (event.key.key == SDLK_ESCAPE) running = false;
        else if (event.key.key == SDLK_M) method = (method + 1) % 3;
        else if (event.key.key == SDLK_C) culling = !culling;
        else if (event.key.key == SDLK_SPACE) spinning = !spinning;
        else if (event.key.key == SDLK_R)
        {
            method = ZBUFFER;
            culling = true;
            spin = 0.0f;
            yaw = 0.4f;
            pitch = 0.3f;
            dist = 6.0f;
        }
    }
    else if (event.type == SDL_EVENT_MOUSE_BUTTON_DOWN &&
             event.button.button == SDL_BUTTON_LEFT) dragging = true;
    else if (event.type == SDL_EVENT_MOUSE_BUTTON_UP) dragging = false;
    else if (event.type == SDL_EVENT_MOUSE_MOTION && dragging)
    {
        yaw -= event.motion.xrel * DRAG_TURN;
        pitch += event.motion.yrel * DRAG_TURN;
        pitch = SDL_clamp(pitch, -PITCH_LIMIT, PITCH_LIMIT);
    }
    else if (event.type == SDL_EVENT_MOUSE_WHEEL)
        dist = SDL_clamp(dist - event.wheel.y * WHEEL_STEP, MIN_DIST,
                         MAX_DIST);
}
In the preceding code, the camera's drag and wheel are Mesh Viewer's, with this demo's limits. R puts the method and culling back too, and the spin to its start.
Each Frame's Work
Each frame, the scene turns, and the camera's matrices are built:
// The scene spins about y, and more slowly about x. The eye orbits the
// middle, as in Mesh Viewer, and looks at it.
if (spinning) spin += SPIN_SPEED * dt;
Mat4 model = Mat4::rotationY(spin) * Mat4::rotationX(spin * 0.5f);
Vec3 eye = { dist * std::cos(pitch) * std::sin(yaw),
             dist * std::sin(pitch),
             dist * std::cos(pitch) * std::cos(yaw) };
const Vec3 MIDDLE = { 0.0f, 0.0f, 0.0f };
const Vec3 UP = { 0.0f, 1.0f, 0.0f };
Mat4 toClip = proj * Mat4::lookAt(eye, MIDDLE, UP);
The scene's model matrix stays separate, since culling and lighting are done in the world. The view and the projection go together into one matrix, which takes a point from the world to clip space.
Drawing
After the skeleton clears the screen, the picture is cleared:
// Clear the picture to the background, and every depth to 2, beyond
// anything's NDC depth, so that the first triangle at a pixel wins it.
std::fill(color.begin(), color.end(), SDL_Color{ 24, 26, 30, 255 });
std::fill(depth.begin(), depth.end(), 2.0f);
A depth of 2 is farther than any NDC depth, which is at most 1, so the first triangle at a pixel always passes the test. Then each triangle is prepared:
// Each triangle: into the world by the model matrix, culled if it
// faces away from the eye, shaded by Lambert's law, with a little
// light everywhere, as in Normals, and put on the picture. The range
// of its corners' depths is kept for the readout.
std::vector<Draw> draws;
int culled = 0;
float nearest = 2.0f;
float farthest = -2.0f;
for (const Tri& t : scene)
{
    Vec3 corner[3] = { model.apply(t.a), model.apply(t.b),
                       model.apply(t.c) };
    Vec3 n = (corner[1] - corner[0]).cross(corner[2] - corner[0])
                 .normalized();
    Vec3 center = (corner[0] + corner[1] + corner[2]) / 3.0f;
    if (culling && n.dot(eye - center) <= 0.0f)
    {
        ++culled;
        continue;
    }
    float bright = SDL_clamp(n.dot(LIGHT), 0.0f, 1.0f) * 0.75f + 0.25f;
    Draw d;
    d.color = { (Uint8)(t.color.r * bright),
                (Uint8)(t.color.g * bright),
                (Uint8)(t.color.b * bright), 255 };
    if (!toPicture(toClip, corner, d)) continue;
    for (const ScreenVert& v : d.v)
    {
        nearest = std::min(nearest, v.z);
        farthest = std::max(farthest, v.z);
    }
    draws.push_back(d);
}
In the preceding code, the triangle's corners are taken into the world, where its normal and its middle give the back-face test. A culled triangle is counted and skipped. The brightness is Lambert's law from Chapter 28: the normal's dot product with the light, clamped at 0. It's scaled to 0.75, and 0.25 is added, so that a face turned from the light is dim rather than black. The color is the triangle's own, times that brightness. Then toPicture puts the corners on the picture, and the range of their depths is kept for the readout. Then the method decides how the list is filled:
// The painter's algorithm sorts the triangles, the farthest first,
// and paints the nearer over them. The z-buffer needs no sort.
if (method == PAINTER)
    std::sort(draws.begin(), draws.end(),
              [](const Draw& p, const Draw& q)
              { return p.key > q.key; });
int filled = 0;
for (const Draw& d : draws)
    fillTriangle(color, depth, d, method == ZBUFFER, filled);
The sort's comparison is a small lambda, as in Chapter 22. It puts a larger key first, which is a farther triangle. With the z-buffer, the list is filled in whatever order it's in. Then the picture is shown:
// Show the picture: copy it into the texture, four bytes a pixel, and
// draw the texture over the whole window.
SDL_UpdateTexture(picture, nullptr, color.data(), PIC_WIDTH * 4);
SDL_RenderTexture(renderer, picture, nullptr, nullptr);
The SDL_UpdateTexture function copies the colors into the texture, a row at a time, with a row being PIC_WIDTH times 4 bytes. Then SDL_RenderTexture, with no rectangles, draws the whole texture over the whole window. Last come the readout and the controls:
// The readout: the method and culling, the triangles drawn and
// culled, the pixels filled as a share of the picture's, and the
// corners' range of NDC depths.
int share = (int)std::lround(100.0 * filled / (PIC_WIDTH * PIC_HEIGHT));
drawText(renderer, font,
         std::string("hidden surfaces: ") + METHOD_NAME[method] +
         ", culling " + (culling ? "on" : "off"), 12, 10, TEXT);
drawText(renderer, font,
         std::to_string(draws.size()) + " triangles drawn, " +
         std::to_string(culled) + " culled, pixels filled " +
         std::to_string(share) + "% of the picture's", 12, 32, TEXT);
drawText(renderer, font,
         "NDC depths of the corners: " + fmt2(nearest) + " to " +
         fmt2(farthest), 12, 54, TEXT);
drawText(renderer, font,
         "[M] method   [C] culling   [Space] spin   [Drag] orbit   "
         "[Wheel] in and out   [R] reset   [Esc] quit",
         12, WINDOW_HEIGHT - 26, GREY);
The pixels filled are shown as a share of the picture's pixels, so that the number means the same at any picture size. The cleanup has one line to add, for the texture, which goes first:
// Clean up, in the reverse order of creation.
SDL_DestroyTexture(picture);
The texture belongs to the renderer, so it goes before the renderer does.
Trying It Out
Run the demo. The bar turns through the cube, and the edges where it enters and leaves the cube's faces are sharp and right. Then try it, step by step:
- Start right. Press Space to stop the spin, then R, to put the scene back as it started. With the z-buffer and culling, the bar comes out of the cube's faces exactly where it crosses them. The readout's depths are crowded between 0.96 and 0.97.
- Sort instead. Press M for the painter's algorithm. Where the bar comes out of the cube, its long face is cut along the face's diagonal: one of its two triangles is drawn over the cube, and the other under it. The bar becomes a spike, well away from where it really crosses.
- No method, with culling. Press M again for no method. The cube is drawn right, and so is the bar, since each is convex. But the bar lies over the whole cube, since its triangles come later in the list.
- No method, no culling. Press C. Now the back faces are drawn too, in the list's order, and they cover front faces: the picture is a mess. The pixels filled go up from 26% of the picture's to 53%.
- Culling with the z-buffer. Press M to return to the z-buffer. The picture is right with culling off too, since the z-buffer handles the back faces. But it fills twice the pixels to get there, so culling still saves half the work.
- Orbit. Drag around the scene with each method. The painter's algorithm is right from some angles and wrong from others, as the averages change order. The z-buffer is right from all of them.
The next image shows step 1.

On the left, the bar comes out of the cube's front face along a slanting line, where the two really cross. On the right, it comes out of the cube's side. The next image shows step 2.
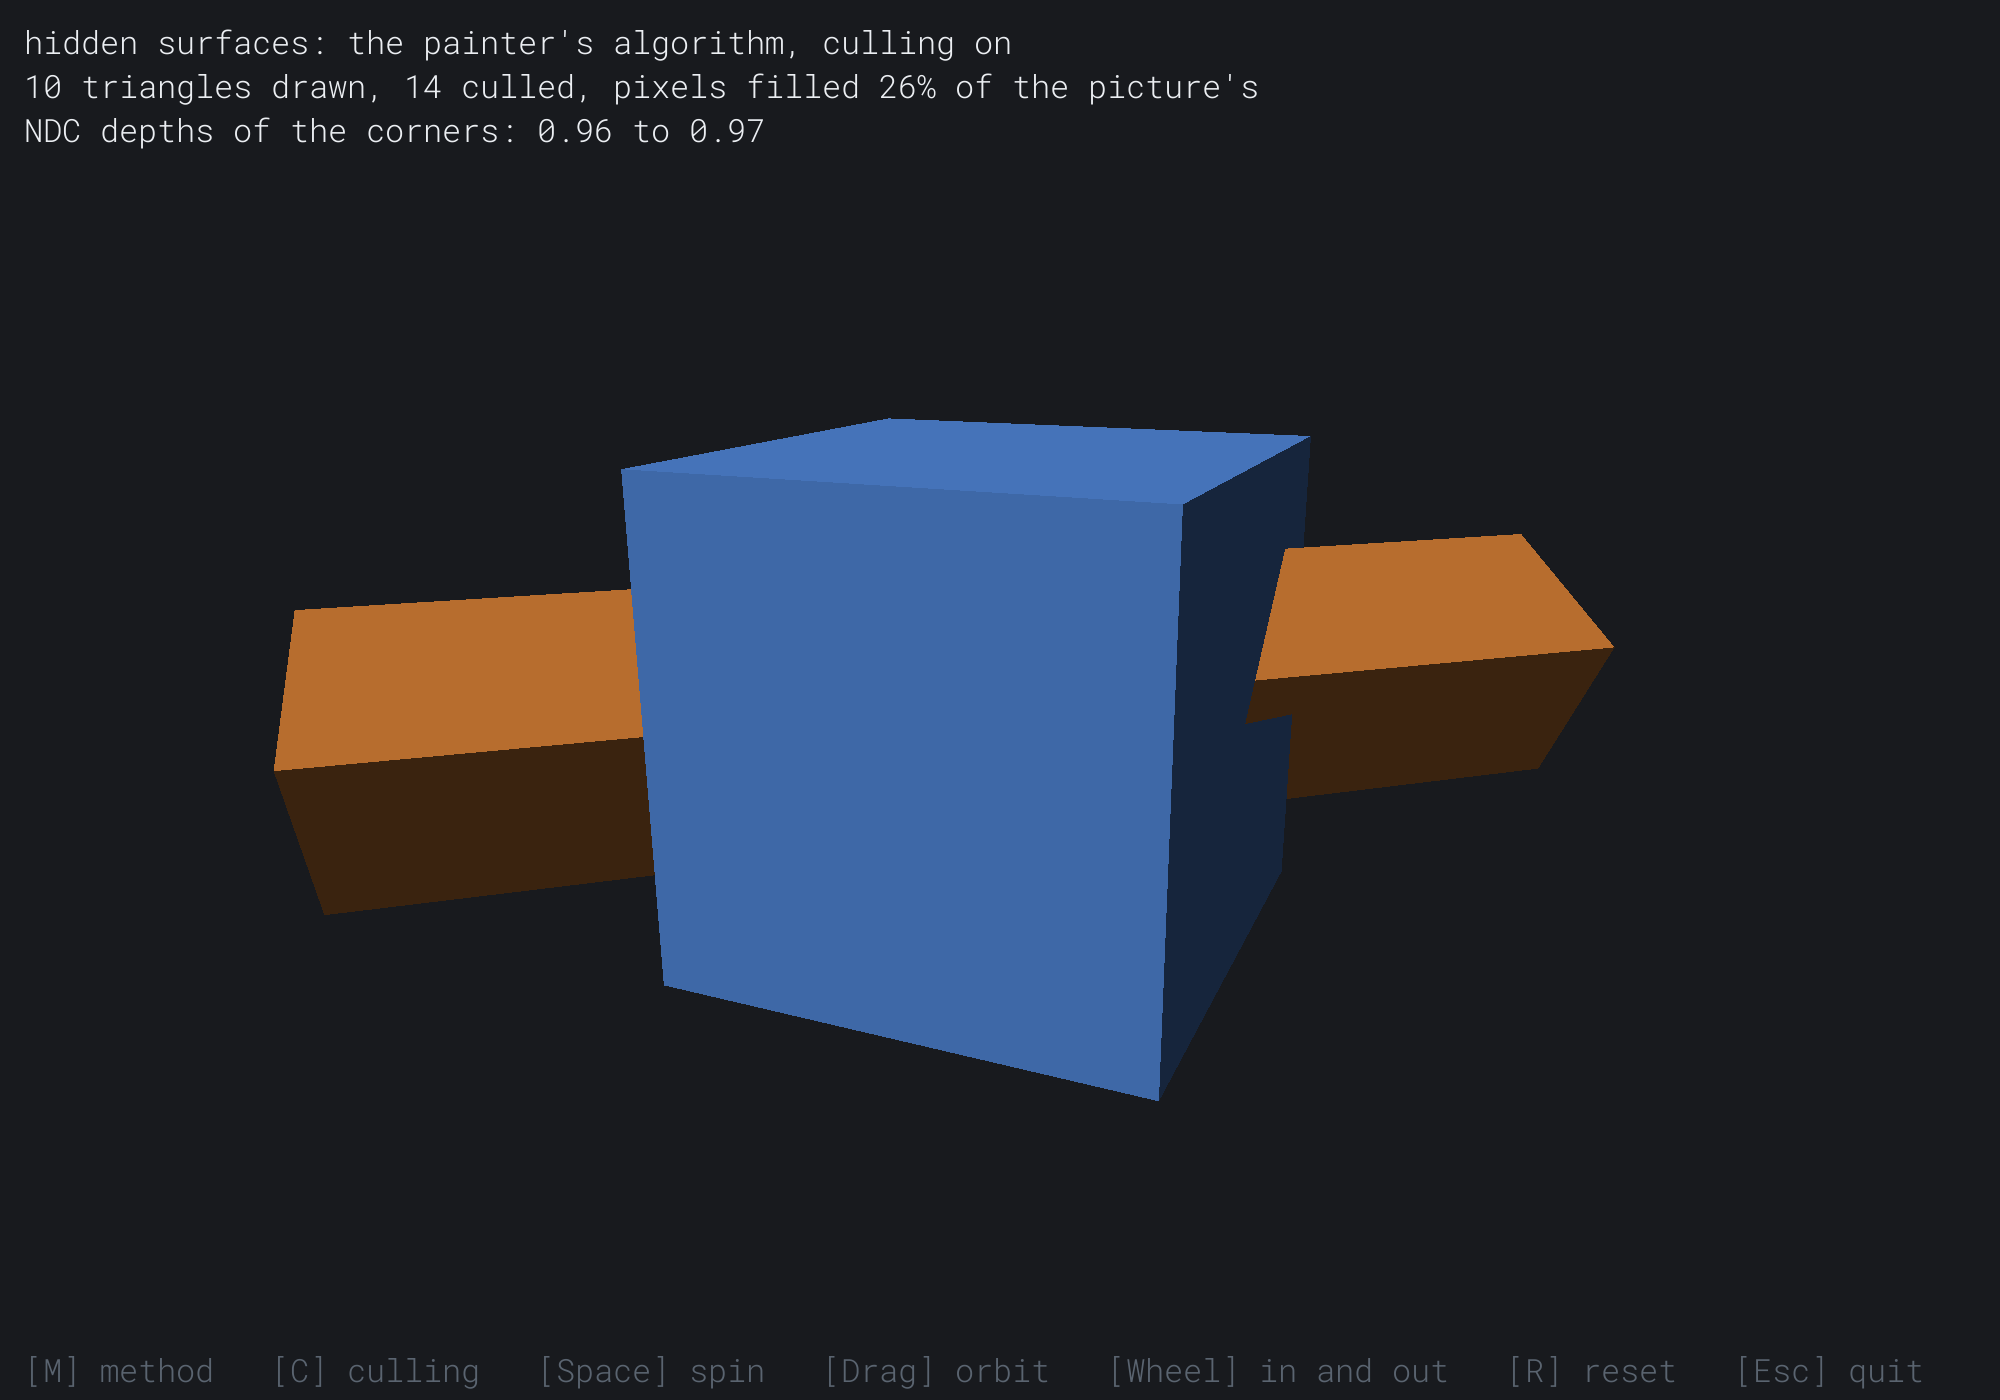
On the left, the cube's front face covers the bar, which should cross it. On the right, one triangle of the bar's face is drawn over the cube's side, and its partner under it, since their averages fall on either side of the side's. The next image shows step 3.
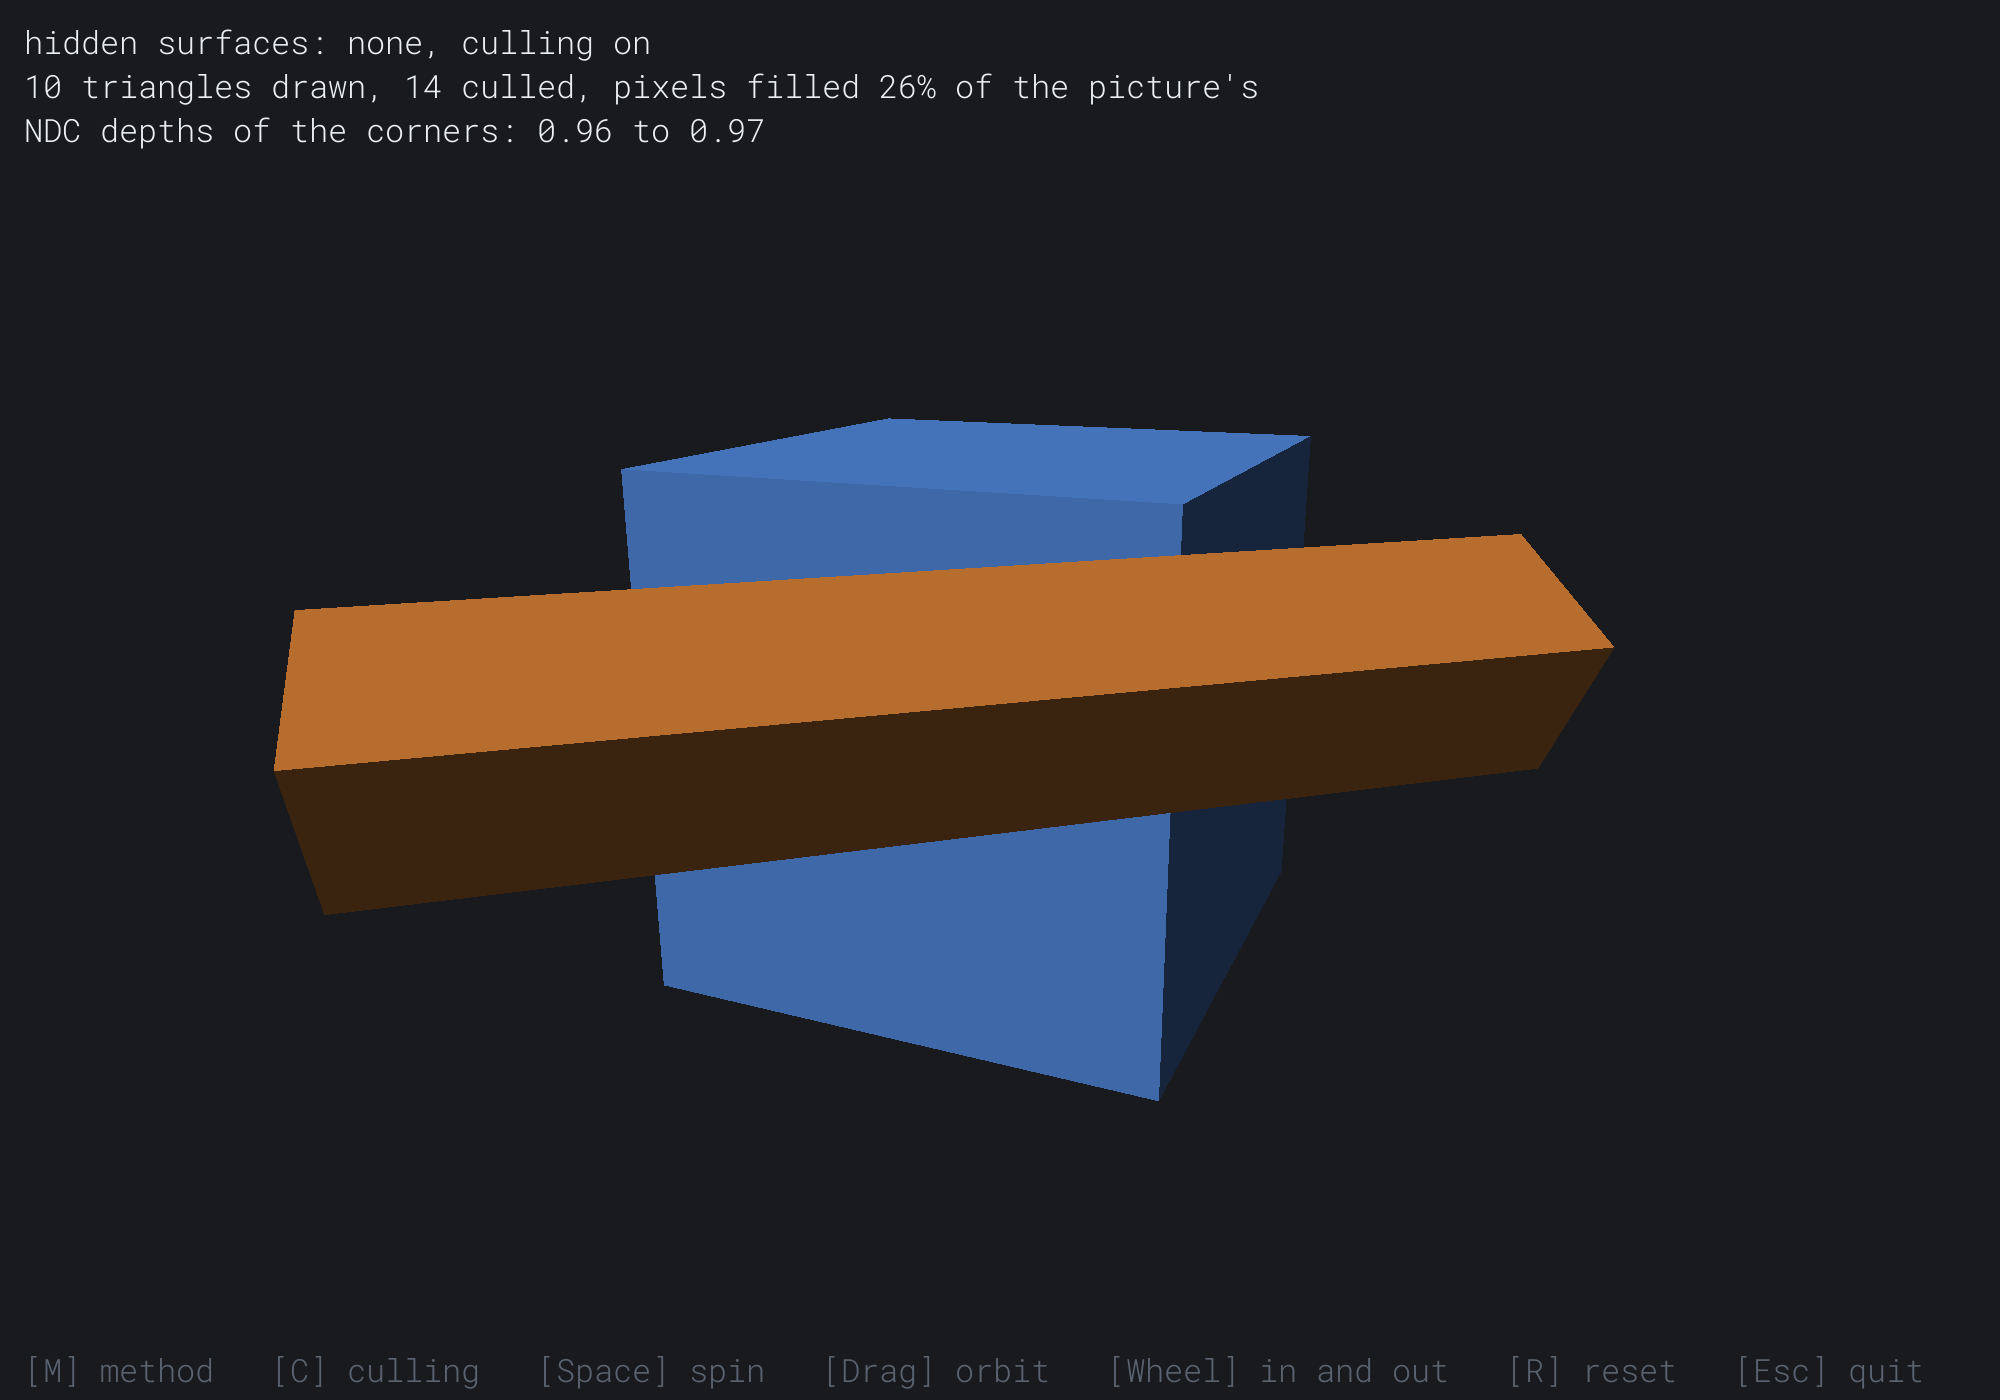
Each box is drawn right on its own, but the bar, drawn after the cube, covers it all.
FAQ
Q) Is culling still worth it with a z-buffer?
A) Yes. The z-buffer would hide the back faces anyway, but only after filling them, pixel by pixel. Culling skips them with one dot product each. In Solid Cube's starting view, it cuts the pixels filled from 53% of the picture's to 26%.
Q) Why are some pixels on a shared edge filled twice?
A) A pixel whose center is exactly on the edge two triangles share passes both triangles' tests, since each accepts 0. With solid colors and a z-buffer, nobody can tell. With surfaces you see through, a pixel blended twice shows. Graphics cards follow a top-left rule: a pixel exactly on an edge belongs to the triangle on one agreed side, so every pixel is filled once.
Q) Why are the corners' depths so close together?
A) They're NDC's z, which Chapter 30 found crowded toward 1, and the near plane of 0.1 crowds them more. At the start, the boxes' depths, 4.3 to 7.7, take only 0.955 to 0.976. A float still tells them apart, but surfaces much closer than the boxes' faces could round together. Moving the near plane out spreads them, as Chapter 30 showed.
Exercises
The first three exercises need only a pencil. The others change Solid Cube.
- Weights (paper). For the triangle in Figure 33.1, find the weights of the pixel whose center is at
(200.5, 150.5). Do they add up to 1? - Front or back (paper). A triangle's normal is
(0, 0, 1), and its center is(0, 0, 2). Is it drawn with the eye at(0, 0, 10)? With the eye at(0, 0, -3)? - Fans (paper). How many triangles does a hexagon fan into? Draw a pentagon with a dent, and find a first corner whose fan covers some of the outside.
- Count the savings (code). Add the most and least triangles culled, and the most and least pixels filled, over a whole turn of the scene, with culling on and off.
- A third box (code). Add a box in front of the cube that the bar doesn't touch, and find a view where the painter's algorithm draws the two whole boxes in the wrong order.
- Into the boxes (challenge). Let the camera come as near as 0.5, and clip each triangle at the near plane in clip space, instead of dropping it. A triangle cut by the plane keeps three or four corners, to be fanned.
For the code exercises, work on a copy of the demo's folder, so that the original stays as the chapter describes it.
AI Exercise (Optional)
With a rasterizer and a z-buffer, you can draw a small world of your own. Open your AI chatbot of choice, and try a prompt like this:
"I have a C++ demo using SDL3 with my own triangle rasterizer: it fills triangles into a std::vector<SDL_Color> picture, a pixel at a time, by three 2D cross products, blends each corner's NDC depth by the barycentric weights, and keeps a std::vector<float> depth buffer. A function addBox(tris, matrix, color) adds the 12 triangles of a cube, placed by a Mat4. I cull back faces with n.dot(eye - center) and shade by Lambert's law. Please build a small landscape of blocks on a 24 by 24 grid, each a box whose height comes from a smooth noise function, colored by height: sand, grass, rock and snow. Add a camera that flies with the mouse and WASD. Then add fog: blend each pixel toward the sky's color by its distance from the eye. Explain why the fog should use the view-space depth, w, rather than the NDC depth kept in the buffer."
That prompt describes the rasterizer you built, so the AI builds on it, rather than writing its own. NDC depth is crowded toward 1, so fog driven by it would come on all at once, close to the eye. View-space depth grows evenly with distance, so the fog thickens steadily. That's why the AI should carry w to each pixel too, which is where Chapter 34 begins.
Then let blocks be dug away with a click, using a ray from the eye through the mouse.
Summary
Filling faces needs an answer to which surface shows at each pixel. A triangle is filled by testing each pixel's center against its three edges, with Chapter 4's 2D cross product. The three cross products, over the triangle's, are the pixel's barycentric weights. They blend whatever the corners carry. NDC depth blends exactly across a flat triangle, since 1 over w is a straight-line function of the place on the picture, while view-space depth doesn't. Back-face culling skips a triangle whose normal points away from the eye, by the sign of n · (eye - center), and is enough on its own for one convex object. The painter's algorithm fills triangles the farthest first, and fails when triangles cross or when their average depths mislead. The z-buffer keeps the nearest depth for each pixel, and is right whatever the order, but surfaces almost on top of each other can still flicker through each other. Chapter 34 lays a picture over the faces, with texture coordinates that the weights blend, and finds that they need the depth to blend right.