
Every shape so far has been made of straight lines. This chapter bends them. Curves are how a camera sweeps smoothly from one view to the next, how an enemy glides along a designed route instead of turning sharp corners, and how a designer draws a road or a river. And the most useful curve in game making, the Bezier curve, is built from something you already know well: Chapter 8's lerp.
That's the pleasure of this chapter. A Bezier curve is lerping done in layers: lerps between lerps between lerps. We'll build one, write it a second way that shows where it can go, and find its velocity, which says which way it heads and how fast. Then we'll build curves that pass through points you choose, and solve the one tricky problem curves bring: moving along them at a steady speed.
In this chapter, we will:
- Build Bezier curves from layers of lerps, by de Casteljau's algorithm
- Write the same curve as a weighted average, and see where it can and can't go
- Find the curve's velocity, and from it the tangent, the normal and the speed
- Build Catmull-Rom splines, which pass through every waypoint, from Bezier pieces
- Move along a curve at a steady speed, with an arc-length table
- Build Path Designer, where you shape a path and watch two dots race along it
We'll start with a single lerp.
Bezier Curves From Lerp
A lerp walks a straight line. Layer a few of them, and the line bends.
One Lerp, Then Layers
Given two points and a fraction t, lerp(A, B, t) walks a straight line from A to B as t goes from 0 to 1. That's a linear Bezier, a Bezier curve with two control points. It doesn't bend yet, but everything else grows from it.
Now take three control points, P0, P1 and P2, and lerp between lerps. First find the point t of the way from P0 to P1, and the point t of the way from P1 to P2. Then lerp between those two points by the same t. As t sweeps from 0 to 1, that last point traces a quadratic Bezier: a curve that starts at P0, ends at P2, and bends toward P1 without reaching it.
Add a fourth control point, and do it once more. Four points give three lerps, those three give two, and those two give one: the point on a cubic Bezier. It's the workhorse of the family, and the one this chapter uses. Its four control points go in a struct:
// A cubic Bezier: its four control points. It starts at the anchor p0, is
// pulled toward the handles p1 and p2, and ends at the anchor p3.
struct Cubic
{
    Vec2 p0;
    Vec2 p1;
    Vec2 p2;
    Vec2 p3;
};
And the point at t is six lerps, in a little pyramid:
// The point at t on a cubic Bezier, by de Casteljau's algorithm: three
// lerps between the control points, two between those, and one more.
Vec2 bezier(const Cubic& curve, float t)
{
    Vec2 a = lerp(curve.p0, curve.p1, t);
    Vec2 b = lerp(curve.p1, curve.p2, t);
    Vec2 c = lerp(curve.p2, curve.p3, t);
    Vec2 d = lerp(a, b, t);
    Vec2 e = lerp(b, c, t);
    return lerp(d, e, t);
}
The first row, a, b and c, lerps between each neighboring pair of control points. The second row, d and e, lerps between those. The last lerp joins the two into one: the point on the curve at t. There's no curve formula to remember, just lerp three layers deep. This way of finding the point is de Casteljau's algorithm, after Paul de Casteljau, who worked it out for car bodies at Citroën around 1959.
A Worked Example
Take P0 at (0, 8), P1 at (4, 0), P2 at (12, 0) and P3 at (16, 8). On the screen, with y down, that's an arch: the two ends low, and the two handles high above them. At a t of 0.5, every lerp is a halfway point:
a = lerp(P0, P1, 0.5) = (2, 4)
b = lerp(P1, P2, 0.5) = (8, 0)
c = lerp(P2, P3, 0.5) = (14, 4)
d = lerp(a, b, 0.5)   = (5, 2)
e = lerp(b, c, 0.5)   = (11, 2)
lerp(d, e, 0.5)       = (8, 2)
So the curve's halfway point is (8, 2), the top of the arch. It's well below P1 and P2, which are at a height of 0. The next image shows the whole construction.
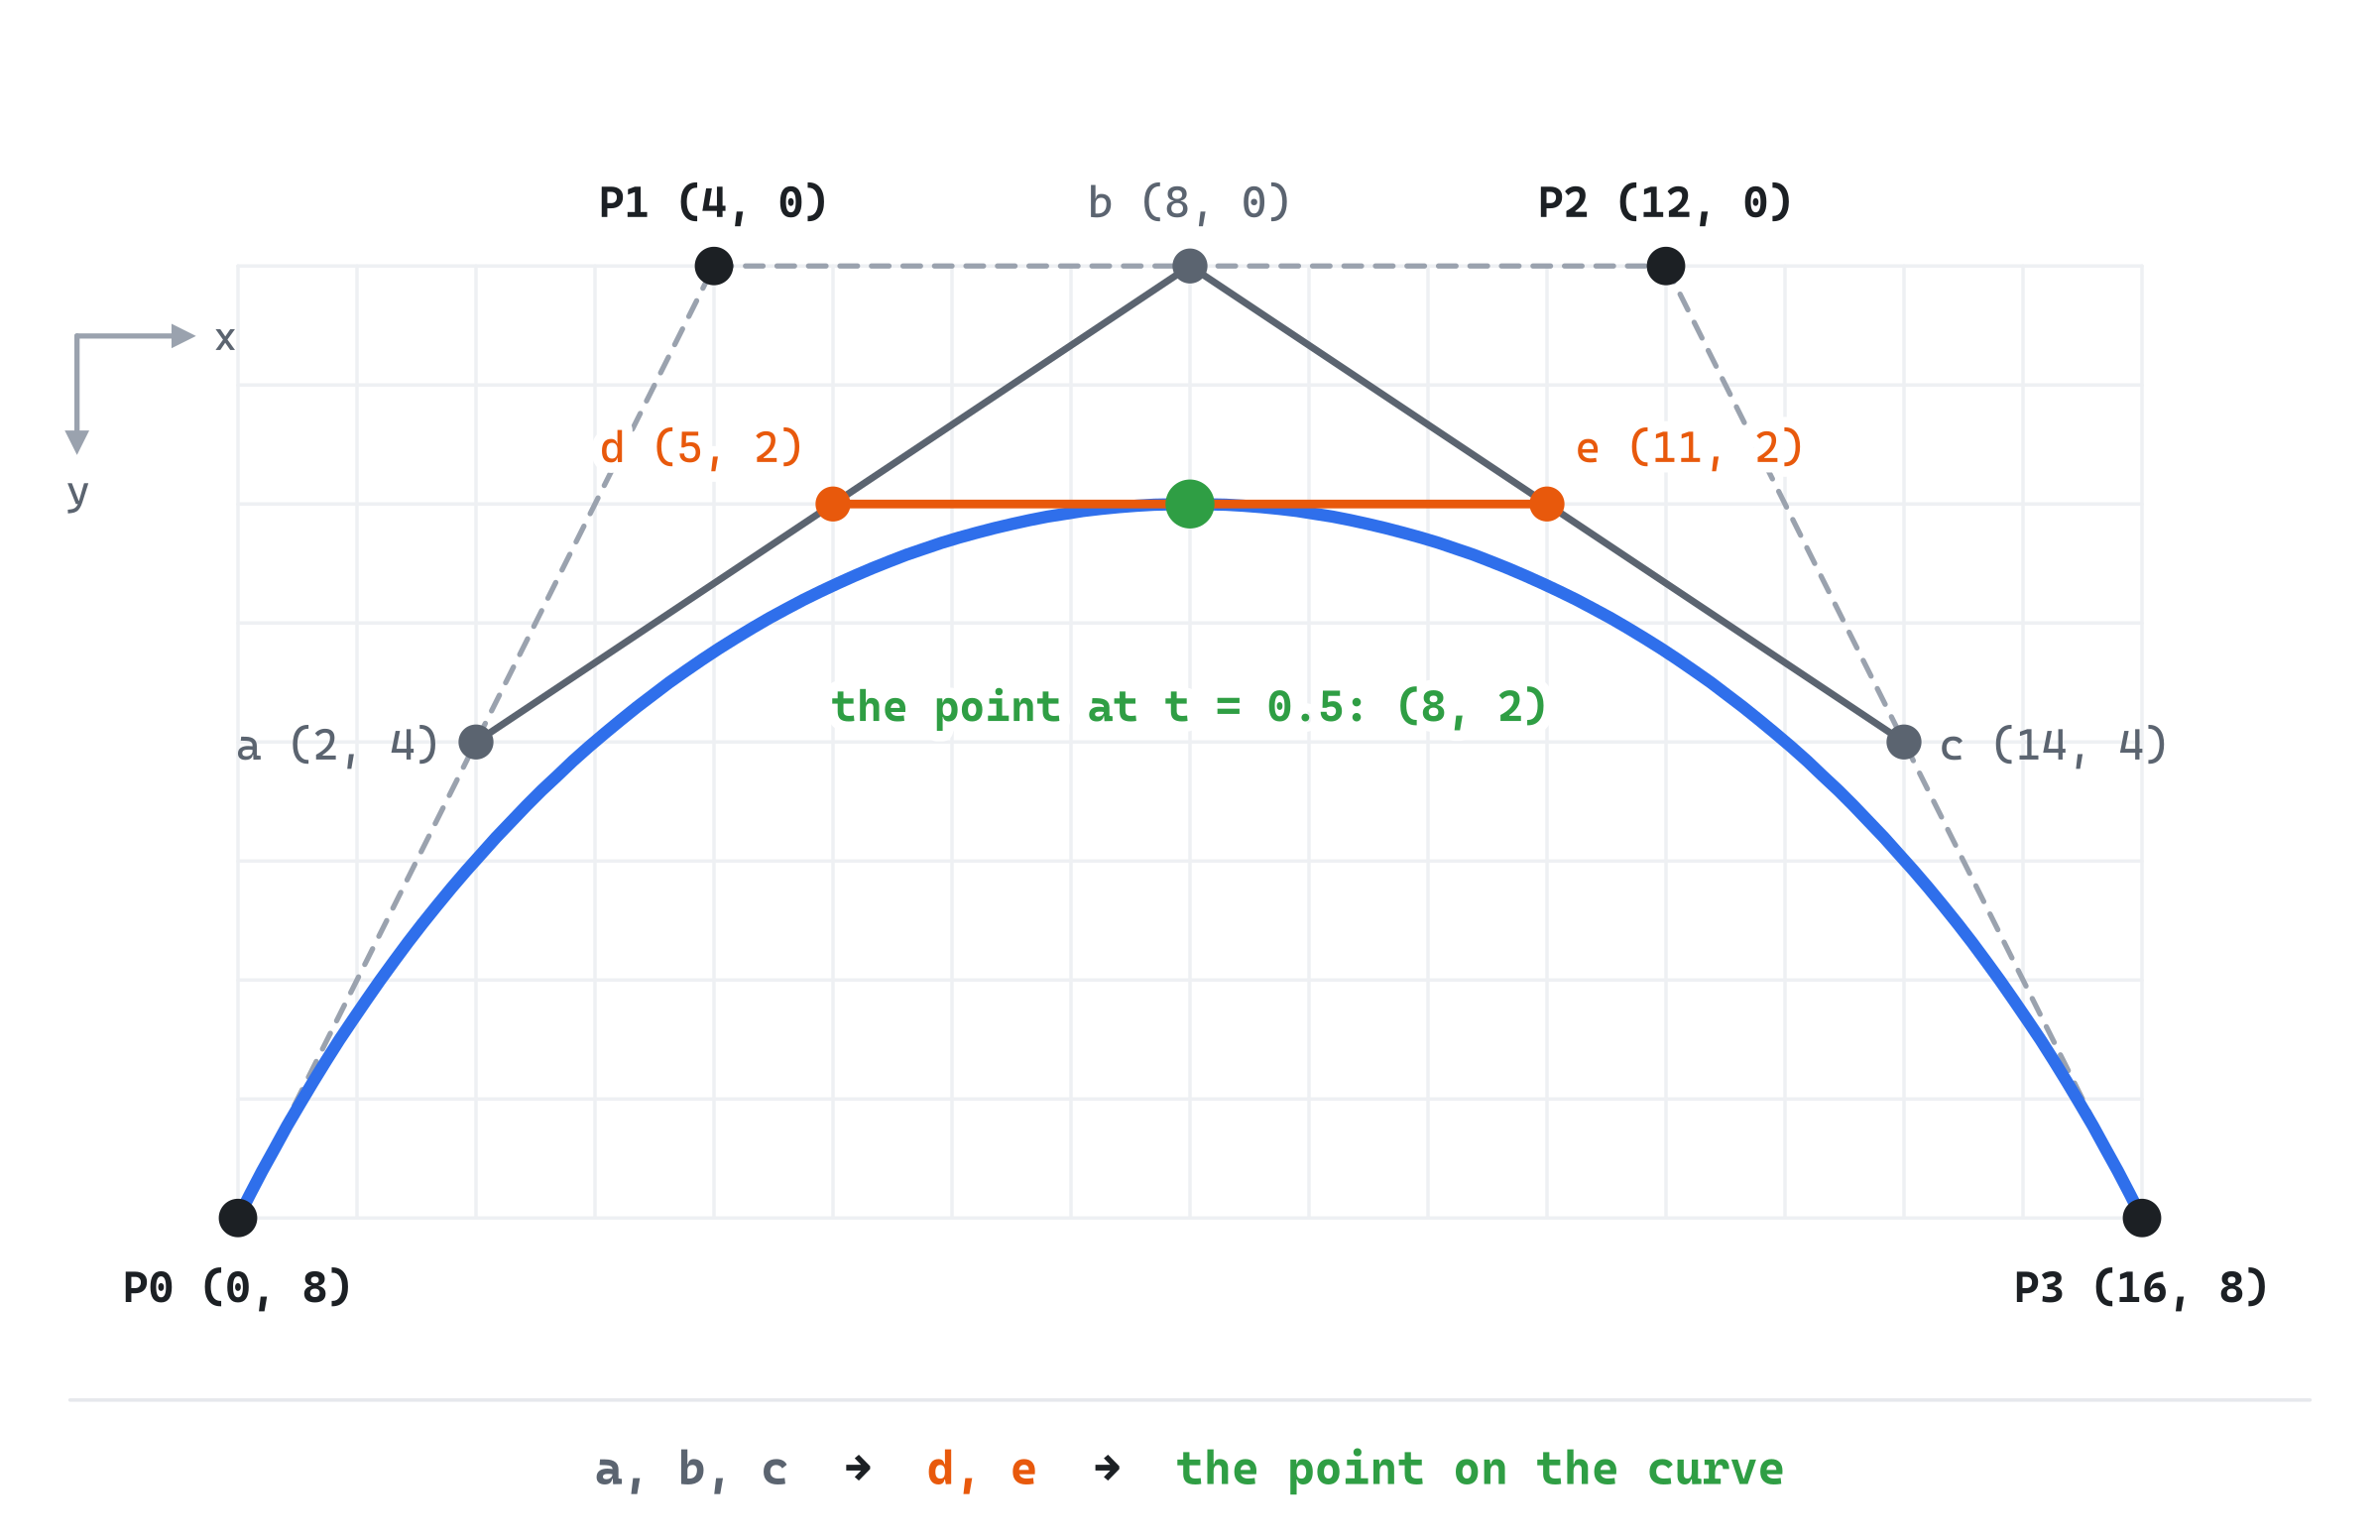
Notice that the line from d to e only touches the curve at the point. We'll see why shortly, and why that matters.
Anchors and Handles
At a t of 0, every lerp gives its first point, so the curve starts exactly at P0. At a t of 1, every lerp gives its second, so it ends exactly at P3. Those two are the curve's anchors. But it doesn't pass through P1 and P2, the handles. It's only pulled toward them. Drag a handle away, and the curve bulges after it. Put the two handles in line with the anchors, and the curve straightens.
That's why designers love Bezier curves. You don't write the curve as an equation. You shape it by moving four points, and the curve follows. Path Designer lets you do exactly that.
Where the Curve Can Go
The pyramid of lerps hides a simpler way to write the same curve.
The Bernstein Form
Multiply the lerps out. A lerp is (1 - t) times its first point plus t times its second. For a quadratic, the lerp of two lerps works out as:
(1 - t)² × P0 + 2(1 - t)t × P1 + t² × P2One more layer gives the cubic:
B(t) = (1 - t)³ × P0 + 3(1 - t)²t × P1 + 3(1 - t)t² × P2 + t³ × P3That's the curve's Bernstein form, after the mathematician Sergei Bernstein. Each control point gets a weight that depends on t. The weights are the terms you get by multiplying out ((1 - t) + t)³, the same way (x + y)³ gives x³ + 3x²y + 3xy² + y³. And (1 - t) + t is 1, so the four weights always add up to 1.
At a t of 0.5, the weights are 1/8, 3/8, 3/8 and 1/8. For the worked example, the x is (0 + 3 × 4 + 3 × 12 + 16) / 8, which is 8. The y is (8 + 0 + 0 + 8) / 8, which is 2. That's (8, 2) again. The pyramid of lerps is how to work the point out. The Bernstein form is how to think about it.
The Convex Hull
Weights that are never negative, and that add up to 1, make a weighted average. A weighted average of some points always lies inside their convex hull: the shape a rubber band would make, stretched around them all. So a Bezier curve never leaves the convex hull of its four control points. The curve can't surprise you by wandering somewhere its points aren't.
It's tempting to say that the curve stays inside the four-sided shape that P0, P1, P2 and P3 make, joined in order. But that shape can cross itself. Take P0 at (0, 0), P1 at (10, 10), P2 at (0, 10) and P3 at (10, 0). Joined in order, they make a bow-tie. The curve's point at a t of 0.2 is (3.92, 4.80), outside both halves of the bow-tie, though inside the square around all four points. The next image shows it.
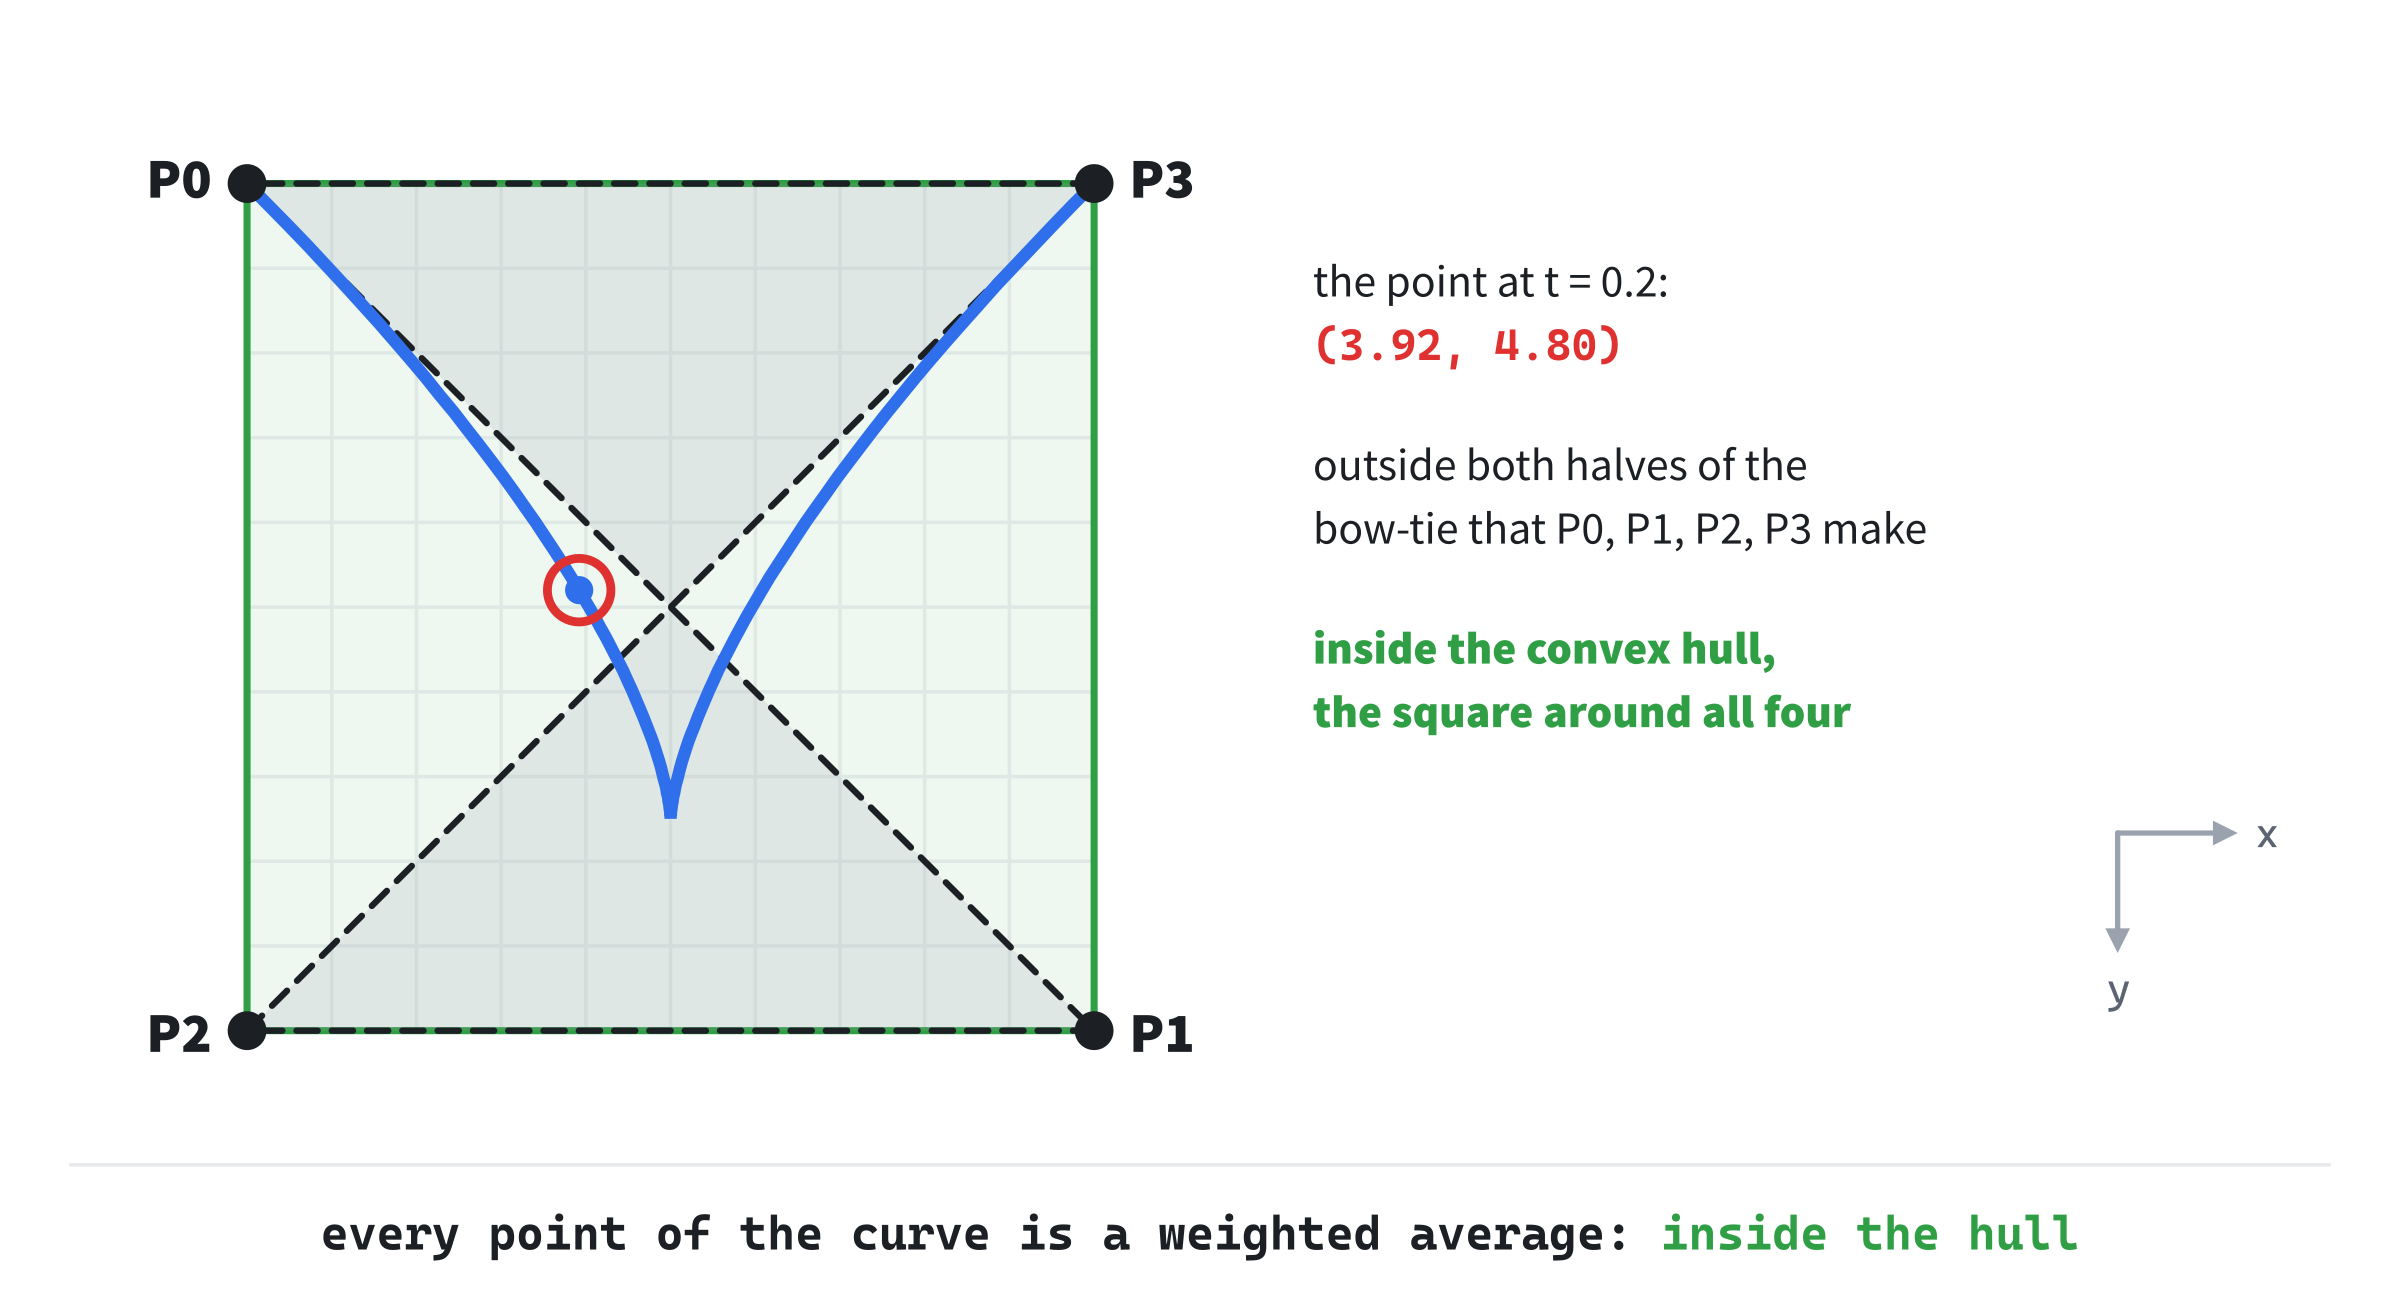
This curve even comes to a sharp point, at a t of 0.5. We'll see why in the next section. The hull gives a cheap test for free, too: the box around a curve's four control points, from Chapter 11's boundsOf, holds the whole curve. That's a quick first check before any careful test against the curve itself.
The Curve's Velocity
As t grows, the point moves along the curve. Which way, and how fast?
A Tiny Step
Chapter 8 measured a slope without calculus: take a tiny step, and compare. Do the same with a lerp. For two fixed points X and Y, lerp(X, Y, t) is X + t × (Y - X). So a tiny step h in t moves it by h times Y - X. A line's velocity is its own segment, the same at every t.
In de Casteljau's pyramid, though, X and Y move too. When t grows by h, the point lerp(X, Y, t) moves for two reasons. The mix moves toward Y, by h times Y - X, as before. And X and Y themselves move, so the point moves by that same mix of their moves: 1 - t of X's move, plus t of Y's. Work up the pyramid, a row at a time:
- In the first row,
a,bandclerp between fixed points. So they move by h timesP1 - P0,P2 - P1andP3 - P2. - In the second row,
dmixesaandb. Its mix moves it by h timesb - a. The mix of their moves is h times(1 - t)(P1 - P0) + t(P2 - P1), and that'sb - aagain. Sodmoves by 2h timesb - a. In the same way,emoves by 2h timesc - b. - In the last row, the point mixes
dande. Its mix moves it by h timese - d. The mix of their moves is 2h times(1 - t)(b - a) + t(c - b), which ise - dagain. So the point moves by 3h timese - d.
So the curve's velocity, how far the point moves for each unit of t, is three times de Casteljau's last segment:
velocity = 3 × (e - d)Each row adds one more copy. A line's velocity is its segment, a quadratic's is twice its last segment, and a cubic's three times. That's why, in Figure 14.1, the line from d to e touches the curve at the point: it runs exactly the way the curve is heading there. In code, the velocity is the first two rows of the pyramid, and one subtraction:
// The velocity of the point at t on a cubic Bezier, in pixels per unit of
// t: three times de Casteljau's last segment, from d to e. Its direction
// is the way the curve heads, and its length is how fast t moves along it.
Vec2 bezierVelocity(const Cubic& curve, float t)
{
    Vec2 a = lerp(curve.p0, curve.p1, t);
    Vec2 b = lerp(curve.p1, curve.p2, t);
    Vec2 c = lerp(curve.p2, curve.p3, t);
    return (lerp(b, c, t) - lerp(a, b, t)) * 3.0f;
}
The function repeats the pyramid's first two rows, and stops before the last lerp, since the velocity needs only d and e.
At the Ends
At a t of 0, d is P0 and e is P1, so the velocity is three times P1 - P0. The curve leaves P0 heading straight for P1, and the farther away P1 is, the faster it leaves. At a t of 1, d is P2 and e is P3, so the curve arrives at P3 heading straight from P2. That's what the handles do: each one sets the direction, and the speed, at its anchor.
In the worked example, the velocity at a t of 0 is three times (4, -8), or (12, -24): up and to the right, toward P1. At a t of 0.5, it's three times e - d, or (18, 0). That's straight across, at the top of the arch. The bow-tie curve's sharp point is the velocity's doing too. At its t of 0.5, d and e are the same point, (5, 7.5), so the velocity is zero. The point stops for an instant, and the curve turns back on itself.
Tangent, Normal and Speed
The velocity's direction is the curve's tangent: the way it's heading. Normalized, it's a unit vector along the curve. A quarter turn of that, by Chapter 4's perp, is the curve's normal, at right angles to it. On the screen, it points to the right of the direction of travel, as Chapter 12 found. A car on a road would face along the tangent, and the normal would point out of its right-hand door. To turn a sprite to face along a path, turn it to the velocity's angle, from Chapter 5's angle, as Chapter 9's agents face their velocity.
The velocity's length is the speed: how many pixels the point moves for each unit of t. It isn't the same all along the curve. Path Designer's starting curve has P0 at (150, 520), P1 at (340, 130), P2 at (660, 130) and P3 at (870, 500). Its speed is 1,301 pixels per unit of t at the start, only 780 in the middle, and 1,276 at the end. That difference is the whole reason for the last part of this chapter.
Catmull-Rom Splines
A Bezier curve passes through only two of its four points. That's ideal for shaping by eye, but awkward for a patrol route through waypoints you've placed, which the path must actually reach.
Through Every Waypoint
A Catmull-Rom spline, after Edwin Catmull and Raphael Rom, who described it in 1974, passes through every one of a list of waypoints. Between each pair of neighboring waypoints, it's one cubic piece. And at each waypoint, its velocity is half the step from the waypoint before it to the waypoint after it. So at a waypoint W1, between W0 and W2, the path heads in the direction from W0 to W2, as if cutting the corner it makes.
Handles From Neighbors
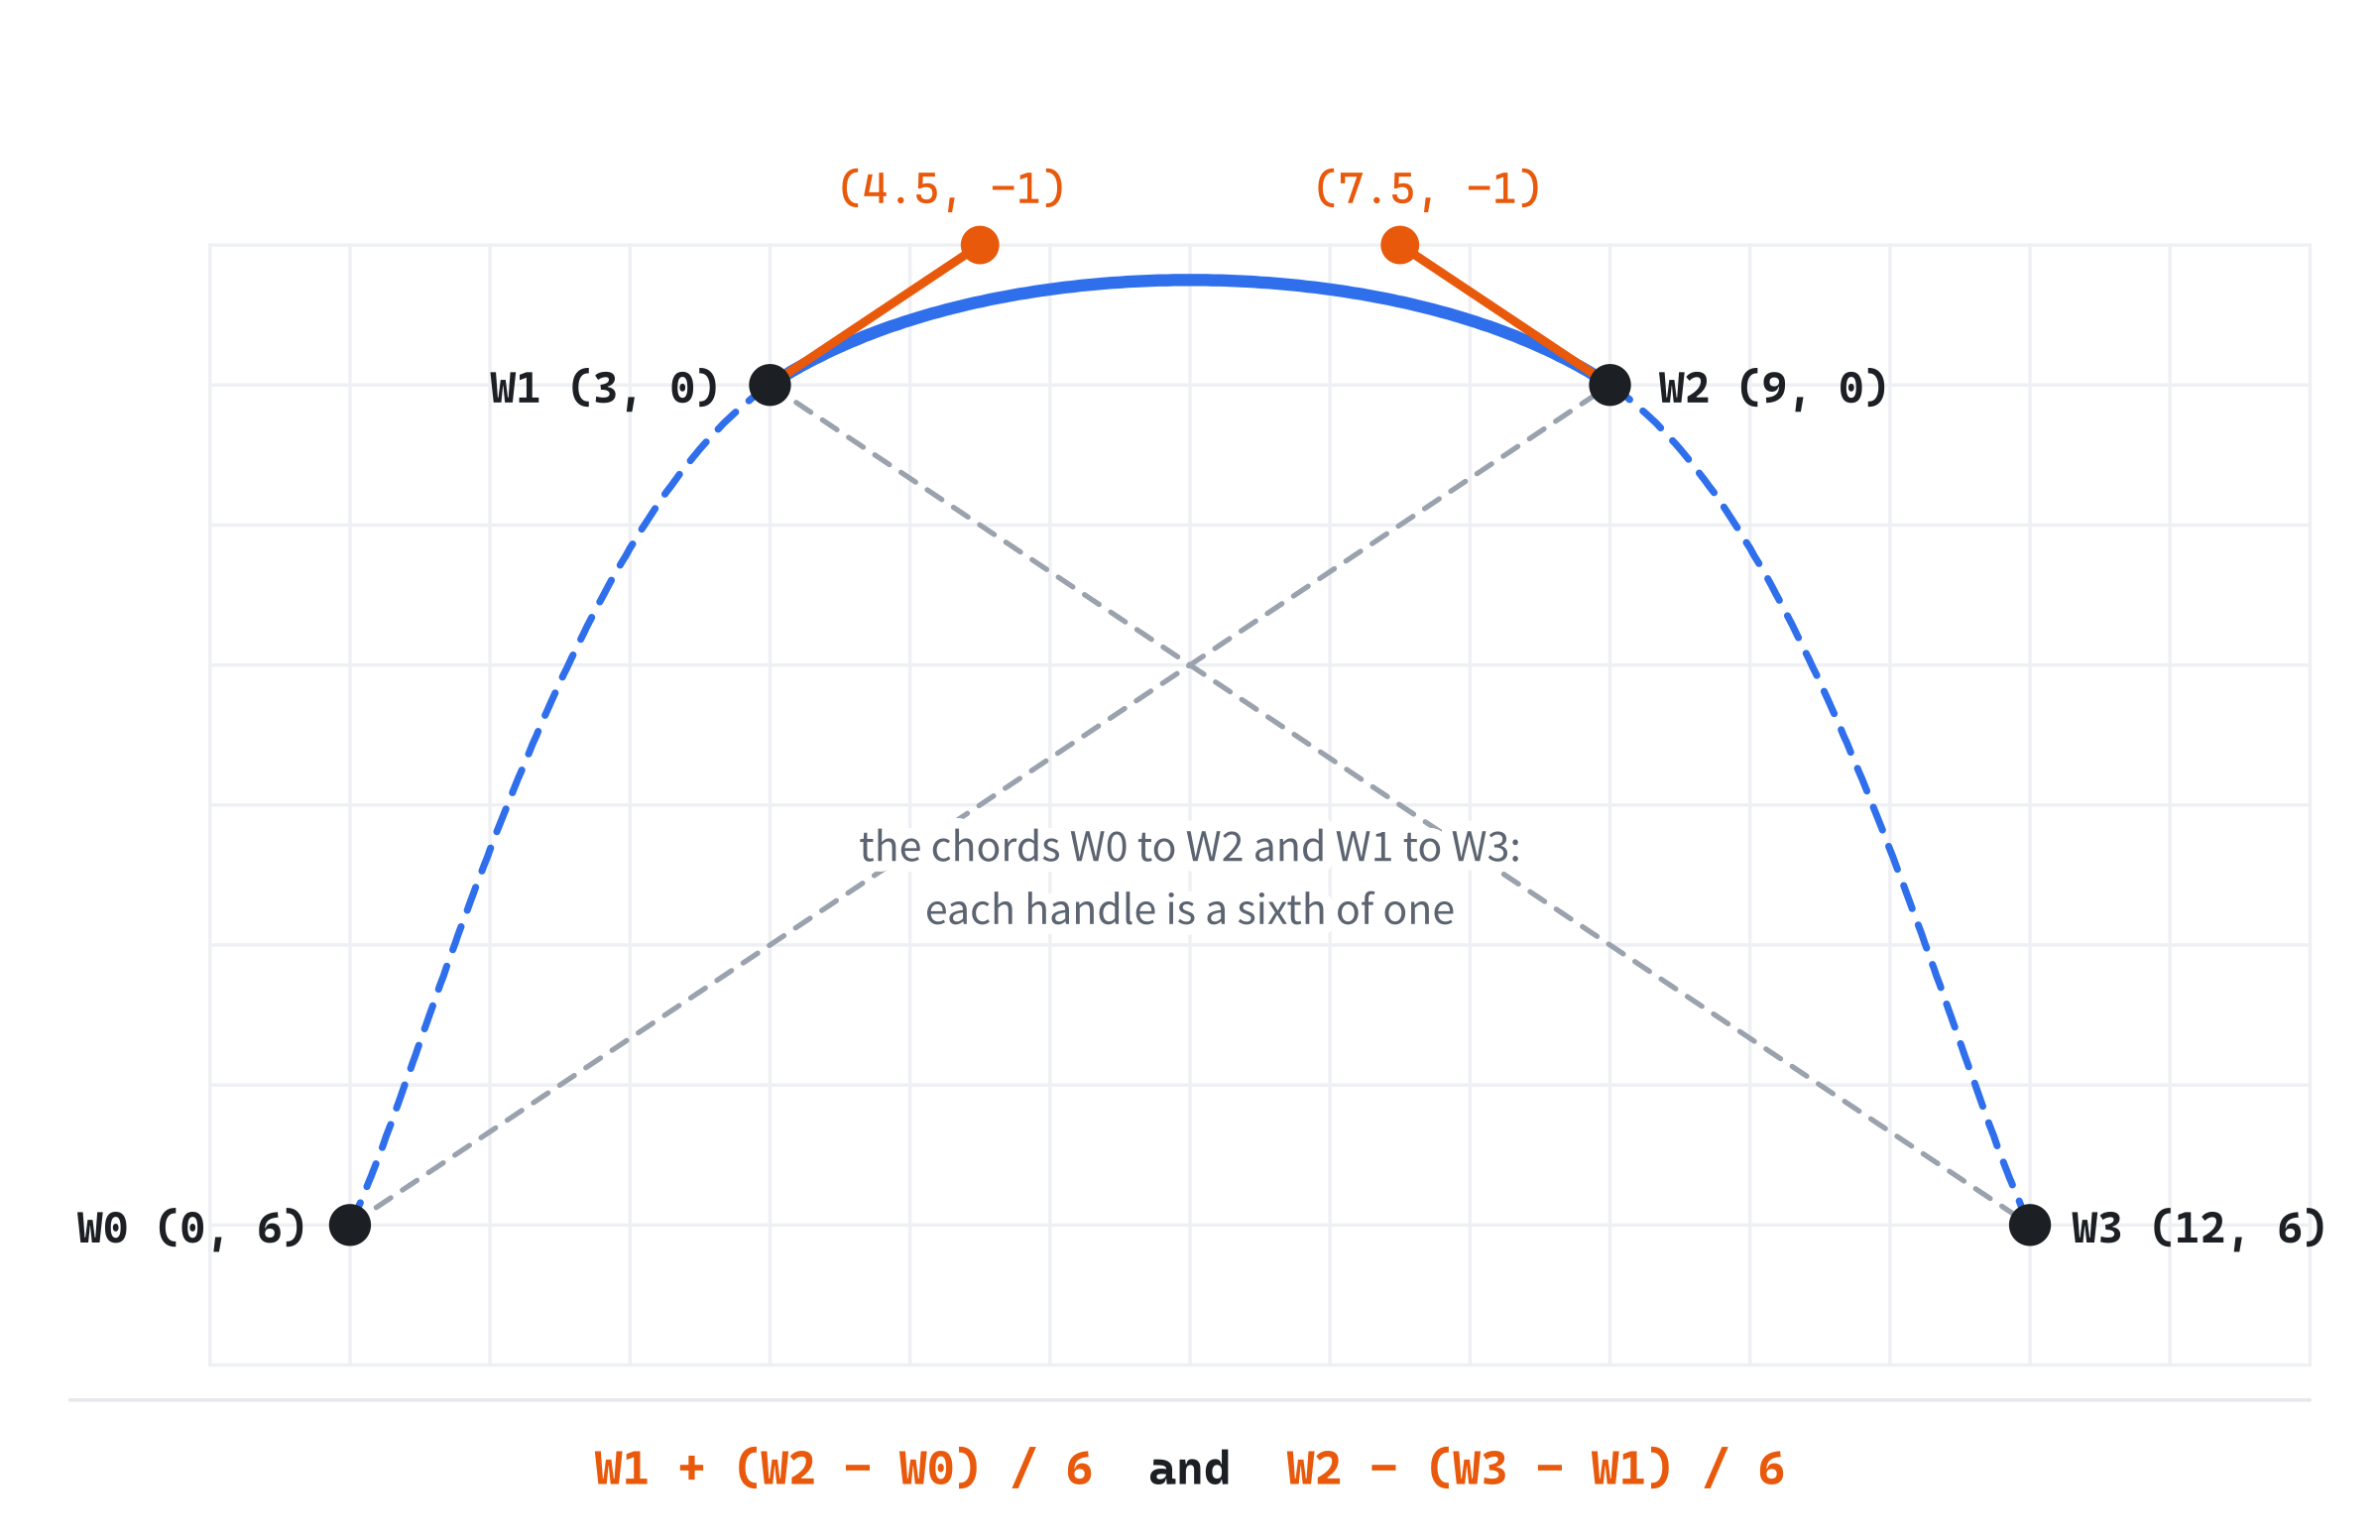
Each piece can be a Bezier, with its handles worked out from that rule. A Bezier leaves its first anchor with a velocity of three times the step to its first handle. The piece from W1 to W2 must leave W1 with a velocity of half of W2 - W0. So its first handle is a third of that, which is a sixth of W2 - W0, from W1. It arrives at W2 in the same way, so its second handle is a sixth of W3 - W1 back from W2:
handle 1 = W1 + (W2 - W0) / 6
handle 2 = W2 - (W3 - W1) / 6
Take waypoints W0 at (0, 6), W1 at (3, 0), W2 at (9, 0) and W3 at (12, 6). The first handle is (3, 0) plus a sixth of (9, -6), which is (4.5, -1). The second is (9, 0) less a sixth of (9, 6), which is (7.5, -1). The next image shows the piece, with its handles running parallel to the chords between each anchor's neighbors.
In code, a Catmull-Rom piece is a Cubic, and the bezier function draws it like any other:
// The Catmull-Rom piece from p1 to p2, as a cubic Bezier. Its velocity at
// each end is half the step between that end's neighbors, so each handle
// is a sixth of that step from its anchor.
Cubic catmullRomPiece(Vec2 p0, Vec2 p1, Vec2 p2, Vec2 p3)
{
    return { p1, p1 + (p2 - p0) / 6.0f, p2 - (p3 - p1) / 6.0f, p2 };
}
The braces build the Cubic from its four points in order: one anchor, the two handles, and the other anchor.
Why the Pieces Join Smoothly
The piece arriving at a waypoint, and the piece leaving it, both use the same rule for their velocity there: half the step between the waypoint's neighbors. So they meet heading the same way, at the same speed, and the path has no kink at the join. And each piece depends only on four waypoints, its two anchors and their outer neighbors. So moving one waypoint reshapes only the four pieces that use it, and the rest of the path stays put. That's called local control, and it's why designers can tweak one part of a long path without disturbing the rest.
A Loop
Path Designer joins its waypoints into a closed loop, so that every waypoint has a neighbor on each side:
// A closed Catmull-Rom loop through some waypoints: a piece from each one
// to the next, and from the last back to the first, so each has neighbors.
std::vector<Cubic> catmullRomLoop(const std::vector<Vec2>& waypoints)
{
    size_t n = waypoints.size();
    std::vector<Cubic> pieces;
    for (size_t i = 0; i < n; ++i)
    {
        pieces.push_back(catmullRomPiece(waypoints[(i + n - 1) % n],
                                         waypoints[i],
                                         waypoints[(i + 1) % n],
                                         waypoints[(i + 2) % n]));
    }
    return pieces;
}
The % wraps the neighbors around the list, as Chapter 11's polygon code wrapped its corners. The piece from the last waypoint goes back to the first. An open path, which doesn't loop, needs a rule for its ends, which have no neighbor beyond them. The FAQ gives the usual one.
Moving at a Steady Speed
Here's the puzzle curves bring. You'd think that stepping t at a steady rate would move a dot along the curve at a steady speed. It doesn't. The speed is the velocity's length, and that changes along the curve. On Path Designer's starting curve, the first twelfth of t covers about 103 pixels, and the twelfth in the middle only about 65.
The Problem
So a dot driven by a steady t races where the curve's speed is high, and crawls where it's low. Path Designer shows this with a ghost: a dot whose t moves steadily, lapping the curve in the same time as the steady dot. Its speed on the screen swings from 324 pixels a second at the start, down to 194 in the middle, and back to 317 at the end. The next image shows equal steps of t beside equal steps of distance.
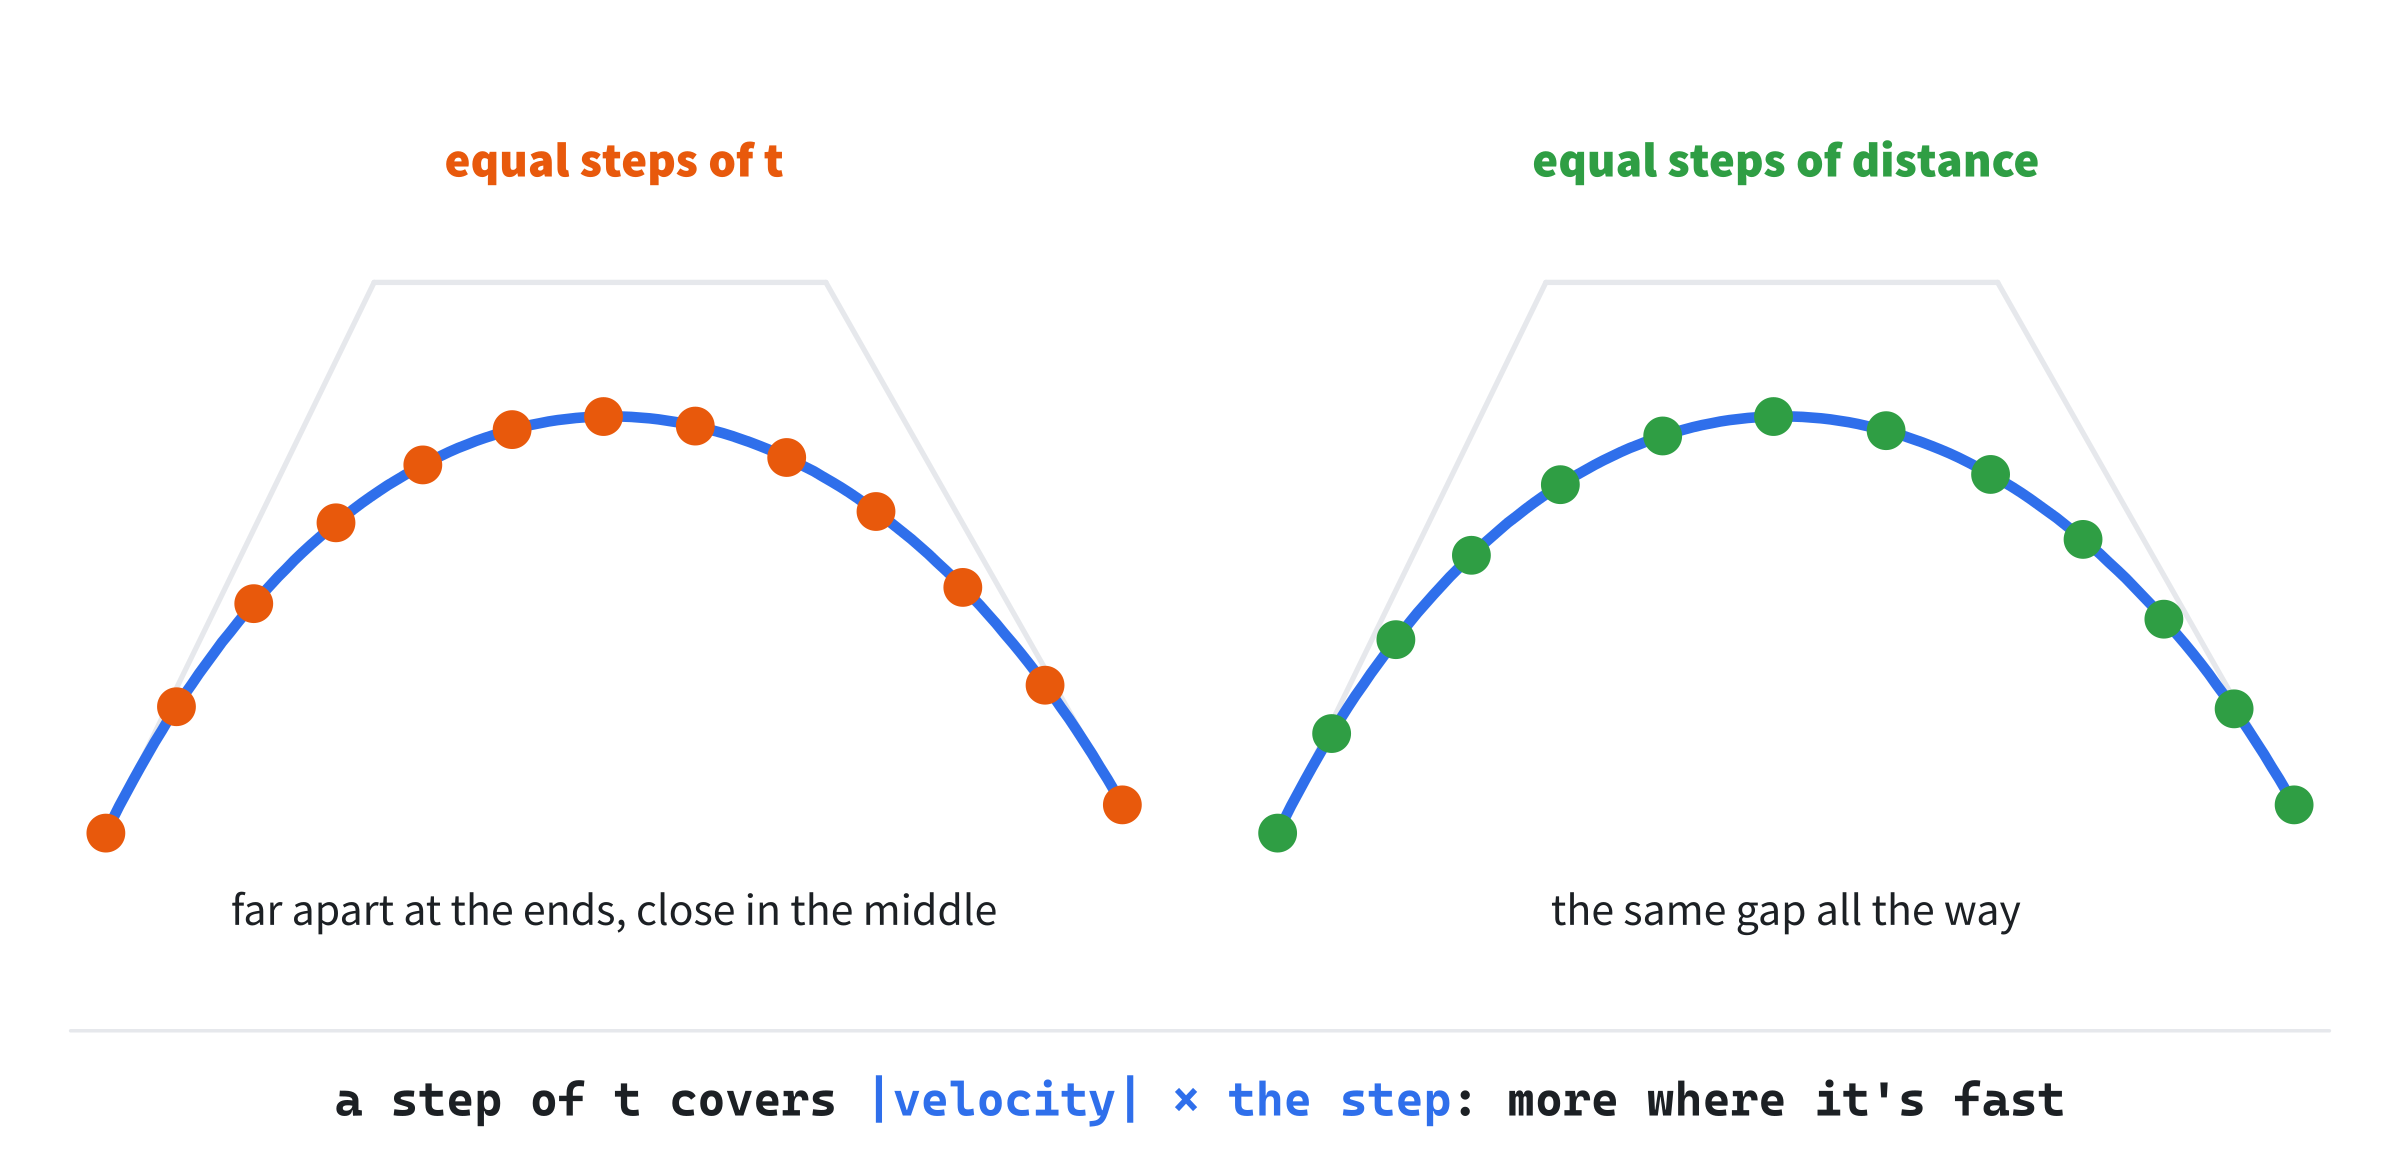
The fix is to work in distance instead of in t. Move the dot a steady distance each frame, and look up which t is that far along. That needs a table.
A Path of Pieces
A path, from here on, is a list of cubic pieces, end to end. In Bezier mode, it's one piece, and in Catmull-Rom mode, six. With it goes its arc-length table:
// A path of cubic pieces, each starting where the one before it ends, and
// its arc-length table: the points at SAMPLES equal steps of t on each
// piece, and how far along the path each point is.
struct Path
{
    std::vector<Cubic> pieces;
    std::vector<Vec2> points;
    std::vector<float> distances;
};
One number, u, says where along the whole path a point is. It runs from 0 to the number of pieces. Its whole part picks the piece, and the rest is t on that piece, so a u of 3.25 is a t of 0.25 on piece 3, counting from 0:
// A path's parameter, u, runs from 0 to its number of pieces: its whole
// part picks the piece, and the rest is t on that piece. These two give
// the point, and the velocity, at u.
Vec2 pointAt(const Path& path, float u)
{
    int last = (int)path.pieces.size() - 1;
    int i = std::clamp((int)u, 0, last);
    return bezier(path.pieces[i], u - (float)i);
}

Vec2 velocityAt(const Path& path, float u)
{
    int last = (int)path.pieces.size() - 1;
    int i = std::clamp((int)u, 0, last);
    return bezierVelocity(path.pieces[i], u - (float)i);
}
The clamp keeps the piece's number in range. So the very end of the path, where u is the number of pieces, is a t of 1 on the last piece.
The Arc-Length Table
The table samples the path at many small, equal steps of t, and adds up the straight distances between neighboring samples. Each entry says how far along the path its sample is:
// The arc-length table: the path's points at SAMPLES equal steps of t on
// each piece, and the distance along the path to each, adding up the
// straight hops from one point to the next.
void buildTable(Path& path)
{
    int count = (int)path.pieces.size() * SAMPLES;
    path.points = { pointAt(path, 0.0f) };
    path.distances = { 0.0f };
    for (int k = 1; k <= count; ++k)
    {
        Vec2 p = pointAt(path, (float)k / SAMPLES);
        float hop = distance(path.points.back(), p);
        path.distances.push_back(path.distances.back() + hop);
        path.points.push_back(p);
    }
}
The first sample is the path's start, at a distance of 0. Each one after it is a step of 1 / SAMPLES further along u, and its distance is the one before it, plus the hop between them. The last entry is the path's whole length. It's an estimate, since the path between two samples is really a tiny arc, not a straight line. But with 120 samples to a piece, the arc and the line are almost the same. The points are kept too, since they're exactly what's needed to draw the path.
Looking Up a Distance
To find the u at a distance s along the path, find the first sample at least s along, and then go back part of the way toward the sample before it:
// The path's u at a distance s along it, from the table. A binary search,
// std::lower_bound, finds the first sample at least s along. The path is
// taken as straight between that sample and the one before it, so u is
// the same share of the way between their values of u.
float uAtDistance(const Path& path, float s)
{
    const std::vector<float>& d = path.distances;
    auto it = std::lower_bound(d.begin(), d.end(), s);
    if (it == d.begin()) return 0.0f;
    if (it == d.end()) return (float)path.pieces.size();
    size_t k = (size_t)(it - d.begin());
    float span = d[k] - d[k - 1];
    float share = (span > 0.0f) ? (s - d[k - 1]) / span : 0.0f;
    return ((float)(k - 1) + share) / SAMPLES;
}
The distances only ever grow along the table, so std::lower_bound, from the <algorithm> header, can find the sample by binary search. It looks at the middle entry, keeps whichever half must hold the answer, and repeats. For a table of 121 entries, that's at most 7 looks, where checking every entry in turn could take 121. Between the two samples, the path is taken as straight, so u is the same share of the way between their values as s is between their distances.
A distance of 0 or less gives a u of 0, the start. A distance past the end gives the last u, the end.
Accuracy and Cost
How good is the estimate? Path Designer's starting curve measures 964.889 pixels with 120 samples. With 20,000 samples, it measures 964.902, so 120 samples are short by about a hundredth of a pixel. That's far less than anyone can see.
Building the table costs one Bezier point for every sample, which is 120 points for a single curve, and 720 for six pieces. That's cheap, but there's no reason to do it every frame. The table only changes when the path does, so Path Designer builds it only when a point moves, or the mode changes. Looking up a distance, which happens every frame, costs just the binary search.
Building Path Designer
Path Designer has two modes. In Bezier mode, you shape one cubic curve by dragging its four control points, and faint lines show de Casteljau's lerps finding the steady dot's point. In Catmull-Rom mode, you drag the six waypoints of a loop, and each piece's handles show faintly. In both, a steady dot laps the path at 240 pixels a second, with its tangent and normal, and the ghost laps it by steady steps of u.
Get the code. The complete project is in the
Path Designerfolder of the book's repository.
Path Designer starts from the skeleton, with the timing, since its dots move by themselves. It reuses drawGrid, fillCircle, drawArrow, fmt2, drawCircleOutline and setColor. Its Vec2.h is Magnet's, since this chapter adds nothing to it. Here are its includes, its colors and its two constants:
#include <algorithm>
#include <cmath>
#include <string>
#include <vector>
#include "Vec2.h"

constexpr int WINDOW_WIDTH  = 1000;
constexpr int WINDOW_HEIGHT = 700;

constexpr SDL_Color TEXT = { 235, 238, 242, 255 };
constexpr SDL_Color GREY = { 90, 100, 112, 255 };
constexpr SDL_Color BLUE = { 47, 111, 235, 255 };
constexpr SDL_Color AMBER = { 232, 89, 12, 255 };
constexpr SDL_Color GREEN = { 47, 158, 68, 255 };
constexpr SDL_Color FAINT = { 70, 78, 90, 255 };
constexpr SDL_Color SILVER = { 150, 158, 170, 255 };

// The steady dot's speed, in pixels a second, and how many samples the
// arc-length table takes on each piece of the path.
constexpr float SPEED = 240.0f;
constexpr int SAMPLES = 120;
The structs and functions this chapter built come next, in the order the chapter built them. The rest of the demo comes in four parts: the state, the events, the work each frame, and the drawing.
The State
The state goes after the font is loaded:
// The points to drag: Bezier mode's four control points, and
// Catmull-Rom mode's six waypoints, which make a loop.
Vec2 controls[4] = { { 150, 520 }, { 340, 130 }, { 660, 130 },
                     { 870, 500 } };
std::vector<Vec2> waypoints = { { 190, 330 }, { 330, 140 }, { 640, 190 },
                                { 840, 330 }, { 660, 560 }, { 330, 520 } };
bool catmullRom = false;

// Pointers to each mode's points, so that one loop can grab any of
// them, as Shape Gallery's handles do. Neither list ever grows, so the
// pointers stay good.
std::vector<Vec2*> controlHandles;
for (Vec2& p : controls) controlHandles.push_back(&p);
std::vector<Vec2*> waypointHandles;
for (Vec2& p : waypoints) waypointHandles.push_back(&p);
Vec2* grabbed = nullptr;

// The path, rebuilt with its table only when a point moves or the mode
// changes, and the steady dot's distance along it.
Path path;
bool rebuild = true;
float traveled = 0.0f;
bool paused = false;
In the preceding code, controls holds Bezier mode's four control points, and waypoints Catmull-Rom mode's six. The two lists of pointers are Shape Gallery's trick from Chapter 11: one loop can grab any point through them. A pointer into a std::vector stays good only while the vector doesn't grow, and waypoints never does. The rebuild flag starts true, so the first frame builds the path and its table. And traveled is the steady dot's distance along the path.
The Events
C switches the mode, and Space pauses. A left click grabs the first point within 15 pixels, in the current mode's list, and letting go drops it:
// Events: quitting, and the keys and clicks that happen once.
SDL_Event event;
while (SDL_PollEvent(&event))
{
    if (event.type == SDL_EVENT_QUIT) running = false;
    else if (event.type == SDL_EVENT_KEY_DOWN)
    {
        if (event.key.key == SDLK_ESCAPE) running = false;
        else if (event.key.key == SDLK_C)
        {
            catmullRom = !catmullRom;
            grabbed = nullptr;
            rebuild = true;
        }
        else if (event.key.key == SDLK_SPACE) paused = !paused;
    }
    else if (event.type == SDL_EVENT_MOUSE_BUTTON_DOWN &&
             event.button.button == SDL_BUTTON_LEFT)
    {
        const std::vector<Vec2*>& handles =
            catmullRom ? waypointHandles : controlHandles;
        Vec2 press = { event.button.x, event.button.y };
        for (Vec2* h : handles)
        {
            if (distance(press, *h) < 15.0f)
            {
                grabbed = h;
                break;
            }
        }
    }
    else if (event.type == SDL_EVENT_MOUSE_BUTTON_UP) grabbed = nullptr;
}
In the preceding code, switching modes also lets go of any grabbed point, since it belongs to the other mode's list. And it sets rebuild, since the path is now a different one.
Each Frame's Work
After the mouse is read, a grabbed point follows it, and the path is rebuilt if anything has changed:
// A grabbed point follows the mouse, so the path must be rebuilt.
if (grabbed)
{
    *grabbed = { mx, my };
    rebuild = true;
}

// The path's pieces, and its table, when something has changed.
if (rebuild)
{
    if (catmullRom)
        path.pieces = catmullRomLoop(waypoints);
    else
        path.pieces = { { controls[0], controls[1], controls[2],
                          controls[3] } };
    buildTable(path);
    rebuild = false;
}
The braces in Bezier mode make a list of one Cubic, from the four control points. Then the dots move:
// The steady dot goes SPEED pixels a second along the path, and its
// distance wraps at the path's length, so that it laps. Wrapping the
// distance itself keeps it from growing without end.
float total = path.distances.back();
if (total > 0.0f)
{
    float step = paused ? 0.0f : SPEED * dt;
    traveled = std::fmod(traveled + step, total);
}
float u = uAtDistance(path, traveled);

// The ghost's u is the same share of the path's pieces as the steady
// dot's distance is of its length. So the two lap together, but the
// ghost moves by steady steps of u, not of distance. Its speed is
// the velocity's length there, times how fast its u moves.
float pieceCount = (float)path.pieces.size();
float ghostU = (total > 0.0f) ? traveled / total * pieceCount : 0.0f;
float uRate = (total > 0.0f) ? pieceCount * SPEED / total : 0.0f;
float ghostSpeed = velocityAt(path, ghostU).length() * uRate;
Each frame, traveled grows by SPEED * dt, unless the demo is paused. Then std::fmod wraps it at the path's length, so that the dot laps. Wrapping traveled itself matters. If it grew forever, and only a copy were wrapped, any change in the path's length would make the dot jump. After 30 laps of a 965-pixel curve, dragging a point to make the curve 2 pixels shorter would move the dot by about 60 pixels. Wrapped each frame, traveled stays a distance along the path as it is now.
The steady dot's u comes from the table. The ghost's u is the same share of the path's pieces as traveled is of its length, so the two dots lap together, but the ghost moves by steady steps of u. Its speed on the screen is the velocity's length at its u, times how fast its u changes. That rate is the number of pieces it covers in a lap, over the time a lap takes, which is the length over SPEED.
Drawing
After the grid come the pieces' handles, faintly. A line runs from each anchor to its handle, and in Bezier mode, a third line joins the two handles, which completes the control polygon:
// Each piece's handles, faint: a line from each anchor to its handle,
// and in Bezier mode, the line between the handles too, which
// completes the control polygon.
for (const Cubic& piece : path.pieces)
{
    setColor(renderer, FAINT);
    SDL_RenderLine(renderer, piece.p0.x, piece.p0.y, piece.p1.x,
                   piece.p1.y);
    SDL_RenderLine(renderer, piece.p2.x, piece.p2.y, piece.p3.x,
                   piece.p3.y);
    if (!catmullRom)
        SDL_RenderLine(renderer, piece.p1.x, piece.p1.y, piece.p2.x,
                       piece.p2.y);
    setColor(renderer, GREY);
    fillCircle(renderer, piece.p1, 3.0f);
    fillCircle(renderer, piece.p2, 3.0f);
}
In Catmull-Rom mode, these handles are the ones worked out from the waypoints, which you can't drag, so they're small grey dots. Then the path is drawn, through the table's points:
// The path, through the table's points.
setColor(renderer, BLUE);
for (size_t k = 1; k < path.points.size(); ++k)
{
    const Vec2& a = path.points[k - 1];
    const Vec2& b = path.points[k];
    SDL_RenderLine(renderer, a.x, a.y, b.x, b.y);
}
In Bezier mode, de Casteljau's lerps are drawn at the steady dot's u, which is its t, since there's one piece:
// In Bezier mode, de Casteljau's lerps at the steady dot's t: the
// first row, a to b to c, in grey, and the second, d to e, in silver.
if (!catmullRom)
{
    const Cubic& curve = path.pieces[0];
    Vec2 a = lerp(curve.p0, curve.p1, u);
    Vec2 b = lerp(curve.p1, curve.p2, u);
    Vec2 c = lerp(curve.p2, curve.p3, u);
    Vec2 d = lerp(a, b, u);
    Vec2 e = lerp(b, c, u);
    setColor(renderer, GREY);
    SDL_RenderLine(renderer, a.x, a.y, b.x, b.y);
    SDL_RenderLine(renderer, b.x, b.y, c.x, c.y);
    for (Vec2 p : { a, b, c }) fillCircle(renderer, p, 3.0f);
    setColor(renderer, SILVER);
    SDL_RenderLine(renderer, d.x, d.y, e.x, e.y);
    for (Vec2 p : { d, e }) fillCircle(renderer, p, 3.0f);
}
The braces in { a, b, c } make a short list for the loop to walk, so each point gets a dot. Then come the ghost and the steady dot, with its tangent and normal:
// The ghost, a ring moved by steady steps of u.
drawCircleOutline(renderer, pointAt(path, ghostU), 8.0f, SILVER);

// The steady dot, with its tangent, the velocity's direction, as a
// green arrow, and its normal, a quarter turn of that, in amber.
Vec2 dot = pointAt(path, u);
Vec2 tangent = velocityAt(path, u).normalized();
drawArrow(renderer, dot, dot + tangent * 60.0f, GREEN);
drawArrow(renderer, dot, dot + tangent.perp() * 36.0f, AMBER);
setColor(renderer, AMBER);
fillCircle(renderer, dot, 7.0f);
The tangent is the velocity, normalized, drawn 60 pixels long. The normal is its quarter turn, 36 pixels long. Then come the points you can drag, with Bezier mode's named P0 to P3:
// The points to drag, named in Bezier mode.
const std::vector<Vec2*>& handles =
    catmullRom ? waypointHandles : controlHandles;
for (size_t i = 0; i < handles.size(); ++i)
{
    setColor(renderer, (handles[i] == grabbed) ? TEXT : AMBER);
    fillCircle(renderer, *handles[i], 6.0f);
    if (!catmullRom)
        drawText(renderer, font, "P" + std::to_string(i),
                 handles[i]->x + 10, handles[i]->y - 8, GREY);
}
Last come the readout and the controls:
// The readout: the path and its length, then each dot's u, and its
// speed on the screen.
std::string name = catmullRom
    ? "Catmull-Rom loop through " + std::to_string(waypoints.size()) +
      " waypoints"
    : "Bezier curve";
drawText(renderer, font,
         name + ": " + std::to_string(std::lround(total)) + " px long",
         12, 10, TEXT);
drawText(renderer, font,
         "steady dot: u = " + fmt2(u) + ", " +
         std::to_string(std::lround(SPEED)) + " px/s", 12, 30, AMBER);
drawText(renderer, font,
         "ghost: u = " + fmt2(ghostU) + ", " +
         std::to_string(std::lround(ghostSpeed)) + " px/s",
         12, 50, SILVER);
drawText(renderer, font,
         "[Drag] a point   [C] Bezier or Catmull-Rom   [Space] pause"
         "   [Esc] quit", 12, WINDOW_HEIGHT - 26, GREY);
The first line names the path and gives its length, the table's last entry. The other two give each dot's u, and its speed on the screen.
Trying It Out
Run the demo, and watch the two dots set off from P0 together. Press Space to pause them. The next image shows the curve paused 290 pixels along.
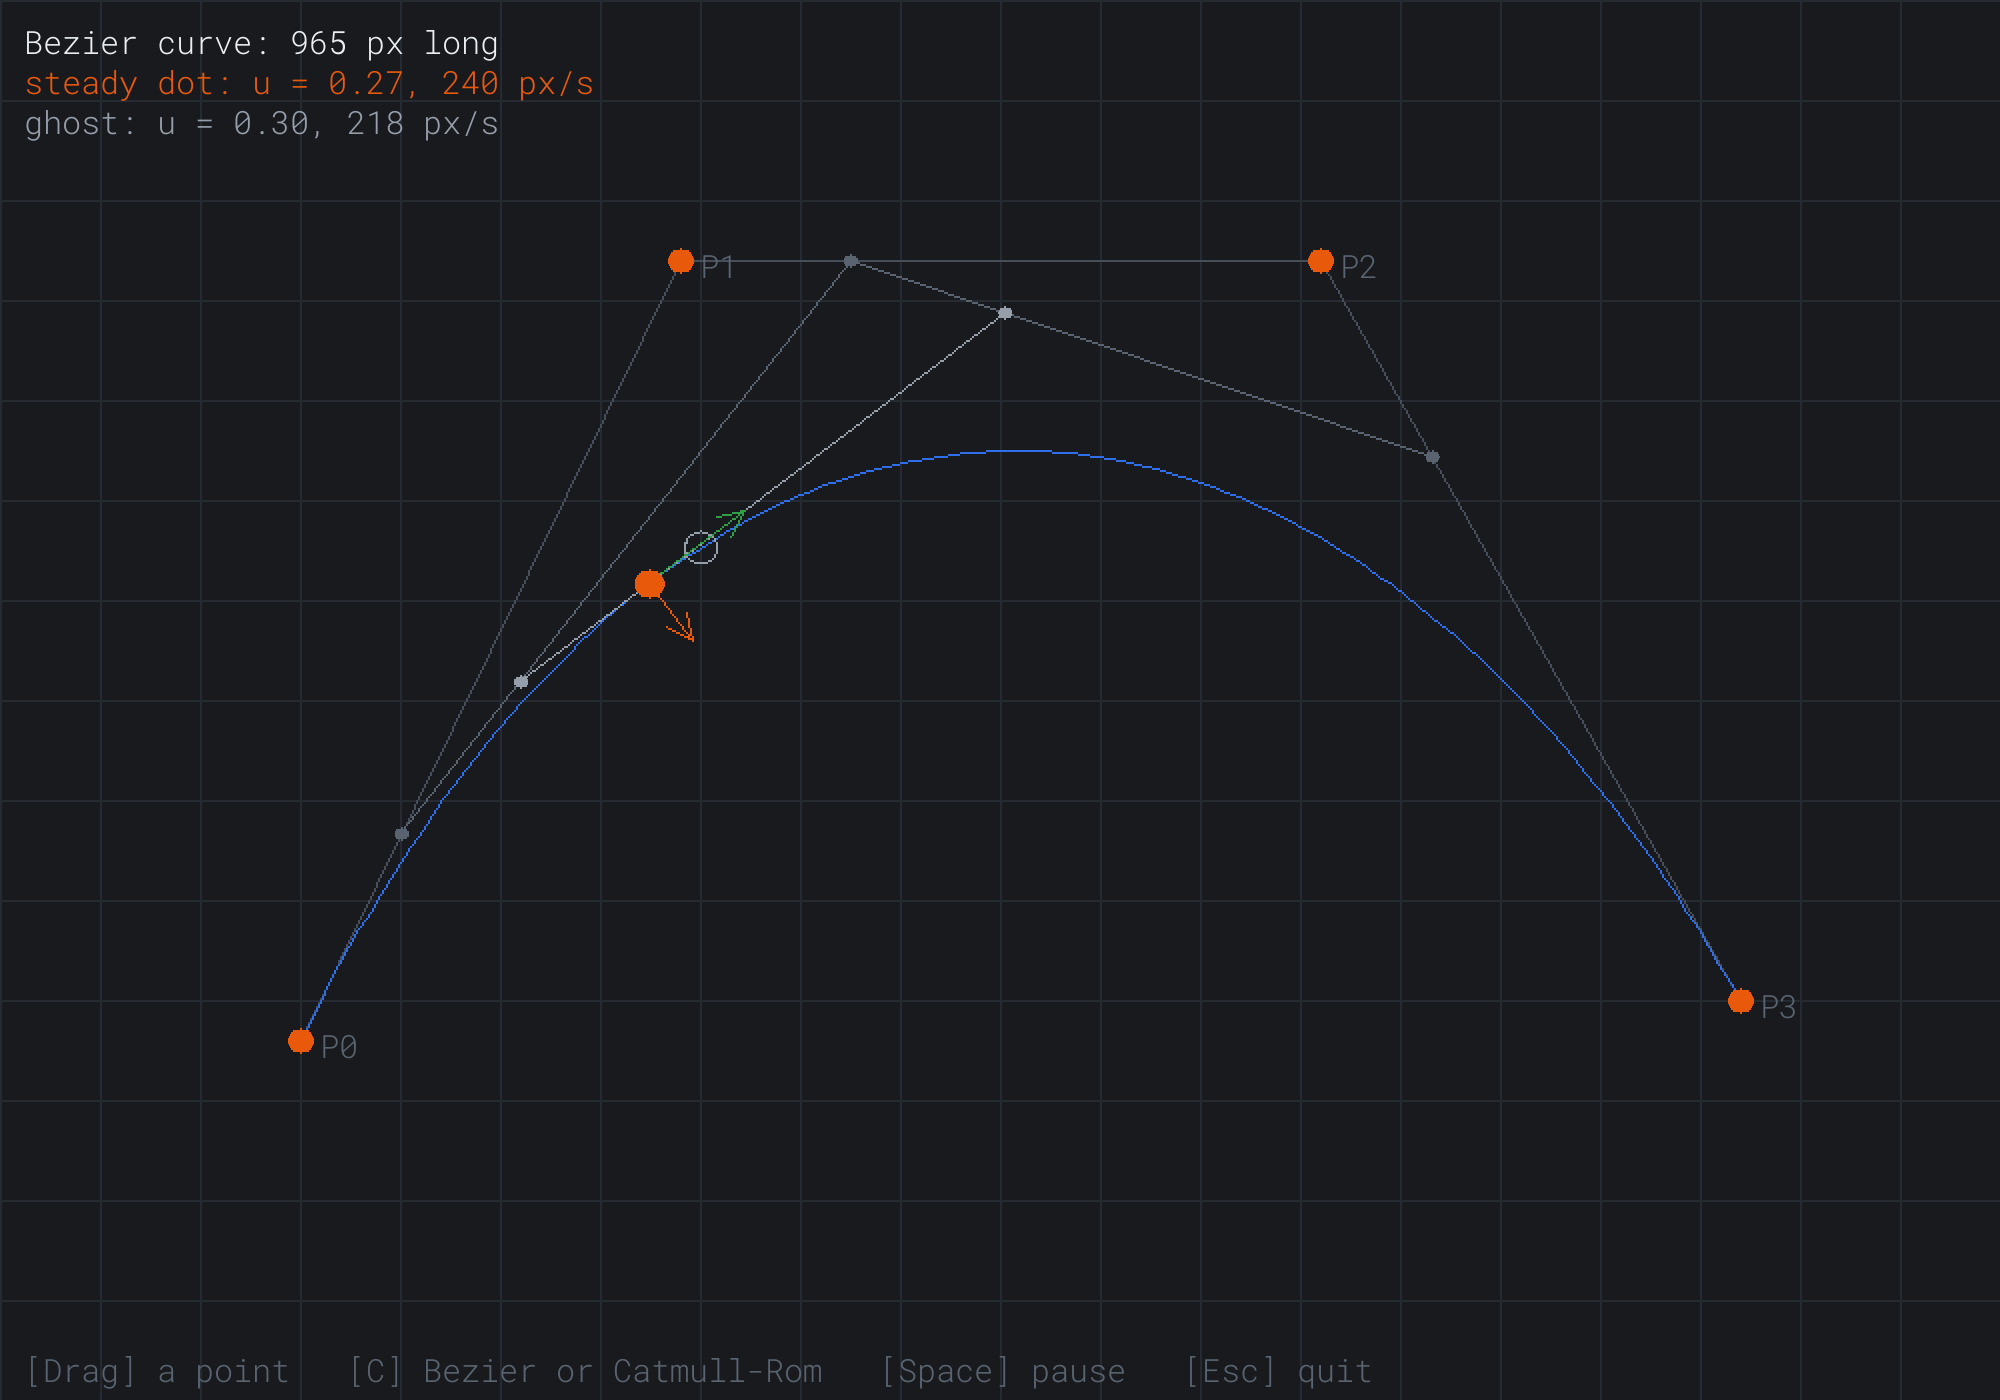
The steady dot is at a u of 0.27. The ghost, at 0.30, is 31 pixels ahead, and moving at 218 pixels a second. The grey lines are the first row of de Casteljau's lerps, and the silver one is the second, from d to e. The steady dot sits on that silver line, with the green tangent running along it, and the amber normal to its right.
Then try it, step by step:
- Watch a lap. Press Space to let the dots go. They reach P3 together, but the ghost leads in the first half, and drops behind in the second. Its speed swings from about 324 pixels a second near the ends to 194 in the middle, while the steady dot holds 240.
- Stretch a handle. Drag P1 straight up, to the top of the window. The curve's start gets faster, since its velocity there is three times the step to P1, and the ghost's lead grows, from about 35 pixels to about 64.
- Close a handle. Drag P1 until it sits on P0. As the dots leave P0, the green tangent points at P2, not P1. The ghost creeps away from P0, its speed near 0. At P0 itself, the velocity is zero, which the FAQ explains. To pull P1 back out, drag P0 away first.
- Switch to Catmull-Rom. Press C. The path becomes a loop through six waypoints, with each piece's worked-out handles showing faintly.
- Move a waypoint. Drag one waypoint. Only the part of the loop near it changes: the four pieces that use it. The rest stays exactly where it was.
The next image shows the Catmull-Rom loop of step 4, paused 900 pixels along.
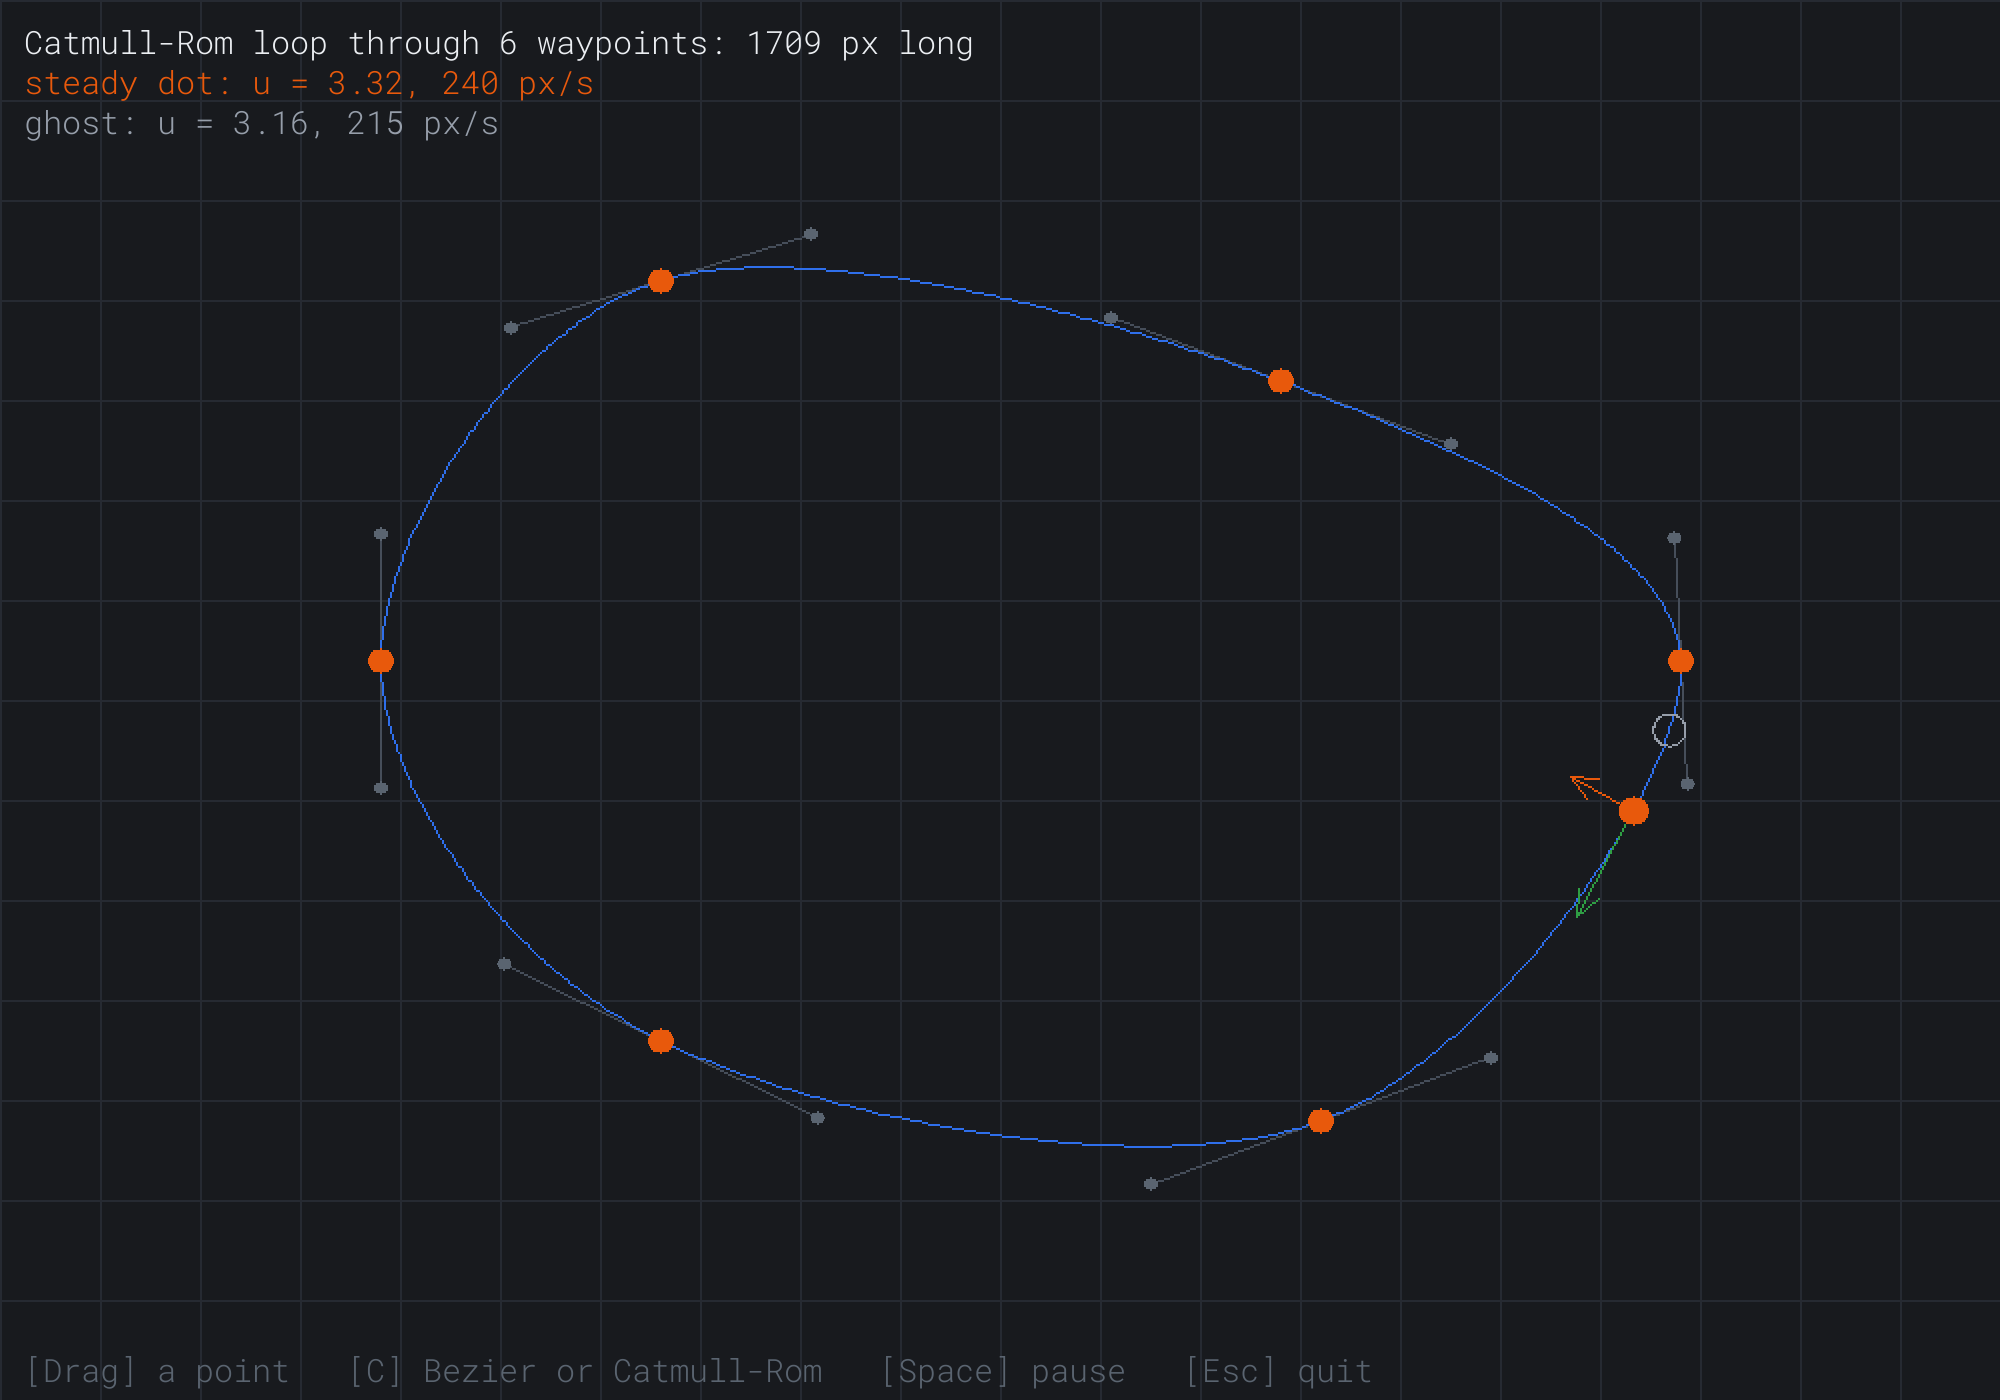
The loop is 1,709 pixels long. The steady dot is at a u of 3.32, on piece 3. The ghost, at 3.16, is 44 pixels behind it, moving at 215 pixels a second. The path passes through every waypoint, with no kinks.
Between them, the two modes show the chapter's two kinds of curve, one shaped by handles and one passing through points. And the same table walks both at a steady speed.
FAQ
Q) What happens to the tangent when a handle sits on its anchor?
A) At the anchor itself, the velocity is three times the step from the anchor to the handle, which is zero. The curve still leaves the anchor heading somewhere: toward the other handle, as a tiny step shows. But at that one instant, the velocity has no direction, and normalized turns it into the zero vector. Path Designer never draws the dot exactly on the anchor, so its arrow points at the other handle instead. Anything that turns to face along a path should keep its last heading when the velocity gets tiny, as Chapter 9's agents keep theirs when they stop.
Q) How many samples does the table need?
A) Enough that doubling them hardly changes the length. Path Designer's 120 measure its starting curve as 964.889 pixels, and 240 measure it as 964.898, against the true 964.902. Each doubling cuts the error to about a quarter. A path with tight bends needs more samples than a gentle one, since a straight hop cuts across a tight bend by more.
Q) How do I join two Bezier curves smoothly?
A) Share the point where they meet, so that the second starts where the first ends. Then keep the handles on either side of that point in a straight line through it, so that the first curve arrives in the direction the second leaves in. For the same speed on both sides as well, put the two handles at the same distance from the point. That's what Catmull-Rom's handles do.
Q) What about a Catmull-Rom path that doesn't loop?
A) Its first and last waypoints have a neighbor on one side only. The usual fix is to count each end as its own missing neighbor. Then the first piece leaves its start heading toward the next waypoint, and the last piece arrives at its end heading from the one before. The dashed pieces in Figure 14.3 were made that way.
Exercises
The first three exercises need only a pencil. The others change Path Designer.
- De Casteljau by hand (paper). For the worked example's points, P0
(0, 8), P1(4, 0), P2(12, 0)and P3(16, 8), find the point at atof 0.25 with de Casteljau's lerps. Then check it with the Bernstein form's weights. - Velocity by hand (paper). For the same curve, find the velocity at a
tof 0, 0.5 and 1, and the speed at each. Where does a steadytmove fastest? - Catmull-Rom handles (paper). Four waypoints run
(0, 0),(4, 0),(8, 4)and(8, 8). Find the two handles of the piece from(4, 0)to(8, 4). - Face along the path (code). Replace the steady dot with a small triangle that points along the path, turned by the velocity's angle with Chapter 6's
rotated. Then drag P1 onto P0, and see what happens at the start. - An open path (code). Make Catmull-Rom mode an open path, rather than a loop, with each end counted as its own missing neighbor, as the FAQ describes. What should the dots do when they reach the last waypoint?
For the code exercises, work on a copy of the demo's folder, so that the original stays as the chapter describes it.
AI Exercise (Optional)
A path you can walk at a steady speed can also be walked at any speed you like, and that makes a roller coaster. A real coaster car speeds up as it drops, and slows as it climbs, and the arc-length table is what lets a game move it by the right distance each frame. With an AI's help, you can turn Path Designer's loop into a ride. Open your AI chatbot of choice, and try a prompt like this:
"I have a C++ demo using SDL3 with a closed Catmull-Rom loop made of cubic Bezier pieces. A struct Path holds the pieces and an arc-length table, the distance along the path at each sample, and I have functions pointAt(path, u), velocityAt(path, u) and uAtDistance(path, s). Please turn the loop into a roller coaster. Add a car that rides it, drawn as a small rectangle turned to face along the track by the velocity's angle. Its speed should come from its height, as a real coaster's does: with y pointing down, drop is the car's y less the y of the loop's highest point, and speed is the square root of 2 times g times drop, plus a small minimum so that it never stops. Each frame, move the car by speed times dt along the path, using the table. Explain why moving by distance, rather than by steps of u, makes the speed right."
That prompt describes your path and your functions, so the AI builds the ride from them, instead of from a curve library of its own. It gives the rule for the speed in words, with the screen's y pointing down, which is the part an AI most often gets backward. And it asks why moving by distance matters, which is this chapter's lesson in a new setting.
Then drag the waypoints into hills and dips, and watch the car crawl over the tops and race through the bottoms. If the car stalls on a high hill, raise the minimum speed. Then try a loop-the-loop, by dragging two waypoints past each other, so that the track crosses itself.
Summary
A Bezier curve is lerping in layers: by de Casteljau's algorithm, three lerps between four control points, two between those, and one more give the point at t. The curve starts and ends at its anchors, and is pulled toward its handles. Multiplied out, it's the Bernstein form: a weighted average of the four points, whose weights add to 1. So the curve stays inside their convex hull, though not always inside the four-sided shape they make, which can be a bow-tie. Its velocity is three times de Casteljau's last segment, 3 × (e - d), so it leaves its start heading for the first handle, and arrives at its end from the second. The velocity's direction is the tangent, its quarter turn is the normal, and its length is the speed, which changes along the curve. A Catmull-Rom spline passes through every waypoint, as Bezier pieces whose handles are a sixth of the step between each anchor's neighbors, so neighboring pieces join smoothly. To move at a steady speed, move by distance, and turn the distance into u with an arc-length table. A binary search finds the entry, and the table is rebuilt only when the path changes. Path Designer showed both kinds of path, and a ghost that showed why the table matters. That ends Part 3, and its geometry of shapes at rest. Part 4 turns to collision detection: deciding when two shapes touch, and what to do about it, starting with whether a point is inside a shape.