
For twenty-three chapters, everything on the screen has been points, lines and filled shapes. They've been enough to teach most of a game's mathematics, but games aren't made of outlines. They're made of images: a brick wall, a face, a patch of grass. This chapter puts an image on the screen. More than that, it controls exactly how the image lands there: stretched, warped, tiled or cut out of a larger sheet.
The SDL_RenderTexture function draws an image into an upright rectangle, and it's the right tool for that. But it only ever draws upright rectangles. This chapter goes underneath it. It hands SDL its own triangles, each corner carrying its own position in the image, and so takes control of how the image maps onto the shape. Along the way, it builds an image from nothing but bytes, and looks at what happens between the texels when the image is drawn larger or smaller than it is.
In this chapter, we will:
- See what a texture is, a grid of texels, and build one in code
- Address a texture with UV coordinates, from 0 to 1, whatever its size
- Find which texels a UV lands on, and how nearest and linear sampling differ
- Draw our own triangles, each corner with its own UV, with
SDL_RenderGeometry - See what warping a quad really does to an image
- Cut cells from an atlas, keep them from bleeding into each other, and tile a texture
- Build Texture Quad, an image on a quad whose corners you drag
We'll start with what a texture is.
What a Texture Is
A texture is a rectangle of colored dots. Each dot is a texel, short for texture element, as a pixel is a picture element. To a computer, it's a long row of bytes, and a width that says where each row ends.
Texels as Bytes
Texture Quad's texture is 256 texels square. Each texel is four bytes: red, green, blue and alpha, each from 0 to 255. So the whole texture is 256 × 256 × 4 bytes, which is 262,144. They run row after row, starting from the top-left texel. To find texel (x, y), count y whole rows of 256 texels and add x. Then multiply by 4, the bytes in a texel:
index = (y × width + x) × 4It's the formula behind every image, screen and bitmap, and Chapter 19's grid found its cells the same way, row by row. Here's the function that sets one texel:
// Set one texel of the pixel buffer: four bytes, red, green, blue and
// alpha, starting at (y * ATLAS + x) * 4.
void setTexel(std::vector<Uint8>& pixels, int x, int y, SDL_Color c)
{
    int i = (y * ATLAS + x) * 4;
    pixels[i] = c.r;
    pixels[i + 1] = c.g;
    pixels[i + 2] = c.b;
    pixels[i + 3] = c.a;
}
The buffer is a std::vector<Uint8>, a vector of bytes. The function finds the texel's first byte, and writes the color's four channels into it and the three bytes after it.
Byte Order and Pitch
Two details decide whether those bytes come out as the colors you meant. The first is the pixel format, which says what each byte means. Texture Quad's is SDL_PIXELFORMAT_RGBA32. It means the bytes red, green, blue and alpha, in that order in memory. It's easy to confuse with SDL_PIXELFORMAT_RGBA8888, which describes a 32-bit whole number with red in its highest byte. A PC stores a whole number's lowest byte first. So in memory, that format's bytes run alpha, blue, green and red. SDL makes RGBA32 mean whichever packed format puts the bytes in R, G, B, A order on the machine it's built for. A texture whose red and blue come out swapped has almost always been given the wrong one.
The second is the pitch: the bytes from the start of one row to the start of the next. For a texture built in code, it's the width times 4, 1,024 bytes here. But SDL may pad the rows of an SDL_Surface, such as one loaded from a file, so that each starts at a tidy address. Its pitch can then be more than its width times 4. Code that walks a surface's pixels should step by its pitch, never by the width times 4.
An Atlas Made in Code
Since a texture is only bytes, it doesn't have to come from a file. Texture Quad writes its own, which keeps the demo self-contained, and shows there's nothing hidden inside an image. The texture is an atlas: four images, or cells, in one texture, each 128 texels square. Each cell has a test pattern, chosen so that a warp or a tiling is easy to read:
// The color at (x, y) in cell n's pattern. A pale line every 16 texels
// makes any warp easy to read.
SDL_Color patternTexel(int n, int x, int y)
{
    SDL_Color c = { 0, 0, 0, 255 };
    if (n == 0)
    {
        // A gradient: red grows to the right, and green downward.
        c = { (Uint8)(x * 255 / (CELL - 1)), (Uint8)(y * 255 / (CELL - 1)),
              64, 255 };
    }
    else if (n == 1)
    {
        // A checkerboard of squares 16 texels wide.
        bool dark = (x / 16 + y / 16) % 2 == 1;
        c = dark ? SDL_Color{ 40, 90, 200, 255 }
                 : SDL_Color{ 200, 220, 255, 255 };
    }
    else if (n == 2)
    {
        // Rings 10 texels wide, around the cell's middle.
        float d = std::sqrt((x - 63.5f) * (x - 63.5f) +
                            (y - 63.5f) * (y - 63.5f));
        bool dark = (int)(d / 10.0f) % 2 == 1;
        c = dark ? SDL_Color{ 230, 120, 40, 255 }
                 : SDL_Color{ 60, 30, 10, 255 };
    }
    else
    {
        // Diagonal stripes, 16 texels apart.
        bool dark = ((x + y) / 16) % 2 == 1;
        c = dark ? SDL_Color{ 40, 180, 90, 255 }
                 : SDL_Color{ 15, 60, 35, 255 };
    }
    if (x % 16 == 0 || y % 16 == 0)
        c = { (Uint8)((c.r + 255) / 2), (Uint8)((c.g + 255) / 2),
              (Uint8)((c.b + 255) / 2), 255 };
    return c;
}
In the preceding code, x and y are the texel's place within its cell, from 0 to 127. The gradient's red grows from 0 at the left to 255 at the right, and its green from top to bottom. The checkerboard's squares are 16 texels wide, so x / 16 + y / 16 counts squares, and its being odd picks the dark color. The rings measure each texel's distance from the cell's middle, at 63.5, and change color every 10 texels. The stripes count the sum x + y in steps of 16, which makes diagonal bands. Last, every 16th row and column is blended halfway to white, a pale grid over every pattern.
The atlas puts the four patterns side by side:
// The atlas, as bytes: each cell's pattern, with a red square in its
// top-left corner, so that its way up shows under any warp.
std::vector<Uint8> buildAtlas()
{
    std::vector<Uint8> pixels(ATLAS * ATLAS * 4);
    for (int n = 0; n < 4; ++n)
    {
        int ox = (n % 2) * CELL;
        int oy = (n / 2) * CELL;
        for (int y = 0; y < CELL; ++y)
            for (int x = 0; x < CELL; ++x)
            {
                SDL_Color c = (x < 8 && y < 8) ? SDL_Color{ 240, 40, 40, 255 }
                                               : patternTexel(n, x, y);
                setTexel(pixels, ox + x, oy + y, c);
            }
    }
    return pixels;
}
Cell n starts at column (n % 2) * CELL and row (n / 2) * CELL, so cell 0 is the top left, 1 the top right, 2 the bottom left and 3 the bottom right. An 8-texel red square goes in each cell's top-left corner, which shows which way up the cell is, however the quad is warped. The demo's keys number the cells 1 to 4, for people, and the code numbers them 0 to 3.
UV Coordinates
The texture is 256 texels across today, but it could be 512 tomorrow. Code that uses the texture shouldn't have to care.
A Space From 0 to 1
So a texture is addressed in UV coordinates: u across, from 0 at the left edge to 1 at the right, and v down, from 0 at the top to 1 at the bottom. The names u and v are a convention, since x, y and z were taken. A UV of (0.5, 0.5) is the middle of the image, whether it's 16 texels wide or 4,000.
Drawing a texture on a shape is then a matter of saying, for each corner of the shape, which point of the texture belongs there. Tag a quad's four corners with the texture's four corners, and the whole texture stretches across it. The next image shows a texture's UVs, and a quad that carries them.
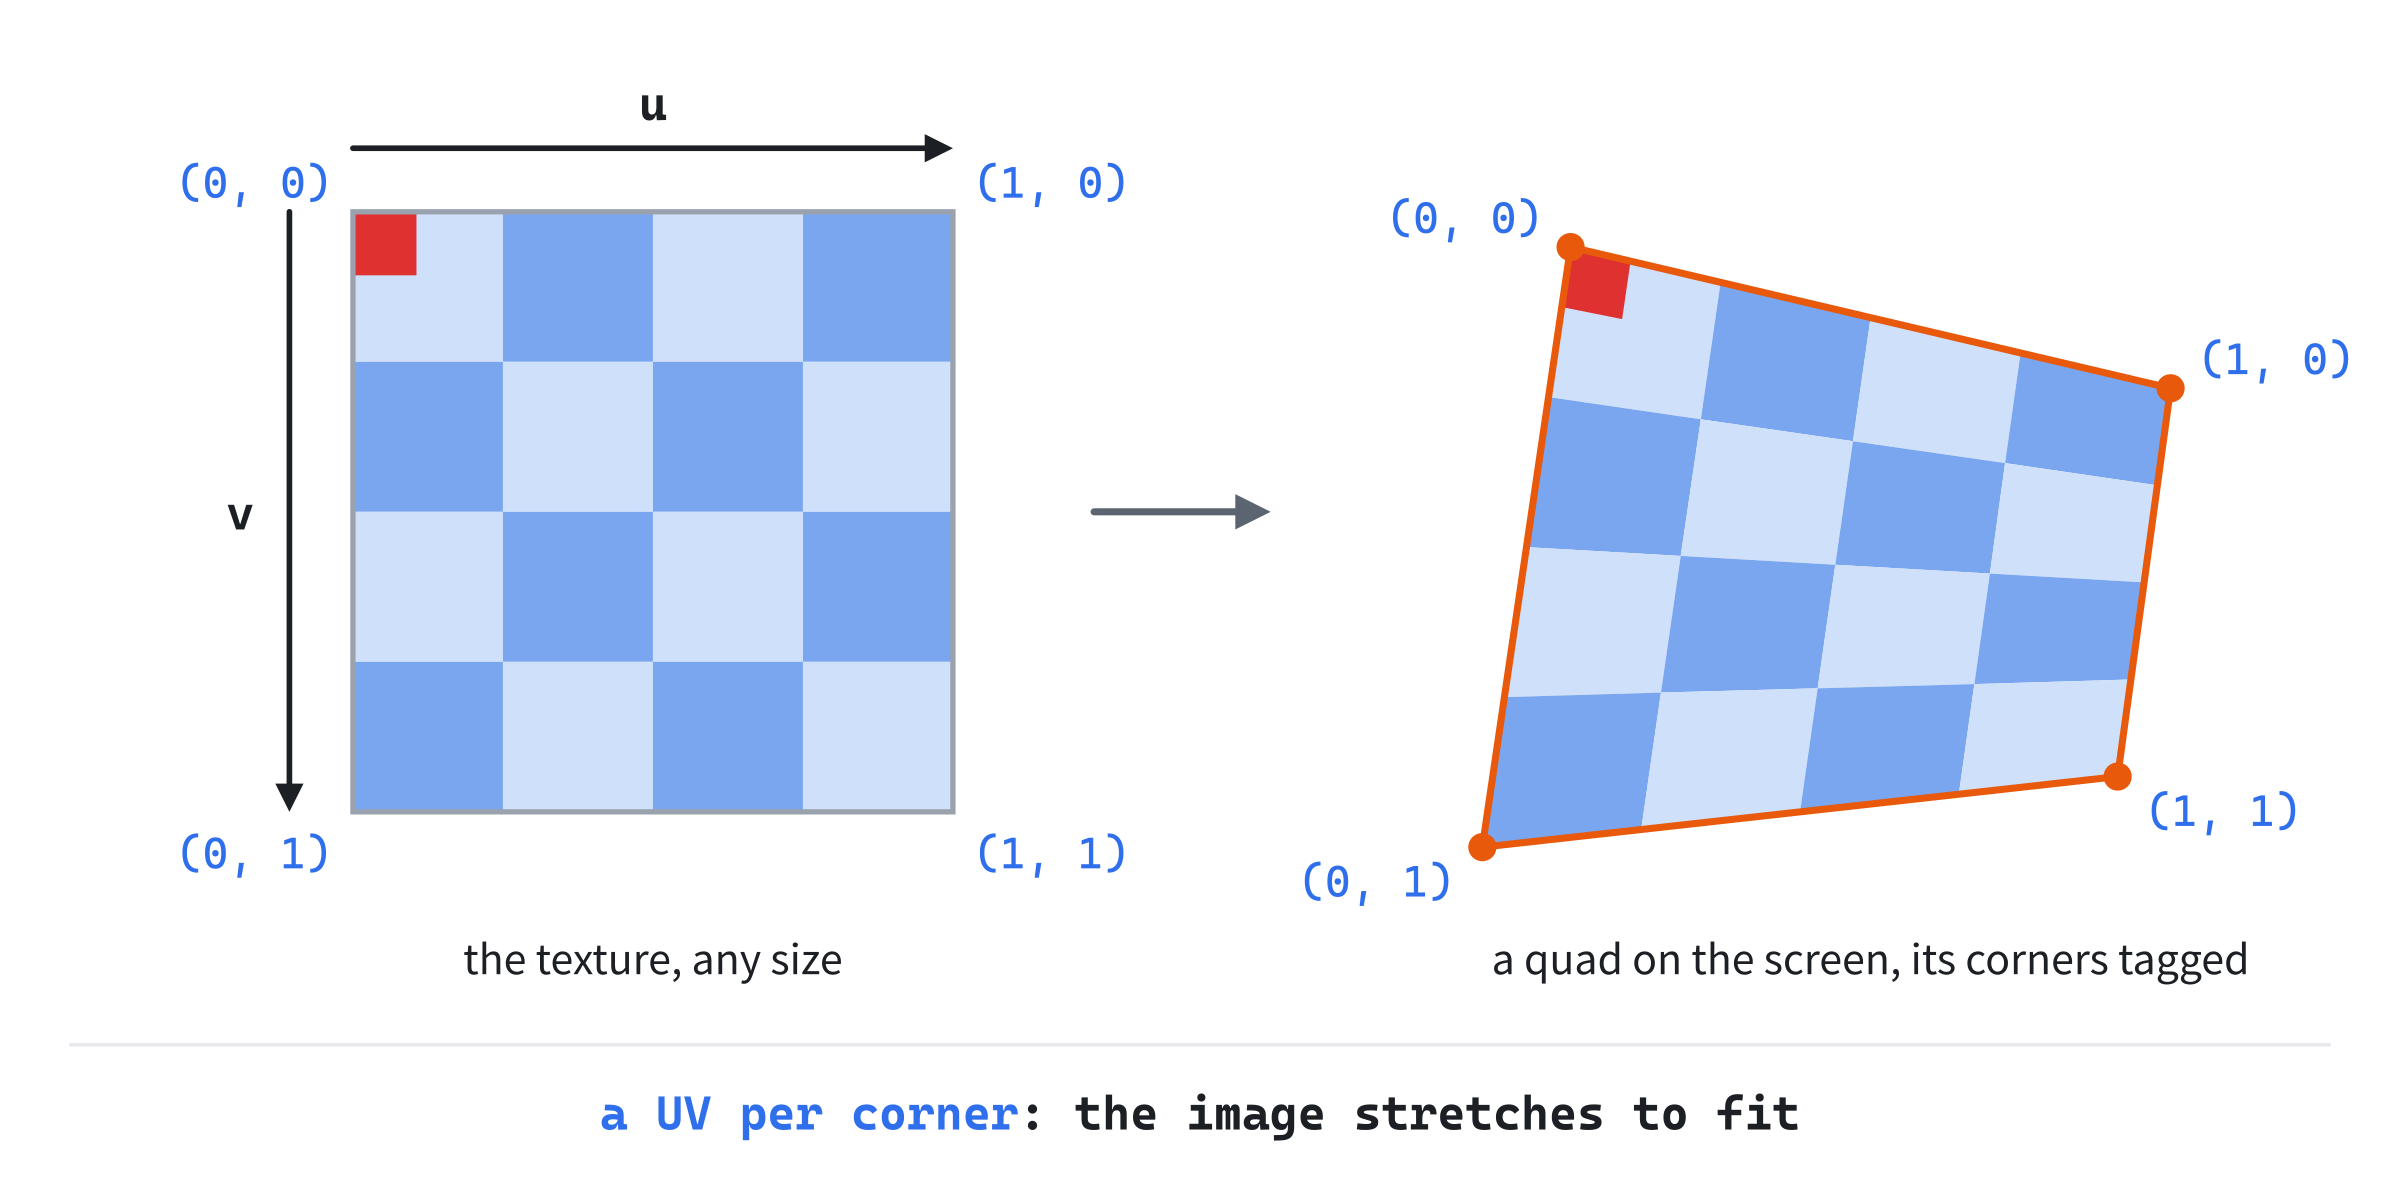
Tag them instead with UVs that run only from 0 to 0.5 each way, and only the top-left quarter of the texture appears. That's how an atlas's cells are drawn, as Atlases explains.
Which Way Is Up
In SDL, as in Direct3D, v grows downward, like the screen's y. OpenGL's equivalent, often called t, grows upward. Code moved from one to the other shows its images upside down until v is flipped, as 1 − v.
Sampling
A texture is almost never drawn at exactly its own size. So for each pixel on the screen, the renderer has to decide which texel's color to use. That decision is sampling.
Which Texel
Texel i, of a texture W texels wide, covers the stretch of u from i/W to (i + 1)/W, and its center is at (i + 0.5)/W. So the texel under a UV is the whole part of u times W. On a texture 8 texels wide, u = 0.4 gives 3.2, so it lands in texel 3, which covers 0.375 to 0.5.
Nearest sampling takes that texel's color, as it is. Magnified, each texel becomes a crisp block, which is right for pixel art. Linear sampling blends instead. It finds the texel centers on either side of the sample, two along u and two along v. Then it blends those four texels by how close the sample is to each, with Chapter 8's lerp, across and then down. To find them, take u times W, less a half, which measures the sample's place from texel centers. For u = 0.4 on 8 texels, that's 2.7, so the sample is 0.7 of the way from texel 2's center to texel 3's. It takes 0.3 of texel 2's color and 0.7 of texel 3's. The next image shows both, and one more case that matters later.
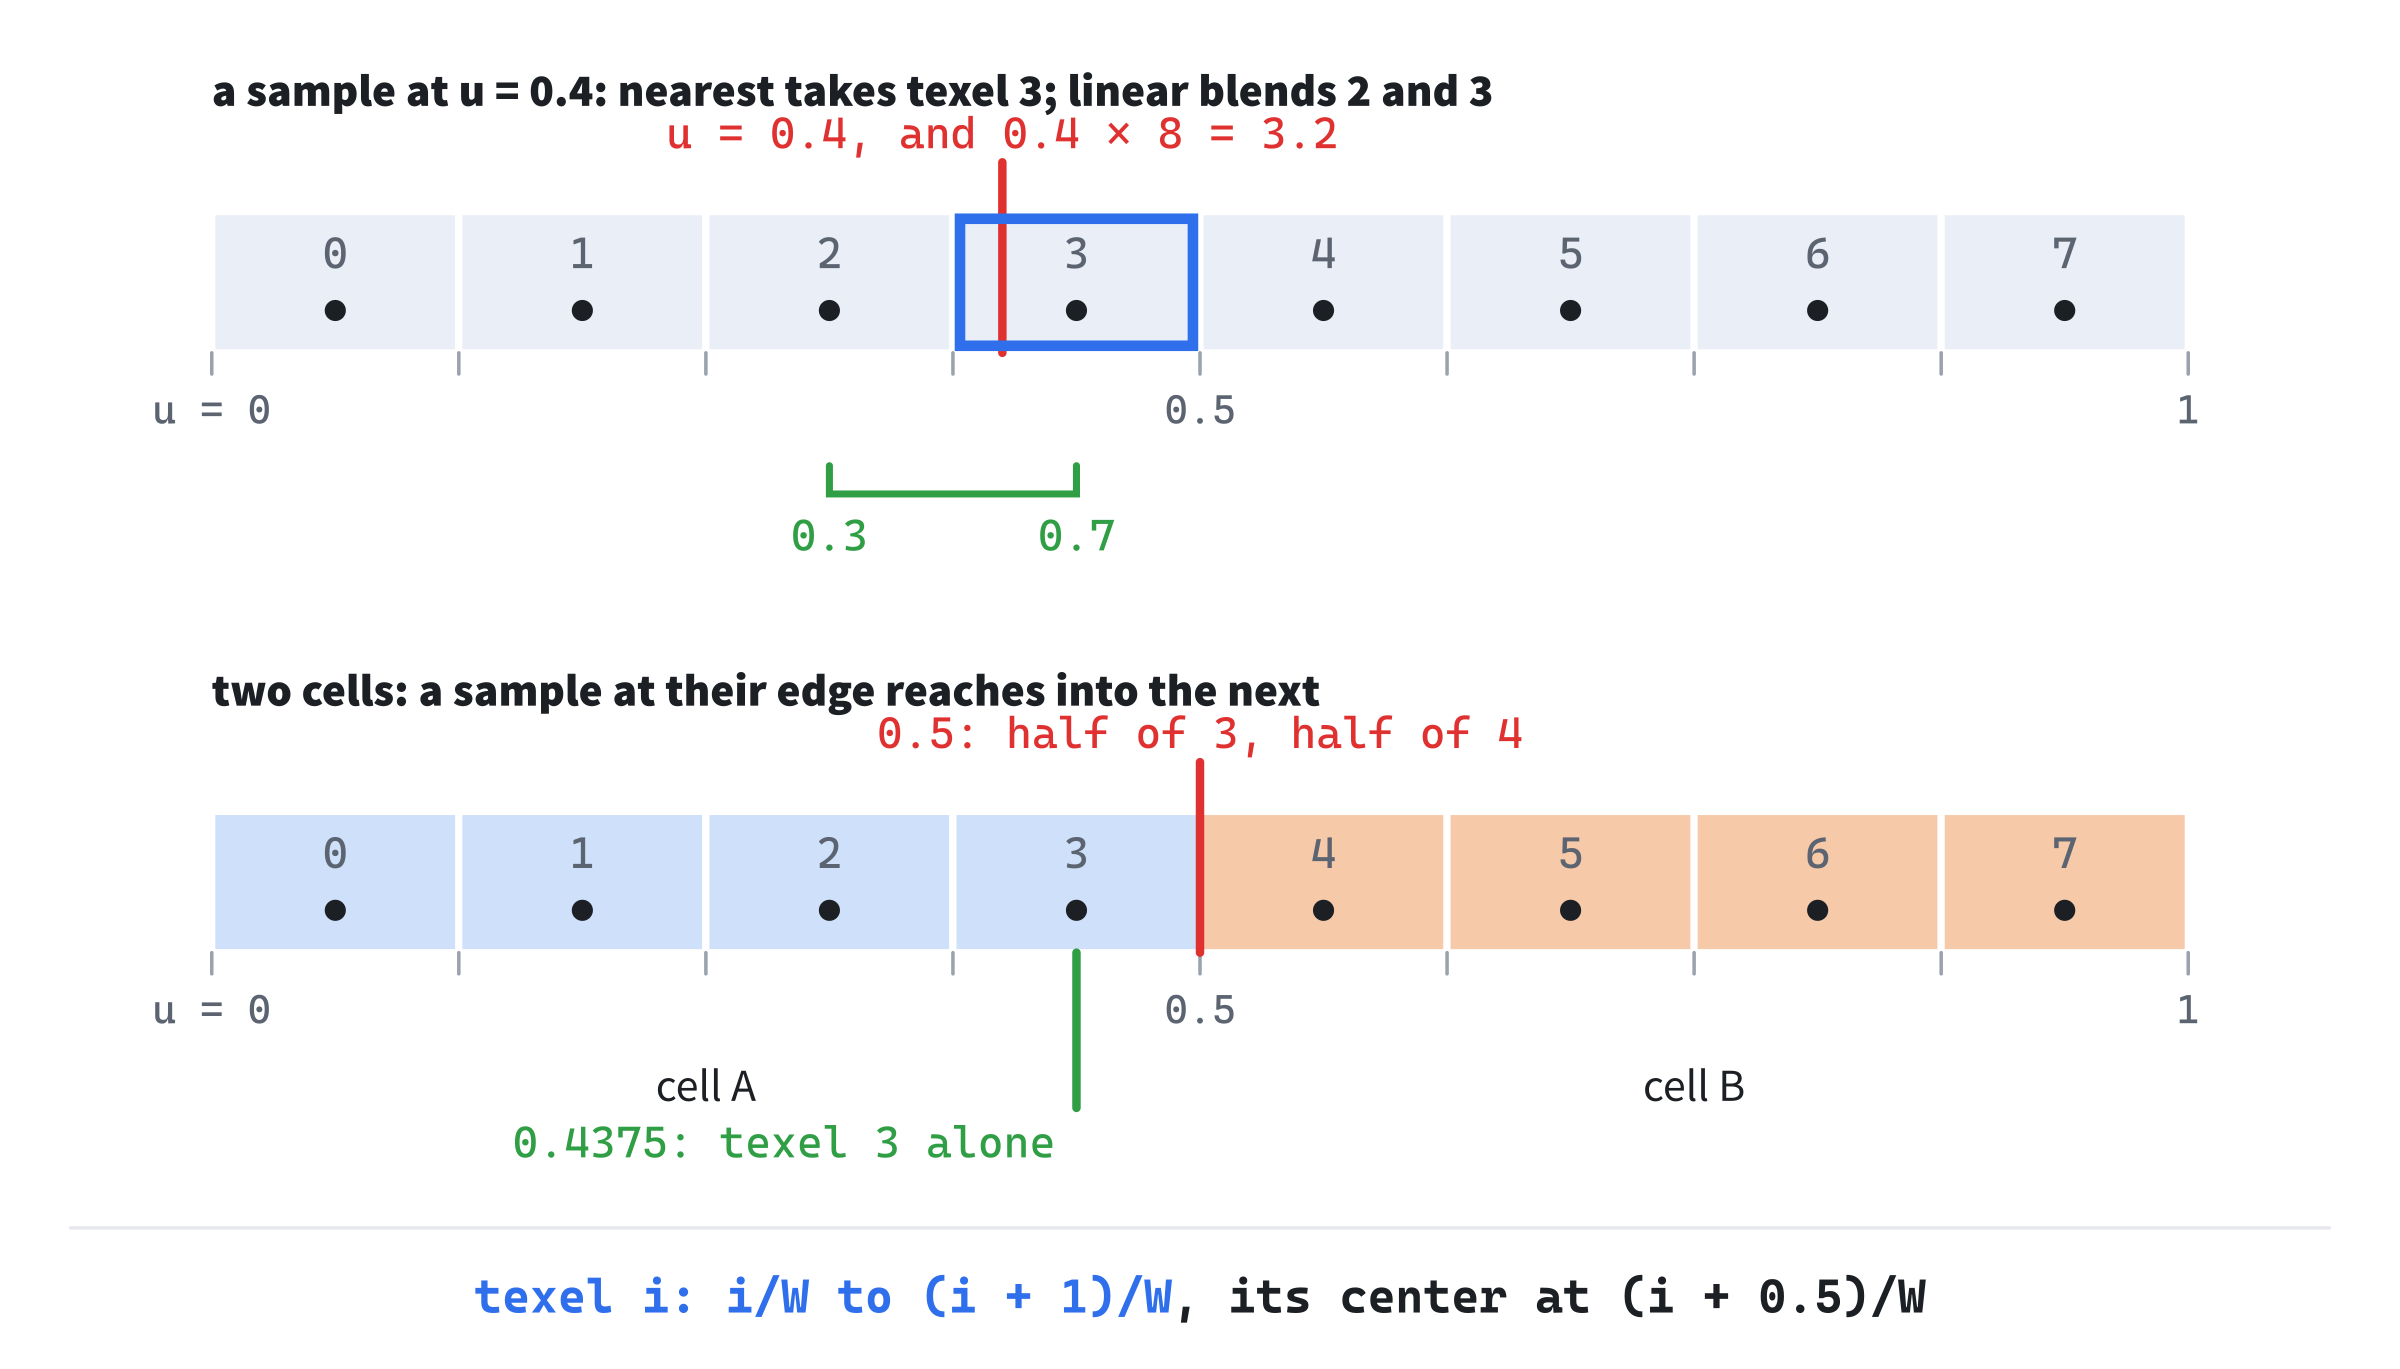
The lower row is two cells of 4 texels. At u = 0.5, the edge between the cells, u times 8 less a half is 3.5. So linear sampling takes half its color from the last texel of the first cell, and half from the first texel of the next. That's the start of bleeding, which Atlases explains.
Neither kind is better. Nearest keeps edges hard, and linear keeps gradients smooth. SDL sets the choice for each texture, with SDL_SetTextureScaleMode, and does the sampling on the graphics card.
Drawn Smaller
Drawn larger than its size, a texture has fewer texels than pixels, and sampling fills in between them. Drawn smaller, it has more texels than pixels, and that's harder. Nearest sampling takes one texel for each pixel, and skips the rest. Linear blends only the four nearest, and skips the rest just the same. So fine detail, such as a line one texel wide, appears in some pixels and not in others. As the shape moves, it comes and goes, a flicker called shimmering.
The usual cure is a mipmap: a chain of copies of the texture, each half the size of the one before, and blended properly from it. A texture drawn small samples from the copy nearest its drawn size, so nothing is skipped. SDL's 2D renderer doesn't make mipmaps, and Texture Quad doesn't need them, but a game that shrinks textures much would.
Drawing Your Own Triangles
The SDL_RenderGeometry function is SDL's call for drawing triangles. It takes a list of corners, called vertices, and a list of indices, which say which three vertices make each triangle. It fills every triangle, and samples a texture as it goes, if it's given one.
A Vertex
Each vertex is an SDL_Vertex. Here's a sketch of SDL's own declaration, with its comments put in this book's words:
// A sketch: SDL's SDL_Vertex, from SDL_render.h, with its comments
// rewritten.
typedef struct SDL_Vertex
{
    SDL_FPoint position;    // Where the corner is, on the screen.
    SDL_FColor color;       // A tint, each channel a float from 0 to 1.
    SDL_FPoint tex_coord;   // The corner's UV in the texture.
} SDL_Vertex;
The color is an SDL_FColor, whose channels are floats from 0 to 1, not the bytes of an SDL_Color. It multiplies the texture's colors. White, with all four channels at 1, leaves the texture as it is, and any other color tints it. The tex_coord is the corner's UV. Across each triangle, the renderer blends the three corners' UVs, so that every pixel inside gets a UV of its own, and samples the texture there.
A Quad From a Grid
A quad is two triangles that share an edge: four vertices, and six indices. Texture Quad builds its quad from many more, a grid of 12 by 12 squares, for a reason that What the Warp Is explains:
// The quad, as a grid of grid by grid squares, two triangles each. A vertex
// at fractions s across and t down is placed between the four corners:
// along the top and bottom edges by s, then between those by t. Its UV is
// placed the same way, between (u0, v0) and (u1, v1). The corners are 0
// top left, 1 top right, 2 bottom left and 3 bottom right.
void buildQuad(const Vec2 corner[4], float u0, float v0, float u1, float v1,
               int grid, std::vector<SDL_Vertex>& verts,
               std::vector<int>& indices)
{
    verts.clear();
    indices.clear();
    for (int j = 0; j <= grid; ++j)
        for (int i = 0; i <= grid; ++i)
        {
            float s = (float)i / grid;
            float t = (float)j / grid;
            Vec2 top = lerp(corner[0], corner[1], s);
            Vec2 bottom = lerp(corner[2], corner[3], s);
            Vec2 p = lerp(top, bottom, t);
            SDL_Vertex v;
            v.position = { p.x, p.y };
            v.color = { 1.0f, 1.0f, 1.0f, 1.0f };
            v.tex_coord = { lerp(u0, u1, s), lerp(v0, v1, t) };
            verts.push_back(v);
        }
    for (int j = 0; j < grid; ++j)
        for (int i = 0; i < grid; ++i)
        {
            int a = j * (grid + 1) + i;   // The square's top left,
            int b = a + 1;                // its top right,
            int c = a + grid + 1;         // its bottom left,
            int d = c + 1;                // and its bottom right.
            indices.insert(indices.end(), { a, b, d, a, d, c });
        }
}
In the preceding code, the first loops make the vertices, grid + 1 along each side. A vertex at the fractions s across and t down is placed by Chapter 8's lerp, twice: along the top edge and the bottom edge by s, then between those two points by t. Its UV is blended between (u0, v0) and (u1, v1) by the same fractions, so the texture follows the vertices wherever they go. The second loops make the triangles. Each square's four vertices are numbered a to d, and its two triangles are a, b, d and a, d, c. Both share a and d, so the square is split along the diagonal from its top left to its bottom right. The insert adds all six indices at once, from a braced list.
With a grid of 12, that's 169 vertices and 288 triangles, which is nothing for a graphics card. With a grid of 1, it's the plain quad: 4 vertices and 2 triangles.
What the Warp Is
Drag a corner of the quad, and the image warps. It's worth knowing exactly how, since the answer depends on how the quad is cut into triangles.
Two Triangles
Within a triangle, the renderer blends the three corners' UVs evenly, which is an affine map. It keeps straight lines straight, and parallel lines parallel. Two triangles make two affine maps, which agree along their shared diagonal and nowhere else. So when the quad isn't a parallelogram, the image bends where the triangles meet, in a crease down the diagonal. Lines that cross it kink, and circles get a corner.
Bilinear
The grid of 12 places every vertex by the lerp twice, a bilinear blend of the four corners, and each of its small triangles is affine on its own. The kinks are still there, but they're tiny, and spread across the grid, so the warp looks smooth. Its character is the bilinear blend's: the texture's rows and columns stay straight, and are evenly spaced along each edge. Curves and diagonals bend, so the rings turn to eggs.
Perspective
Neither is what a square looks like in perspective, as a floor stretching away. In perspective, the rows bunch up toward the far edge, since equal steps across the floor look smaller with distance. The next image shows one keystone shape, mapped three ways.
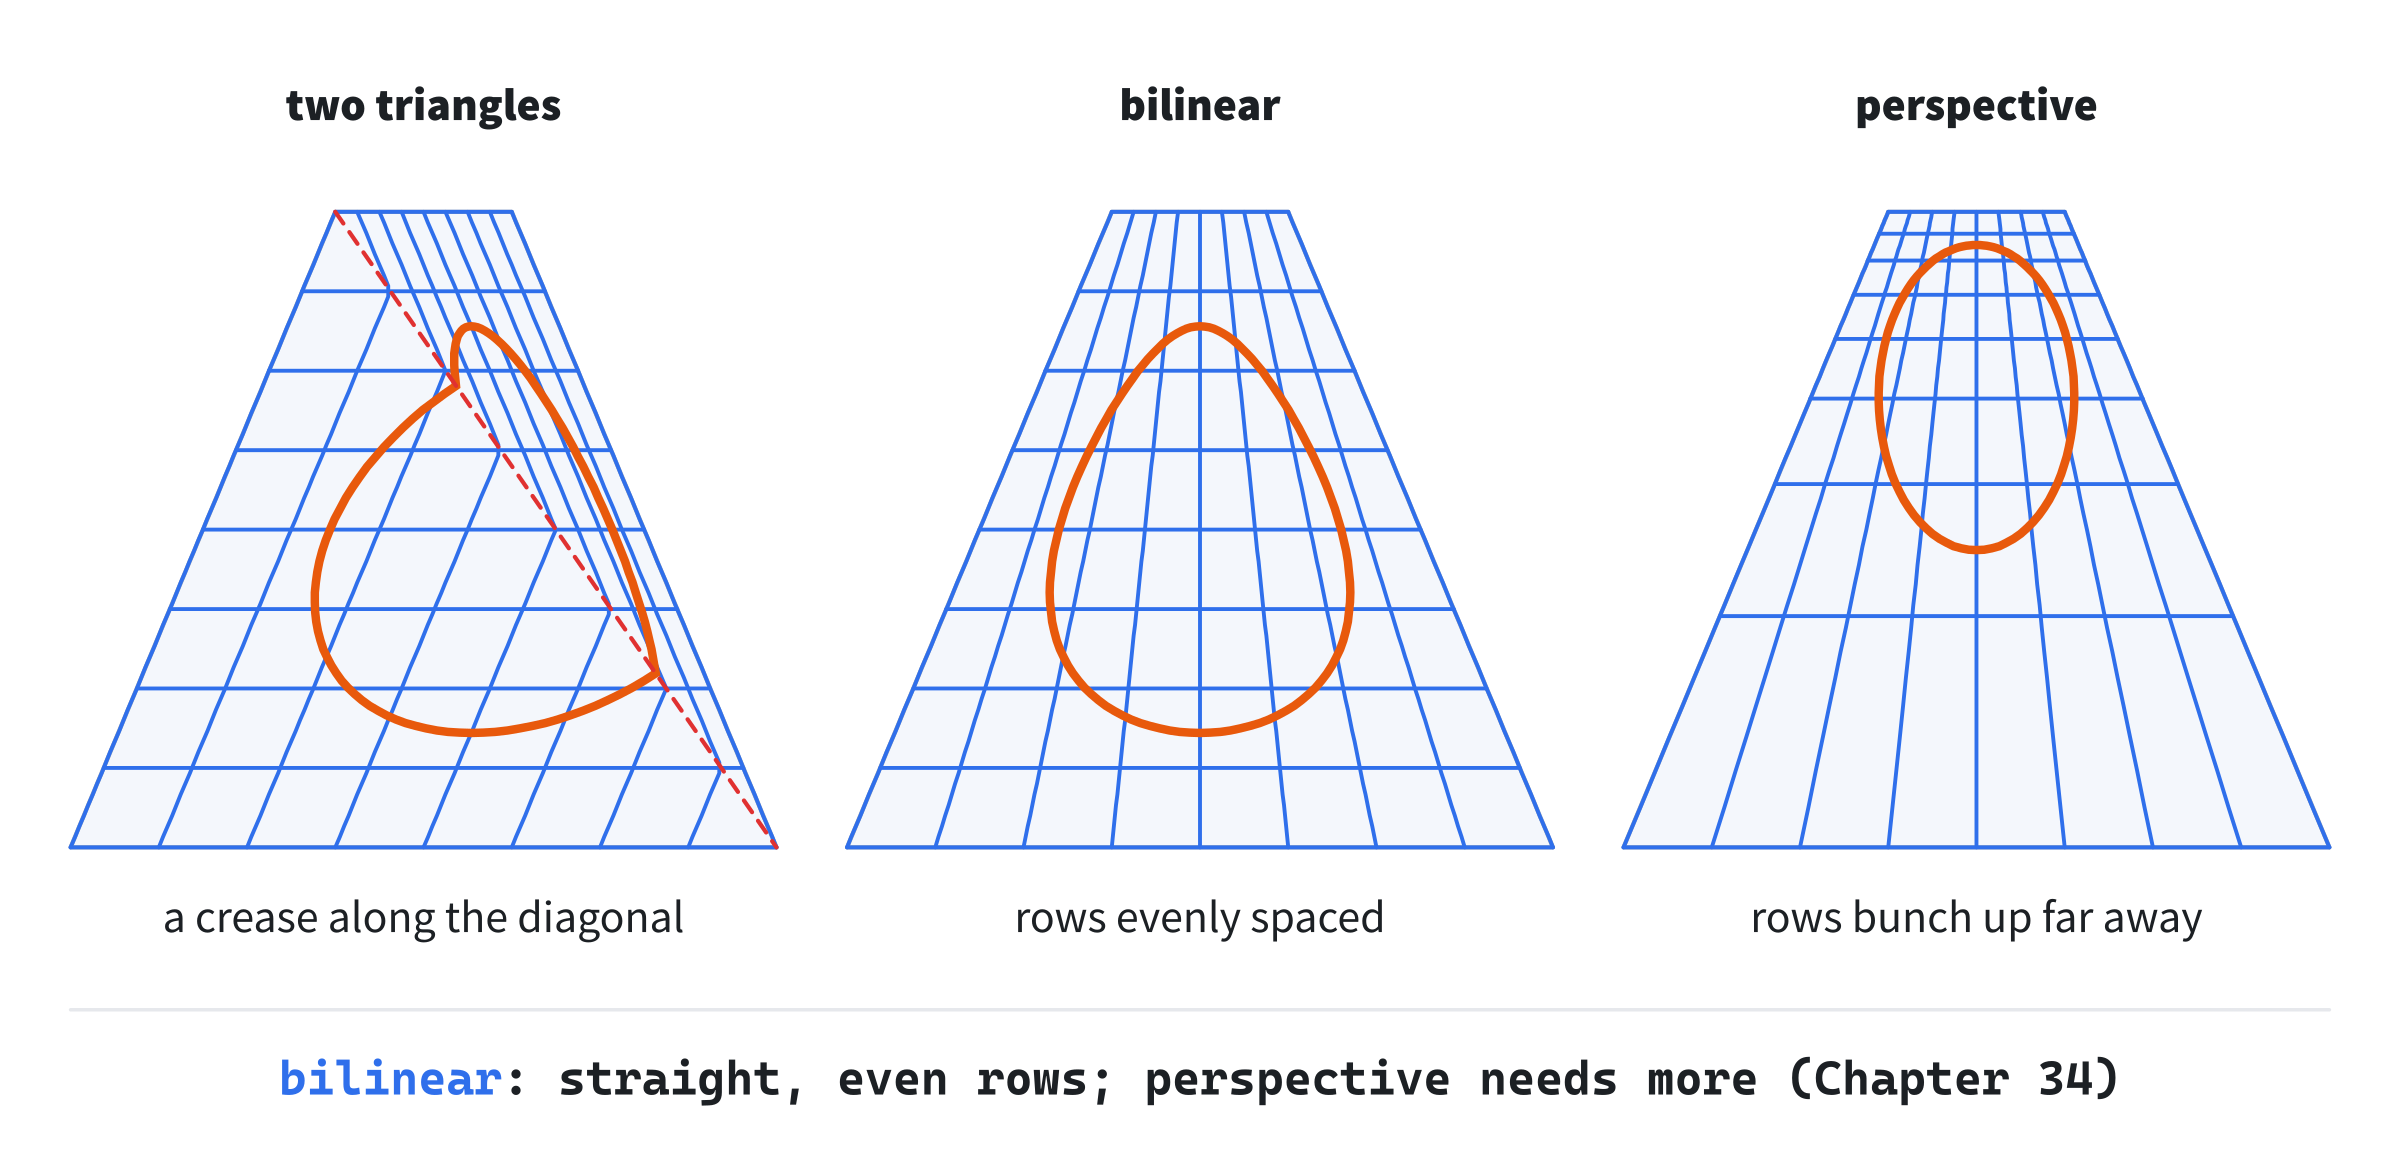
Cutting the quad into more triangles only follows whatever rule placed the vertices more closely, here the bilinear blend. True perspective needs the sampling itself to divide by depth, at every pixel, which Chapter 34 does with its own triangle filler.
Folded
Drag one corner across the opposite edge, and the quad folds. Some triangles now have their corners the other way around, and appear mirror-imaged. The SDL_RenderGeometry function doesn't care which way a triangle's corners go, so it draws them all. Part 7's triangle filler will care, since it's how a cube tells its front faces from its back ones.
Atlases
Changing textures between draws costs the renderer time, and changing them hundreds of times a frame can slow a game badly. So games pack many images into one texture, an atlas, and draw each one by its UVs.
Cells by Their UVs
Picking a cell is four numbers. Texture Quad's atlas is 2 by 2, so each cell is half the atlas each way:
cell 0: u from 0 to 0.5, v from 0 to 0.5
cell 1: u from 0.5 to 1, v from 0 to 0.5
cell 2: u from 0 to 0.5, v from 0.5 to 1
cell 3: u from 0.5 to 1, v from 0.5 to 1
To draw a cell, give the quad that cell's UVs instead of the whole texture's. Nothing else changes.
Bleeding
Linear sampling makes one problem. At a cell's edge, as Figure 24.2 showed, the sample sits halfway between the cell's last texel and the next cell's first. So the next cell's colors seep into the edge of the one being drawn, a thin fringe called bleeding.
There are two cures. The first moves the cell's UVs in by half a texel at each edge, so that the samples there land on the cell's own edge texels, and blend nothing from outside. It costs half a texel of the cell's border, which is rarely missed. The second is to pad the cells, with a margin between them that repeats each cell's edge texels. Texture Quad's E key applies the first cure. On a 256-texel atlas, half a texel is 0.5 / 256 of the UV range, about 0.002. With nearest sampling, there's nothing to cure, since each sample takes one texel, and the edge sample's texel is the cell's own.
Wrapping and Tiling
A UV doesn't have to stay between 0 and 1. What a texture does outside that range is its address mode.
Clamp and Wrap
With clamp, a UV past 1 takes the edge texel's color, so the image's edge stretches on. With wrap, the texture repeats: a u of 2.5 takes the same texel as 0.5. Give a quad UVs from 0 to 3 instead of 0 to 1, with wrap, and the image appears 3 times each way. That's tiling, the way one small texture covers a wall, a floor or a scrolling background.
SDL sets the mode for SDL_RenderGeometry with SDL_SetRenderTextureAddressMode, new in SDL 3.4, one mode for u and one for v. Its default, SDL_TEXTURE_ADDRESS_AUTO, wraps when the UVs go outside 0 to 1, and clamps when they don't. Texture Quad sets the mode it wants every frame, so that its choice is plain in the code.
The Whole Texture Repeats
Wrapping repeats the whole texture, not a cell of an atlas. Texture Quad tiles its whole atlas, so the four cells repeat together. A surface that should tile one image usually gets a texture of its own, for that reason. Or it's drawn as one quad for each repeat, each with the cell's UVs.
Building Texture Quad
Texture Quad maps its atlas onto a quad whose corners you drag. Keys 1 to 4 pick a cell, A shows the whole atlas, and T tiles it 1, 2 or 3 times each way. N switches between nearest and linear sampling, and G between the grid of triangles and just two. E moves a cell's UVs in by half a texel, and R puts the corners back where they started.
Get the code. The complete project is in the
Texture Quadfolder of the book's repository.
Texture Quad starts from the skeleton, with its mouse, but without the timing, since nothing moves by itself. It reuses setColor, from Chapter 8, and Chapter 8's lerp, from Vec2.h. Its Vec2.h is A-Star Explorer's, since this chapter adds nothing to it. Here are its includes and its colors:
#include <cmath>
#include <string>
#include <vector>
#include "Vec2.h"

constexpr int WINDOW_WIDTH  = 1000;
constexpr int WINDOW_HEIGHT = 700;

constexpr SDL_Color TEXT = { 235, 238, 242, 255 };
constexpr SDL_Color GREY = { 90, 100, 112, 255 };
constexpr SDL_Color AMBER = { 232, 89, 12, 255 };
constexpr SDL_Color HANDLE = { 200, 210, 220, 255 };
The quad's outline is amber, and its corner handles are pale grey. Then come the constants:
// The atlas: 256 texels square, a 2 by 2 grid of cells 128 texels square,
// and the cells' names, for the readout.
constexpr int ATLAS = 256;
constexpr int CELL = 128;
const char* const CELL_NAMES[] = { "gradient", "checkerboard", "rings",
                                   "stripes" };

// The quad is cut into GRID by GRID squares, two triangles each, unless G
// asks for one square. A corner can be grabbed within GRAB pixels.
constexpr int GRID = 12;
constexpr float GRAB = 22.0f;
The atlas is 256 texels square, in cells of 128, and CELL_NAMES names the cells for the readout. The grid is 12 squares each way, and a corner can be grabbed within 22 pixels. Then come setTexel, patternTexel, buildAtlas and buildQuad, as the chapter showed them.
The State
The state goes after the font is loaded. First, the atlas is built, and given to the renderer as a texture:
// The atlas, built as bytes, then copied into a texture.
std::vector<Uint8> pixels = buildAtlas();
SDL_Texture* atlas = SDL_CreateTexture(renderer, SDL_PIXELFORMAT_RGBA32,
                                       SDL_TEXTUREACCESS_STATIC,
                                       ATLAS, ATLAS);
SDL_UpdateTexture(atlas, nullptr, pixels.data(), ATLAS * 4);
The SDL_CreateTexture function makes an empty texture, 256 texels square, in the RGBA32 format. It's SDL_TEXTUREACCESS_STATIC, since it's filled once and rarely changed. Then SDL_UpdateTexture copies the bytes into it. It takes the texture and the rectangle to fill, where nullptr means all of it. Then it takes the bytes, and their pitch, 256 times 4. Once it's copied, the texture lives with the graphics card, and the bytes could be thrown away. Then comes the rest of the state:
// The corners, and where R puts them back. Then the corner being
// dragged, or -1; the cell shown, 0 to 3, or -1 for the whole atlas; how
// many times it repeats each way; and the settings: linear sampling,
// many triangles or two, and UVs moved in from a cell's edges.
const Vec2 HOME[4] = { { 320, 150 }, { 680, 150 },
                       { 320, 510 }, { 680, 510 } };
Vec2 corner[4] = { HOME[0], HOME[1], HOME[2], HOME[3] };
int drag = -1;
int cell = 0;
int reps = 1;
bool linear = false;
bool fine = true;
bool inset = false;
std::vector<SDL_Vertex> verts;
std::vector<int> indices;
The quad starts as a square, 360 pixels across, in the middle of the window. It shows cell 0, the gradient, with nearest sampling and the grid of triangles.
The Events
The keys change what's shown and how, and a click grabs a corner:
// Events: quitting, and the keys and clicks that happen once.
SDL_Event event;
while (SDL_PollEvent(&event))
{
    if (event.type == SDL_EVENT_QUIT) running = false;
    else if (event.type == SDL_EVENT_KEY_DOWN)
    {
        if (event.key.key == SDLK_ESCAPE) running = false;
        else if (event.key.key >= SDLK_1 && event.key.key <= SDLK_4)
        {
            cell = (int)(event.key.key - SDLK_1);
            reps = 1;
        }
        else if (event.key.key == SDLK_A)
        {
            cell = -1;
            reps = 1;
        }
        else if (event.key.key == SDLK_T)
        {
            cell = -1;
            reps = reps % 3 + 1;
        }
        else if (event.key.key == SDLK_N) linear = !linear;
        else if (event.key.key == SDLK_G) fine = !fine;
        else if (event.key.key == SDLK_E) inset = !inset;
        else if (event.key.key == SDLK_R)
            for (int i = 0; i < 4; ++i) corner[i] = HOME[i];
    }
    else if (event.type == SDL_EVENT_MOUSE_BUTTON_DOWN &&
             event.button.button == SDL_BUTTON_LEFT)
    {
        // The nearest corner within GRAB pixels, if there is one.
        Vec2 press = { event.button.x, event.button.y };
        float nearest = GRAB;
        for (int i = 0; i < 4; ++i)
        {
            if (distance(press, corner[i]) < nearest)
            {
                nearest = distance(press, corner[i]);
                drag = i;
            }
        }
    }
    else if (event.type == SDL_EVENT_MOUSE_BUTTON_UP) drag = -1;
}
In the preceding code, the keys 1 to 4 have consecutive keycodes, so subtracting SDLK_1 turns them into the cells 0 to 3. A and T both show the whole atlas, and T steps the repeats from 1 to 3, then back to 1. A click grabs the nearest corner within 22 pixels, if there is one, by keeping the closest found so far.
Each Frame's Work
Each frame, the quad is built afresh, from its corners and the UVs it should show:
// A dragged corner follows the mouse.
if (drag >= 0) corner[drag] = { mx, my };

// The UVs to map: a cell, a quarter of the atlas, or the whole atlas,
// reps times each way. With inset on, a cell's UVs move in by half a
// texel, so that linear sampling stays inside the cell.
float u0 = 0.0f;
float v0 = 0.0f;
float u1 = (float)reps;
float v1 = (float)reps;
if (cell >= 0)
{
    float half = inset ? 0.5f / ATLAS : 0.0f;
    u0 = (cell % 2) * 0.5f + half;
    v0 = (cell / 2) * 0.5f + half;
    u1 = u0 + 0.5f - 2.0f * half;
    v1 = v0 + 0.5f - 2.0f * half;
}
buildQuad(corner, u0, v0, u1, v1, fine ? GRID : 1, verts, indices);
The UVs start as the whole atlas, repeated reps times each way. For a cell, they're that cell's half of the atlas each way, and with inset on, they move in by half a texel at each edge. The quad has GRID squares each way, or 1 when G has turned the grid off.
Drawing
After the skeleton clears the screen, the quad is drawn:
// The quad, sampled as N says, and repeating the texture when it's
// tiled, with UVs past 1.
SDL_SetTextureScaleMode(atlas, linear ? SDL_SCALEMODE_LINEAR
                                      : SDL_SCALEMODE_NEAREST);
SDL_TextureAddressMode address = (reps > 1) ? SDL_TEXTURE_ADDRESS_WRAP
                                            : SDL_TEXTURE_ADDRESS_CLAMP;
SDL_SetRenderTextureAddressMode(renderer, address, address);
SDL_RenderGeometry(renderer, atlas, verts.data(), (int)verts.size(),
                   indices.data(), (int)indices.size());
The texture's scale mode is set first, then the address mode, wrap when the atlas is tiled and clamp when it isn't. Then SDL_RenderGeometry takes the texture, the vertices and their count, and the indices and their count. The outline and the handles come next:
// The quad's outline, and its corners, white when grabbed or near.
setColor(renderer, AMBER);
const int edge[8] = { 0, 1, 1, 3, 3, 2, 2, 0 };
for (int e = 0; e < 8; e += 2)
    SDL_RenderLine(renderer, corner[edge[e]].x, corner[edge[e]].y,
                   corner[edge[e + 1]].x, corner[edge[e + 1]].y);
for (int i = 0; i < 4; ++i)
{
    bool hot = drag == i || distance(corner[i], { mx, my }) < GRAB;
    setColor(renderer, hot ? TEXT : HANDLE);
    SDL_FRect handle = { corner[i].x - 6, corner[i].y - 6, 12, 12 };
    SDL_RenderFillRect(renderer, &handle);
}
The array edge lists the outline's four sides as pairs of corners, around the quad, since the corners are numbered across and then down. A handle turns white while it's dragged, or the mouse is near enough to grab it. Then comes a small copy of the atlas, drawn by SDL_RenderTexture into a rectangle, with the cell being shown outlined:
// A small copy of the atlas, with the cell shown outlined.
SDL_FRect thumb = { WINDOW_WIDTH - 176.0f, 76.0f, 160.0f, 160.0f };
SDL_SetTextureScaleMode(atlas, SDL_SCALEMODE_NEAREST);
SDL_RenderTexture(renderer, atlas, nullptr, &thumb);
setColor(renderer, GREY);
SDL_RenderRect(renderer, &thumb);
drawText(renderer, font, "the atlas", thumb.x, thumb.y - 22, GREY);
if (cell >= 0)
{
    SDL_FRect shown = { thumb.x + (cell % 2) * 80.0f,
                        thumb.y + (cell / 2) * 80.0f, 80.0f, 80.0f };
    setColor(renderer, AMBER);
    SDL_RenderRect(renderer, &shown);
}
The copy is always nearest sampled, so its texels stay sharp. Last come the readout and the controls:
// The readout: what's shown, then the settings, then the controls.
std::string shownText = "the whole atlas, " + std::to_string(reps) +
                        " by " + std::to_string(reps);
if (cell >= 0)
    shownText = "cell " + std::to_string(cell + 1) + " of 4, the " +
                CELL_NAMES[cell];
drawText(renderer, font, "showing " + shownText, 12, 8, TEXT);
drawText(renderer, font,
         std::string("sampling ") + (linear ? "linear" : "nearest") +
         "   " + std::to_string(indices.size() / 3) + " triangles" +
         "   cell edges " + (inset ? "moved in half a texel" :
                             "as they are"), 12, 26, GREY);
drawText(renderer, font,
         "[Drag] a corner   [1] to [4] a cell   [A] whole atlas   "
         "[T] tile   [R] reset", 12, WINDOW_HEIGHT - 46, GREY);
drawText(renderer, font,
         "[N] nearest or linear   [G] triangles   [E] cell edges   "
         "[Esc] quit", 12, WINDOW_HEIGHT - 26, GREY);
The first line names what's shown: a cell, numbered 1 to 4 for people, or the whole atlas and its repeats. The second gives the sampling, the number of triangles, which is the indices over 3, and whether the cell's edges are moved in. The texture is destroyed with the rest, first in the skeleton's cleanup:
SDL_DestroyTexture(atlas);It was made after the renderer, so it goes before it.
Trying It Out
Run the demo. The gradient fills a square, with the atlas in the top right corner of the window. Then try it, step by step:
- Warp it. Press 3 for the rings, and drag the top two corners toward each other, into a keystone. The rows and columns of the pale grid stay straight and evenly spaced, and the rings turn into eggs.
- Show the crease. Press G. With two triangles, the grid's columns kink along the diagonal from the top left to the bottom right, and so do the rings.
- Sample. Press G again, then N, and drag a corner far out, so that the texels grow large. With linear sampling, the rings' edges turn soft. Press N again for hard edges.
- Shrink it. Drag the corners close together, so that the quad is much smaller than the cell. Move a corner a little, and the pale grid's lines come and go: shimmering. Linear sampling softens it, but doesn't cure it.
- Find the bleed. Press R, then 2 for the checkerboard, and N for linear sampling. Drag the corners out until the quad fills most of the window, and look closely at its left edge. A thin pink line runs along it, a couple of pixels wide: the gradient's red, bleeding in from the cell to the left. Press E, and it's gone.
- Tile it. Press T twice, for the whole atlas 3 by 3, and warp the quad. All four cells repeat together.
- Fold it. Drag a top corner across to the other side. The quad folds into a bow tie, and the half that flipped is drawn mirror-imaged.
The next image shows step 1.
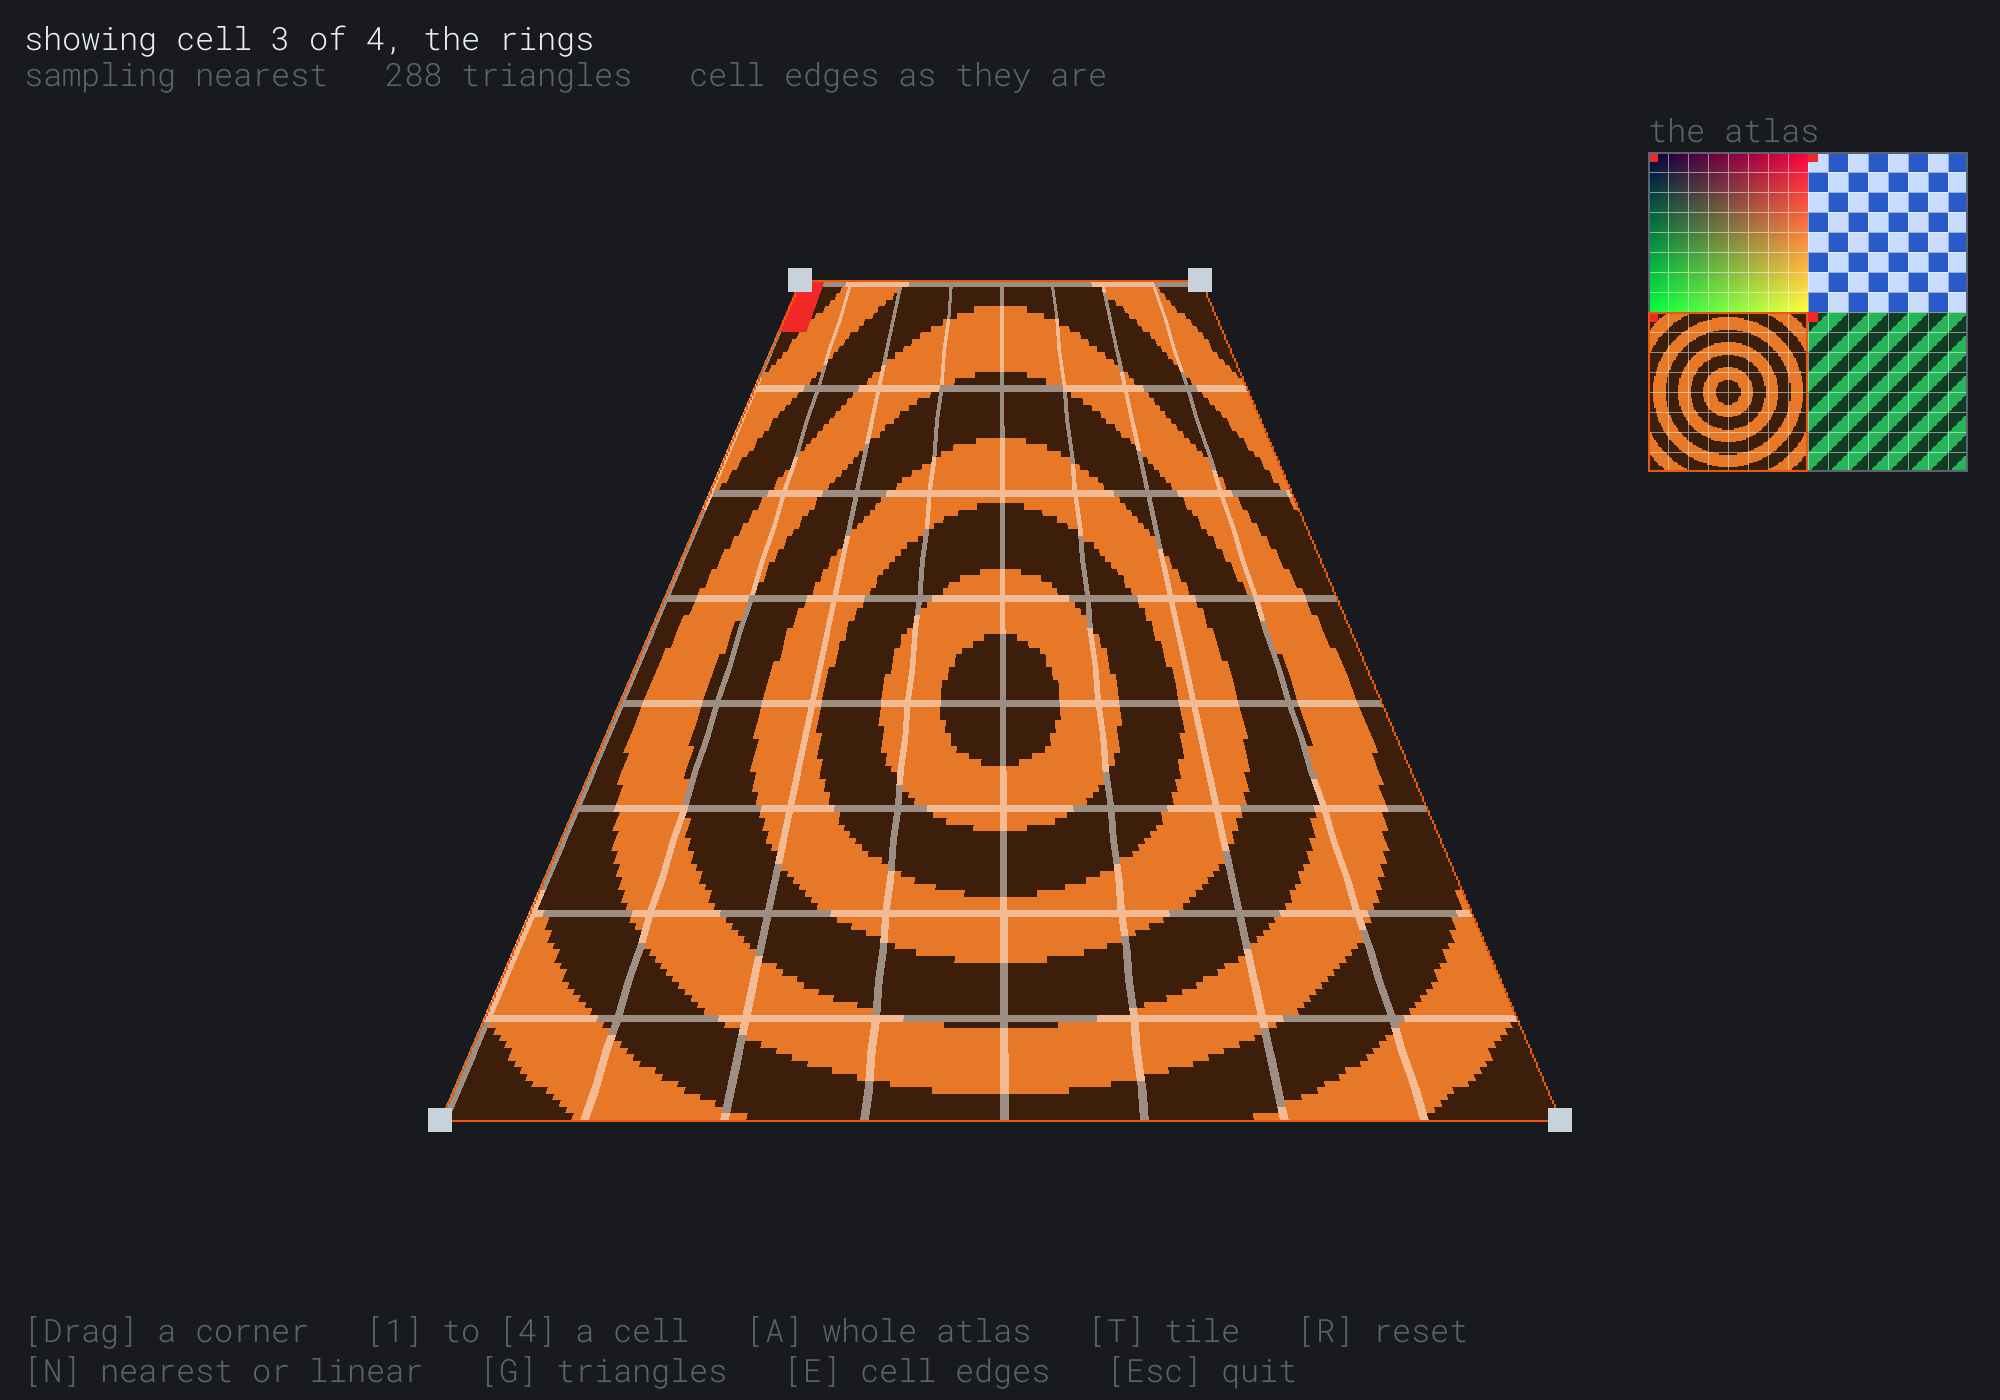
The quad's top is 200 pixels wide and its bottom 560, and the rings have become eggs, narrow toward the top. The grid's columns lean in with the sides, but stay straight, and its rows stay level and evenly spaced. The next image shows step 2.
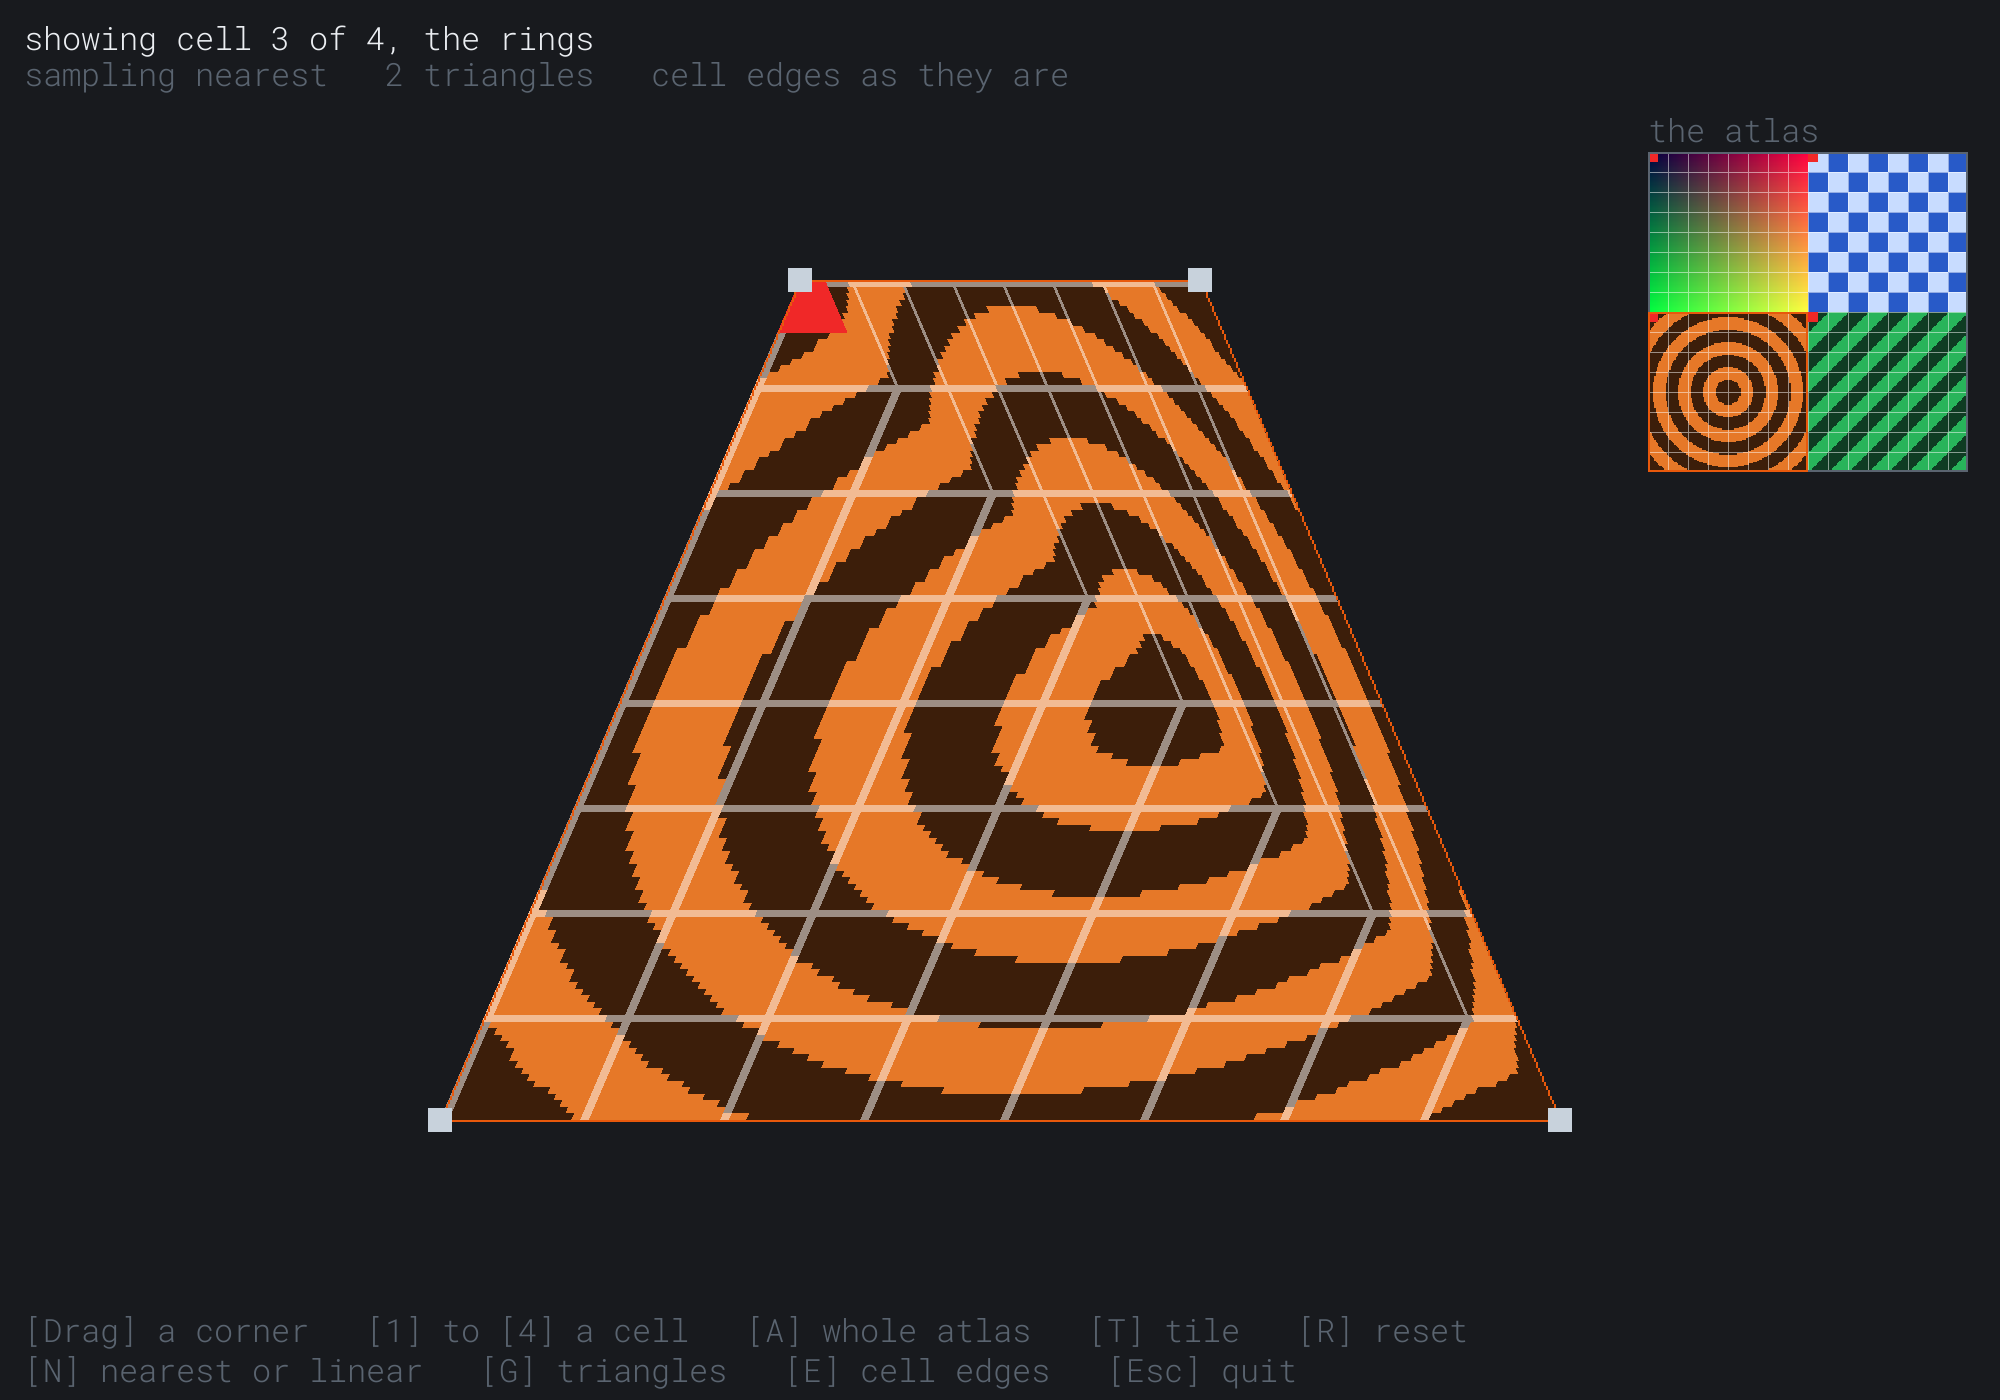
The two triangles meet along the diagonal from the top-left corner to the bottom right. Each column of the grid changes direction there, and each ring has a corner. The next image shows step 6, on a skewed quad.
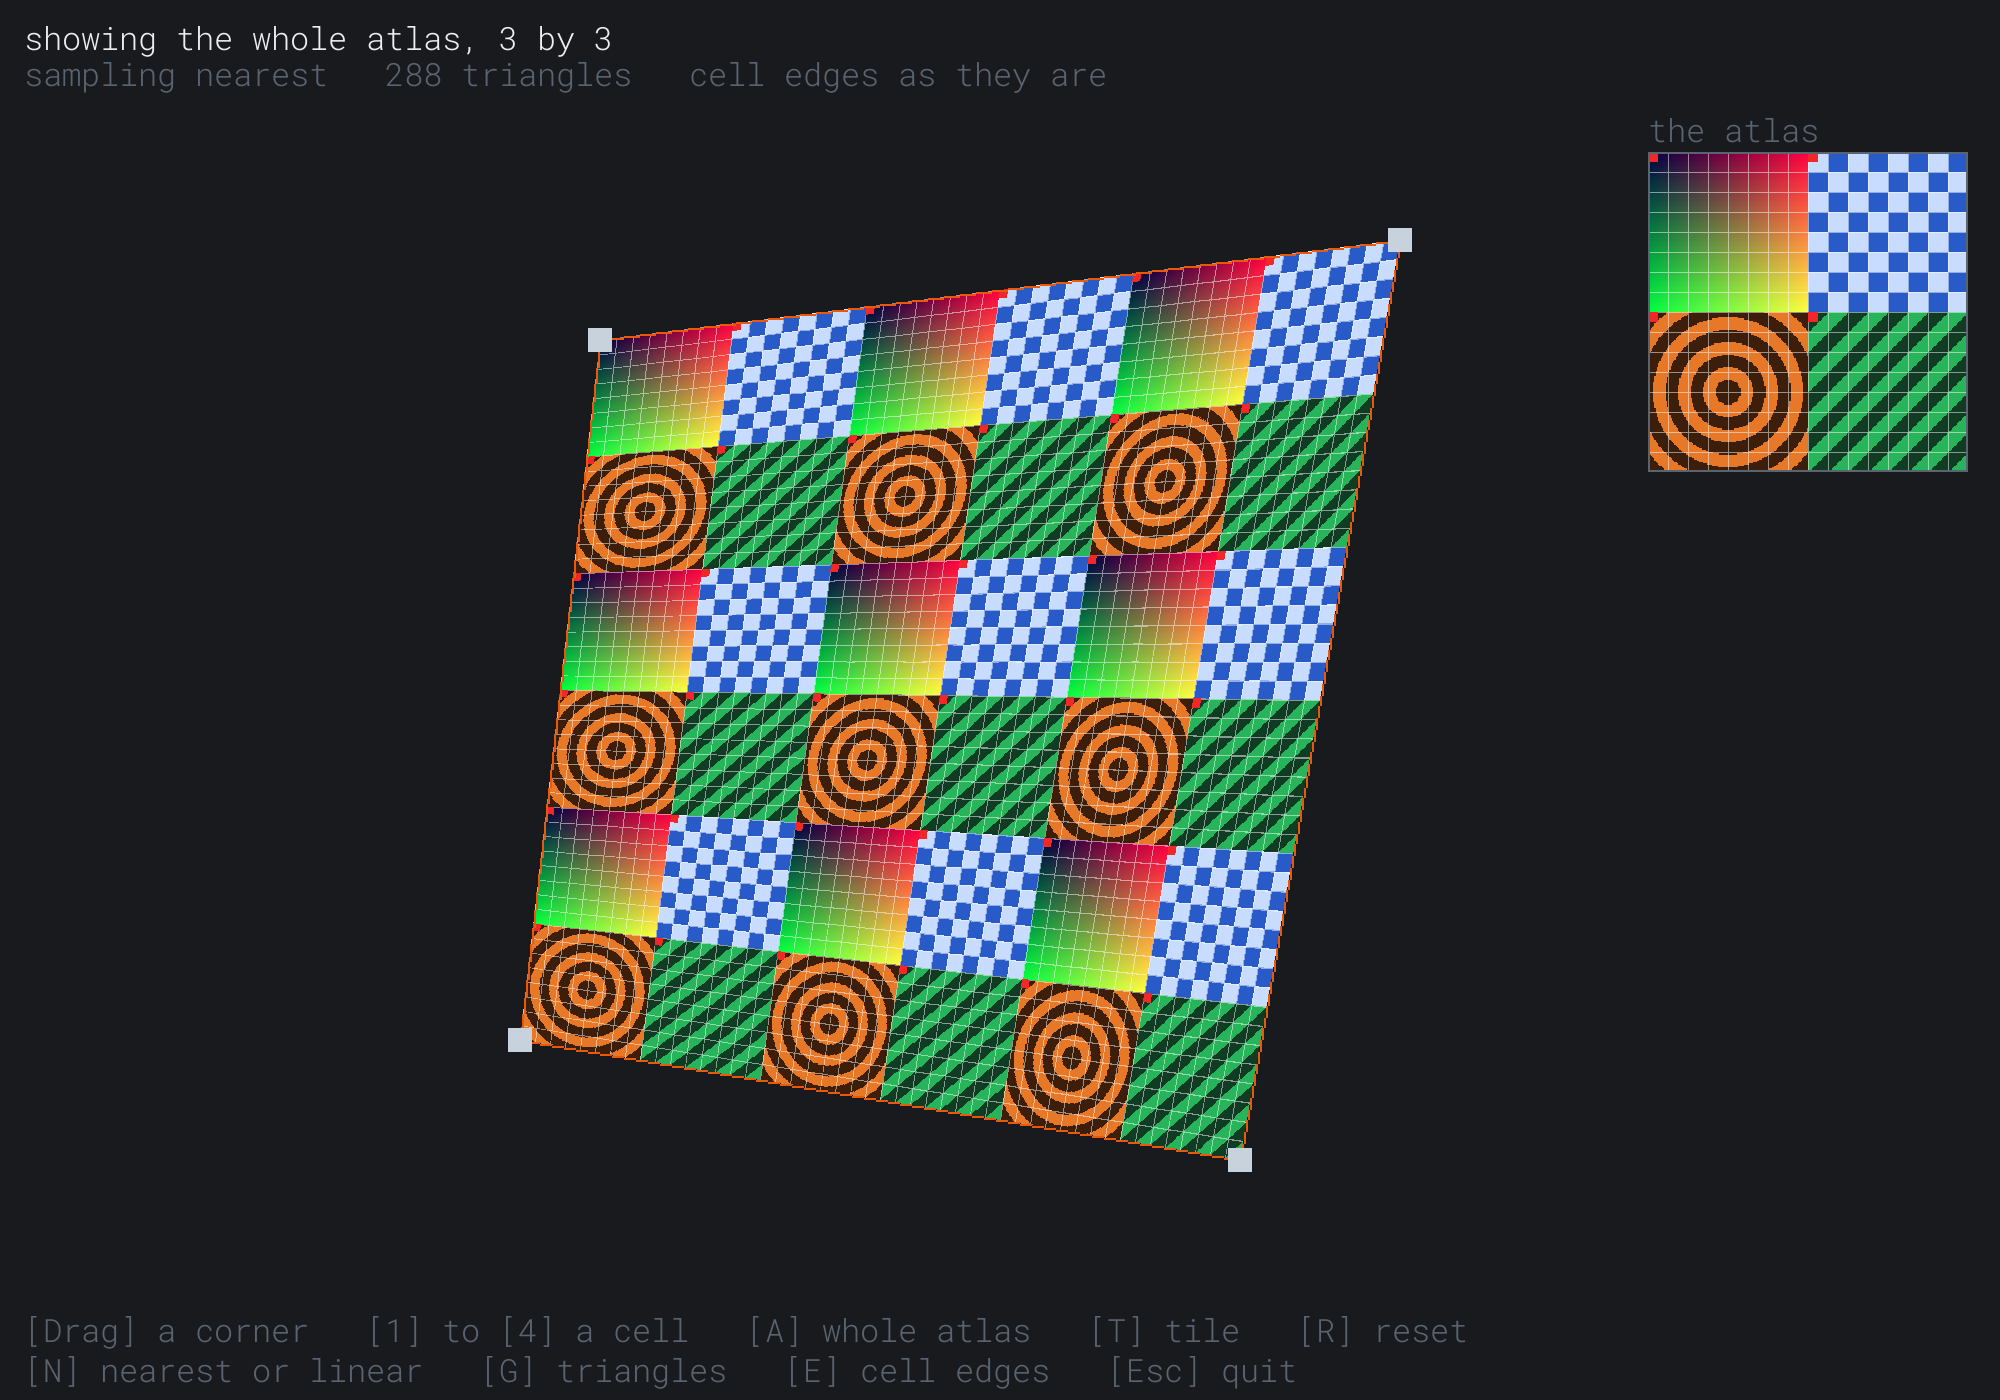
The UVs run from 0 to 3, and wrap repeats the atlas three times each way, each copy warped with its share of the quad.
FAQ
Q) Why are my texture's red and blue swapped?
A) Its bytes are in one order, and the pixel format says another. Bytes written red, green, blue, alpha need SDL_PIXELFORMAT_RGBA32. A format named with 8888, such as RGBA8888, describes a packed 32-bit number, whose bytes a PC stores the other way around.
Q) Why won't my 300 by 200 texture tile?
A) Some renderers can only wrap textures whose sides are powers of two, such as 256 or 512. The renderer's property SDL_PROP_RENDERER_TEXTURE_WRAPPING_BOOLEAN says whether it can wrap other sizes. If it can't, make the texture's sides powers of two, or draw one quad for each repeat.
Q) What's SDL_SCALEMODE_PIXELART?
A) A third scale mode, new in SDL 3.4, for pixel art drawn at sizes that aren't whole multiples of its own. Nearest sampling then makes some texels a pixel wider than others, so a pattern of equal texels looks uneven. The pixel art mode keeps the texels crisp, while making them look evenly sized.
Exercises
The first three exercises need only a pencil. The others change Texture Quad.
- Texel arithmetic (paper). On the 256-texel atlas, which byte holds the red of texel (10, 3)? Which texel does the UV (0.5, 0.25) land in, with nearest sampling? Between which texels does linear sampling blend, across and down?
- Cell UVs (paper). For a 4 by 4 atlas of equal cells, what are the UVs of the cell in the second row and third column? What are they, moved in by half a texel, on a 512-texel atlas?
- Bilinear by hand (paper). A quad's corners are
(0, 0),(100, 0),(0, 100)and(200, 100). Where does the bilinear blend put the vertex at s = 0.5, t = 0.5? Where would the two triangles' blend put it, if the quad were split from the top left to the bottom right? - A texture that changes (code). Make the atlas's texture
SDL_TEXTUREACCESS_STREAMING, and each frame, redraw the rings with their radius growing over time, copying the bytes in withSDL_UpdateTexture. How fast can it go before the frame rate drops? - Tile one cell (code). Add a key that tiles a single cell 3 times each way, by drawing 9 quads, each with the cell's UVs, placed by the same bilinear blend.
For the code exercises, work on a copy of the demo's folder, so that the original stays as the chapter describes it.
AI Exercise (Optional)
Textures turn a quad into anything with a picture on it. With an AI's help, you can turn Texture Quad into a small scene, a flag that waves in the wind. Open your AI chatbot of choice, and try a prompt like this:
"I have a C++ demo using SDL3 with a texture built in code, and a function buildQuad(corner, u0, v0, u1, v1, grid, verts, indices), which makes a grid of SDL_Vertex for SDL_RenderGeometry, each vertex placed by a bilinear blend of four corners, with UVs blended the same way. Please change it into a waving flag: build a 64 by 40 texture of a flag of three colored stripes and a star, then draw it on a grid of 30 by 20 squares, with its left edge fixed to a pole. Move each vertex up and down by a sine wave that travels along the flag over time, growing from nothing at the pole to 20 pixels at the free edge, and shade each vertex's color darker where the wave slopes down, using the vertex color. Explain why the texture follows the waves without any change to the UVs."
That prompt describes your function, so the AI builds on it, rather than writing a mesh of its own. It moves the vertices and keeps the UVs, which is this chapter's lesson: the texture follows the vertices. And it uses the vertex color to tint, which the chapter mentioned but the demo leaves white.
Then try nearest sampling on the flag, and see why games blend. Then make the waves bigger, and watch for where the grid is too coarse to follow them.
Summary
A texture is a grid of texels, stored as bytes. In the RGBA32 format, each texel is four bytes: red, green, blue and alpha. Texel (x, y) starts at byte (y × width + x) × 4, and a surface's rows may be padded, so its pitch is the true step from row to row. UV coordinates address a texture from 0 to 1 each way, whatever its size, with v growing downward in SDL. Texel i covers u from i/W to (i + 1)/W. Nearest sampling takes the texel a sample lands in, and keeps edges crisp. Linear sampling blends the four texels around it, found from u times W, less a half, and keeps gradients smooth. Drawn smaller than its size, a texture shimmers, since sampling skips texels, and mipmaps are the cure. The SDL_RenderGeometry function fills triangles from vertices, each with a position, a color that tints and a UV. The renderer blends the UVs across each triangle. Two triangles crease a quad that isn't a parallelogram, and a grid of them follows the bilinear blend, which keeps rows straight and evenly spaced but isn't perspective. An atlas packs many images into one texture, each drawn by its UVs, and moving a cell's UVs in by half a texel keeps linear sampling from bleeding in its neighbors. Wrap repeats a texture when UVs pass 1, which tiles it, and clamp stretches its edge. Chapter 25 moves from drawing one shape to placing many, with transforms that carry each shape's children along with it.