
In the last chapter we learned about loops in the abstract — counting down, counting up, stepping through ranges, and nesting one loop inside another. Now we get to see what they are really for.
In this project we will fill the entire screen with a grid of colored squares, and we will do it with just two loops, one inside the other. Then, with a couple of extra lines, we will make the whole pattern come alive and scroll. By the end you will have written code that draws hundreds of squares per frame, and you will see, very clearly, the thing that makes loops so powerful: a tiny amount of code producing a huge amount of result.
This is also the first project where the loop genuinely earns its keep. A bouncing ball needs no loop to draw it — it is one circle. A grid of two hundred squares would be unthinkable to write out by hand. With a for loop inside a for loop, it is four lines.
In this chapter, we will:
- Set up a new project called Pattern Drawer.
- Work out how many squares fit on the screen.
- Use nested
forloops to draw a full grid of squares. - Color each square based on its position using
whenand the modulo operator. - Animate the whole pattern so it scrolls smoothly.
- Run it, then experiment with the values.
- Try an optional AI exercise to take the pattern further.
Let's build it.
Code for this chapter: the complete project lives in the
Chapter 7folder of the accompanying code at github.com/EliteIntegrity/Learning-Kotlin-by-Building-Android-Games.
Setting Up the Project
You know the drill by now. We will move quickly through the setup, because you have done it three times already.
- Create a New Project in Android Studio.
- Pick Empty Views Activity.
- Name the application PatternDrawer.
- Make sure the Language is set to Kotlin.
- Click Finish.
When the project finishes syncing, open app > java > com.example.patterndrawer > MainActivity.kt and delete every line of the auto-generated code, exactly as we have done before.
Coding the Game
We will build this up in stages, just like the bouncing ball. First the skeleton, then a static grid, then the animation.
The Setup and Variables
Type or paste this into your empty MainActivity.kt:
package com.example.patterndrawer

import android.content.Context
import android.graphics.Canvas
import android.graphics.Color
import android.graphics.Paint
import android.os.Bundle
import android.view.View
import androidx.appcompat.app.AppCompatActivity

class MainActivity : AppCompatActivity() {
    override fun onCreate(savedInstanceState: Bundle?) {
        super.onCreate(savedInstanceState)
        setContentView(PatternDrawerView(this))
    }
}

class PatternDrawerView(context: Context) : View(context) {

    private val paint = Paint()

    // The width and height of every square in the grid, in pixels
    val cellSize = 100f

    // Counts up once every frame; we use it to slow the animation down
    var tick = 0
    // Shifts the colors along by one each time it changes, so the pattern scrolls
    var colorShift = 0

    init {
        paint.style = Paint.Style.FILL
    }
By now this top section should feel routine. MainActivity hands the screen over to our custom PatternDrawerView, and inside the view we set up a Paint brush.
The interesting new variable is cellSize. This is the width and height of a single square in our grid, in pixels. We make it a val because the size of our squares is not going to change while the app runs. The tick and colorShift variables are for the animation, and we will come back to what they do once the grid itself is working. Just type them in for now.
The init block sets the paint style to FILL, so our squares come out solid. Notice we have not set a color in init this time. That is deliberate — every square is going to choose its own color as we draw it.
Drawing the Grid
Now for the part this whole chapter has been building toward. Add the onDraw function below the init block, still inside the PatternDrawerView class. We will start with just the grid, no animation yet.
    override fun onDraw(canvas: Canvas) {
        super.onDraw(canvas)

        // Wipe the screen to black before we draw the new frame
        canvas.drawColor(Color.BLACK)

        // How many columns and rows of squares do we need to fill the screen?
        val columns = (width / cellSize).toInt()
        val rows = (height / cellSize).toInt()
First we clear the screen to black. Then we do a little arithmetic to figure out how big our grid needs to be.
We know how wide the screen is (width) and how big each square is (cellSize). Dividing one by the other tells us how many squares fit across: width / cellSize. The same idea with height tells us how many fit down the screen. We wrap each result in .toInt() — the conversion we learned back in Chapter 2 — because the number of squares has to be a whole number. You cannot draw three-and-a-half columns of squares.
Notice that we calculate columns and rows once, here, before the loops start. This is exactly the performance habit from the last chapter: there is no reason to recompute these values for every square, because they never change while we draw a single frame. Work it out once, use it many times.
Now the two loops. Add this directly underneath:
        // The outer loop steps down through the rows...
        for (row in 0..rows) {
            // ...and for each row, the inner loop steps across the columns
            for (col in 0..columns) {

                // For now, just paint every square the same color
                paint.color = Color.MAGENTA

                // Turn the grid position (col, row) into pixel coordinates
                val left = col * cellSize
                val top = row * cellSize

                // Draw this one square
                canvas.drawRect(left, top, left + cellSize, top + cellSize, paint)
            }
        }
    }
}
This is the nested loop from the last chapter, doing real work at last. The outer loop picks a row and holds it. The inner loop then runs all the way across that row, drawing one square in every column. When the inner loop finishes, the outer loop moves down to the next row and the inner loop runs again. Row by row, the whole screen fills up.
The key trick is turning a grid position into a screen position. The square in column col should be drawn col square-widths from the left, so its left edge is at col * cellSize. The same logic gives us the top edge: row * cellSize. With the left and top corners known, the right edge is just left + cellSize and the bottom is top + cellSize. That is what we hand to drawRect.
You might wonder why we loop 0..rows and 0..columns rather than 0 until rows. Remember that .. includes the top number, so this draws one extra row and one extra column. Those extras hang slightly off the edge of the screen — which is exactly what we want. It guarantees the grid covers every last pixel, with no bare strip down the right side or along the bottom where the squares didn't quite reach. A tiny bit of over-drawing at the edge is a perfectly sensible price for full coverage.
If you run the app right now, you will see the entire screen tiled with solid magenta squares. That is hundreds of squares, drawn by four lines of looping code. Take a moment to appreciate that before we make it prettier.
Giving Each Square Its Own Color
A screen of identical squares proves the loops work, but it is dull. Let's make each square choose a color based on where it sits in the grid. Find the line we wrote a moment ago:
                // For now, just paint every square the same color
                paint.color = Color.MAGENTA
Replace those two lines with this:
                // Pick a color from the square's position plus the shift.
                // The % 3 keeps the result as 0, 1, or 2.
                val colorIndex = (row + col + colorShift) % 3
                paint.color = when (colorIndex) {
                    0 -> Color.rgb(244, 67, 54)     // red
                    1 -> Color.rgb(76, 175, 80)     // green
                    else -> Color.rgb(33, 150, 243) // blue
                }
Here three chapters of learning come together in five lines. We add the square's row and col together (and a colorShift value we will use in a moment — treat it as zero for now). Then we take that sum modulo 3, using the % operator from Chapter 2. Modulo gives the remainder after dividing, so (row + col) % 3 is always 0, 1, or 2, no matter how big the grid gets. It cycles round and round.
We feed that result into a when expression — the value-returning when we met in Chapter 4. Each possible result picks a different color, and because when here is producing a value, we assign the whole thing straight to paint.color.
The colors themselves use Color.rgb(red, green, blue), where each number runs from 0 (none of that color) to 255 (as much as possible). Color.rgb(244, 67, 54) is a warm red, (76, 175, 80) a leafy green, and (33, 150, 243) a bright blue. Feel free to dip into your own values — that is half the fun.
Because neighboring squares differ by one in row + col, the colors fall into diagonal stripes: red, green, blue, red, green, blue, running across the screen at a slant. Run it now and you will see those diagonal bands.
Making It Move
A static striped grid is nice. A scrolling one is far more satisfying, and it costs us almost nothing, because we already have a game loop pattern from earlier chapters. This is where tick and colorShift finally do their jobs. Add these lines at the very end of onDraw, after the closing brace of the outer for loop but before the closing brace of onDraw:
        // Slow the animation down: only shift the colors every 15 frames
        tick++
        if (tick % 15 == 0) {
            colorShift++
        }

        // Keep the loop running so the pattern scrolls
        invalidate()
Remember that colorShift is added into every square's color calculation. When colorShift goes up by one, every square's color steps along to the next one in the red-green-blue cycle. Do that repeatedly and the diagonal stripes appear to march across the screen.
But there is a catch, and it is the same one we discussed with infinite loops and the frame budget. Our game loop runs around sixty times a second. If we did colorShift++ on every single frame, the stripes would flicker by sixty steps a second — a dizzying, unpleasant strobe. So we slow it down. The tick variable counts every frame, and the line if (tick % 15 == 0) only lets colorShift change once every fifteen frames — about four steps a second. That is a calm, pleasant scroll.
That modulo trick — using % to make something happen "every Nth time" — is one you will reach for again and again in games: every tenth frame, every third enemy, every fifth row. It is worth filing away.
Finally, invalidate() keeps the loop alive, just as it did for the bouncing ball. The complete MainActivity.kt is in this chapter's code folder if you would like to check yours against it.
Playing the Game
Hit the green Play button.
After the emulator boots, you should see the whole screen filled with diagonal stripes of red, green, and blue, scrolling smoothly and endlessly across the display.
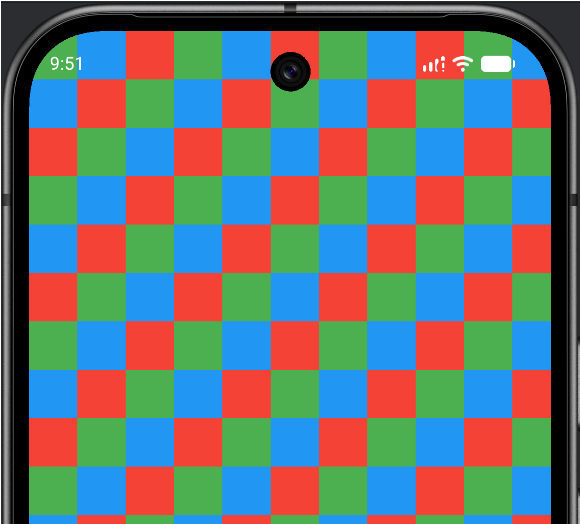
It is, frankly, a little hypnotic. And every frame of it is hundreds of squares, each one positioned and colored by the same short pair of loops.
Understanding the Code
Let's step back and tie the whole thing together, because this project quietly used almost everything we have learned so far.
The shape of the program is the same custom-View foundation from Chapter 1. The animation is the same invalidate() game loop from Chapter 3. What is new is everything that happens inside a single frame.
First we worked out the size of the grid by dividing the screen dimensions by cellSize and converting to whole numbers with .toInt() (Chapter 2). We did that calculation once, before the loops, to avoid wasting work — the performance habit from Chapter 6.
Then the two nested for loops (Chapter 6) walked the grid, the outer one row by row and the inner one column by column. For each square, we calculated a color index with the modulo operator (Chapter 2), chose a color with a value-returning when (Chapter 4), converted the grid position into pixel coordinates with a little multiplication, and drew the square with drawRect (Chapter 1).
Finally, a second use of modulo throttled the animation so it scrolled at a comfortable pace rather than strobing. Six chapters of small ideas, combined into one moving picture. That is how real programs are built — not from one big clever trick, but from many small, well-understood pieces stacked together.
Experimenting
This project is a playground. Stop the app, change one thing, and run it again to see what happens.
- Change
cellSizeto40f. A much finer grid, with hundreds more squares. Notice it still runs smoothly — but keep going smaller and you will eventually find the point where your phone starts to struggle. That is the frame budget from Chapter 6, made visible. - Change
cellSizeto300f. Big chunky blocks. Far fewer squares. - Change the
% 3to% 2and remove the blue line from thewhen(and itselsewill need to become the second color). Two colors instead of three — a classic checkerboard feel. - Change
% 3to% 6and add more color cases to thewhen. A rainbow. - Change
tick % 15totick % 2. A frantic, fast scroll. Change it totick % 60for a slow, lazy drift. - Try
(row - col + colorShift)instead of(row + col + colorShift). The stripes now slant the other way.
Every one of these is a one- or two-line change, and every one transforms what you see. That is the loop's gift: change the rule once, and it applies to every square automatically.
Summary
You have built something that would have been absurd to attempt before this point: a full-screen, animated, multicolored pattern, drawn fresh sixty times a second. The engine behind it is nothing more than two for loops, one nested inside the other, plus a sprinkle of modulo arithmetic to choose colors and pace the animation.
More importantly, you have now felt the real reason loops matter. The amount of code did not grow with the number of squares. Whether the grid holds fifty squares or five thousand, it is the same handful of lines. That is the leverage that loops give you, and from here on we will lean on it constantly — to manage swarms of particles, grids of game tiles, and lists of enemies.
In the next chapter we tackle functions: named, reusable blocks of code. So far all our logic has been crammed into onDraw and onTouchEvent, and it is starting to get crowded in there. Functions are how we tidy up, give our chunks of logic sensible names, and stop repeating ourselves. They are the last big piece of Act 1, and they set us up perfectly for the capstone game that closes it out.
AI Exercise (Optional)
Time to let AI extend your pattern. This one is a vibe-coding challenge, so the rules are relaxed: if it works, brilliant; if it doesn't, you have lost nothing and learned something. The author's own experiment is in the code repository for the curious, but yours will be different, and that is entirely the point.
Open your AI chatbot and try a prompt like this:
"I have a Kotlin Android app that uses a custom Canvas View. In onDraw I use two nested
forloops to fill the screen with a grid of squares, and I color each square with awhenexpression based on(row + col + colorShift) % 3, wherecolorShiftslowly increases to make the pattern scroll. I'm a beginner — I know variables, if/when, basic math including modulo, andforloops with ranges, but I have NOT yet learned functions, lists, or arrays. Without using any of those, show me how to make the squares pulse in size, so each square grows and shrinks a little instead of perfectly filling its cell. Keep it to the features I listed and paste the full onDraw so I can compare it to mine."
Notice the constraints again — we tell the AI exactly what we know and forbid the rest. That single sentence is the difference between code you can read and code that leaves you baffled.
When the AI responds, read its onDraw line by line against your own. Where did it change the square's size, and what value is it using to make the pulsing happen? Can you find the math that makes a square grow and then shrink rather than just growing forever? If any line uses something you have not met, paste it back and ask, "explain this line as if I have never seen it." Make the AI work to your level, not the other way around.