
Welcome. You are about to take your first steps into Android game development with Kotlin. If you have never programmed before, or never built an Android app, this chapter is designed specifically for you. We are going to start at the absolute beginning.
By the time you finish this chapter, you will have installed the official development tools, created a brand-new app, bypassed Android's standard user interface system entirely, and drawn a colored shape directly to the screen using your own code.
This is the longest setup section in the book. Installing tools and creating your first project is the sort of thing that feels fiddly the first time but becomes second nature very quickly. Take it slowly here so the rest of the book can move quickly.
Code for this chapter: the complete
MainActivity.ktfor the "Hello Canvas" project lives in theChapter 1folder of the accompanying code at github.com/EliteIntegrity/Learning-Kotlin-by-Building-Android-Games. If anything goes wrong as you type, you can check your version against that one.
In this chapter, we will:
- Get a brief overview of the book and the games we are going to build.
- Install Android Studio, the official Android development environment.
- Create a new project specifically designed for drawing graphics.
- Explore the Android Studio interface just enough to find our code.
- Learn what code comments are and why we use them.
- Write a custom
Viewclass to take control of the screen. - Understand the basics of packages, imports, classes, and functions.
- Run the app on the device emulator and take a first look at debugging.
Let's get to it.
An Overview of the Book
This book teaches Kotlin by building games, in that order. The Kotlin comes first because it has to — you cannot build a game without knowing how to write the code that makes it run. But the games come fast, and they keep coming. Roughly every other chapter is a project. The theory chapters teach you a piece of Kotlin, and then the very next chapter puts it straight to work on screen.
We are going to build everything ourselves using nothing but the raw Android screen. No game engine. No drag-and-drop UI editor. We will draw our own shapes, move them with our own math, and read our own touches. In Act 1 we will make a bouncing ball, a tap-controlled shape, and a small catcher game. In Act 2 we will manage swarms of particles and grid-based levels. In Act 3 we will properly learn object-oriented programming, build a real multi-threaded game loop, and animate sprites pulled from a texture atlas with sound effects firing as the action happens. By Act 4 you will know enough to bring an AI assistant on board and turbo-charge your development — building bigger games faster, while still understanding every line.
It is worth being honest up front: the first app we build, in this very chapter, is going to look modest. A single colored square. That is fine. Every game in this book is an elaboration of the same handful of pieces you are about to meet — a screen we control, code that decides what to draw, and a loop that keeps it all moving. Get these foundations solid and the rest of the book builds on them naturally. Let's start with the tools.
Setting Up Android Studio
Android Studio is our Integrated Development Environment (IDE). It is a single, massive piece of software that includes a text editor for writing code, the Kotlin compiler for turning that code into a working app, an Android emulator (so you can run apps on your PC without needing a physical phone), and all the tools needed to package your game.
Open your web browser and go to the official Android developer site at developer.android.com/studio. Download the latest version of Android Studio for your operating system.
Run the installer. The first thing it does is ask you to agree to a few screens. Over the course of the download and install process, leave all the default settings checked — especially the Android Virtual Device (AVD), which is the emulator we will use to test our games. The installation might take a while because it has to download a lot of extra components, including the Android SDK (Software Development Kit). Go make a cup of tea.
When it finishes, launch Android Studio. You might see a few more setup screens asking about importing settings (choose not to) or selecting a theme (choose Dark or Light, whatever feels best to your eyes). Once you reach the Welcome screen, you are ready to build an app.
Creating the Project
Once Android Studio is installed and running, we need to create our first project. This step is crucial. Android Studio really wants you to use its shiny standard UI toolkits, like Jetpack Compose or XML layouts. But we want to build games, which means we want a blank slate where we can draw our own graphics.
- On the Welcome screen, click New Project.
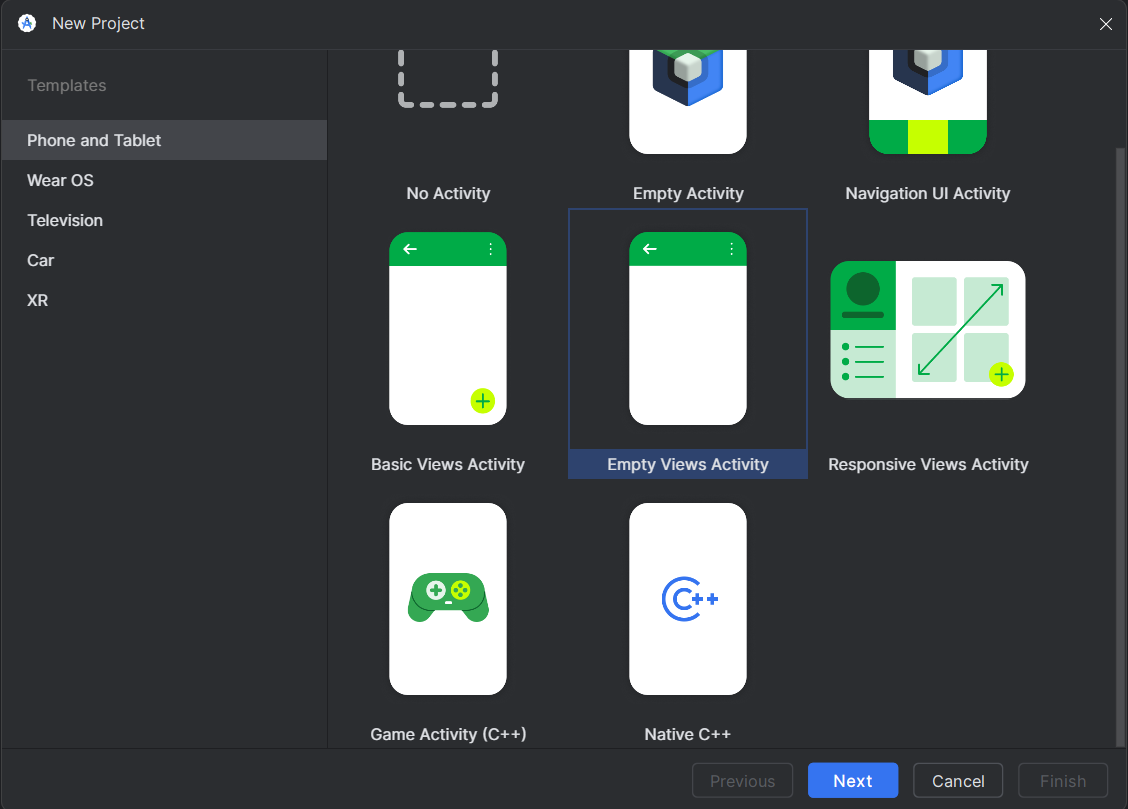
- You will be presented with a wall of templates. Scroll down until you find Empty Views Activity. It is absolutely critical that you choose "Empty Views Activity" and not just "Empty Activity" or "Basic Activity".
- Click Next.
Now you will see a form where we can name our app and tell Android Studio how to set it up.
- In the Name field, type Hello Canvas. Notice the capital letter at the start of each word and the space between them.
- Glance at the Package name field. It has updated automatically based on your app name (likely something like
com.example.hellocanvas). This is fine. - Make sure the Language is set to Kotlin.
- Leave the Minimum SDK at the default. This just dictates the oldest Android phone your app will support.
- Click Finish.
Android Studio will think for a minute. At the bottom of the screen, you will see a loading bar and messages about "Gradle sync". It is downloading the background libraries needed to create our app. Wait until it finishes and the loading bar disappears.
Finding Our Code
Look at the left-hand side of the Android Studio UI. This area is the project window. It shows all the files and folders that make up your app. Android apps require dozens of files just to exist, but we will rarely need to touch most of them because Android Studio generates them for us.
In the project window, make sure the dropdown menu at the top is set to Android. Then, click the little arrows to expand the folders like this: app > java > com.example.hellocanvas.
Inside that final folder, you will see a file named MainActivity.kt. (The .kt extension stands for Kotlin).
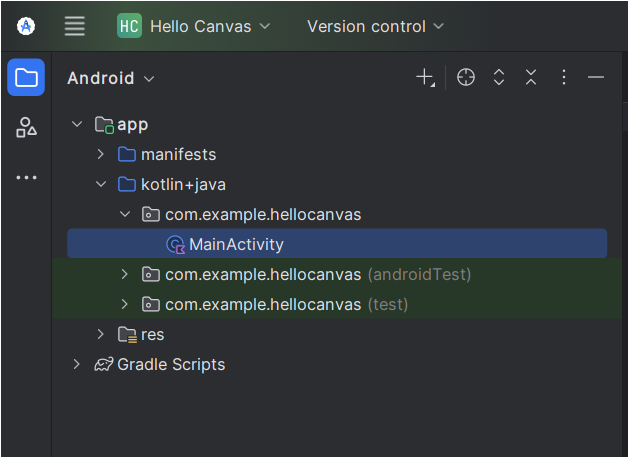
app > java > com.example.hellocanvas, showing MainActivity.kt.Double-click MainActivity.kt to open it in the main editor window. You will see some code that Android Studio wrote for us. We don't want it.
Click into the editor, highlight every single line of code in that file, and press Delete. We are going to start from a completely blank slate so you know exactly what every line does.
Code Comments
Before we type any real code, let's talk about comments. A comment is a piece of text in your source file that the compiler ignores completely. It is there purely for human readers — for you, for anyone you share your code with, and for the future version of you who opens this file in six months having forgotten how it works.
In Kotlin, a comment starts with two forward slashes and runs to the end of the line:
// This is a comment. Kotlin ignores it entirely.
val score = 0 // A comment can also sit after code on the same line.
Throughout this book you will see plenty of comments inside the code blocks. They are not there to repeat what the code obviously says. They are there to explain why a line does what it does, or to point out something a newcomer might miss at a glance. The code you are about to type is full of them, and they are part of how this book teaches. Get into the habit of writing your own comments as you go.
Coding the "Hello Canvas" Project
Type or paste the following code into your completely empty MainActivity.kt file. Don't worry if it looks alien; we are going to walk through every single line afterward. The only rule right now is that you must type it exactly as shown, including every { and } brace.
package com.example.hellocanvas

import android.content.Context
import android.graphics.Canvas
import android.graphics.Color
import android.graphics.Paint
import android.os.Bundle
import android.view.View
import androidx.appcompat.app.AppCompatActivity

class MainActivity : AppCompatActivity() {
    override fun onCreate(savedInstanceState: Bundle?) {
        super.onCreate(savedInstanceState)

        // Instead of a standard layout, we set our custom View as the entire screen
        setContentView(HelloCanvasView(this))
    }
}

// This is our custom drawing board
class HelloCanvasView(context: Context) : View(context) {

    // We create a Paint object. Think of this as our paintbrush.
    private val paint = Paint()

    override fun onDraw(canvas: Canvas) {
        super.onDraw(canvas)

        // Clear the entire screen with a dark gray color
        canvas.drawColor(Color.DKGRAY)

        // Dip our paintbrush in red paint
        paint.color = Color.RED
        // Set the style to fill in the shape completely
        paint.style = Paint.Style.FILL

        // Draw a rectangle using our canvas and paint
        // Coordinates are (left, top, right, bottom)
        canvas.drawRect(100f, 100f, 400f, 400f, paint)
    }
}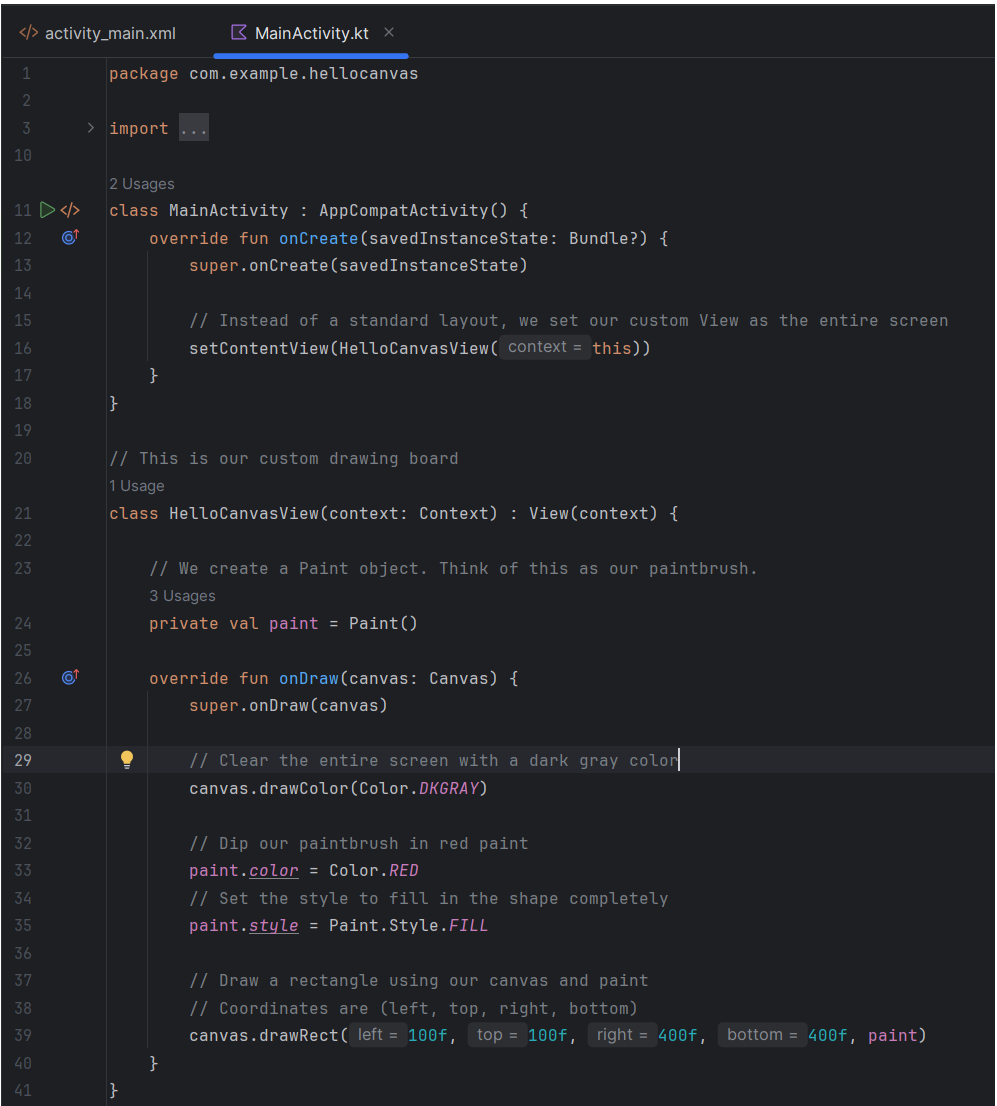
MainActivity.kt with our custom code in place. If Android Studio shows any red underlines, hover over them — they are almost always import or typo issues.Understanding the Code
Let's break down exactly what is happening here, starting from the very top. If you have never programmed before, some of these concepts will take time to fully click. That is completely normal. Just follow the logic for now.
Packages and Imports
The very first line is the package declaration:
package com.example.hellocanvasThink of a package as an address for your code. If you create a class called MainActivity, and someone else creates a class called MainActivity, Android needs to know which one is yours. The package name ensures your code is uniquely identified on the device.
Next, we have a block of import statements:
import android.content.Context
import android.graphics.Canvas
import android.graphics.Color
// ...
When we build apps, we rely heavily on code that other smart engineers at Google have already written for us. We don't want to write the complex math required to color a pixel on a screen; we just want to say "draw a red square." The import statements bring those pre-built tools (like Canvas and Color) into our file so we can use them.
Classes and Inheritance
Next, we encounter our first class:
class MainActivity : AppCompatActivity() {What is a class? Think of a class as a blueprint. A blueprint for a house tells the builders where the walls and doors go, but the blueprint itself is not a house. You use the blueprint to build the house. In Kotlin, we write a class to define how something should behave, and later, the system builds an object from that blueprint. (We will cover classes fully in Chapter 16, so don't worry if this feels a bit abstract right now.)
Our class is called MainActivity. The colon : means "inherits from", and AppCompatActivity is a massive blueprint provided by Android that knows exactly how to open a window on a phone screen, handle the back button, and talk to the operating system. By inheriting from it, our little MainActivity instantly gains all those superpowers without us having to write thousands of lines of code.
Notice the opening curly brace { at the end of the line. Everything between this { and its matching closing } at the bottom belongs to the MainActivity class.
Functions and Overriding
Inside our class, we have a function:
    override fun onCreate(savedInstanceState: Bundle?) {
        super.onCreate(savedInstanceState)
        setContentView(HelloCanvasView(this))
    }
A function (defined by the fun keyword) is a named block of code that performs a specific task. Android automatically looks for a function named onCreate when it first launches your app. (We will learn exactly how to write and use our own functions in Chapter 8.)
Because we inherited from AppCompatActivity, Android already has a default version of onCreate. The override keyword tells Android, "I know you have a default way of creating this window, but I want to step in and add my own instructions."
Inside the function, we call super.onCreate(...). The super keyword means "go ahead and do the original, default setup stuff first."
Then, we hit the magic line: setContentView(HelloCanvasView(this)). Normally, an Android app passes an XML layout file to setContentView to draw standard buttons and text. Here, we are handing it a brand-new instance of our own custom drawing board, which we called HelloCanvasView. We have effectively hijacked the screen.
Our Custom Drawing Board
Now look at the second class we wrote:
class HelloCanvasView(context: Context) : View(context) {
    private val paint = Paint()
We created a new blueprint called HelloCanvasView, and this time it inherits from Android's base View class. A View is anything that Android knows how to draw on the screen.
Inside it, we immediately create a Paint object and store it in a variable called paint. We will cover variables properly in Chapter 2, but for now, think of Paint as your paintbrush. It holds information like what color you are using and how thick the brush is.
Finally, the part where we actually draw:
    override fun onDraw(canvas: Canvas) {
        super.onDraw(canvas)

        canvas.drawColor(Color.DKGRAY)

        paint.color = Color.RED
        paint.style = Paint.Style.FILL

        canvas.drawRect(100f, 100f, 400f, 400f, paint)
    }
}
Android automatically calls the onDraw function whenever the screen needs to be painted, and it hands us the Canvas object to draw on. If Paint is the brush, Canvas is the paper.
First, we call canvas.drawColor(Color.DKGRAY) to wipe the entire screen clean with a dark gray background.
Next, we prepare our brush. We set paint.color to red and paint.style to FILL so our shape is solid rather than just an outline.
Finally, we use canvas.drawRect to draw a rectangle. It asks for four numbers: the left, top, right, and bottom coordinates. In Android, the coordinate (0, 0) is the top-left corner of the screen. So, 100f, 100f is a point 100 pixels in from the left and 100 pixels down from the top.
You might be wondering about the f after the numbers. That simply tells Kotlin these are Float values (decimal numbers), which the drawing system requires. We will cover Float and other data types thoroughly in the next chapter.
I know I have just blurted out a dozen new concepts, but if you are feeling a little overwhelmed, relax — we will revisit everything as we progress through the book. I didn't want Chapter 1 to end without you seeing some pixels on the screen.
Running the App
It is time to see your work.
At the top of Android Studio, look for a green "Play" arrow button. Next to it, there should be a dropdown showing an available device (like "Pixel 10 API 34"). This is your Android Virtual Device (emulator).
Click the green Play button.
Android Studio will compile your Kotlin code into an Android app, boot up the emulator, install the app, and launch it. The first time you do this, the emulator might take a minute or two to start up. You will see a virtual phone appear on your screen.
If everything went well, the phone will display a dark gray background with a solid red square near the top left.
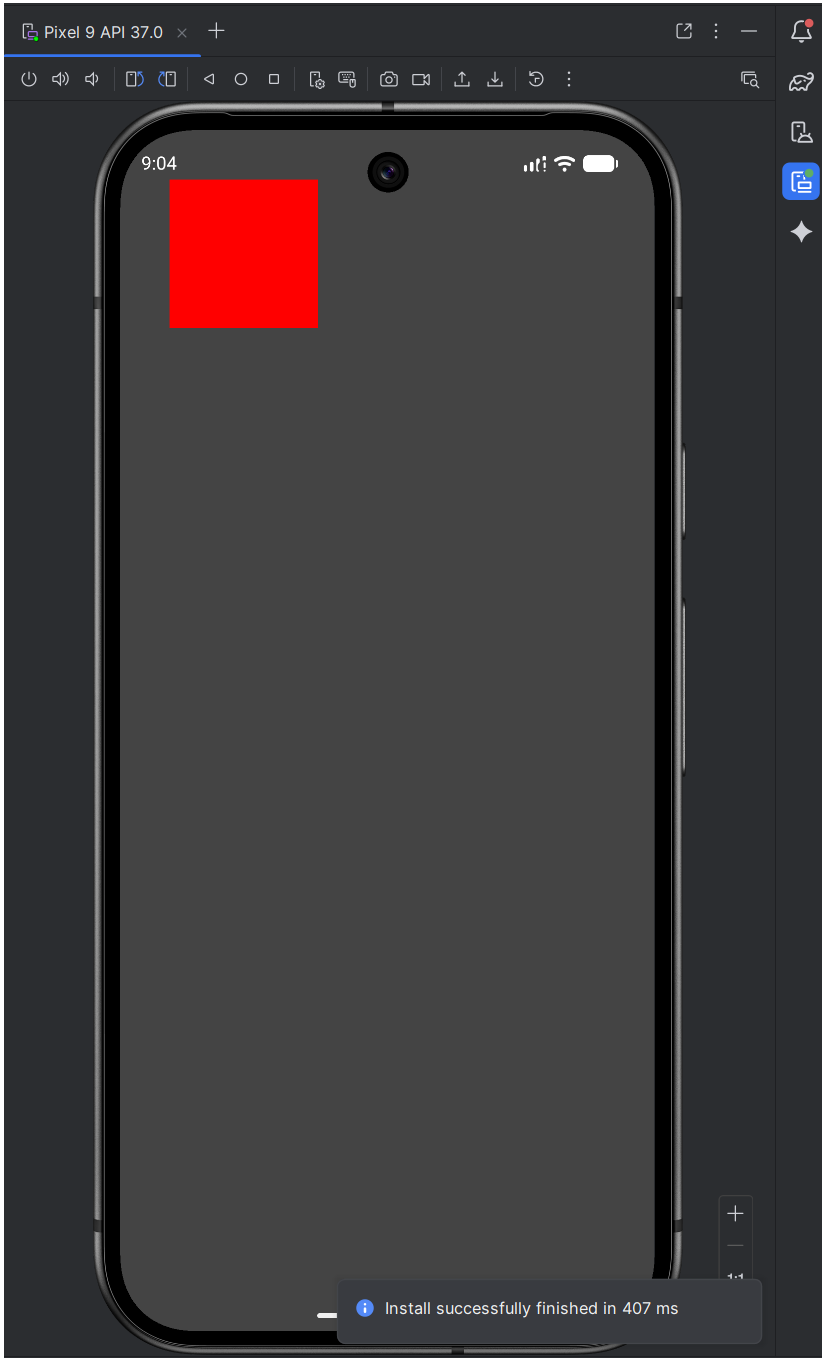
Congratulations, you have built and run the first app of the book. It doesn't look like much yet, but you have bypassed the restrictions of standard Android UI and taken direct control of the pixels on the screen. Every game we build from here on will use this exact same foundation.
When It Doesn't Work
It is entirely possible that the square did not appear, or the app refused to run at all. That is normal. Every programmer alive spends a good chunk of their time figuring out why something didn't work. Here are the usual suspects.
Red squiggly lines under your code. Android Studio checks your code as you type and underlines anything it doesn't understand. Hover your mouse over the red line and it will tell you what it thinks is wrong. Most often, this is a simple typo — a missing brace }, a misspelled word, or a capital letter where a lowercase one belongs. Kotlin is case-sensitive, so Canvas and canvas are two completely different things.
"Unresolved reference" errors. This usually means an import is missing, or a word is misspelled so Kotlin can't find what it refers to. Double-check the block of import statements at the top of the file against the code shown earlier.
The app builds but the screen is blank or crashes. The most likely cause is a mismatch between your package name and the one in the code. Look at the very first line, package com.example.hellocanvas. It must match the package Android Studio created for you. If yours is different, use yours.
When something goes wrong, the error message is your friend, not your enemy. Read it carefully. It is trying to help.
A First Look at Debugging
Android Studio has a second window that becomes one of your most important tools: Logcat. Logcat is a running stream of messages from your app and the device it is running on. When your app crashes, the reason is almost always written here in red.
You can also write your own messages to Logcat, which is one of the simplest and most useful debugging techniques there is. Suppose you want to confirm that your onDraw function is actually being called. You can print a message every time it runs.
Add this single line inside onDraw, just after super.onDraw(canvas):
android.util.Log.d("HelloCanvas", "onDraw was called!")The Log.d function ("d" is for debug) takes two pieces of text: a tag you choose so you can find your own messages easily, and the message itself. Run the app again, then look at the bottom-left of Android Studio for the Logcat tab (the icon with a cute cat's face) and click it. Amongst dozens of default system messages, you will see "onDraw was called!" appear. If the screen redraws, you will see it appear repeatedly.

onDraw is called. This is your first debugging tool — use it constantly.This habit — asking the program to tell you what it is doing rather than guessing — will save you hours over the course of this book. Android Studio also has a full visual debugger with breakpoints, which lets you pause your program and inspect every variable mid-run. We will reach for it as our programs get more complex. For now, just knowing that Logcat exists, and that you can print to it, is enough.
You can delete that Log.d line again before moving on, or leave it in — it does no harm.
Summary
We have made a fast start. You installed the official Android Studio IDE, created a project, and ran an emulator. We looked at the structure of a Kotlin file, learning that package identifies our app and import brings in external tools.
We also got our first glimpse of Object-Oriented Programming by creating a class that inherits from AppCompatActivity to create a window, and another class that inherits from View to create a drawing board. Finally, we used Canvas and Paint to draw our first graphics.
If some of the terminology around classes and functions feels slightly fuzzy right now, do not worry. This was just an introduction. In the next chapter, we will step back and look closely at variables and data types — the basic building blocks we need to start moving our shapes around the screen.
FAQ
Q) I am overwhelmed by all the files in the Android Studio project window. Do I need to know what they all do?
Absolutely not. Android apps require hundreds of configuration files, resource folders, and build scripts. Android Studio handles almost all of them automatically. As we proceed through the book, I will point out the two or three files you actually need to care about. For now, just remember that our Kotlin code lives in MainActivity.kt.
Q) Why did we delete all the code Android Studio generated for us?
Android Studio assumes you want to build a standard app with buttons, text views, and Jetpack Compose. It generates code to set all of that up. Because we are building games and drawing directly to the screen, that generated code is useless to us. Deleting it allows us to start with a clean slate and understand exactly what is happening.
Q) I want to run my app on my own physical Android phone instead of the emulator.
You can! First, you need to enable Developer Options on your phone. Go to Settings > About phone and tap "Build number" seven times (not joking). Then open the new Developer Options menu and turn on "USB debugging". Connect your phone to your PC with a USB cable, allow access if prompted, and your phone will appear in the device dropdown next to the green Play button in Android Studio.
Q) What exactly is that f on the end of 100f?
It stands for Float, which is a type of variable used for decimal numbers (like 100.5). The Android drawing system requires coordinates to be provided as Floats, not whole numbers (Ints), because drawing often involves precise sub-pixel measurements. We will explore Float, Int, and other types fully in Chapter 2.