
Welcome. If you've never written a line of code in your life, you're in exactly the right place. If you've written plenty of C++ and want to start building games, you're in the right place too. This chapter is the on-ramp for both, and for everyone in between. By the end of it, you'll have a working C++ project, a window with an orange square that you steer around with the keyboard, and a first taste of the tools we'll use for the rest of the book.
This is also the longest stretch of setup in the book. Installing tools and connecting a library to them is fiddly the first time and forgettable after that, so take it slowly here. Then the rest of the book can move quickly.
SDL3 Projects/ControllableSquare — the finished version of this chapter's project. Every project is in the book's repository, as the overview below explains, and this one uses the SDL3 folder that sits beside it in SDL3 Projects, so it builds as soon as Visual Studio is installed. When you open it, Visual Studio may warn that the project was downloaded from the web. That's its standard caution for code from the internet, and since this is the book's own code, choose Trust and Continue. Build your own copy anyway, because the setup is half the point of this chapter.In this chapter, we will:
- Get an overview of the book and the games we're going to build
- Install Visual Studio 2026 and the C++ workload
- Download SDL 3 and connect it to a new C++ project
- Take a short tour of the IDE
- Learn what code comments are and why we write them
- Build the Controllable Square, a real SDL program, in small steps that we test as we go
- Walk through every line of the code
- Take a first look at debugging with breakpoints
Let's get to it.
An Overview of the Book
This book teaches C++ by building games, in that order. The C++ comes first because it has to: you can't build a game without knowing how to write the code that runs it. But the games come quickly, and they keep coming. Roughly every other chapter is a project that takes the C++ from the chapter before it and puts it straight onto the screen.
We'll build everything with SDL 3, a free, open-source library that gives us a window, a 2D renderer, and keyboard, mouse, and game controller input. SDL sits underneath plenty of commercial games and emulators, yet it's small enough for us to understand every step. We won't use a game engine. We'll build each piece ourselves, so you'll see exactly how it works.
Here's the road ahead:
- Act 1, the basics. Five small projects: this chapter's Controllable Square, a bouncing ball, Square Invader, a cascade of colored squares, and finally a little shooter, complete with enemies, lives, and a score, that pulls the whole act together.
- Act 2, data and collections. Real artwork arrives. We'll load pictures from files to make a Whack-a-Mole game, fill the screen with bouncing particles, build a grid-based treasure hunt, and finish with an endless runner, complete with an animated character and scrolling scenery.
- Act 3, object-oriented programming. One animated character, built three times, each time with better tools than the last.
- Act 4, AI and beyond. A tour of the C++ this book doesn't have room for, and then AI joins the team. We'll vibe code Snake and Asteroids, which means describing a game to an AI and steering it while it writes the code. Then we'll learn two classic patterns that professional game programmers rely on.
- The final project. Rogue SDL, a complete turn-based dungeon crawler in the tradition of the classic Rogue, with monsters, items, saved games, and dungeons that are generated fresh every time you play. It takes several chapters to build.
The AI chapters come late on purpose. By then you'll know enough C++ to read what the AI writes, push back when it makes a bad call, and steer it toward a finished game. AI is a tool, not a replacement for knowing things, and we'll use it like one.
Every project in the book is on GitHub, finished, at https://github.com/EliteIntegrity/Learning-C-by-Building-Games-2nd-Edition. Choose Code > Download ZIP there, and extract the zip anywhere. Inside it is a folder called SDL3 Projects, with a folder for each project, named in a note at the start of its chapter, and SDL itself beside them. They're for comparing with yours when something won't work, and for picking up a project partway through, not for replacing your own typing, because typing it yourself is how the C++ sticks.
This book uses Visual Studio, on Windows. On a Mac or on Linux, Appendix B, For Mac and Linux Users, shows how to build every project with free tools there instead.
For now, our goal is simpler: install the tools, connect SDL, and move a square around the screen. That's all of Chapter 1. Let's start with Visual Studio.
Setting Up Visual Studio
Visual Studio 2026 is Microsoft's integrated development environment, or IDE. An IDE is one big program that bundles together everything you need to write, build, and debug code: a text editor, the compiler, the debugger, and a host of conveniences. There are other good C++ IDEs, but Visual Studio is the one most Windows game developers use, and it's the one this book is built around.
The Community edition is free for individual use, open-source projects, and small teams. That's the one we want.
Downloading and Installing Visual Studio
Open your web browser and go to https://visualstudio.microsoft.com/downloads/. Find the Community edition and click its download button. You'll get a small installer, just a few megabytes, that downloads the rest of Visual Studio once you run it.
Run the installer. After a minute or so of getting ready, it asks which workloads you want. A workload is a bundle of tools for one kind of development: web, mobile, desktop, games, and so on. Visual Studio is huge, and installing every workload would swallow an enormous amount of disk space for no good reason.
We need exactly one workload: Desktop development with C++. Select its checkbox, as shown in Figure 1.1.
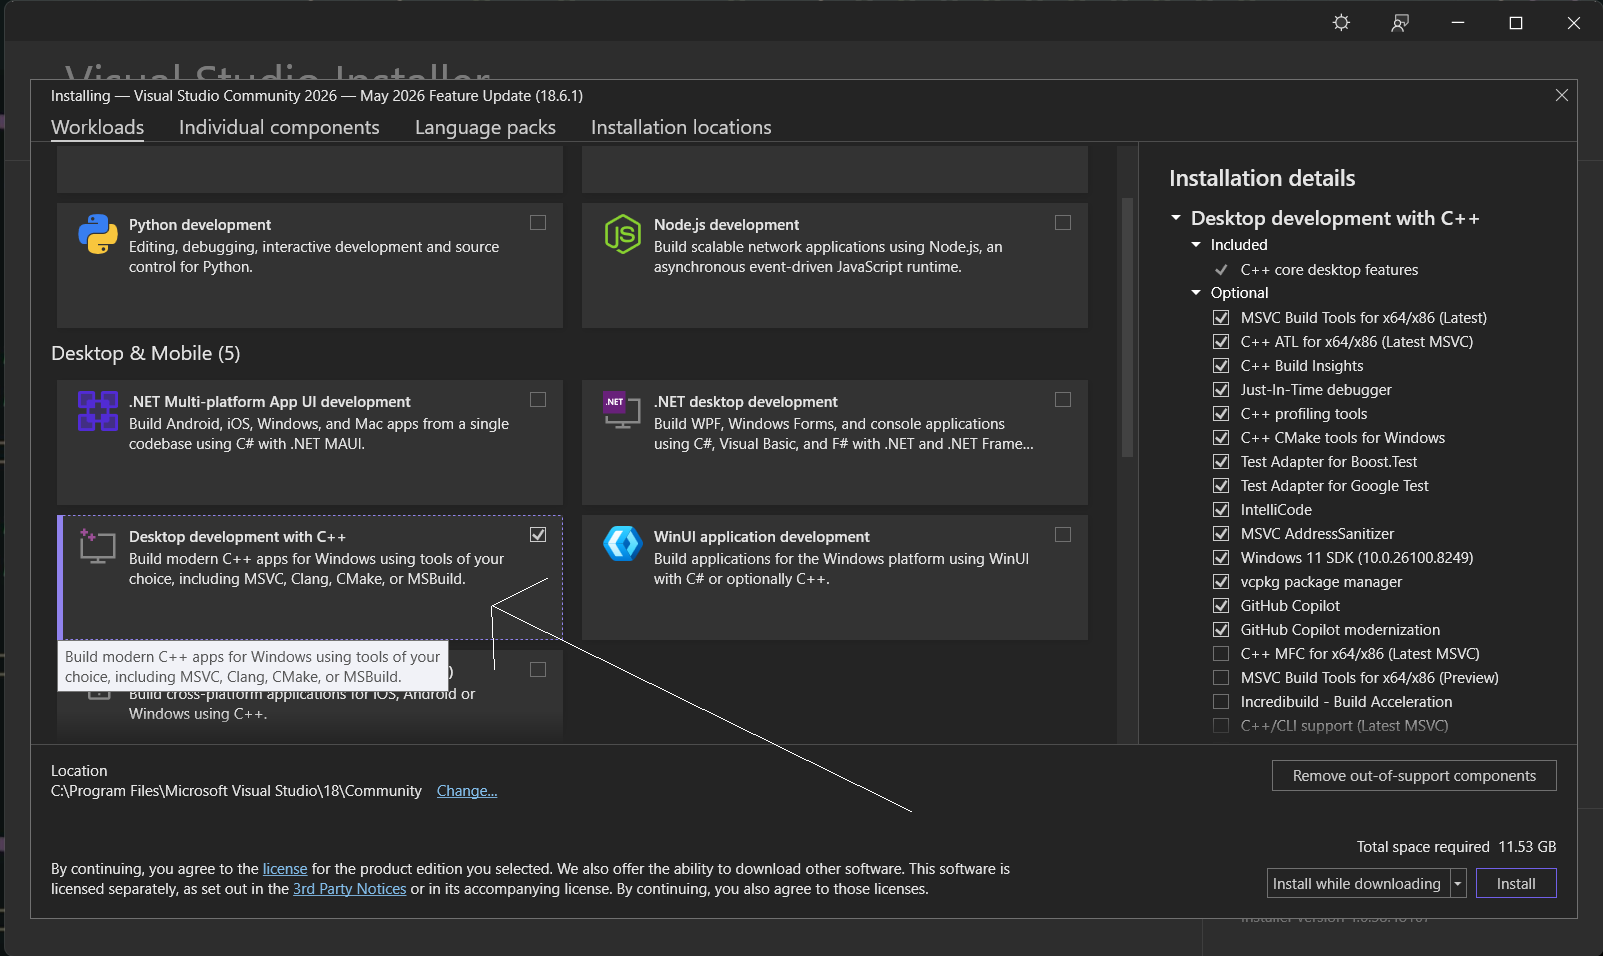
Leave the optional extras in that right-hand panel exactly as they are, and click Install. Depending on your internet connection, this takes anywhere from ten minutes to an hour, so go and make a cup of tea. Better still, carry on with the next section while you wait. When the installer finishes, you can close it. We'll start Visual Studio once SDL is ready.
Downloading SDL 3
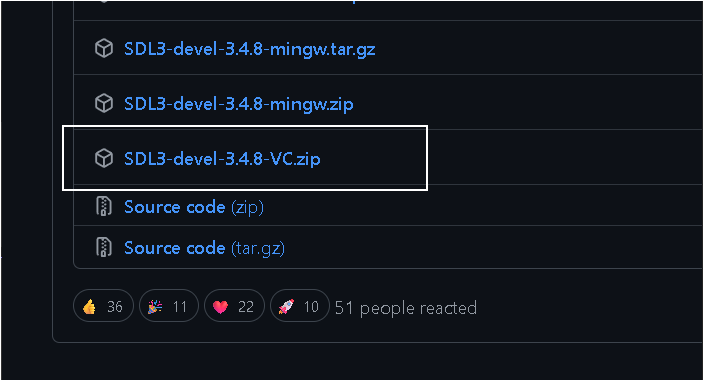
Now for the library. Go to https://libsdl.org and follow the link to the latest SDL 3 release, which takes you to SDL's releases page on GitHub. Scroll down to the list of downloads, labeled Assets, as in Figure 1.2, and find the file whose name ends in -VC.zip, such as SDL3-devel-3.4.8-VC.zip. The version number will probably be higher by the time you read this, and that's fine. The "devel" means it's the package for developers, and "VC" stands for Visual C++: this is the version that's ready to use with Visual Studio.
Download the zip, then unpack it where this book expects to find it:
- Right-click the zip file and choose Extract All.
- Change the destination to
C:\and click Extract. This creates a folder with a name likeC:\SDL3-3.4.8. - Rename that folder to plain
SDL3.
Open C:\SDL3 and check what's inside before you move on. You should see folders called include and lib right there, not another folder with a version number in its name. If there's an extra level, move its contents up. Every path in this book assumes C:\SDL3\include and C:\SDL3\lib\x64, and a stray extra folder is the most common reason this setup goes wrong.
Two of the folders in C:\SDL3 matter to us. The include folder holds SDL's header files, which describe every SDL function so that the compiler can check we're using them correctly. The lib\x64 folder holds four files for 64-bit Windows, and two of them matter: SDL3.lib, which is needed while our program is being built, and SDL3.dll, which holds SDL's code and is needed every time our program runs. We won't need the other two, SDL3.pdb and SDL3_test.lib. We'll put all three pieces to work shortly.
Creating the Project
With SDL unpacked and Visual Studio installed, we can create the project that will hold our code.
Starting Visual Studio
Start Visual Studio from the Start menu. The first time it runs, it may ask you to sign in and to pick a color theme. Signing in is optional, so skip it if you like, and choose whichever theme you prefer. The screenshots in this book use the dark one.
Next comes the start window, with a list of recent projects on the left (empty, for now) and a column of buttons on the right. Click Create a new project.
Visual Studio can make dozens of kinds of project, so type Empty Project into the search box at the top of the next window. Several results appear. Pick the one tagged C++, Windows, and Console, and click Next. The Console tag means our program gets a console window, a plain text window that opens alongside the game and shows any messages the program prints. We'll put that to good use.
Naming the Project
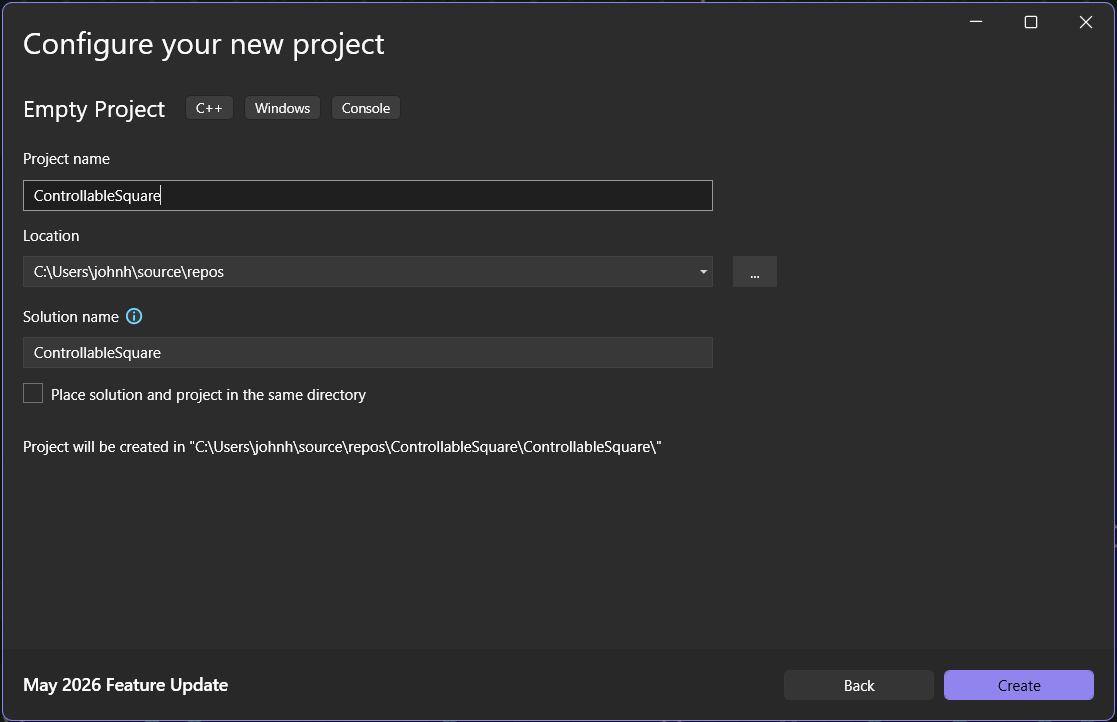
The next window configures the new project. Type ControllableSquare into Project name. The Location that Visual Studio suggests, a source\repos folder inside your user folder, is fine, and Solution name fills itself in to match. Leave Place solution and project in the same directory unchecked.
You've just met two words that Visual Studio uses constantly. A project is one program: its source files, plus the settings for building them. A solution is a container that can hold several projects. Ours will only ever hold one, so for now you can treat the two words as meaning the same thing.
Before you click Create, look at the line near the bottom that begins "Project will be created in," shown in Figure 1.3. That path is your project folder. It's where Visual Studio keeps your code, and in a few minutes, it's where we'll put a file that SDL needs. Notice that it ends in ControllableSquare\ControllableSquare: the outer folder holds the solution, and the inner one holds the project.
Click Create. Visual Studio thinks for a moment, then drops you into a brand-new, completely empty project.
A Quick Tour of the IDE
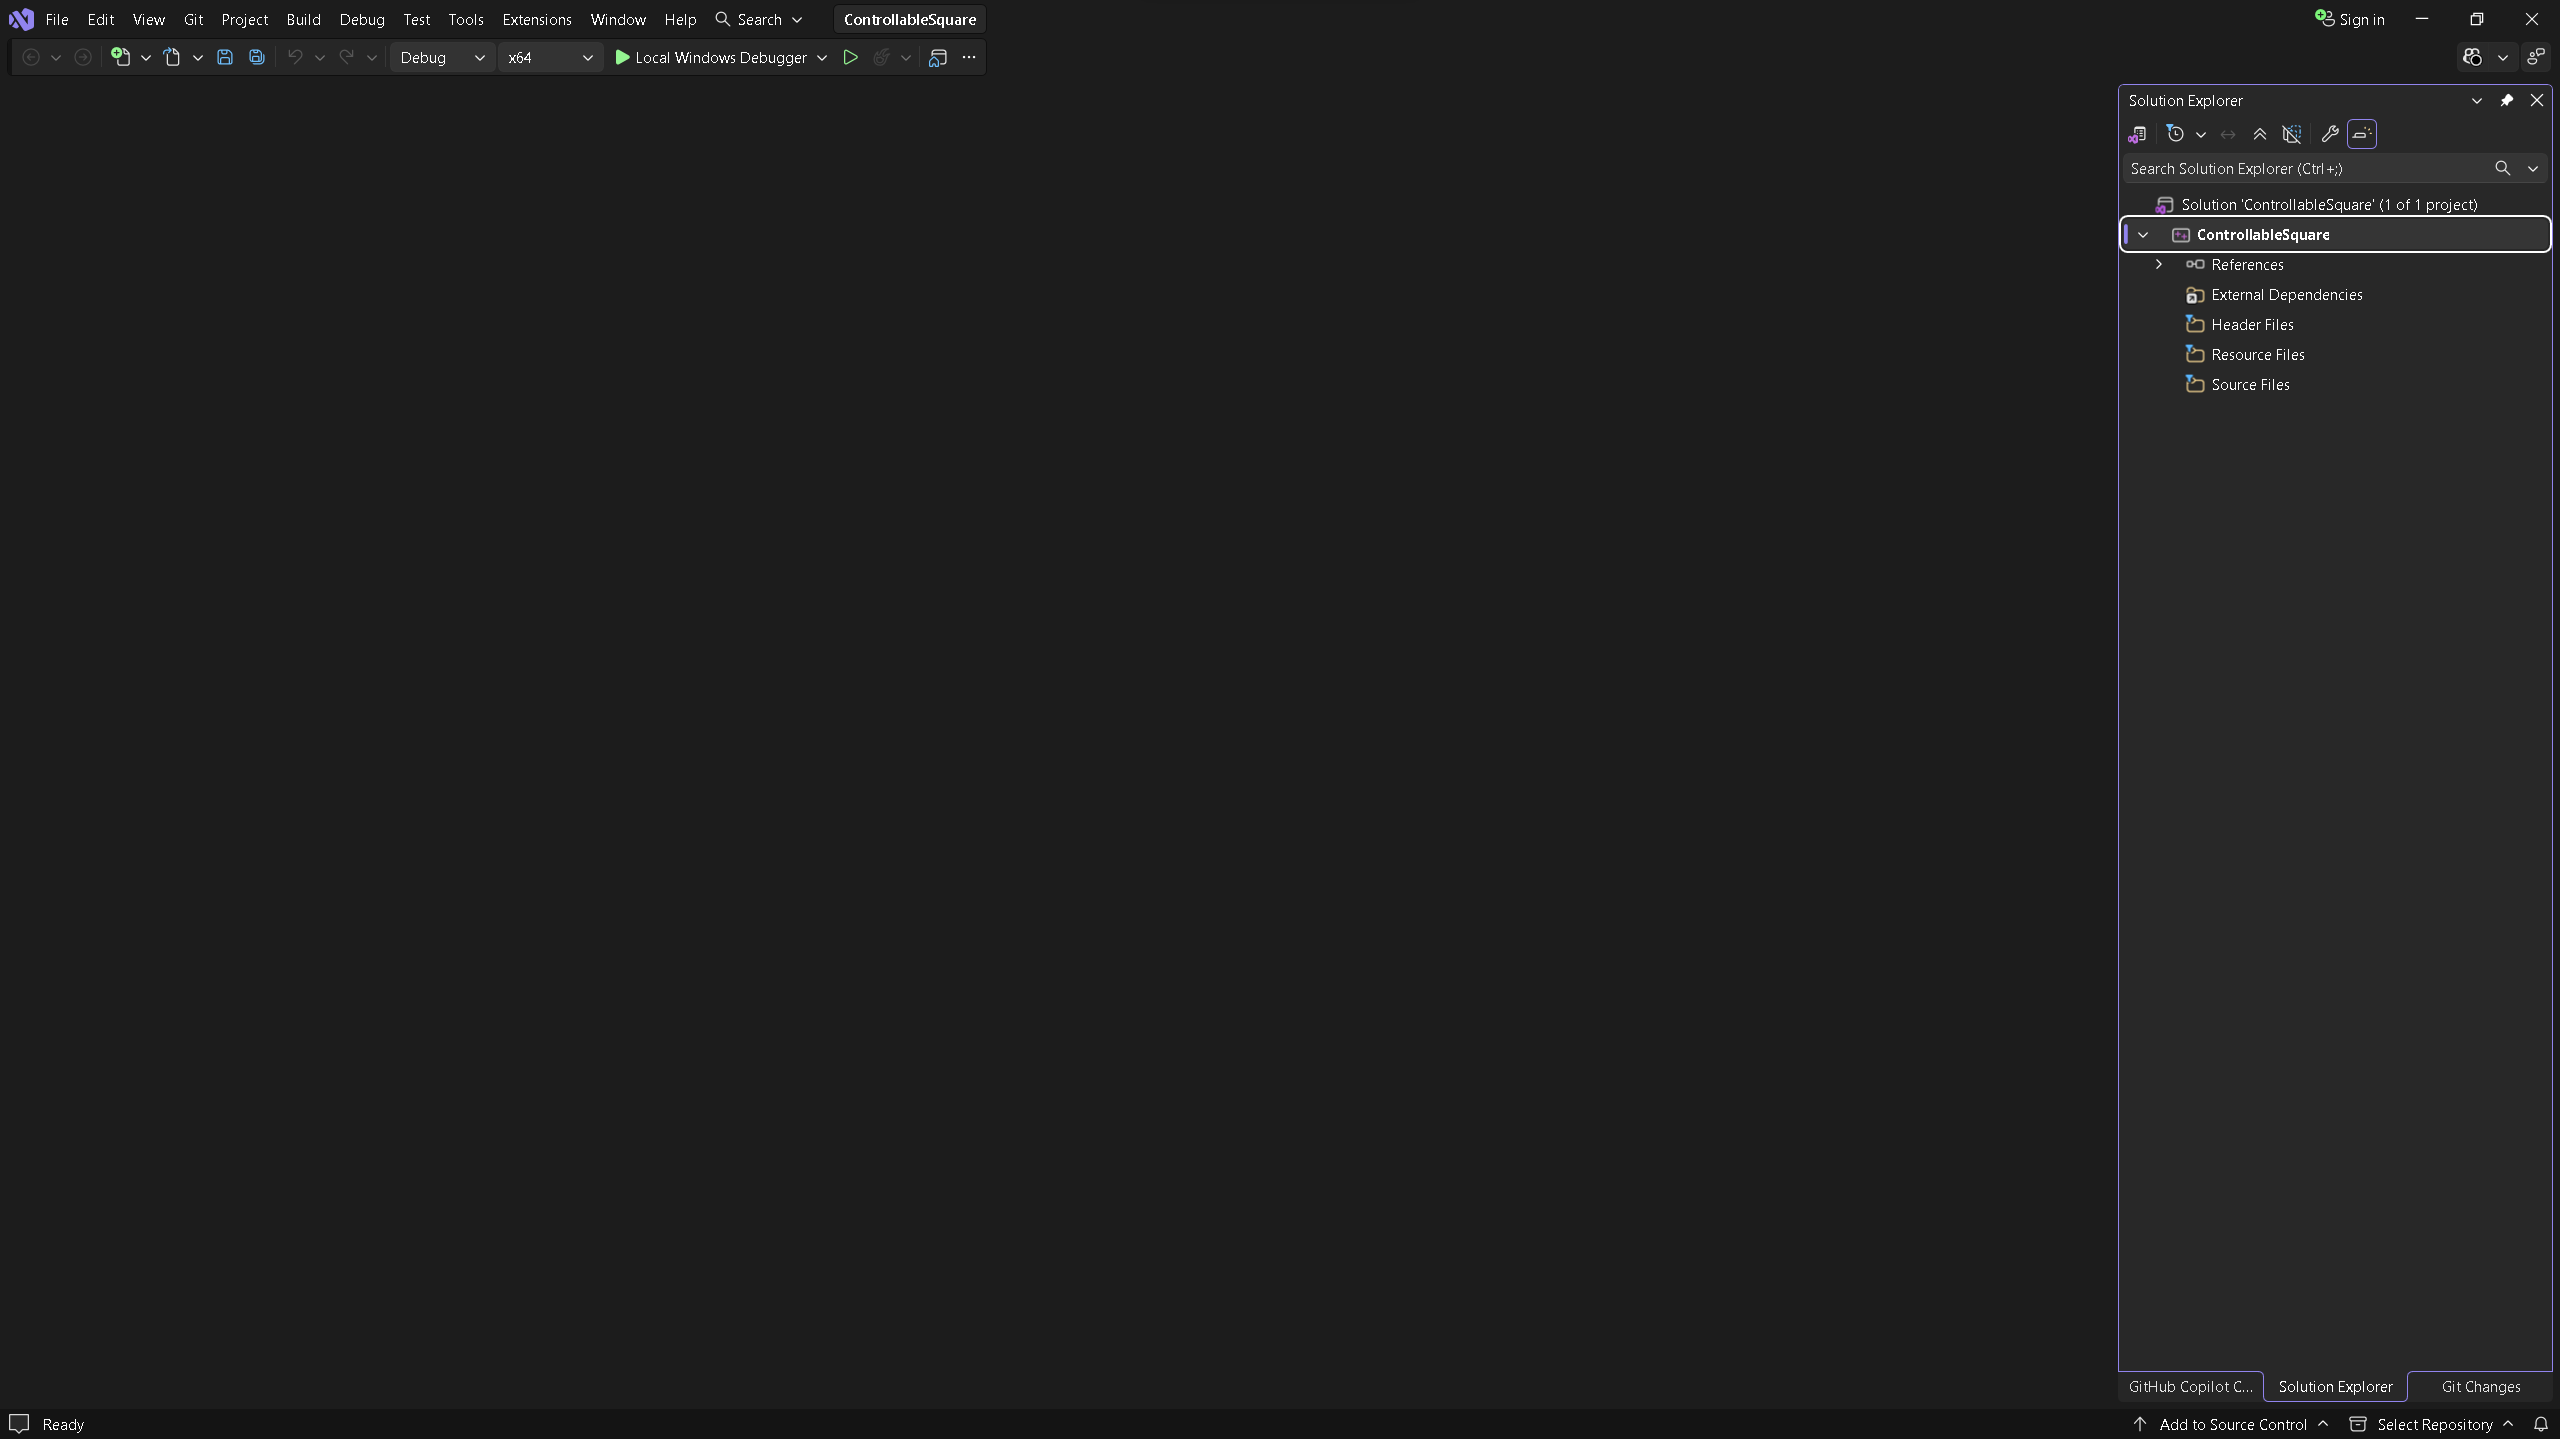
If a page of news or release notes opens in the middle of the window, close its tab. What's left is the main Visual Studio window, shown in Figure 1.4. There's a lot here, but for now you only need to find four areas:
- The editor fills the middle. It's empty now, but it's where your code lives, with a tab along the top for each open file.
- Solution Explorer, on the right, shows the solution and the project inside it. Under the project are folders called Header Files, Resource Files, and Source Files. They're only labels for organizing the list: on disk, all the files sit together in the project folder.
- The toolbar runs along the top. Its two dropdowns read Debug and x64, which means we're making a debug build (the kind that's easiest to investigate) for 64-bit Windows. Next to them is a green arrow labeled Local Windows Debugger, which builds the program and then runs it. Pressing F5 does the same thing.
- The Output window appears along the bottom the first time you build. The compiler reports its progress there, and so does the debugger. When something goes wrong, it's the first place to look.
If one of these ever goes missing, the View menu brings it back.
That's the tour. Visual Studio has hundreds of features, but these four areas are the ones you'll use every day.
Adding a Source File
Our code needs a file to live in. In Solution Explorer, right-click the Source Files folder and choose Add > New Item. If Visual Studio shows a list of templates, pick C++ File (.cpp). Either way, set the name to main.cpp and click Add.
The new, empty file opens in the editor. We'll fill it in once the project knows where SDL is. There's a reason we created the file first, though: Visual Studio only shows the compiler's settings once a project contains at least one .cpp file, and those settings are next.
Telling the Project Where SDL Is
This is the step where people usually get stuck. Visual Studio doesn't know where you put SDL, so we have to tell it, and it needs to know at three different moments. Figure 1.5 shows the journey from main.cpp to a running program, and which piece of SDL each step needs.
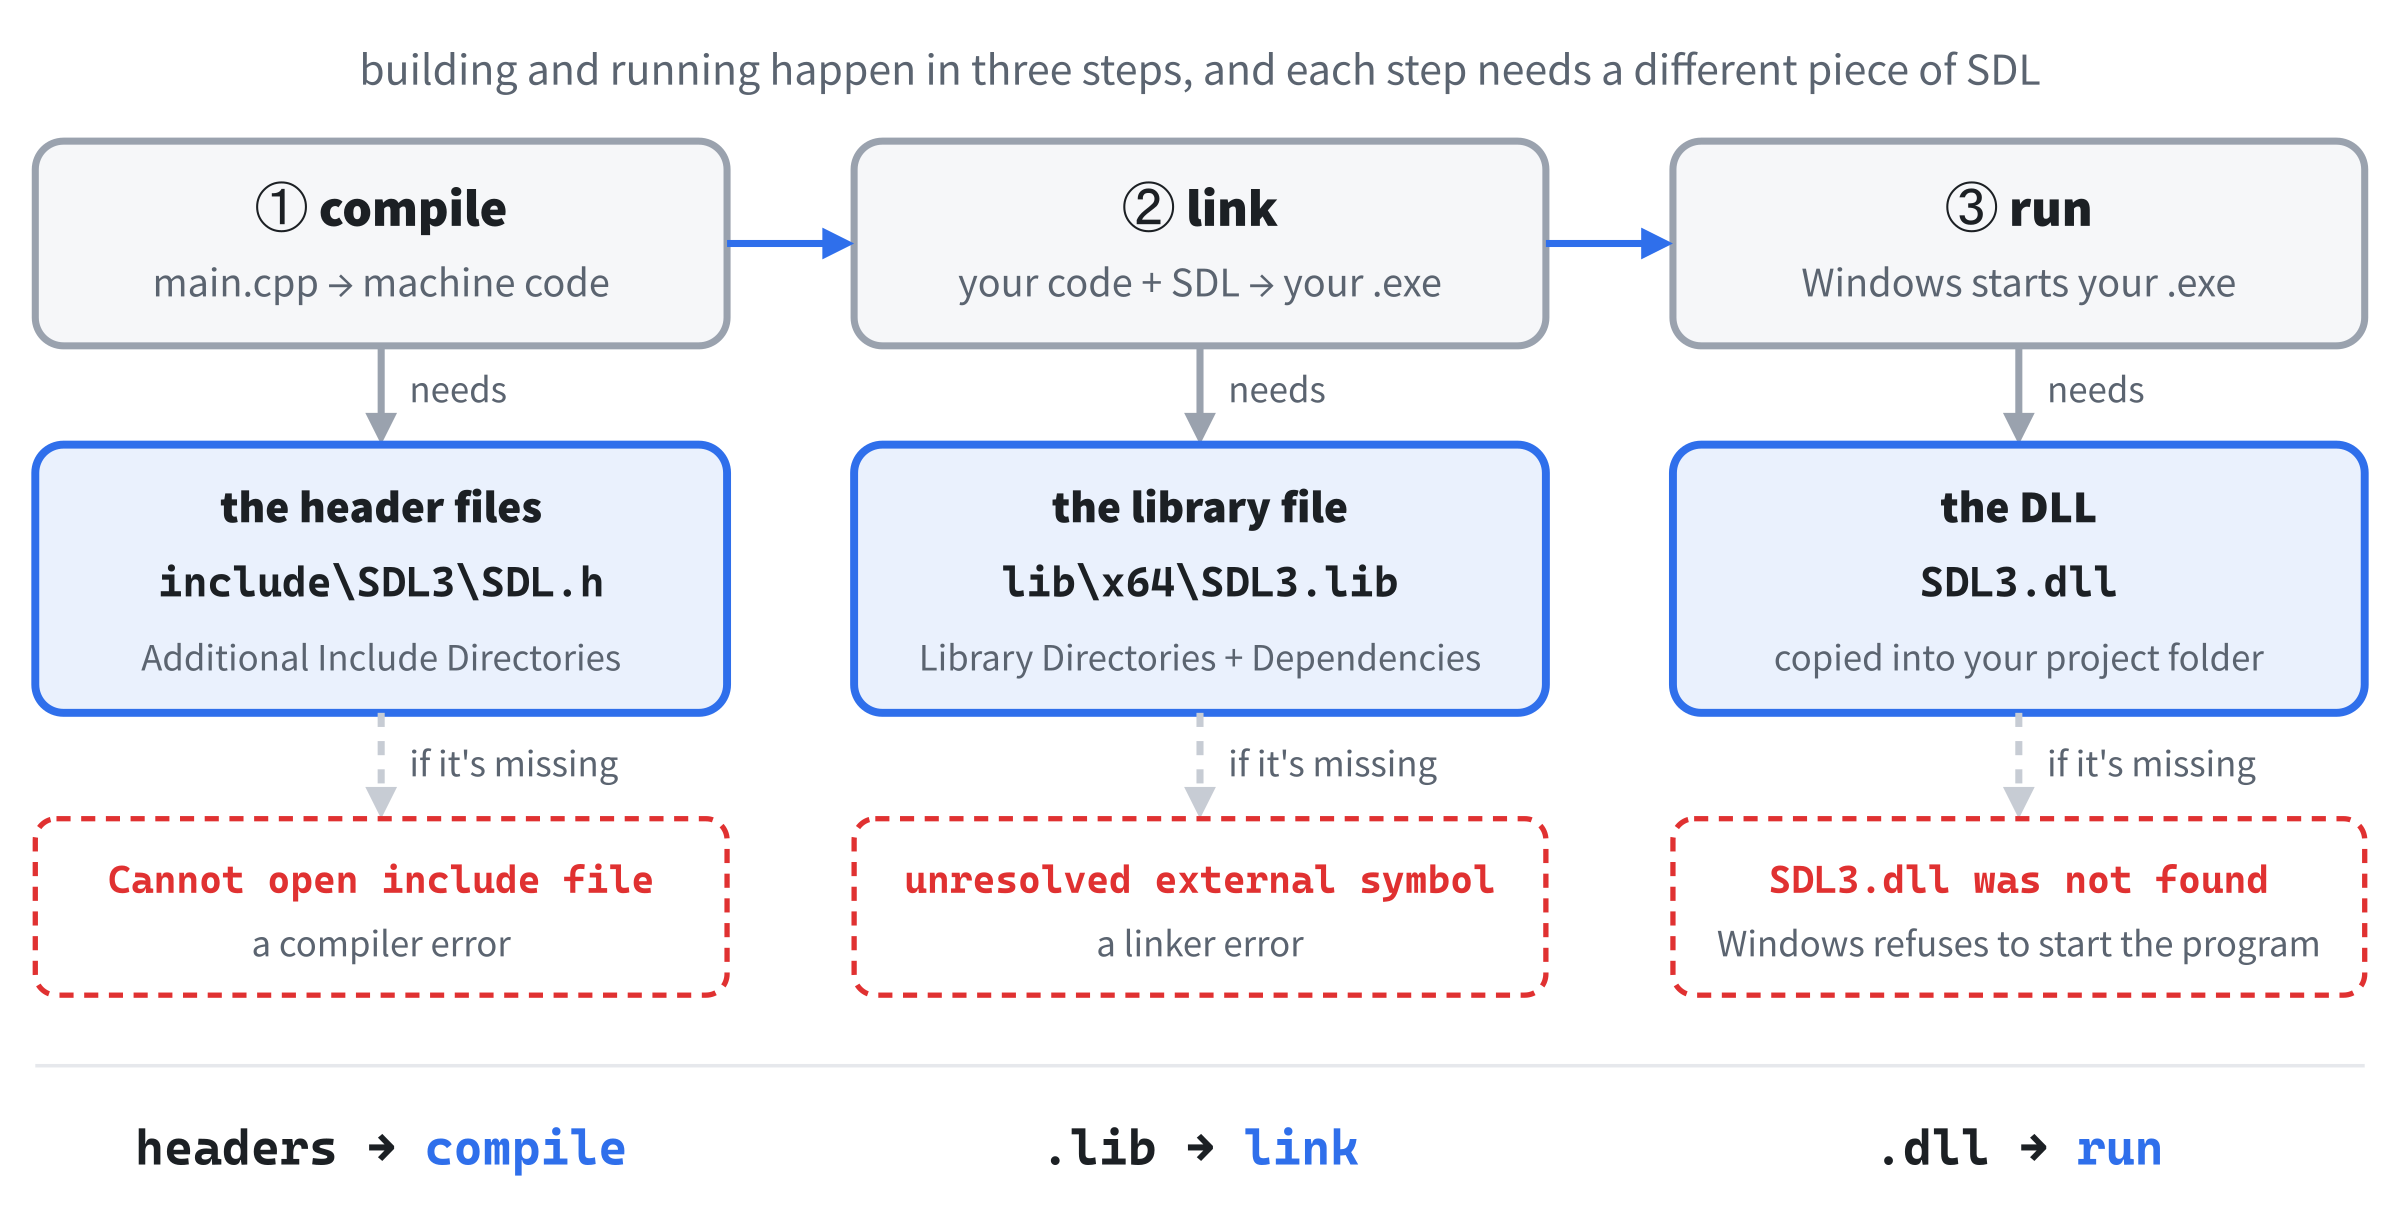
First, the compiler turns main.cpp into machine code, the instructions a processor actually runs. To check our SDL code, it reads SDL's header files, so it needs to know where the include folder is. Next, the linker connects our machine code to SDL's to make a finished program, a .exe file, and for that it needs SDL3.lib. Finally, when the program starts, Windows loads SDL3.dll. The first two pieces are project settings, and the third is a file we'll copy.
To change the settings, right-click the project, ControllableSquare, in Solution Explorer. Make sure it's the project and not the solution line above it. Choose Properties from the very bottom of the menu. The Property Pages window opens, with a tree of categories down its left side. Don't be put off by the sheer number of settings, because we're going to change just four of them.
Before changing anything, look at the two dropdowns at the top of the window. Set Configuration to All Configurations and Platform to All Platforms, as in Figure 1.6. Every change we make then applies to every kind of build, not just the debug build we're using today.

Check these two dropdowns every time you open the Property Pages. They don't remember your choice. Instead, they reset to the build you're currently using, and a setting you change while they say Debug will be missing from the release build. That makes for a puzzling error weeks later, when you've long forgotten why.
Now make these four changes, choosing each category in the tree on the left and then the setting on the right:
- Where the header files are. Open Configuration Properties > C/C++ > General. Click in the Additional Include Directories box, click the small arrow that appears at its right-hand end, and choose Edit. Type
C:\SDL3\includeinto the box at the top of the window that opens, and click OK. - Which version of C++ to use. Open C/C++ > Language. Click C++ Language Standard, and choose ISO C++20 Standard (/std:c++20) from its dropdown.
- Where the library files are. Open Linker > General. Edit Additional Library Directories the same way as in step 1, type
C:\SDL3\lib\x64, and click OK. - Which library file to use. Open Linker > Input. Edit Additional Dependencies, type
SDL3.libinto the box at the top, and click OK. The list of libraries underneath is Visual Studio's own, so leave it alone.
Click OK to close the Property Pages.
Steps 1, 3, and 4 set up the first two pieces in Figure 1.5. Step 1 tells the compiler where to look, step 3 tells the linker where to look, and step 4 names the file the linker should use.
That leaves step 2, which needs a word of explanation. C++ gets a new official version every three years, and Visual Studio still starts new projects on C++14, the version from 2014. We'll use a few features from C++20 later in the book, so we'll switch now and never have to think about it again.
Copying the DLL
The last piece isn't a setting. SDL is a dynamic library, which means its code lives in a separate file, SDL3.dll, that Windows loads each time our program starts. A DLL, or dynamic-link library, is a file of ready-made code that programs can share. If Windows can't find it, our program won't start at all.
We'll put the DLL in the project folder:
- In Solution Explorer, right-click the ControllableSquare project and choose Open Folder in File Explorer. A File Explorer window opens in the project folder, and you'll see
main.cppthere. - In a second File Explorer window, open
C:\SDL3\lib\x64and copySDL3.dll. - Paste it into the project folder, beside
main.cpp.
Why the project folder? When you press F5, Visual Studio starts the program with the project folder as its working directory, the folder the program treats as "here." Windows checks the working directory when it's hunting for a DLL, so that's where SDL3.dll needs to be. Later in the book, the pictures our games load will go in the project folder too, for the same reason.
Double-clicking your finished .exe is different, because the program then starts in its own folder. Visual Studio builds the .exe into x64\Debug inside the solution folder, one level up from the project folder. To run it from there, or to share your game with a friend, put a copy of SDL3.dll right beside the .exe. Release builds go into x64\Release, and they need a copy too.
If SDL's code lives in the DLL, you might wonder what SDL3.lib is for. It's an import library, a list of everything inside SDL3.dll. The linker uses it to check that every SDL function we call really exists, then leaves a note in our .exe that says "fetch these from SDL3.dll when the program starts." That's why a missing .lib stops the build, while a missing .dll only shows up when you run.
That's the setup done. Take a breath. Later project chapters condense all of this into a quick checklist, because you'll have done it before. The first time is the slow time.
Coding the Controllable Square
Here's what we're going to make: an 800 by 600 window, filled with dark gray, with an orange square in the middle. Hold W, A, S, or D and the square glides up, left, down, or right. Press Escape, or click the window's X, to quit.
That's all. It sounds modest, but it's a real game-shaped program, with a window, a game loop, events, keyboard input, timed movement, and drawing. Every game in this book grows from these same pieces.
We'll build the program in small steps and explain every line as it arrives. Type each block into main.cpp in the place its introduction describes. Along the way are three checkpoints, where the program builds and runs so that you can check your work before going further. The whole file appears in one piece at the end of this section, if you'd like to compare.
Code Comments
Before the first real line of code, let's look at comments. A comment is text in a source file that the compiler ignores completely. It exists purely for human readers: you, anyone you share the code with, and the future you who comes back to it in six months and can't remember what it does.
C++ has two kinds of comment. A multi-line comment starts with /* and ends with */, and it can stretch across as many lines as you need. Programmers often start a file with one that says what the file is for, and that's how our program begins. Type this at the very top of main.cpp:
/*
    Controllable Square
    The Chapter 1 project from Learning C++ by Building Games

    Opens an 800 x 600 window with an orange square in the middle.
    W, A, S, and D move the square. Escape, or the window's X, quits.
*/
In the preceding code, everything from the opening /* to the closing */ is a comment, so the compiler skips all seven lines. The indents and the blank line are only there to make it easier to read.
The other kind is the single-line comment. It starts with two forward slashes, //, and runs to the end of the line. You can give one a line to itself, or put it at the end of a line of code to explain that line, and we'll use plenty of both, starting in a moment.
The comments in this book aren't there to repeat what the code says. They explain why the code does something, or they flag something a beginner might not spot at a glance. Get into the habit of writing comments as you go. Your future self will thank you.
The Includes
Now for the first lines the compiler actually reads. C++ programs pull in code from other files with #include lines, and SDL needs two of them. Add these below the comment, leaving a blank line after it:
#include <SDL3/SDL.h>
#include <SDL3/SDL_main.h>
In the preceding code, each line pastes the contents of one of SDL's header files into ours. The # marks an instruction that's carried out before the real compiling begins, and #include means "paste that file in here." The first line brings in SDL's main header, which describes everything we'll use to make a window, draw shapes, and read the keyboard. The angle brackets tell the compiler to search the include folders it knows about, and thanks to our first setting, that list now includes C:\SDL3\include. The SDL3/SDL.h part is the path from there, a file called SDL.h in a folder called SDL3.
The second line brings in a small helper for the program's starting point. Every C++ program starts in a function called main, which we'll write in a moment, but some systems expect the starting point to look a little different. The SDL_main.h header quietly smooths over those differences, so the same main works everywhere SDL runs. It belongs only in the file that contains main.
Some Constants
Next, we'll name a few constants, values that stay fixed while the program runs. Named values make the code easier to read and much easier to change. Add these four lines below the includes, leaving a blank line after the includes:
const int   WINDOW_W  = 800;      // the window's width in pixels
const int   WINDOW_H  = 600;      // the window's height in pixels
const float SQUARE_SZ = 80.0f;    // the length of each side of the square
const float SPEED     = 300.0f;   // the square's speed, in pixels per second
In the preceding code, each line creates one named value. Read the first line from left to right: const promises that the value will never change, int says it's a whole number, WINDOW_W is the name we chose, and = 800 gives it its value. The semicolon at the end finishes the instruction, like the period at the end of a sentence. Nearly every line of C++ ends with one, and forgetting it is probably the most common typing mistake there is.
The last two lines use float instead of int. A float is a number that can have a fraction, like 80.5, and we'll need fractions because the square moves in small steps that are rarely a whole number of pixels. The f on the end of 80.0f marks the number itself as a float. Without it, C++ would treat 80.0 as a double, a bigger and more precise kind of decimal number. Chapter 2 explains why that difference matters.
Writing constants in capital letters is a common habit, and the one this book follows, because it makes them easy to spot. The extra spaces that line up the names, the values, and the comments are just for tidiness, since the compiler ignores them. Each line ends with a single-line comment that says what the value is for.
Here's the payoff. If you decide later that you want a bigger window or a faster square, you change one number here, and every line that uses it follows along. That's far better than hunting down 800 in twenty different places. Chapter 2 covers constants, and the variables they're related to, in full.
The main Function
Every C++ program starts in a function called main. When you run the program, main is where it begins, and when main finishes, the program ends. We'll cover functions properly in Chapter 8. For now, think of main as the box that holds all our code. Add it below the constants, with a blank line in between:
int main(int argc, char* argv[])
{
    return 0;
}
In the preceding code, the first line says that main hands back an int when it finishes, and that it receives two values, argc and argv, in its parentheses. They carry any extra text typed after the program's name when someone starts it from a command line, like ControllableSquare.exe --fullscreen. We won't use them, but SDL's helper expects main to look exactly like this, so in they go. The char* argv[] part combines two ideas we'll meet later: a pointer, which records where something is stored (Chapter 10), and an array, which is a numbered row of values (Chapter 13).
The curly braces mark where main starts and ends, and everything between them is its body. At the moment, the body holds a single instruction. The return 0; line ends main and hands the number 0 back to whatever started the program, which by long-standing convention means "everything went fine." Any other number means something went wrong.
From now on, everything we add goes inside main, above the return 0; line, unless I say otherwise.
Checkpoint: Let's make sure the setup works before writing anything more. Press F5. If Visual Studio asks whether you'd like to build the project first, click Yes. It saves your file, builds the program, and scrolls messages through the Output window. Then a console window appears and reports that the program exited with code 0. That's our return 0; at work, so press any key to close the console.
The program doesn't do anything yet, but it has already used all three pieces of SDL: the compiler found the headers, the linker found SDL3.lib, and Windows found SDL3.dll. If you got an error instead, find it in the Common Errors section near the end of this chapter, fix it, and come back.
Starting SDL
Before SDL can do anything, we have to start it up. This code goes inside main, above return 0;, so first make some room. Click at the end of the line just above that spot, which is the one with main’s opening brace, and press Enter. Visual Studio opens a fresh line, already indented and ready for typing, and you'll make room like this for every block from now on. Add this on the new line:
// Start SDL's video system, which also gives us the keyboard
if (!SDL_Init(SDL_INIT_VIDEO))
{
    SDL_Log("SDL_Init failed: %s", SDL_GetError());
    return 1;
}
In the preceding code, SDL_Init(SDL_INIT_VIDEO) is our first function call. A function is a named chunk of code that does one job, and calling it runs that code. This one was written by the SDL team, and the value in its parentheses, called an argument, tells it what to do. Our argument asks for the video system, which handles windows and drawing and brings keyboard input along with it. When it's done, the function reports back whether it worked: true for success, or false for failure.
That report goes straight into an if, which runs the code between its braces only when the condition in its parentheses is true. The ! means "not," and it flips true to false and false to true, so the whole line reads "if SDL did not start." Normally, SDL starts fine, the condition is false, and the program skips the braces entirely. Chapter 4 covers if and ! properly.
Inside the braces is our plan for when things go wrong. A call to SDL_Log prints a message in the console window. The %s in the message is a placeholder, and SDL replaces it with the next argument: whatever SDL_GetError returns, which is SDL's own short description of what went wrong. After that, return 1; ends main early with a nonzero code, and the program stops.
Notice how the code is laid out. Each brace sits on a line of its own, so matching pairs line up, and the lines between them are indented by four more spaces. The compiler doesn't care about any of that, but it makes the structure visible at a glance, and Visual Studio does most of the indenting for you as you type.
In your file, this whole block also sits four spaces in from the left edge, because it's inside main. From here on, the book shows each block without that outer indentation, so the lines fit the page. You don't need to add it yourself: you started typing on a line that Visual Studio had already indented, and it keeps each new line lined up for you. The complete program at the end of this section shows every line exactly where it sits.
Creating a Window
With SDL running, we can ask it for a window. Add this below the SDL_Init check, still above return 0;, leaving a blank line after the check:
SDL_Window* window = SDL_CreateWindow(
    "Controllable Square",   // the text in the title bar
    WINDOW_W, WINDOW_H,      // the size in pixels
    0                        // no special options
);
if (!window)
{
    SDL_Log("SDL_CreateWindow failed: %s", SDL_GetError());
    SDL_Quit();
    return 1;
}
In the preceding code, SDL_CreateWindow makes the window. It takes four arguments, and because each one deserves a comment, we've spread the call over several lines. C++ doesn't mind, because a statement only ends at its semicolon.
The first argument is the text for the title bar, in double quotes because it's text rather than a number. Next come the width and height, using our constants. The last argument holds options, like making the window resizable, and 0 means "none, thanks."
The whole call sits to the right of an =, so its result is stored in window, our first variable. A variable is a named value that, unlike a constant, can change. Its type comes first, then its name, then the value it starts with.
The type here is SDL_Window*, and the * makes window a pointer: rather than holding the window itself, it holds the window's location in memory, like a note that says where to find it. Pointers get a whole chapter to themselves, Chapter 10. For now, window is our handle on the window, and we'll pass it to SDL whenever we want something done to it.
If SDL couldn't make the window, it hands back a null pointer, a pointer to nothing, and a null pointer counts as false. So if (!window) means "if there's no window." In that case we log the reason, just as before, then call SDL_Quit to shut down the SDL we started a moment ago, and return 1.
Creating a Renderer
A window on its own is just an empty frame. To draw in it, we need a renderer, the part of SDL that does the drawing. Add this below the window code, with a blank line in between:
SDL_Renderer* renderer = SDL_CreateRenderer(window, nullptr);
if (!renderer)
{
    SDL_Log("SDL_CreateRenderer failed: %s", SDL_GetError());
    SDL_DestroyWindow(window);
    SDL_Quit();
    return 1;
}
In the preceding code, SDL_CreateRenderer creates a renderer for our window, and we keep a pointer to it in renderer. The second argument can name a particular way of drawing, and nullptr, C++'s word for a null pointer, means "no preference, pick the best one." On Windows, SDL usually picks Direct3D, which draws with your graphics card.
The check follows the same shape as the window's, with one addition. By now a window exists, so before quitting, we destroy it with SDL_DestroyWindow. Tidying up matters even when things go wrong: whatever we create, we destroy.
One more line finishes the setup. Add it below the renderer check, with a blank line in between:
// Show each frame in step with the monitor's refresh
SDL_SetRenderVSync(renderer, 1);
In the preceding code, SDL_SetRenderVSync turns on vsync, short for vertical sync. Your monitor redraws its picture at a steady rate, usually 60 times a second, and faster on some gaming monitors. With vsync on, SDL waits until the monitor is ready before showing each new frame.
Our game then runs at the monitor's pace instead of flat out, which gives smooth movement and saves the computer from drawing thousands of frames a second that nobody will ever see. The 1 means "sync with every refresh." If a computer can't do vsync, nothing breaks: the call has no effect, and the game still works.
The Game Loop
Now for the heart of every game: the game loop. A game is a loop that runs over and over, many times a second, and each trip around it produces one frame, a single still picture. Show someone 60 frames a second, each slightly different from the last, and they see movement, just like the pages of a flip book.
Each trip around our loop does the five jobs shown in Figure 1.7: handle events, measure the time, move the square, keep it on the screen, and draw the frame. Then the loop checks whether to go around again.

We'll write the loop first and add the jobs one at a time. Add this below the vsync line:
bool running = true;
SDL_Event event;

while (running)
{
}
In the preceding code, the first line creates a bool, a type that holds only true or false. Our running variable starts out true, and it decides whether the loop keeps going. The second line creates event, an SDL_Event that SDL will fill in with each thing that happens: a key press, a mouse click, a click on the window's X.
The while loop repeats the code between its braces for as long as the condition in its parentheses is true. It checks running before every trip, and once running is false, the program carries on from the line after the closing brace. Chapter 6 covers while properly. For now, read it as "keep going until running becomes false."
Don't run the program just yet. So far, nothing inside the loop ever sets running to false, so the loop would spin forever, and the window wouldn't respond to anything, not even its own X. (If you try it anyway, press Shift+F5 in Visual Studio to stop it.)
Handling Events
The first job in each frame is to deal with events, SDL's messages about everything that has happened since the last frame. SDL collects them in a queue, like mail piling up in a mailbox, and we'll read them all before doing anything else. Add this inside the game loop, between its braces:
// Events: everything that has happened since the last frame
while (SDL_PollEvent(&event))
{
    if (event.type == SDL_EVENT_QUIT)
    {
        running = false;
    }
    if (event.type == SDL_EVENT_KEY_DOWN &&
        event.key.key == SDLK_ESCAPE)
    {
        running = false;
    }
}
In the preceding code, a second while loop sits inside the game loop. Each call to SDL_PollEvent takes the oldest event off the queue, copies it into our event variable, and reports true. When the queue is empty, it reports false, and this inner loop ends. So the loop reads every waiting event, one at a time, until there are none left.
The & in front of event gives SDL the variable's address, the place in memory where it lives, so that SDL can write into it. That's another idea from Chapter 10.
Inside the loop, we check what type of event each one is. The == asks "are these two equal?" A single = stores a value and a double == compares two values, and mixing them up is a classic beginner bug. If the type is SDL_EVENT_QUIT, which SDL sends when someone clicks the window's X, we set running to false.
The second if checks two things at once. The && means "and," so the whole condition is true only when both halves are. It's too long for one line, so it carries on to the next, and C++ doesn't mind, just as it didn't with the window call. The first half asks whether this event is a key being pressed.
The second half reads the event's details one level at a time, with a dot for each level: event.key holds the details of a keyboard event, and its own key says which key it was. If it's SDLK_ESCAPE, the Escape key, we set running to false too. Chapter 2 shows how bundles of values like this, called structs, are put together.
Setting running to false doesn't stop anything right away. The rest of the frame still runs, and then the loop's check sees false and lets the program move on.
Drawing a Frame
The last job in each frame is drawing it. For now we'll draw an empty, dark gray window, and the square comes shortly. Add this inside the game loop, below the event loop's closing brace:
// Draw the frame
SDL_SetRenderDrawColor(renderer, 30, 30, 30, 255);     // dark gray
SDL_RenderClear(renderer);

SDL_RenderPresent(renderer);
In the preceding code, SDL_SetRenderDrawColor picks the color for whatever we draw next. After the renderer come four numbers: how much red, green, and blue to mix, and the alpha, or opacity. Each runs from 0 to 255, so 30, 30, 30 is a dark gray, and an alpha of 255 means completely solid. Next, SDL_RenderClear fills the whole window with that color, wiping out the previous frame.
Finally, SDL_RenderPresent puts the finished frame on the screen. Everything before it happens out of sight, and nothing appears until we present.
Why a separate present step? The renderer draws into a hidden picture called the back buffer, while the screen shows the front one. Presenting swaps the two, so the player only ever sees finished frames. If we drew straight onto the screen, the picture would flicker, because you'd catch glimpses of each frame half drawn. This trick is called double buffering, and nearly every game uses it.
That's a complete frame, even if there's nothing in it yet. Before we can run the program, there's one more thing to write: the code that tidies up when the loop ends.
Cleaning Up
When the game loop ends, we hand back everything SDL gave us. Add this below the game loop's closing brace, just above return 0;, with a blank line on each side:
// Clean up, in the reverse order we created things
SDL_DestroyRenderer(renderer);
SDL_DestroyWindow(window);
SDL_Quit();
In the preceding code, we destroy the renderer and then the window, the reverse of the order we created them in, and then shut SDL down. Reverse order is a good habit, because later things often depend on earlier ones: the renderer draws into the window, so the renderer goes first. Windows would tidy up after us when the program ends anyway, but later in the book, we'll create and destroy things while a game is running, and nobody tidies up after us then. It's a habit worth starting now.
Checkpoint: Press F5. This time, a dark gray window titled Controllable Square appears alongside the console. Press Escape, or click the window's X, and the window closes. The console reports exit code 0 as before, so press any key to close it too. If the window won't close, check the event code, especially the == signs and the running = false; lines.
The Square
Up to now, each block has gone just below the one before it. From here on, most blocks go into gaps between lines you've already typed, so it's worth seeing the whole file before we start. Figure 1.8 is a map of main.cpp as it stands after the second checkpoint. The gray lines are already in your file, and the six blue slots are where the rest of the program goes, lettered in the order we'll fill them.
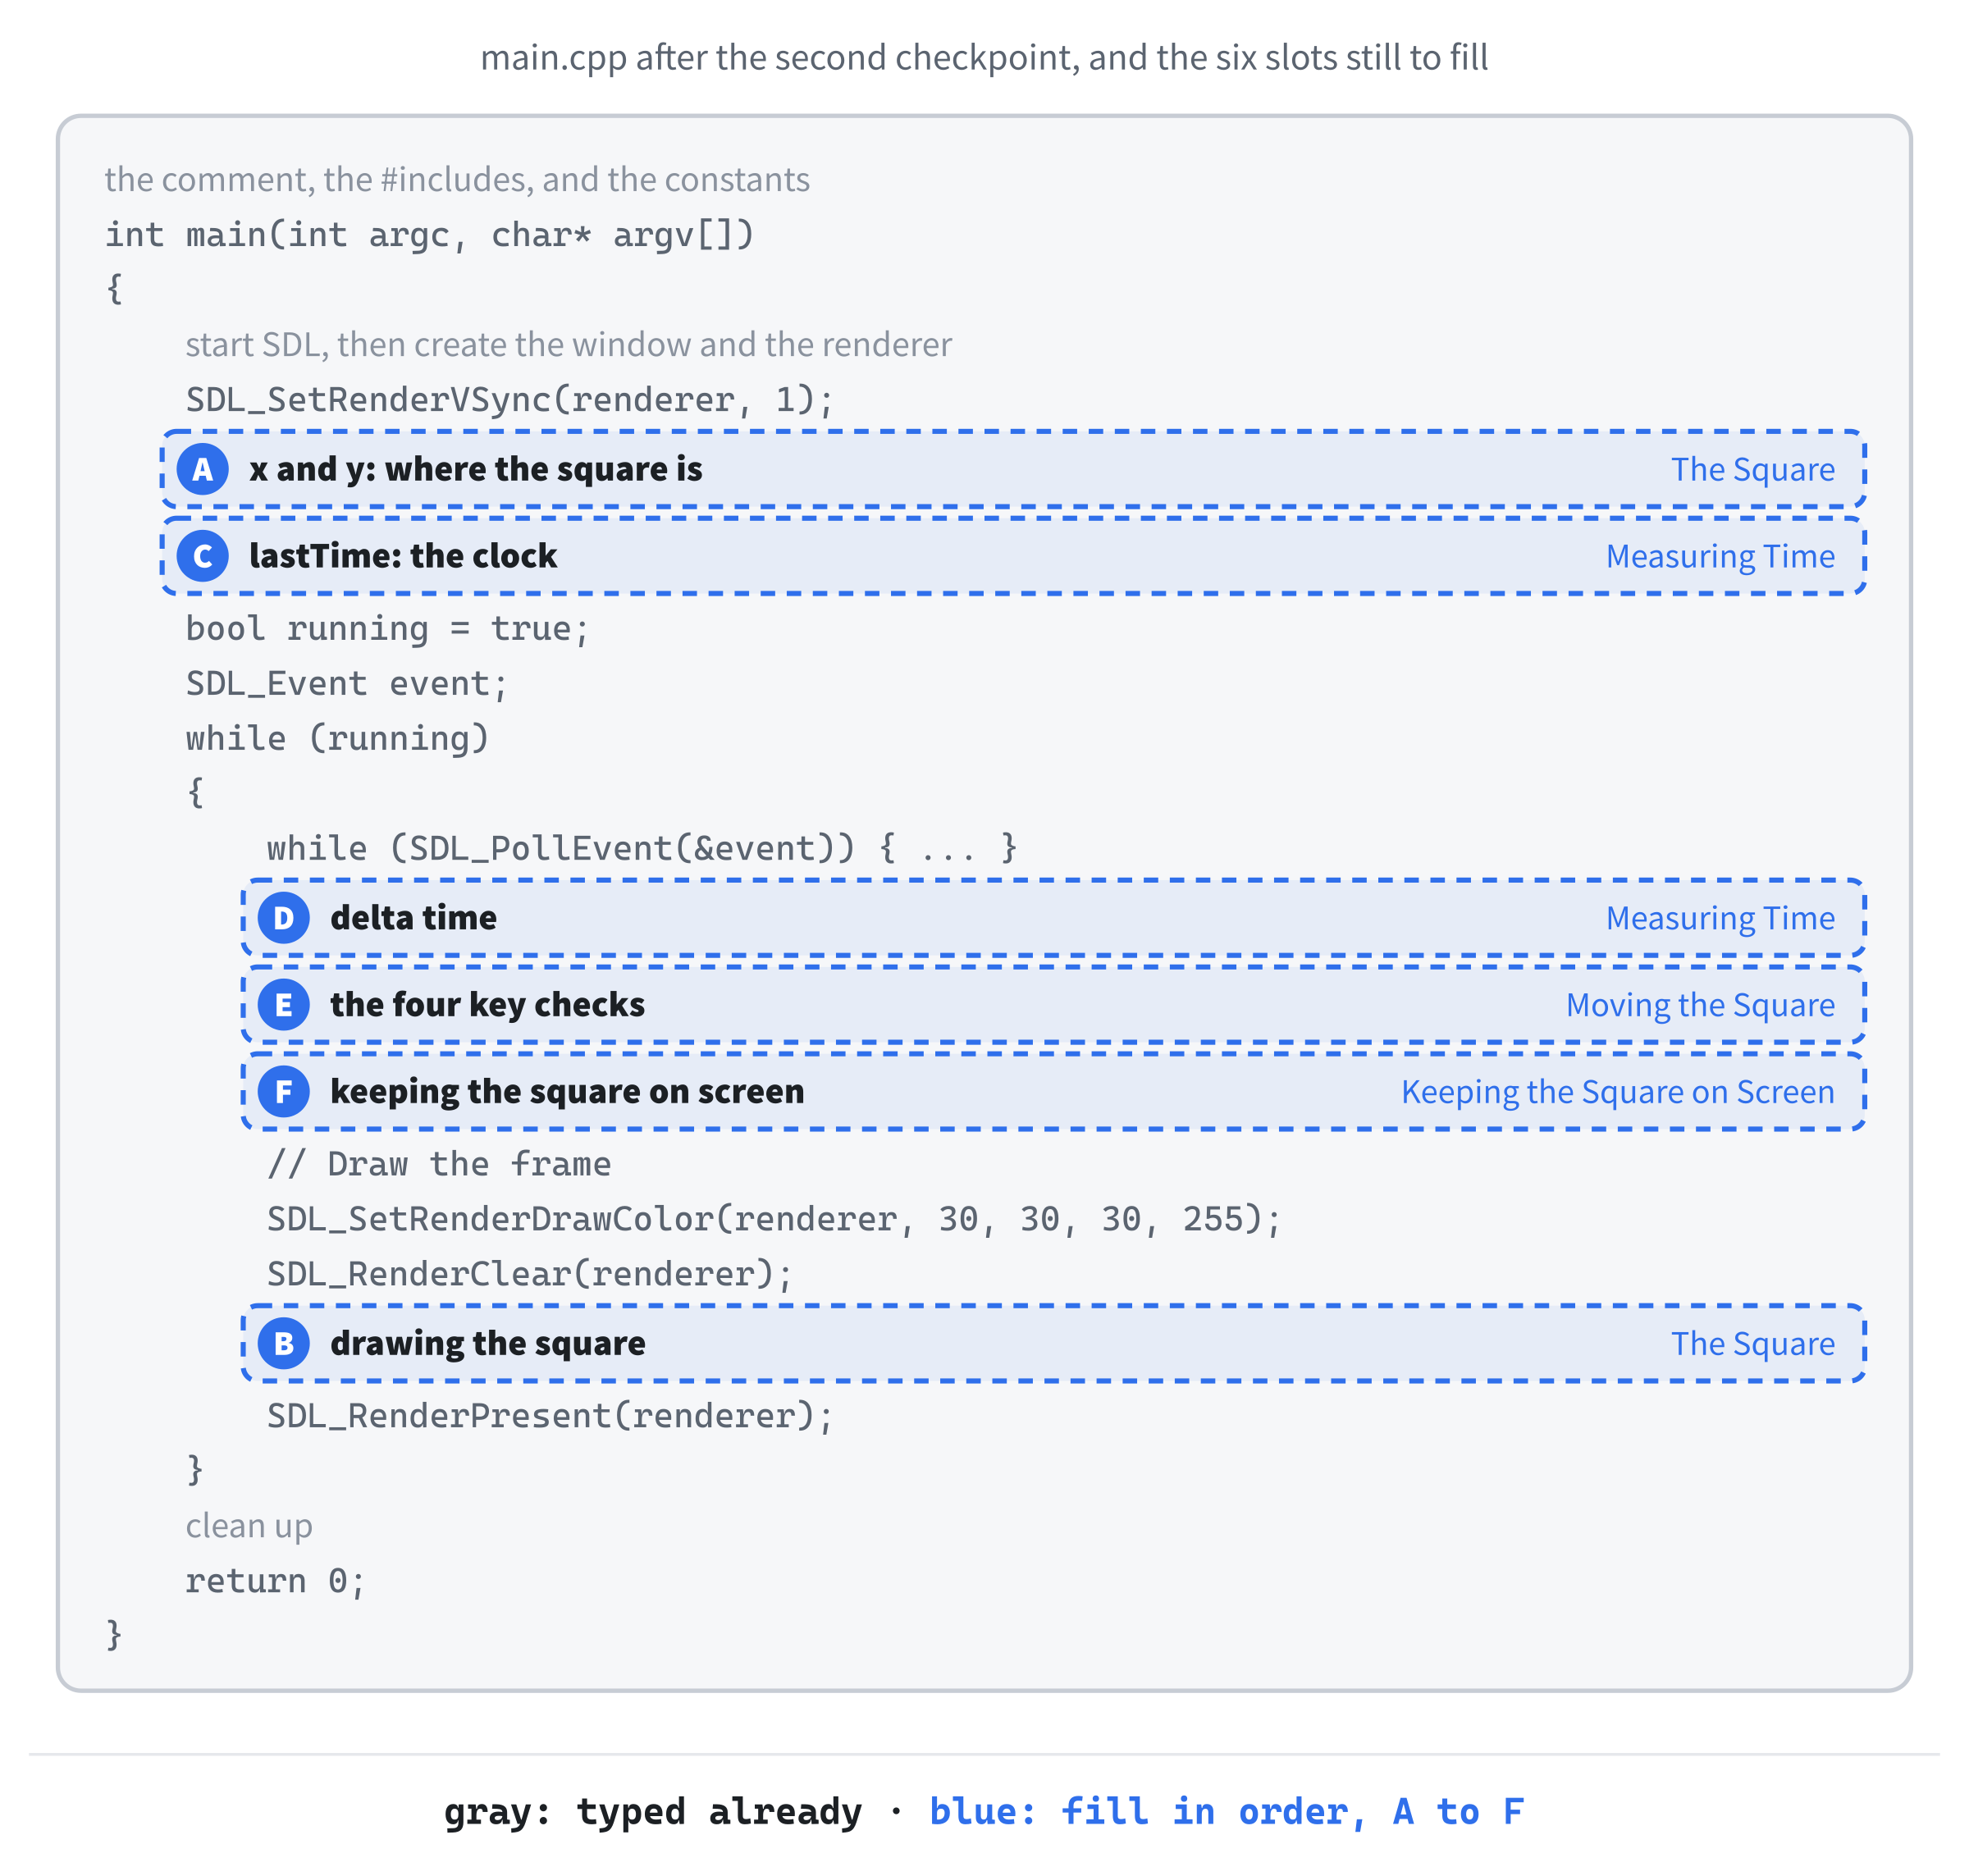
Each block's introduction names its slot and the lines on either side of it. You open a gap just as before: click at the end of the line just above it, and press Enter. If you can't spot a line, press Ctrl+F and type part of it, and Visual Studio will find it for you.
To draw a square, we first need to remember where it is. Two float variables will do: x for its distance from the window's left edge, and y for its distance from the top. They go in slot A, above the game loop, between the vsync line and bool running = true;, with a blank line on each side:
// The square's top-left corner, starting in the middle of the window
float x = (WINDOW_W - SQUARE_SZ) / 2.0f;
float y = (WINDOW_H - SQUARE_SZ) / 2.0f;
In the preceding code, x and y hold the position of the square's top-left corner, and they start with the values that center it. Figure 1.9 shows how SDL measures positions, and where those starting values come from.
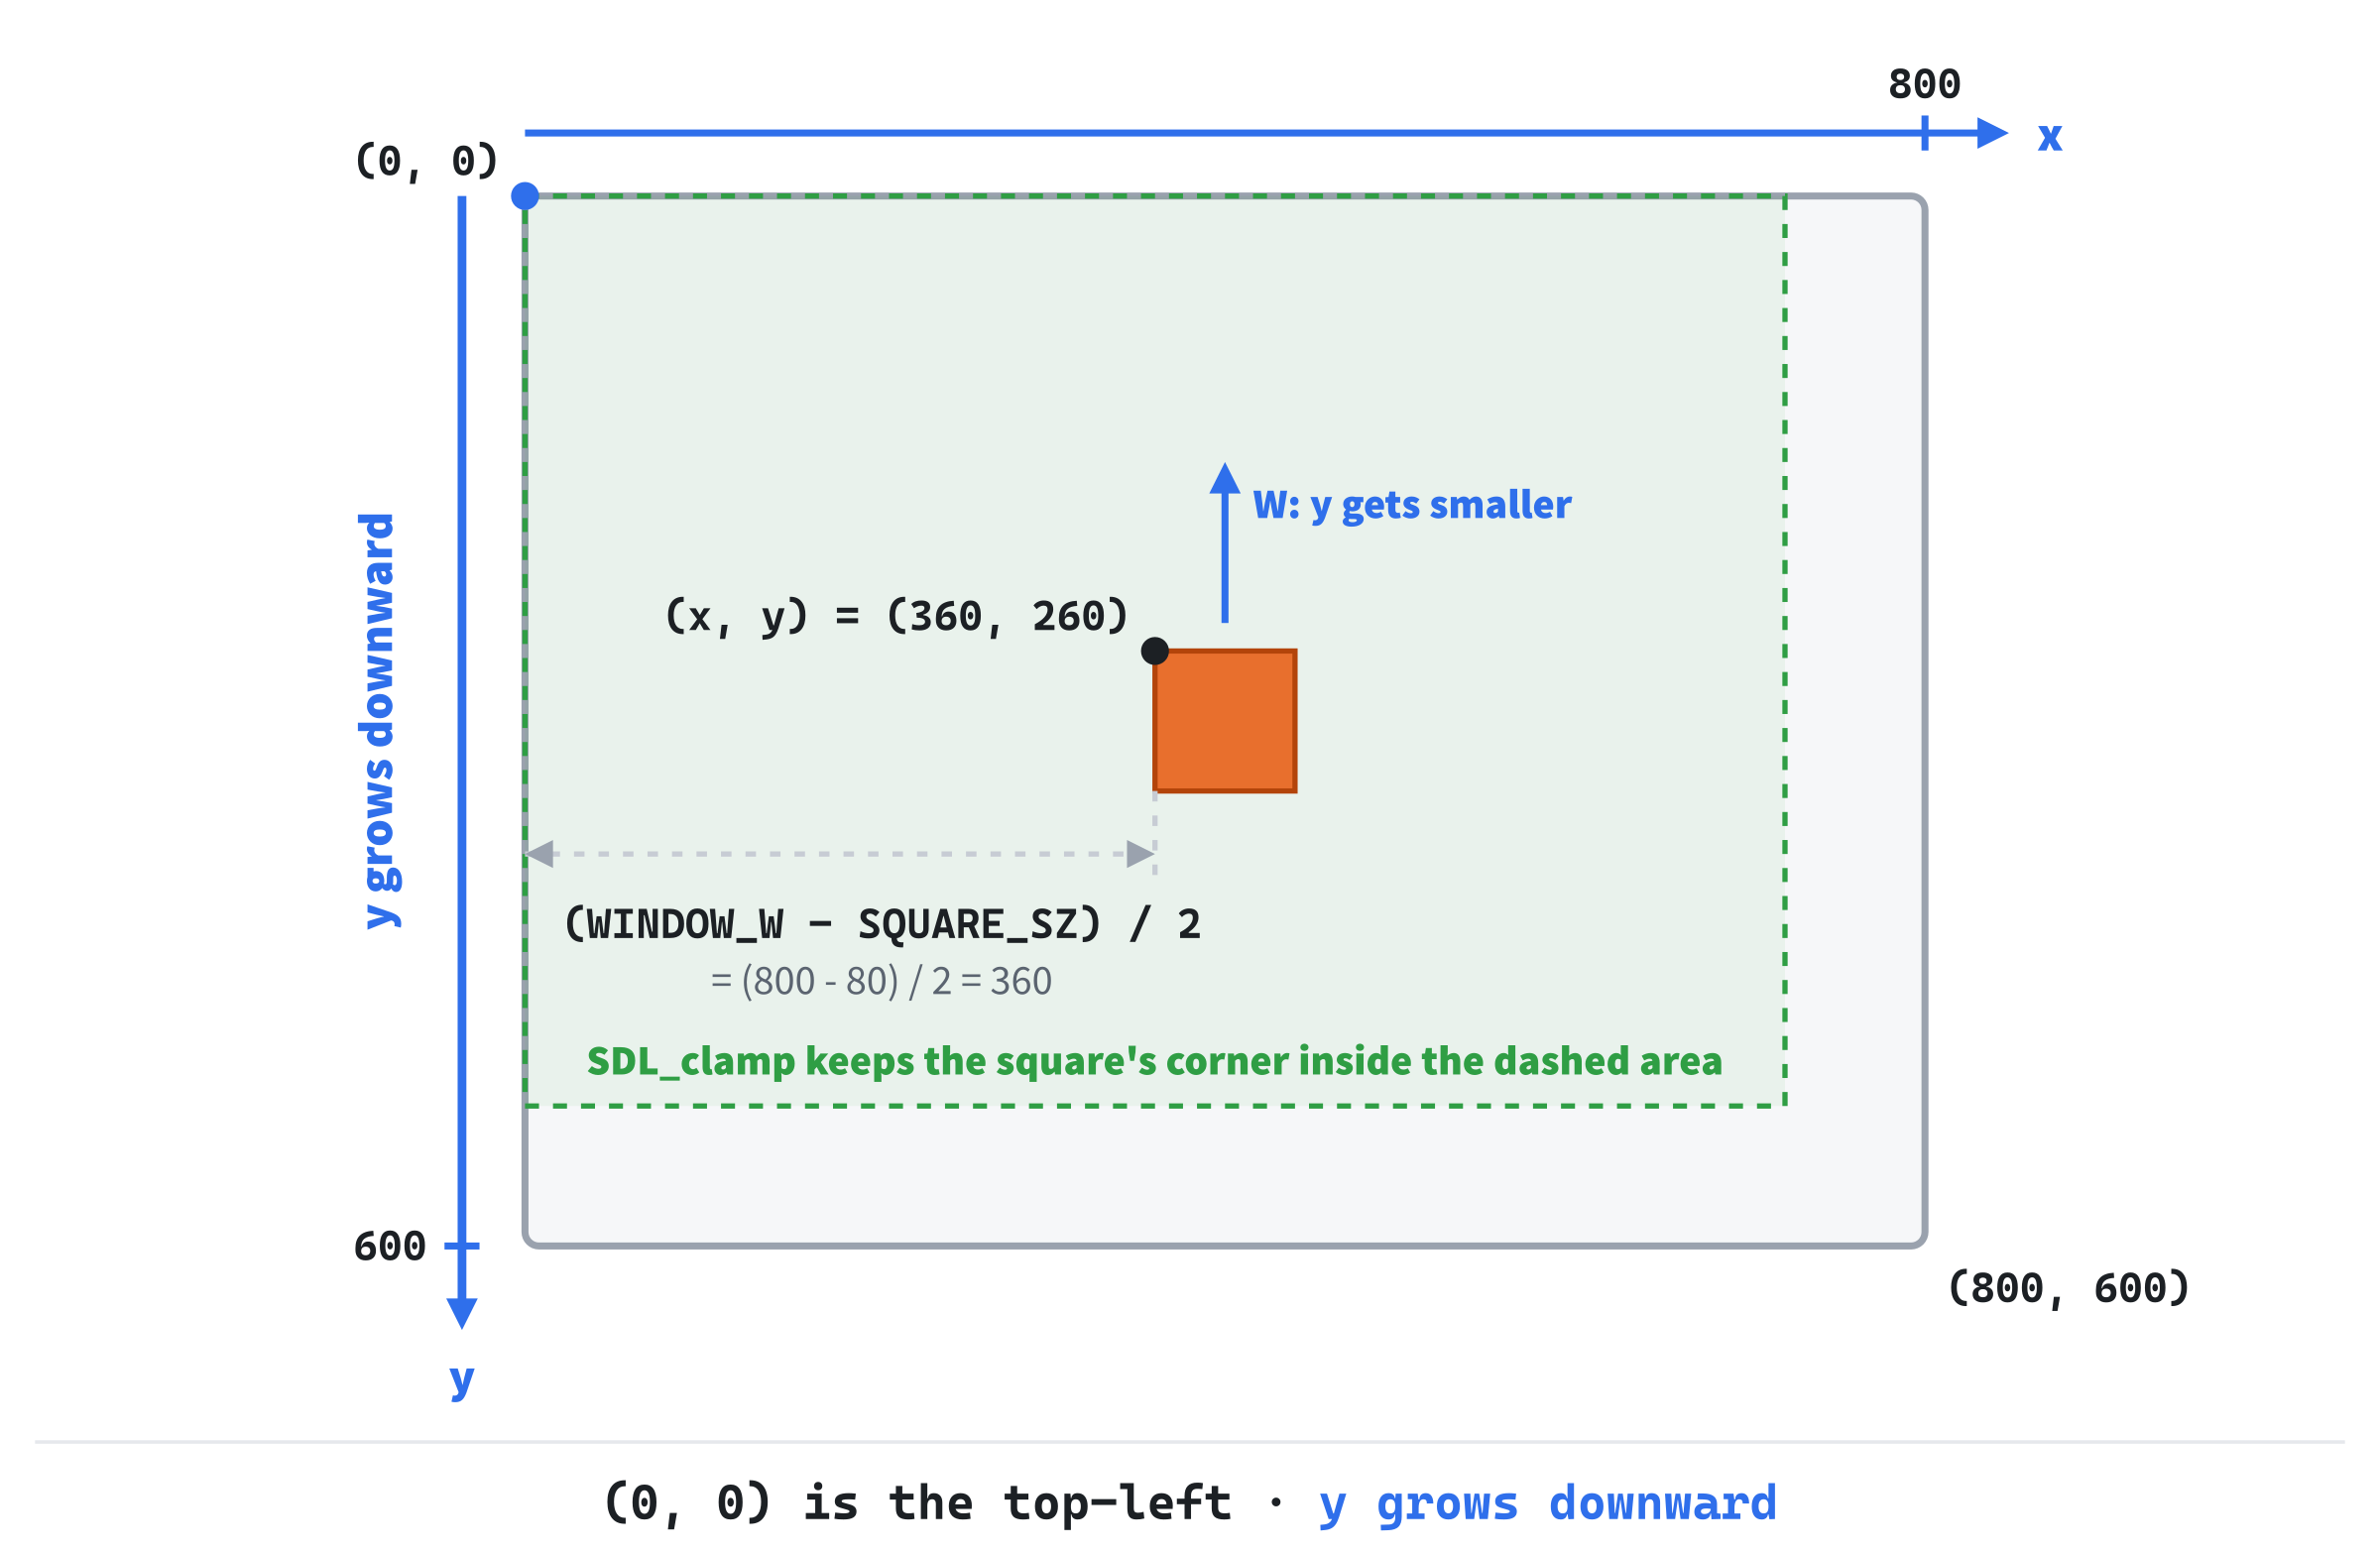
To center the square across the window, we take the window's width, subtract the square's width, and split what's left in half, which leaves an equal gap on each side. The - and / are how C++ writes subtraction and division, and the parentheses make the subtraction happen first, just as they would in math class. So (800 - 80) / 2.0f is 360, and the same calculation with the heights gives 260.
Notice that y grows downward. The top of the window is where y is 0, so moving the square up means making y smaller. It feels backward at first, and it trips everyone up at least once.
Now let's draw the square at that position. These three lines go in slot B, near the bottom of the game loop, between SDL_RenderClear(renderer); and SDL_RenderPresent(renderer);, with a blank line on each side:
SDL_SetRenderDrawColor(renderer, 255, 140, 0, 255);    // orange
SDL_FRect square = { x, y, SQUARE_SZ, SQUARE_SZ };
SDL_RenderFillRect(renderer, &square);
In the preceding code, we switch the draw color to orange: full red, a little over half green, and no blue. Then we describe the square as an SDL_FRect, SDL's type for a rectangle measured in float values. It bundles four values together, and the curly braces fill them in order: the left edge (x), the top edge (y), the width, and the height. Finally, SDL_RenderFillRect draws the rectangle, filled with the current color. The & passes it the address of our rectangle, just as it did for event.
The order matters: we clear, then draw the square on top, then present. If we cleared after drawing, we'd wipe the square away before anyone saw it.
Checkpoint: Press F5. The orange square sits in the middle of the dark gray window. It doesn't move yet. That's next.
Measuring Time
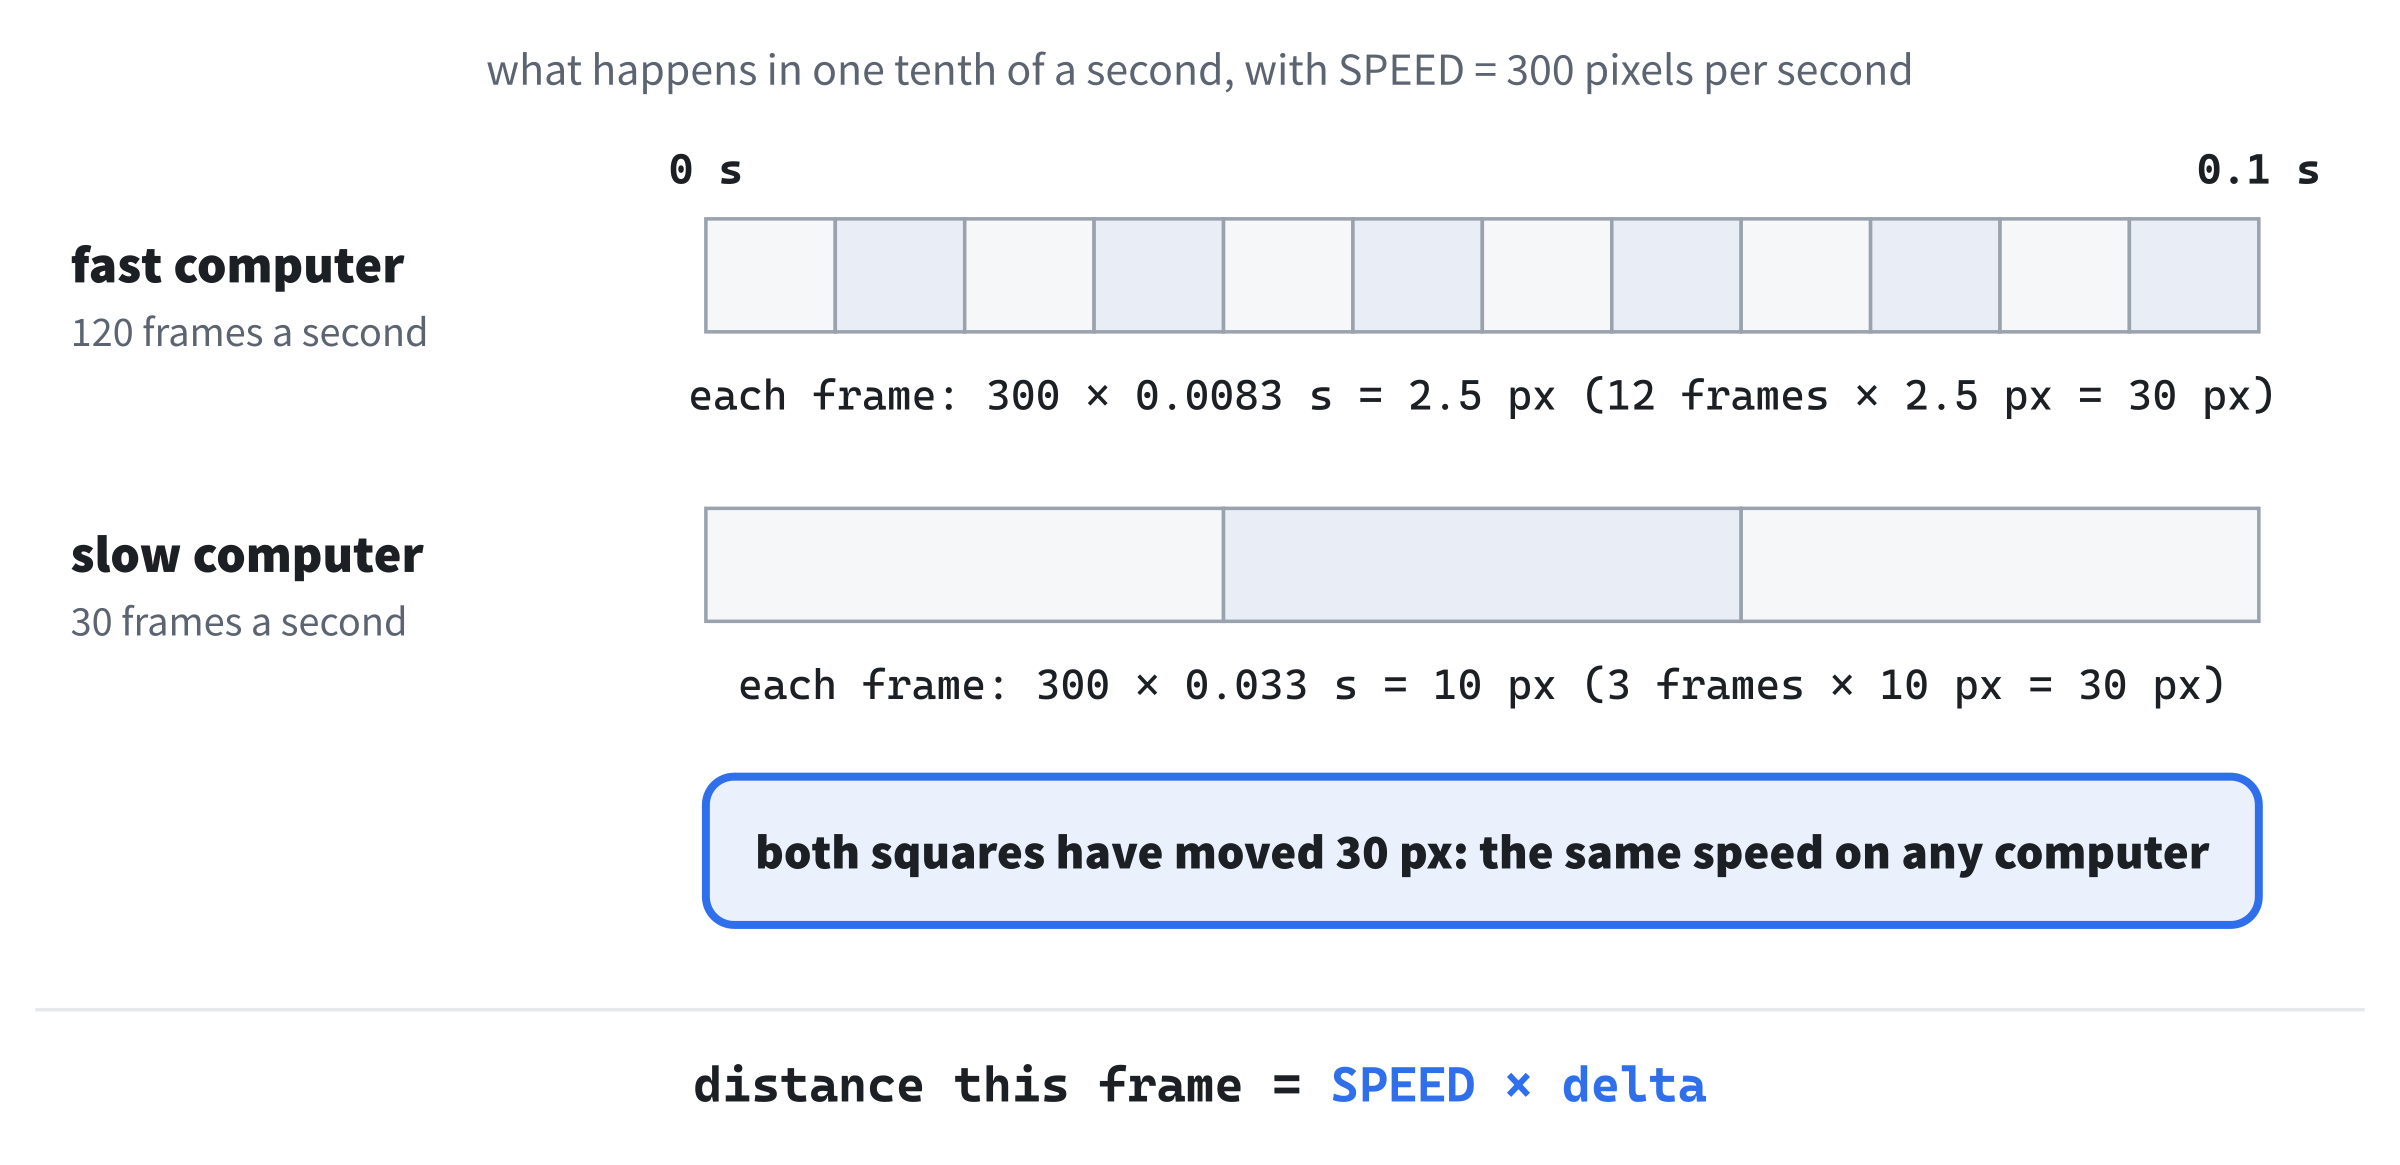
Before we can move the square, we need to decide how far it moves in one frame. That's trickier than it sounds, because frames don't all take the same time. With vsync on, a 60 Hz monitor gives us a new frame every 16.7 milliseconds, a 144 Hz gaming monitor gives us one every 6.9, and a busy computer can take longer now and then. If we moved the square a fixed distance every frame, it would move more than twice as fast on the gaming monitor. That's no way to run a game.
Instead, we'll measure how long each frame took and move the square by its speed multiplied by that time. The measured time is called delta time, after the Greek letter delta, which mathematicians use to mean "the change in" something. Figure 1.10 shows why it works.
To measure a frame, we need to remember when the last one happened. This line goes in slot C, just below x and y and still above bool running = true;, with a blank line on each side:
// The time at the last frame, in milliseconds
Uint64 lastTime = SDL_GetTicks();
In the preceding code, SDL_GetTicks returns the number of milliseconds since SDL started, and we store it in lastTime. Its type, Uint64, is SDL's name for a whole number that can't be negative (the U stands for unsigned) and takes 64 bits of memory, which gives it room for enormous values. How enormous? Enough milliseconds for about 584 million years, so we won't run out. Chapter 2 looks at types like this more closely.
Now for the measuring itself. This block goes in slot D, inside the game loop, below the event loop's closing brace and above the // Draw the frame comment, with a blank line on each side:
// Delta time: how many seconds the last frame took
Uint64 now = SDL_GetTicks();
float delta = (now - lastTime) / 1000.0f;
lastTime = now;
In the preceding code, we read the clock into now, subtract the time at the last frame, and divide by 1,000 to turn milliseconds into seconds. The result goes into delta, so a frame that took 16 milliseconds gives a delta of 0.016. Finally, we copy now into lastTime, ready to measure the next frame. That last line has no type in front of it, because we're changing a variable that already exists rather than creating a new one.
Dividing by 1000.0f rather than 1000 matters. When C++ divides one whole number by another, it throws the fraction away, so 16 divided by 1,000 would give 0. With a float on one side, C++ divides with decimals, and we get 0.016. Chapter 2 has more on this particular trap.
This is also one more reason to use vsync. Without it, a program as simple as ours can race through thousands of frames a second, each one shorter than a millisecond, and a clock that counts whole milliseconds would say most of them took no time at all.
Moving the Square
Now we can move. SDL keeps a table with an entry for every key on the keyboard, saying whether that key is held down right now. We'll check four of them in slot E, starting with W. Add this below the delta time lines, still above // Draw the frame, with a blank line on each side:
// Movement: check which keys are held down right now
const bool* keys = SDL_GetKeyboardState(nullptr);
if (keys[SDL_SCANCODE_W])
{
    y -= SPEED * delta;
}
In the preceding code, SDL_GetKeyboardState gives us that table, and we keep it in keys. Each entry is a bool: true if the key is held down, and false if it isn't. The nullptr argument says we don't need to know how many keys there are. The type, const bool*, means "a pointer to bool values that we promise not to change," and by now you can probably guess which chapter covers pointers. For the moment, treat keys as a list you can ask "is this key down?"
The square brackets do the asking. Writing keys[SDL_SCANCODE_W] looks up the W key's entry, and the if runs its braces only when that entry is true. Inside, the -= operator subtracts the right-hand side from y, so the line is shorthand for y = y - SPEED * delta;.
Remember that y grows downward: subtracting from y moves the square up, which is exactly what W should do. The * means multiply, and just as in math, C++ multiplies before it subtracts. At 300 pixels per second, a 0.016-second frame moves the square 4.8 pixels.
SDL has two ways to name a key. A scancode, like SDL_SCANCODE_W, names a physical position on the keyboard. A keycode, like SDLK_ESCAPE, names the character a key types. Movement wants positions: on a French keyboard, the key in the W position types a Z, but players still steer with the same fingers. Mix the two up and the compiler won't complain, but keys[SDLK_W] quietly checks the wrong key.
The other three keys follow the same pattern. Add them directly below the W check's closing brace, still in slot E:
if (keys[SDL_SCANCODE_S])
{
    y += SPEED * delta;
}
if (keys[SDL_SCANCODE_A])
{
    x -= SPEED * delta;
}
if (keys[SDL_SCANCODE_D])
{
    x += SPEED * delta;
}
In the preceding code, S adds to y to move the square down, A subtracts from x to move it left, and D adds to x to move it right. The += operator is the adding twin of -=. Because each key has its own if, holding two keys works too: W and D together move the square diagonally, up and to the right.
Keeping the Square on Screen
If you held D forever, the square would slide off the right edge of the window and keep going. One of SDL's helpers will stop that, and it fills the last slot, F. Add these lines below the movement code, still above // Draw the frame, with a blank line on each side:
// Keep the whole square inside the window
x = SDL_clamp(x, 0.0f, WINDOW_W - SQUARE_SZ);
y = SDL_clamp(y, 0.0f, WINDOW_H - SQUARE_SZ);
In the preceding code, each use of SDL_clamp takes a value, a lowest allowed value, and a highest allowed value, and hands back the value pinned inside that range. If x has gone below 0, it comes back as 0. If it has gone past the upper limit, it comes back as the limit. Otherwise, it comes back unchanged. Either way, we store the result back in x, and the second line does the same for y.
The upper limits come from the square's size. Because x is the square's left edge, the furthest right it can go is the window's width minus the square's width, 720, which puts the square's right edge exactly on the window's edge. By the same logic, y stops at 520. Figure 1.9 shows this range as the dashed area.
That fills the last slot, and every line of the program is written.
The Complete Program
Here is the whole file in one piece, with every line at its real indentation. If you've typed every block in the place described, this is exactly what you have. When something doesn't work, compare your file with this one, line by line, because the difference is usually a single character:
/*
    Controllable Square
    The Chapter 1 project from Learning C++ by Building Games

    Opens an 800 x 600 window with an orange square in the middle.
    W, A, S, and D move the square. Escape, or the window's X, quits.
*/

#include <SDL3/SDL.h>
#include <SDL3/SDL_main.h>

const int   WINDOW_W  = 800;      // the window's width in pixels
const int   WINDOW_H  = 600;      // the window's height in pixels
const float SQUARE_SZ = 80.0f;    // the length of each side of the square
const float SPEED     = 300.0f;   // the square's speed, in pixels per second

int main(int argc, char* argv[])
{
    // Start SDL's video system, which also gives us the keyboard
    if (!SDL_Init(SDL_INIT_VIDEO))
    {
        SDL_Log("SDL_Init failed: %s", SDL_GetError());
        return 1;
    }

    SDL_Window* window = SDL_CreateWindow(
        "Controllable Square",   // the text in the title bar
        WINDOW_W, WINDOW_H,      // the size in pixels
        0                        // no special options
    );
    if (!window)
    {
        SDL_Log("SDL_CreateWindow failed: %s", SDL_GetError());
        SDL_Quit();
        return 1;
    }

    SDL_Renderer* renderer = SDL_CreateRenderer(window, nullptr);
    if (!renderer)
    {
        SDL_Log("SDL_CreateRenderer failed: %s", SDL_GetError());
        SDL_DestroyWindow(window);
        SDL_Quit();
        return 1;
    }

    // Show each frame in step with the monitor's refresh
    SDL_SetRenderVSync(renderer, 1);

    // The square's top-left corner, starting in the middle of the window
    float x = (WINDOW_W - SQUARE_SZ) / 2.0f;
    float y = (WINDOW_H - SQUARE_SZ) / 2.0f;

    // The time at the last frame, in milliseconds
    Uint64 lastTime = SDL_GetTicks();

    bool running = true;
    SDL_Event event;

    while (running)
    {
        // Events: everything that has happened since the last frame
        while (SDL_PollEvent(&event))
        {
            if (event.type == SDL_EVENT_QUIT)
            {
                running = false;
            }
            if (event.type == SDL_EVENT_KEY_DOWN &&
                event.key.key == SDLK_ESCAPE)
            {
                running = false;
            }
        }

        // Delta time: how many seconds the last frame took
        Uint64 now = SDL_GetTicks();
        float delta = (now - lastTime) / 1000.0f;
        lastTime = now;

        // Movement: check which keys are held down right now
        const bool* keys = SDL_GetKeyboardState(nullptr);
        if (keys[SDL_SCANCODE_W])
        {
            y -= SPEED * delta;
        }
        if (keys[SDL_SCANCODE_S])
        {
            y += SPEED * delta;
        }
        if (keys[SDL_SCANCODE_A])
        {
            x -= SPEED * delta;
        }
        if (keys[SDL_SCANCODE_D])
        {
            x += SPEED * delta;
        }

        // Keep the whole square inside the window
        x = SDL_clamp(x, 0.0f, WINDOW_W - SQUARE_SZ);
        y = SDL_clamp(y, 0.0f, WINDOW_H - SQUARE_SZ);

        // Draw the frame
        SDL_SetRenderDrawColor(renderer, 30, 30, 30, 255);     // dark gray
        SDL_RenderClear(renderer);

        SDL_SetRenderDrawColor(renderer, 255, 140, 0, 255);    // orange
        SDL_FRect square = { x, y, SQUARE_SZ, SQUARE_SZ };
        SDL_RenderFillRect(renderer, &square);

        SDL_RenderPresent(renderer);
    }

    // Clean up, in the reverse order we created things
    SDL_DestroyRenderer(renderer);
    SDL_DestroyWindow(window);
    SDL_Quit();

    return 0;
}
In the preceding code, you can see the program's whole shape at once. The comment, the includes, and the constants come first. Inside main come the setup, the game loop, and the cleanup, in that order. We'll come back to that shape in a moment.
Running the Program
Press F5. Visual Studio saves your work, compiles it, links it with SDL, and starts the program.
Two windows open. The console window shows anything the program prints, and it stays quiet unless something goes wrong. The other is our game: an 800 by 600 window with the orange square in the middle.
Click the game window so that it has the keyboard, then hold W, A, S, or D to move the square, as in Figure 1.11. Drive it into the edges, and it stops there. Press Escape, or click the X, to close it.
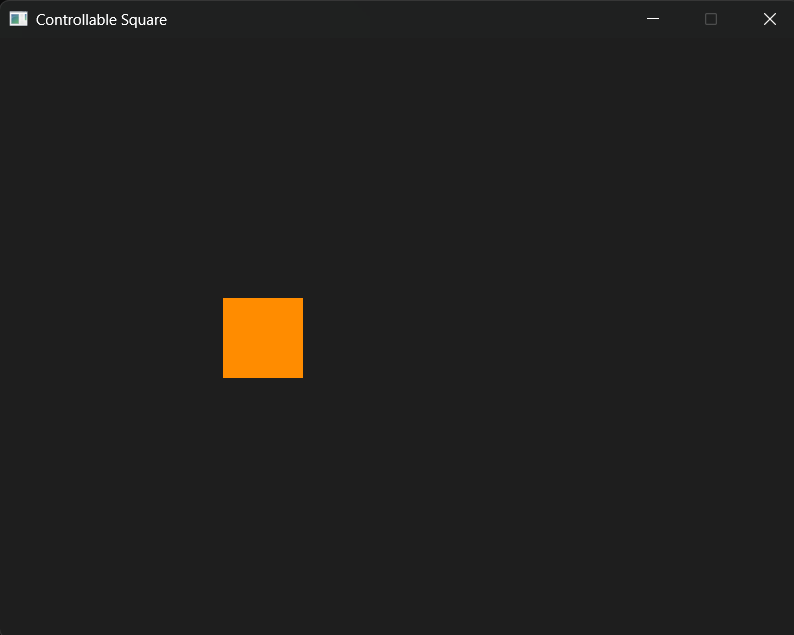
When the game closes, the console stays behind with its message about exit code 0. Press any key to close it.
That's your first SDL program. Congratulations. The square may not look like much, but it has everything a game needs: a window, a loop, input, movement that keeps time, and drawing. Every game in this book is built from these same pieces.
Understanding the Code
Step back from the details for a moment and look at the program's shape, because every game in this book shares it. It has three parts:
- Setup. Start SDL, create the window and the renderer, and set up the game's starting state. Here, that's the square's position and the clock.
- The game loop. Once per frame, handle events, measure the time, update the game (move the square and keep it on screen), and draw.
- Cleanup. Destroy what we created, in reverse order, and shut SDL down.
Whack-a-Mole, the endless runner, and even the final roguelike all follow this shape. They do far more in each part, and later we'll split each part into functions and classes to keep it manageable, but the skeleton never changes. When you meet a new game in this book, look for the three parts first.
Experimenting
The best way to find out how code works is to change it and see what happens. Try any of these, run the program, and then put the value back, or keep it if you like your version better:
- Change
SPEEDto600.0ffor a zippy square, or100.0ffor a sluggish one. - Change
SQUARE_SZto40.0f. The square still starts in the middle and still stops at the edges, because every calculation uses the constant. - Change
WINDOW_WandWINDOW_Hto1280and720. Again, the centering and the edges follow along by themselves. - Change the square's color. The first three numbers after
rendererare red, green, and blue, so0, 200, 255gives a bright sky blue. - Add the arrow keys as a second way to steer. Copy the four
ifblocks, paste the copies directly below the originals, and change their scancodes toSDL_SCANCODE_UP,SDL_SCANCODE_DOWN,SDL_SCANCODE_LEFT, andSDL_SCANCODE_RIGHT.
If an experiment breaks the program, compare your file with the complete program listing and put things back. That's what the listing is for.
Common Errors and Fixes
If the program didn't build, didn't start, or didn't behave, the problem is almost certainly one of these. When a build fails, the Error List window pops up along the bottom of Visual Studio, and the Output window has the full story. Each error comes with a code, like C1083, which is handy if you need to search for it.
First, a rule for the question Visual Studio asks after a failed build: "There were build errors. Would you like to continue and run the last successful build?" Always click No. Clicking Yes runs an older version of your program, or nothing at all, which is a confusing way to spend an evening. Instead, double-click an error in the Error List, and Visual Studio jumps to the line it's complaining about.
C1083: Cannot open include file: 'SDL3/SDL.h': No such file or directory. The compiler can't find SDL's header files. In the Property Pages, check that C/C++ > General > Additional Include Directories says C:\SDL3\include. Then check the folder itself: it should contain a folder called SDL3, with SDL.h inside. If a folder with a version number is in the way, see the tip in the Downloading SDL 3 section.
LNK1104: cannot open file 'SDL3.lib'. The linker knows which file it wants but can't find it. Check that Linker > General > Additional Library Directories says C:\SDL3\lib\x64.
LNK2019: unresolved external symbol SDL_GetError referenced in function SDL_main, along with more like it, one for each SDL function we call. The compiler was happy, but the linker couldn't find SDL's code. Check that Linker > Input > Additional Dependencies includes SDL3.lib, and that the library folder ends in x64, not x86 or arm64. (The SDL_main in the message is our own main, renamed behind the scenes by SDL_main.h.) At the first checkpoint, before we've called any SDL functions, there's just one of these, for SDL_RunApp in wWinMain, which is SDL's own startup code that SDL_main.h adds to the program.
A message box says "The code execution cannot proceed because SDL3.dll was not found." The program built, but Windows couldn't find the DLL when it tried to start it. Copy SDL3.dll from C:\SDL3\lib\x64 into the project folder, beside main.cpp. Right-clicking the project and choosing Open Folder in File Explorer takes you straight there. The same problem shows up in the Output window as a program that "exited with code -1073741515 (0xc0000135)."
The program closes right away, and the console shows "SDL_Init failed:" and a reason. That's our own error handling at work: SDL couldn't start, and the message says why. It's rare on an ordinary Windows PC. If the reason mentions graphics or video, updating your graphics card's driver is the usual fix, and the same goes for the window and renderer messages.
C2065: 'SDL_SCANCODE_w': undeclared identifier. The compiler has never heard of that name, and nine times out of ten, the cause is a typo. C++ is fussy about capital letters, so SDL_SCANCODE_w and SDL_SCANCODE_W are completely different names. Compare the line with the listing, character by character.
C2146: syntax error: missing ';' before identifier 'lastTime'. A semicolon is missing. The error usually points at the line after the mistake, because that's where the compiler realized something was wrong, so look at the end of the line above.
C1075: '{': no matching token found. An opening brace has lost its closing partner. The error points at the opening brace, which can be a long way from where the missing brace belongs, so work through the code checking that every { has its }. When you click next to a brace, Visual Studio highlights its partner, which helps.
The square doesn't move. First, click the game window, because keyboard input goes to whichever window you clicked last. If it still won't move, check that the key checks use SDL_SCANCODE_W and friends, not SDLK_W. As the note in Moving the Square explains, the wrong kind of key name compiles without a murmur and checks the wrong key. Finally, check that delta divides by 1000.0f and not 1000, because dividing whole numbers would make every move zero.
If you're stuck on something that isn't listed here, read the whole error message slowly. It's usually more helpful than it first looks, and searching the web for its code is fine too. And the next section gives you a better tool than guessing.
Introduction to Debugging
If you've done any programming before, you've already met bugs. If you haven't, you're about to. A bug is a flaw that makes a program do something other than what you intended. Bugs are normal: every programmer writes them, every day, and a big part of the job is finding and fixing them. That skill is called debugging, and Visual Studio is genuinely excellent at it.
Two tools are worth knowing from day one.
The first is the Output window, together with the console. While the program builds, the Output window shows each step and any errors. While the program runs, anything it reports with SDL_Log appears in the console window, and in the Output window too. Get into the habit of glancing at them.
The second is the breakpoint. A breakpoint is a marker you put on a line of code that tells Visual Studio "pause the program just before this line runs, and let me look around." While the program is paused, you can see the value of every variable, step through the code one line at a time, and watch what changes.
Let's try it on the square. Find the line y -= SPEED * delta; inside the W check, and click in the gray margin to the left of its line number. A red dot appears, as in Figure 1.12. That's a breakpoint. (Putting the cursor on the line and pressing F9 does the same.)

Now press F5. The game starts and runs normally, because the line with the breakpoint only runs while W is held. Click the game window and press W. Instantly, Visual Studio jumps to the front with a yellow arrow on the breakpoint line. The game is frozen mid-frame, at the exact moment it was about to move the square.
While the game is paused, its window can't respond to anything, and if you click it, Windows might even call it Not Responding. That's expected: the program is frozen exactly where we asked.
Look at the bottom left of Visual Studio for the Autos window, shown in Figure 1.13. It lists the values used on and just before the paused line. You'll find SPEED, delta, and y there, along with the keys entry for W, which is true because you're holding W. Don't be thrown by the keys row itself, which ends in {false}: that's only the first entry in the table, not W's. (The Locals tab beside Autos lists every variable in main.)
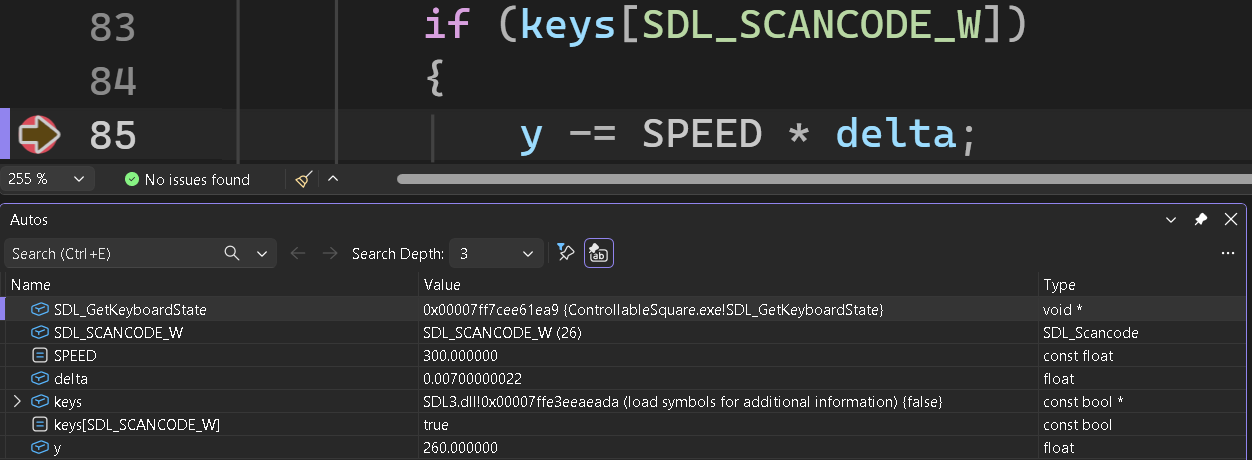
Press F10 to step over the line, which runs it and pauses again on the next one. The yellow arrow moves on, and in the Autos window, y has dropped by a few pixels. Visual Studio shows a value that has just changed in red. Keep pressing F10 and watch the arrow walk through the rest of the frame: past the other key checks (it skips their braces, because those keys aren't held), through the clamp, and into the drawing code.
If you step all the way around into the next frame, you'll see something interesting: delta is enormous, because the time you spent paused counts as part of that frame.
When you've seen enough, press F5 to let the program run on. It won't stop again right away. When Visual Studio jumped to the front, it took the keyboard away from the game, and SDL let go of W. Click the game window and press W again, and the breakpoint fires on the very next frame.
To remove the breakpoint, click the red dot. Shift+F5 stops the program whenever you're finished.
We'll lean on the debugger throughout the book. The next time something doesn't work, don't guess: set a breakpoint, look at the values, and let the program show you where it's going wrong.
Summary
You've installed a complete C++ development environment, connected it to a real game library, and built a small but genuine SDL program, testing it at every step. The square moves at the same speed on any computer, stays on the screen, and quits cleanly, and you've even frozen it mid-frame to look inside. That's more than a lot of C++ courses manage in their first week, never mind their first chapter.
You won't understand every line in depth yet, and that's fine, because the next few chapters fill in the gaps one at a time. Chapter 2 steps away from SDL to look properly at variables, and at structs, the bundles of values behind SDL_FRect and SDL_Event. Then Chapter 3 comes straight back to SDL with a bouncing ball. That rhythm of a theory chapter followed by a project that uses it carries us all the way through Act 1. Welcome aboard.