
![]()
Creating a new Unity project
Start Unity and click on New Project. Enter C# & Unity part 2 in the Project Name field and choose the location where you want to store the project files in the Location field.
Click on the 2D option. Actually, at this stage this doesn’t make any difference but as we will soon be making 2d projects it makes sense to start to become familiar with the very slight differences that the 2d option gives. Click the Create Project button and you will see the Unity interface.
The first thing we need to do is add an object to our game. Identify the Hierarchy window. In the previous image, it is in the centre at the top. It already has one item in it called Main Camera. Right-click in the empty space of Hierarchy window and select Create Empty, as shown next.

Creating an empty game object in Unity 2d
Notice in the hierarchy we have a new item named GameObject. Single left-click GameObject and then identify the Inspector window. The Inspector window is the full-height window on the right-hand side and is pictured next.

Unity 2d empty object Inspector window
Note that the Inspector shows the details of GameObject that we just created. Typically in a more substantial project, we would give all our objects appropriate names. As this will be our one and only object, the default name, GameObject, seems quite appropriate.
What we need to do is create a Unity script. It is in this script that we can interact with the game engine and write some C# code. Note that if we were coding a more substantial project, perhaps a full game, we would not stuff all the code into this one script.
Locate the Add Component button in the Inspector window.
Unity 2d Add Component button
Click the Add Component button and select New Script. Leave all the settings at there default and click Create and Add. We now have a new script called NewBehaviourScript attached to our game object called GameObject.
Open the script by double left-clicking on the NewBehaviourScript in either the Inspector window or the Project window (centre-bottom). Either way, our new script will open up in the MonoDevelop code editor. Before we start coding, let’s talk a little bit about the Unity game loop.
The Unity game loop
Every modern game operates in a loop. Simplified it looks something like this:
- Prepare all the game objects
- Get input from the player
- Update and handle interactions for all the objects in the game
- Draw the scene to the screen
- Repeat from step 2 until the player quits
All these steps together represent a single frame of the game. A frame of a game can be thought of in much the same way as a frame from a cartoon. The biggest differences being that in a game the player also interacts and affects the frame and there is also a whole bunch of math/physics and intelligence/logic altering exactly what the frame will look like.
Unity has its own variation of this loop and although Unity internally is a complex software system, interacting with it is quite straightforward. We have already seen the Start method in the Unity and C# part 1 project. Unity provides more methods and each conforms approximately to one of those steps above- almost.
Unity methods
Here is a quick explanation of some of the most commonly used Unity methods that correspond to a step from the simplified game loop described previously.
Awake
If you want to set up your object and be absolutely certain that the code won’t be missed then add code to the Awake method. This is analogous to the “Prepare all the game objects” step.
Start
The Start method is called just before Unity uses the object. This could be before or during the game loop. This annoying inconsistency will become a helpful feature as we progress with more advanced projects. For now, just know that it is called after Awake and before the object is actually seen by the player.
FixedUpdate
This is the first of two methods that is analogous to the “Update and handle interactions for all the objects in the game” step. The FixedUpdate method is called at precise and regular intervals. The frequency is many times per second. It is called frequently enough to do precise physics calculations like falling, bouncing, colliding, flying, and much more. The thing to remember is that the interval is fixed.
Update
The Update method is called as often as possible. The frequency will be determined by how powerful the device/PC the game is running on, is. This method is also analogous to the “Update and handle interactions for all the objects in the game” step.
The method we have just discussed is called by the Unity engine. We don’t call them ourselves but we do write the code that goes in them. As already discussed, Awake and Start are only called once but FixedUpdate and Update are called repeatedly. If you are totally new to game programming and I assume you are because I wrote this for you, this next bit of information might be useful for understanding how we interact with Unity as a game engine.
- Our game will have lots of objects
- Each object will have its very own, Awake, Start, FixedUpdate and Update methods
- Each and all of the objects FixedUpdate methods will be called in turn by Unity each frame
- Each and all of the objects Update methods will also be called in turn by Unity each frame
- Not every object will do something in all of the available methods- that is down to our requirements
- It is also possible (actually vital) to destroy objects too
- When we destroy an object its methods will not and cannot be called any more
The tutorial Object Oriented Programming with C# will expand on the concept of objects. We now have more than enough information to successfully complete this project.
Writing some more C# code for Unity
When we created the script, Unity generated for us the same code we saw in the previous project which includes two methods, Start and Update. These are so commonly used that they are auto-generated by default.
Add the following method signatures so we can code in the Wake and FixedUpdate methods as well. When you’re done your code should look the same as below.
|
1 2 3 4 5 6 7 8 9 10 11 12 13 14 15 16 17 18 19 20 21 22 23 24 25 26 27 28 |
using UnityEngine; using System.Collections; public class NewBehaviourScript : MonoBehaviour { // Use this before your object is started void Awake (){ Debug.Log ("Executing Awake"); } // Use this for initialization void Start () { Debug.Log ("Executing Start"); } // Update is called once per physics frame void FixedUpdate () { //Debug.Log ("Executing FixedUpdate"); } // Update is called once per frame void Update () { //Debug.Log ("Executing Update"); } } |
Notice I have also added Debug.log(... code to each method. Also, notice that I have commented out the Debug.log(... lines in the FixedUpdate and Update methods. Run the game and take a look at the console output.

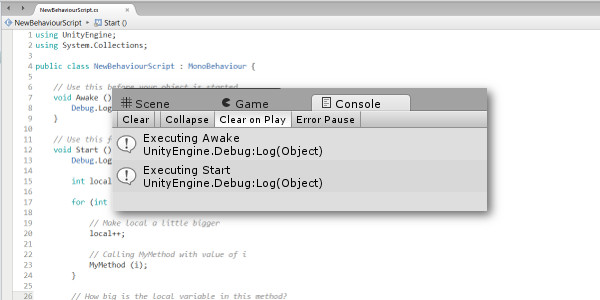
Unity 2d console output Awake and Start methods
You can see in the previous image that Awake and Start have been called once each and that Awake was called before Start.
Now un-comment the Debug.log lines of code in the FixedUpdate and Update methods. Run the game again and examine the output below.

Unity 2d console output FixedUpdate and Update methods
We can see that the Update method is called more frequently as it is called as often as possible, to make the game appear smooth whereas, the FixedUpdate method is called at set intervals so that the physics calculations are precise. Note that the faster your system is the more calls to Update it will be able to fit in between calls to FixedUpdate. My ageing laptop doesn’t achieve very many. Furthermore, if your PC is even slower, it is possible to get more calls to FixedUpdate than to Update.
Now add your own method called MyMethod as shown in the next code, at the end of the script but before the closing curly brace }. If you need more context about where to type this code you can refer to the end of the article where the code is listed in full.
|
1 2 3 4 5 6 7 8 9 10 11 |
void MyMethod(int param){ // This local has scope only in MyMethod int local = 0;// This does nothing to local in Start // Is param a multiple of 10? if(param % 10 == 0){ Debug.Log (param); } } |
Now we will write some code in the Start function that goes through a for loop and calls MyMethod each time.
|
1 2 3 4 5 6 7 8 9 10 11 12 13 14 15 16 17 18 |
// Use this for initialization void Start () { Debug.Log ("Executing Start"); int local = 0; for (int i = 0; i < 100; i++) { // Make local a little bigger local++; // Calling MyMethod with value of i MyMethod (i); }// End of loop // How big is the local variable in this method? Debug.Log("Local in Start = " + local); } |
We can see in the code that the for loop repeatedly calls the MyMethod method and passes in as a parameter the number of times the loop has been executed. The MyMethod method then checks if the number is a multiple of ten, and if it is, outputs that number using Debug.log. It does this check using the % modulus operator that returns the remainder of a division. If the remainder is zero then the number must be a multiple of ten.
Run the game and take a look at the output shown next.

Unity 2d console output variable, scope, loops and methods
We can see that the int variable called local is only in scope in the function that it was created and that each method has its own local variable. We repeatedly initialize local in MyMethod to zero but local in Start persists and its value is output when the for loop completes. We can also see the multiples of ten printed out in order and that local in the Start method has reached 100.
There is another caveat with variable scope that we will see in the Object oriented programming with C# tutorial soon. Take your time to understand the code in the Start and MyMethod methods. Revisit the previous tutorials if necessary.
What have we learned?
We have seen from the results of this project that a Unity game will comprise of a number (possibly a really high number) of objects that are prepared in the Awake and Start methods moved and controlled in the FixedUpdate and Update methods.
Clearly, we need to learn some more about the different types of objects we can create for our games, how exactly we will use FixedUpdate and Update to give our objects behavior and also, how our objects will interact with each other. In addition to this exploration of Unity, we have practiced writing our own C# loops and methods as well as witnessed how a variable’s scope effects where we can use it.
Now is a good time to find out more theory about objects in the Object oriented programming with C# tutorial.
Here is the entire code listing in case you need to refer to it for extra context.
|
1 2 3 4 5 6 7 8 9 10 11 12 13 14 15 16 17 18 19 20 21 22 23 24 25 26 27 28 29 30 31 32 33 34 35 36 37 38 39 40 41 42 43 44 45 46 47 48 49 50 51 52 53 |
using UnityEngine; using System.Collections; public class NewBehaviourScript : MonoBehaviour { // Use this before your object is started void Awake (){ Debug.Log ("Executing Awake"); } // Use this for initialization void Start () { Debug.Log ("Executing Start"); int local = 0; for (int i = 0; i < 100; i++) { // Make local a little bigger local++; // Calling MyMethod with value of i MyMethod (i); } // How big is the local variable in this method? Debug.Log("Local in Start = " + local); } // Update is called once per physics frame void FixedUpdate () { Debug.Log ("Executing FixedUpdate"); } // Update is called once per frame void Update () { Debug.Log ("Executing Update"); } void MyMethod(int param){ // This local has scope only in MyMethod int local = 0;// This does nothing to local in Start // Is param a multiple of 10? if(param % 10 == 0){ Debug.Log (param); } } } |
hi, so i have a problem. under the start method im getting a parser in the loop.
for (int i = 0; i &amp;amp;amp;lt; 100; i++)
im getting it after the 2nd “amp”
Hi Jefferson,
This is my mistake, sorry to waste your time and thanks for finding it. I clicked the wrong save button and all the symbols like greater than got converted to HTML gobbledey gook. I have corrected the code so it should work now.
Hello,
when I run this code I get the following:
Warning CS0219 The variable ‘local’ is assigned but its value is never used
The “local” under the “// This local has class scope” appears underlined in green.
Also my outputs are in increments of 1 instead of 10 as in the screenshot of yours.
Not sure how to fix this.
Hi Vince,
The warning is because the local variable in MyMethod is never used. I am just trying to indicate that although both have the same name they are distinct from each other. I have changed the comments in MyMethod to make it clearer. If you are getting output counting up in steps of 1 check this line.
if(param % 10 == 0){
Hope this helps a bit.
Yeah! This caught me off guard but I was able to decipher the purpose behind that! That two different variables, with the same name, in different methods(?), are not affected by one another. 😀